Robot Operating System Software
ROS2 Overview
The Robot Operating System* (ROS*) is a flexible framework for writing robot software. It is a collection of tools, libraries, and conventions that aim to simplify the task of creating complex and robust robot behavior across a wide variety of robotic platforms.

ROS2 is the second generation (and the newest version) of ROS system in which new technologies and implementations were adopted to better fit IoT and Industry scenarios.
For more information, refer to the official ROS documentation
Intel Edge Controls for Industrial (Intel ECI) integrates many of the subsystems ROS2 provides, including:
ROS2 Core and DDS communication base
Moveit2 Motion Planning framework
Motion Control Gateway
Navigation Stack
Cartographer as Simultaneous Localization And Mapping (SLAM) implementation

ROS2 is built on top of DDS/RTPS as its middleware, which provides discovery, serialization, and transportation. DDS is an end-to-end middleware that provides features relevant to the ROS systems, such as distributed discovery (not centralized like in ROS 1) and control over different “Quality of Service” options for the transportation.
DDS is an industry standard implemented by a range of vendors, such as RTI’s implementation Connext, ADLINK’s implementation OpenSplice or Eclipse’s Cyclone DDS. RTPS (also known as DDSI-RTPS) is the wire protocol used by DDS to communicate over the network. There are implementations of that which do not fulfill the full DDS API, but provide sufficient functionality for ROS2, such as eProsima’s implementation Fast RTPS.
Install Robot Operating System Software
ROS is comprised of many elements, some of which require a graphical Desktop Environment to function. The installation of ROS is divided into “core” components which do not require graphics, and “UI” components which do require graphics. Follow the sections below based on your application requirements.
Install ROS Core (no graphics)
ROS Core elements do not require a graphical Desktop Environment. You can install the ROS Core components from the ECI APT repository for Debian (Bullseye) ONLY. Setup the ECI APT repository, then perform the following steps to install ROS Core components:
Setup the Intel oneAPI APT repository:
# download the key to system keyring
$ sudo wget -O- https://apt.repos.intel.com/intel-gpg-keys/GPG-PUB-KEY-INTEL-SW-PRODUCTS.PUB | gpg --dearmor | sudo tee /usr/share/keyrings/oneapi-archive-keyring.gpg > /dev/null

# add signed entry to apt sources and configure the APT client to use Intel repository:
$ echo "deb [signed-by=/usr/share/keyrings/oneapi-archive-keyring.gpg] https://apt.repos.intel.com/oneapi all main" | sudo tee /etc/apt/sources.list.d/oneAPI.list

$ sudo apt update
Setup the ROS2 APT repository:
# download the key to system keyring
$ sudo wget -O- https://raw.githubusercontent.com/ros/rosdistro/master/ros.key | sudo tee /usr/share/keyrings/ros-archive-keyring.gpg > /dev/null

# add signed entry to apt sources and configure the APT client to use ROS repository:
$ echo "deb [arch=$(dpkg --print-architecture) signed-by=/usr/share/keyrings/ros-archive-keyring.gpg] http://packages.ros.org/ros2/ubuntu $(source /etc/os-release && echo $VERSION_CODENAME) main" | sudo tee /etc/apt/sources.list.d/ros2.list
Attention
If you are located in the People’s Republic of China, modify the
/etc/hostsfile to directly connect to the raw.githubusercontent server:$ sudo bash -c "echo '185.199.108.133 raw.githubusercontent.com' >> /etc/hosts"
Install ROS Core components from the ECI meta-package:
$ sudo apt install eci-robotics
Install ROS UI Components
If you plan on using any graphical elements of ROS (ex: RViz), then additional ROS UI components need to be installed. Complete the following steps to setup ROS with graphics:
Complete the installation of ROS Core: Install ROS Core (no graphics)
If your target system does not already have a graphical Desktop Environment, complete the following section to install a graphical Desktop Environment before proceeding further: Install a graphical Desktop Environment
You can install the ROS UI components from the ECI APT repository for Debian (Bullseye) ONLY. Setup the ECI APT repository, then perform the following commands to install these components:
$ sudo apt install \
  ros-foxy-rviz2 \
  ros-foxy-gazebo-ros \
  ros-foxy-gazebo-ros-pkgs \
  ros-foxy-moveit \
  ros-foxy-moveit-servo\
  ros-foxy-cartographer-ros\
  ros-foxy-turtlebot3\
  ros-foxy-navigation2 \
  ros-foxy-nav2-bringup\
  ros-foxy-desktop
Robotics Applications
ROS2 Navigation Stack

The Navigation2 stack takes in information from odometry and sensor streams and outputs velocity commands to send to a mobile base. As a pre-requisite for navigation stack use, the robot must be running ROS, have a TF transform tree in place, and publish sensor data using the correct ROS Message types. Also, the navigation stack needs to be configured for the shape and dynamics of a robot to perform at a high level.
Simultaneous Localization and Mapping (SLAM)
SLAM is a method used for autonomous vehicles that enables map building and localization of a vehicle in that map simultaneously. SLAM algorithms allow the vehicle to map out unknown environments. Engineers use the map information for tasks such as path planning and obstacle avoidance, the features of which are covered in ROS2 navigation stack.
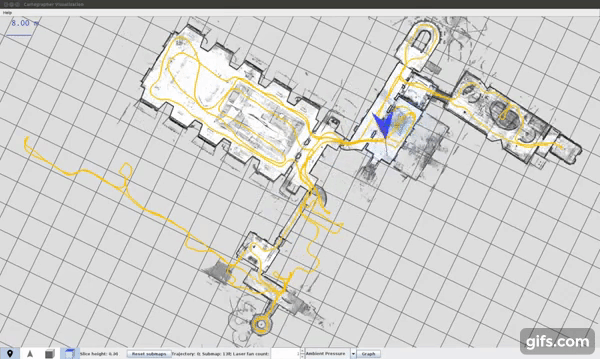
Cartographer is an implementation of SLAM, which has already been integrated with the ROS2 system.
Robot Motion Planning Framework - MoveIt2
MoveIt, an easy-to-use open source robotics manipulation platform for developing commercial applications, prototyping designs, and benchmarking algorithms, is the most widely used software for manipulation. It is released under the terms of the BSD license, and thus free for industrial, commercial, and research use.
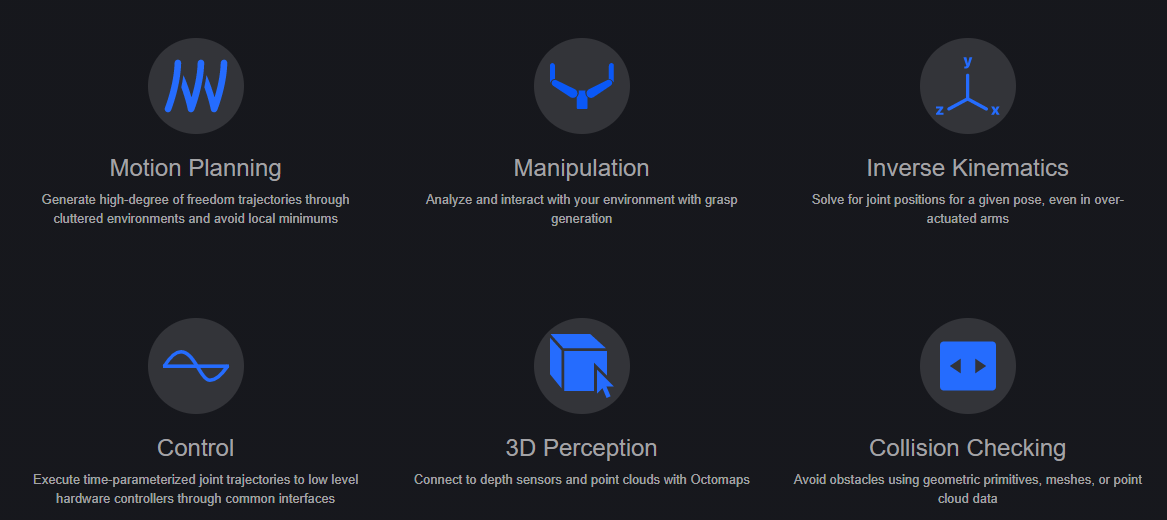
By incorporating the latest advances in motion planning, manipulation, 3D perception, kinematics, control, and navigation, MoveIt is state-of-the-art software for mobile manipulation.
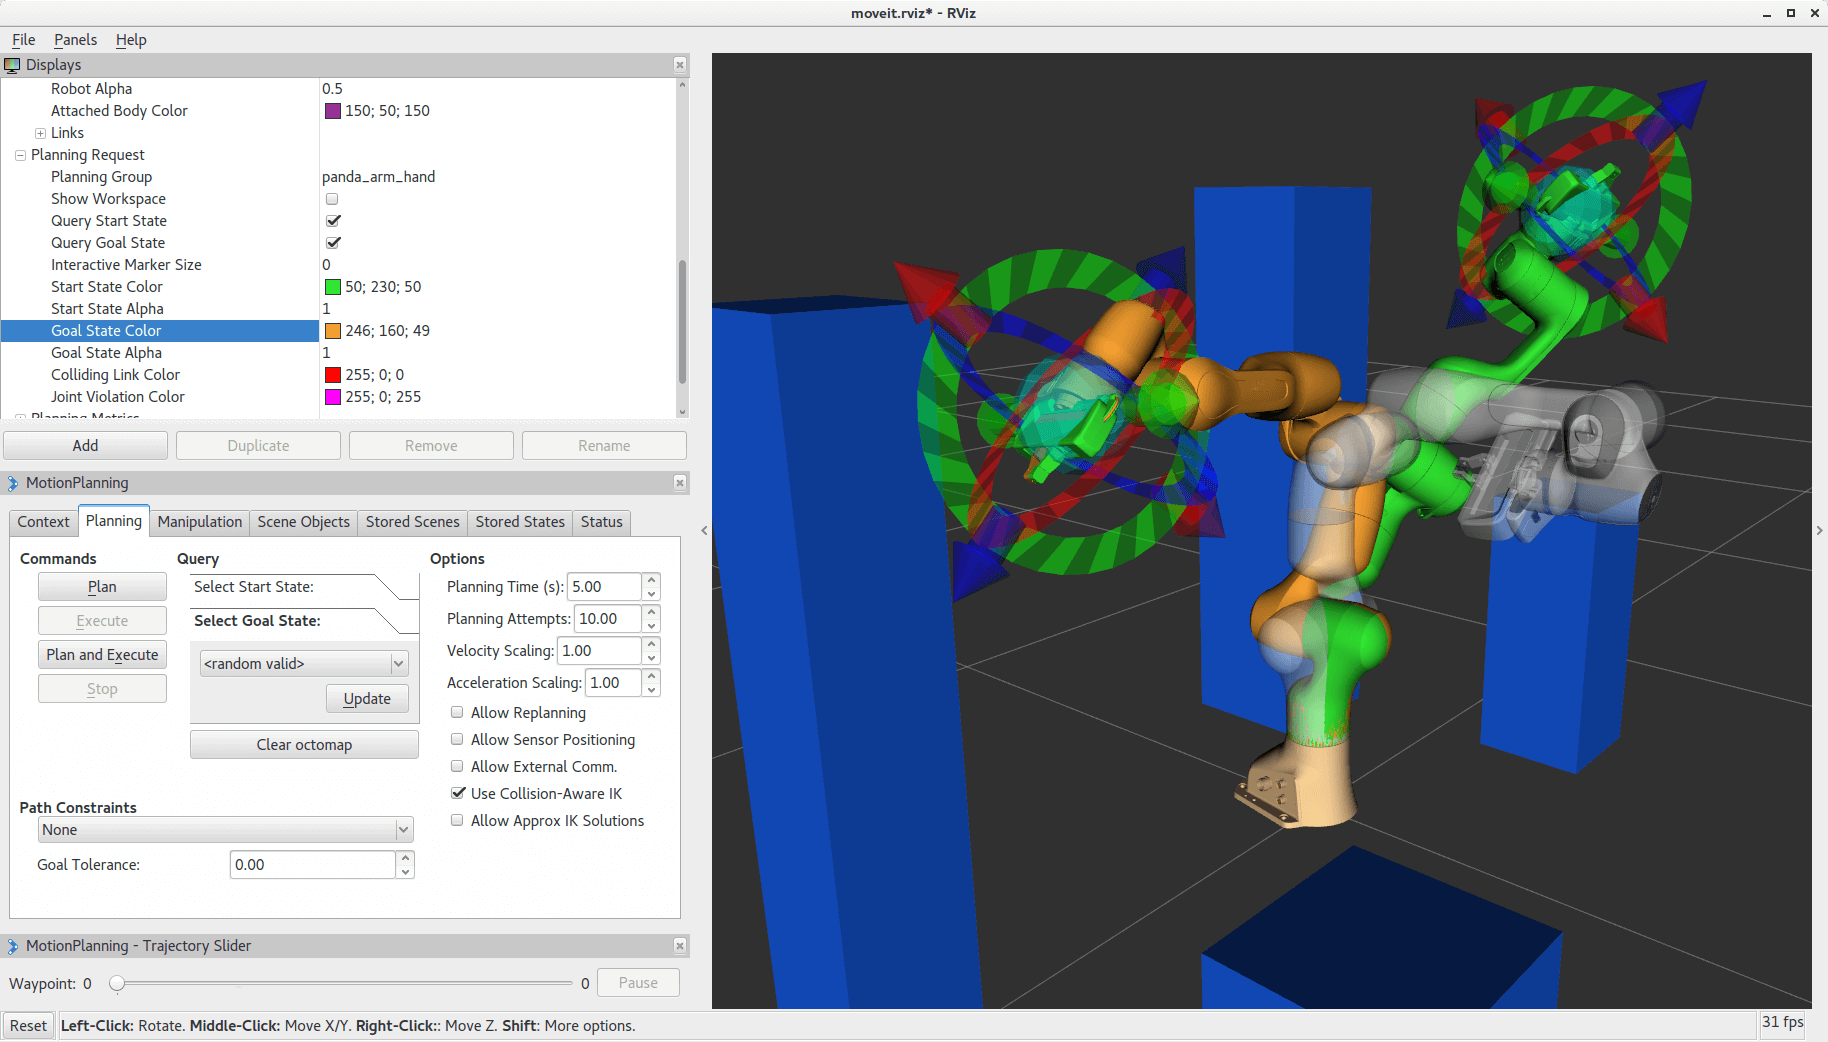
Moveit also supports visual features such as out-of-the-box visual demonstration in RVIZ, simulation combining Gazebo and ROS Control, native step-by-step configuration wizard, and so on.
Motion Control Gateway
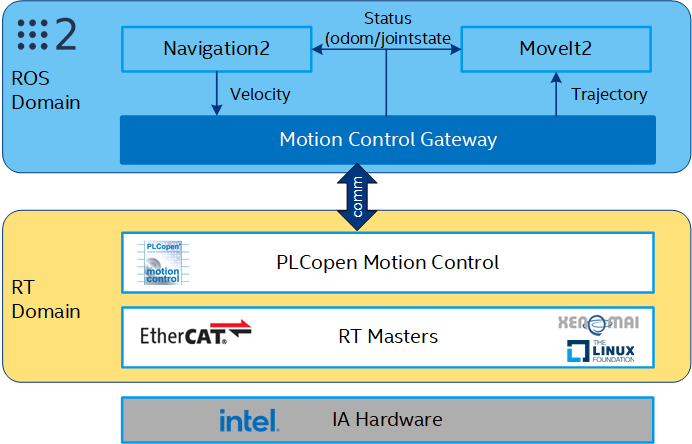
Motion Control Gateway is the communication bridge between ROS2 domain and Intel Motion Control implementation. It subscribes velocity commands (commonly from Navigation2 stack) and joint trajectories (commonly from MoveIt2 stack), communicates RT Domain through Shared Ring Buffer, and gathers the robot’s status (AMR’s odometry or industrial arm’s joint state) and publishes to ROS domain.
For more information, refer to PLCopen Motion Control.
ROS2 Performance Benchmarking Tool
ROS2 Performance Benchmarking Tool Overview
The performance_test tool available at https://gitlab.com/ApexAI/performance_test tests latency and other performance metrics of various middleware implementations that support a pub/sub pattern. It is used to simulate non-functional performance of your application.
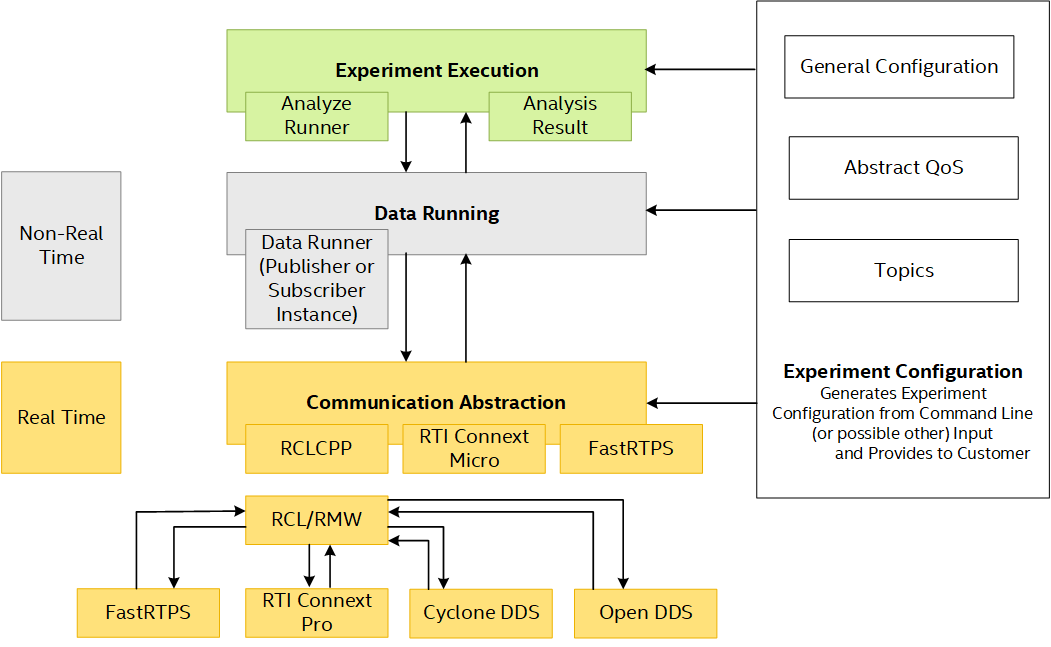
The performance_test tool allows you to quickly set up a pub/sub configuration, for example, number of publisher/subscribers, message size, QoS settings, and middleware. The following metrics are automatically recorded when the application is running:
Latency: Corresponds to the time a message takes to travel from a publisher to subscriber. The latency is measured by timestamping the sample when it is published and subtracting the timestamp (from the sample) from the measured time when the sample arrives at the subscriber.
CPU usage: Percentage of the total system-wide CPU usage
Resident memory: Heap allocations, shared memory segments, stack (used for system’s internal work).
Sample statistics: number of samples received, sent, and lost per experiment run
Intel Optimization and Best Known Methods
New benchmarking KPIs for Industrial Use
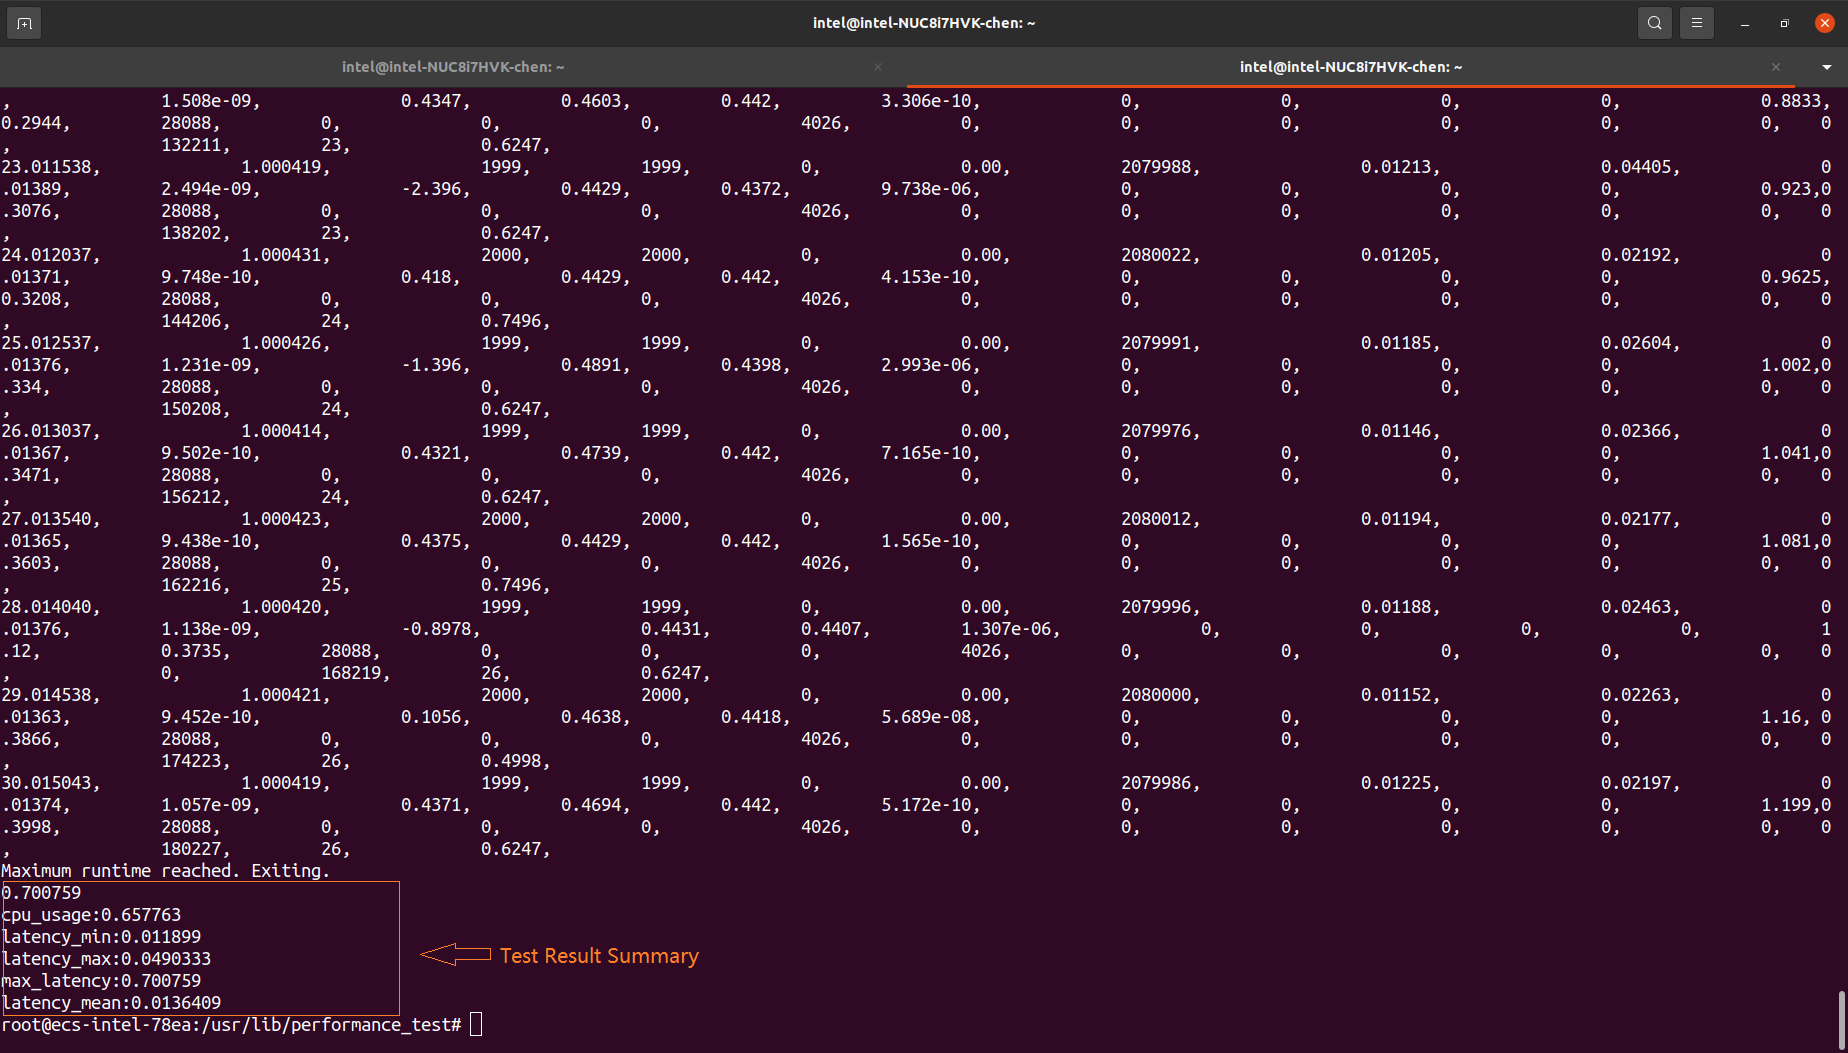
Printed the summary benchmarking results to the console output after testing is done. This allows you to quickly and easily know the performance result. This is beneficial when the target image does not enable graphics features, thus there is no chance to open the benchmarking files (for instance, PDF files).
Printed the worst cases that are unfit for performance requirements (mainly for DDS communication latency). Comparing with the mean value of max-latency, industrial scenarios care more about the worst cases of max-latency.
Optimization for Real-Time
Created DDS profile to enable synchronous DDS communication mode and set up memory allocation policy.
Enable CPU core affinity for ROS or DDS nodes.
Set higher priority for ROS or DDS nodes.
Optimization Results
To demonstrate the optimization status, consider the following test scenario:
Message size of 1KB.
The message is published with the frequency of 2000Hz, sending a message out every 0.5ms.
CPU runs under a test load of 50%.
ROS2 performance was tested on three different hardware platforms, and the following figure compares the performance with and without Intel optimization.
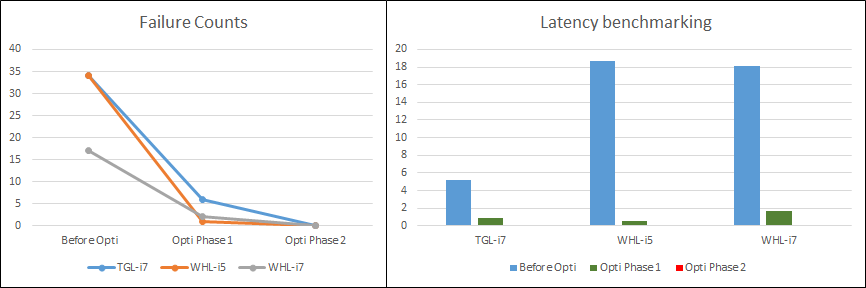
The Failure Counts graph records the number of the message pub/sub cycles that have a latency greater 0.5ms. (In this case, latency is greater than 0.5ms, which means that one or more messages was not received and was not available for further handling).
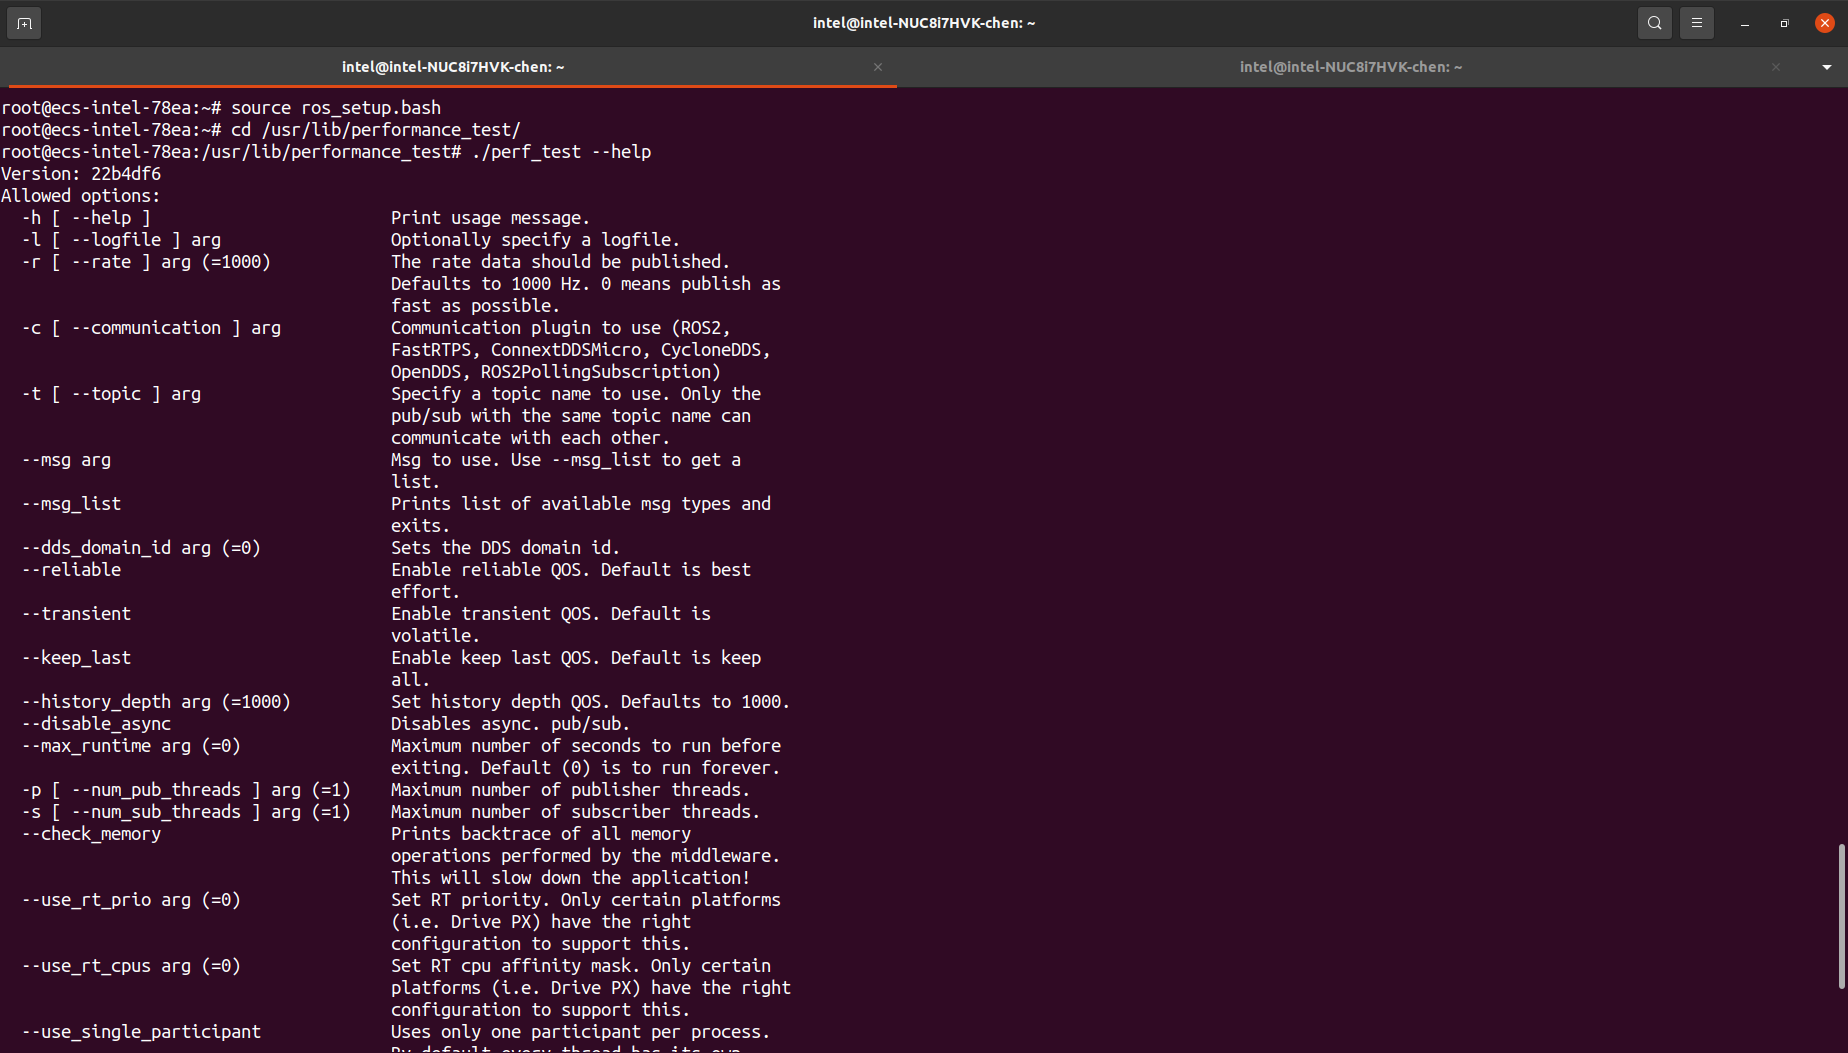
Launch ROS2 Performance Tool
The following are the arguments and options of the benchmarking tool.
$ source /opt/ros/foxy/ros_setup.bash
$ ros2 run performance_test perf_test --help
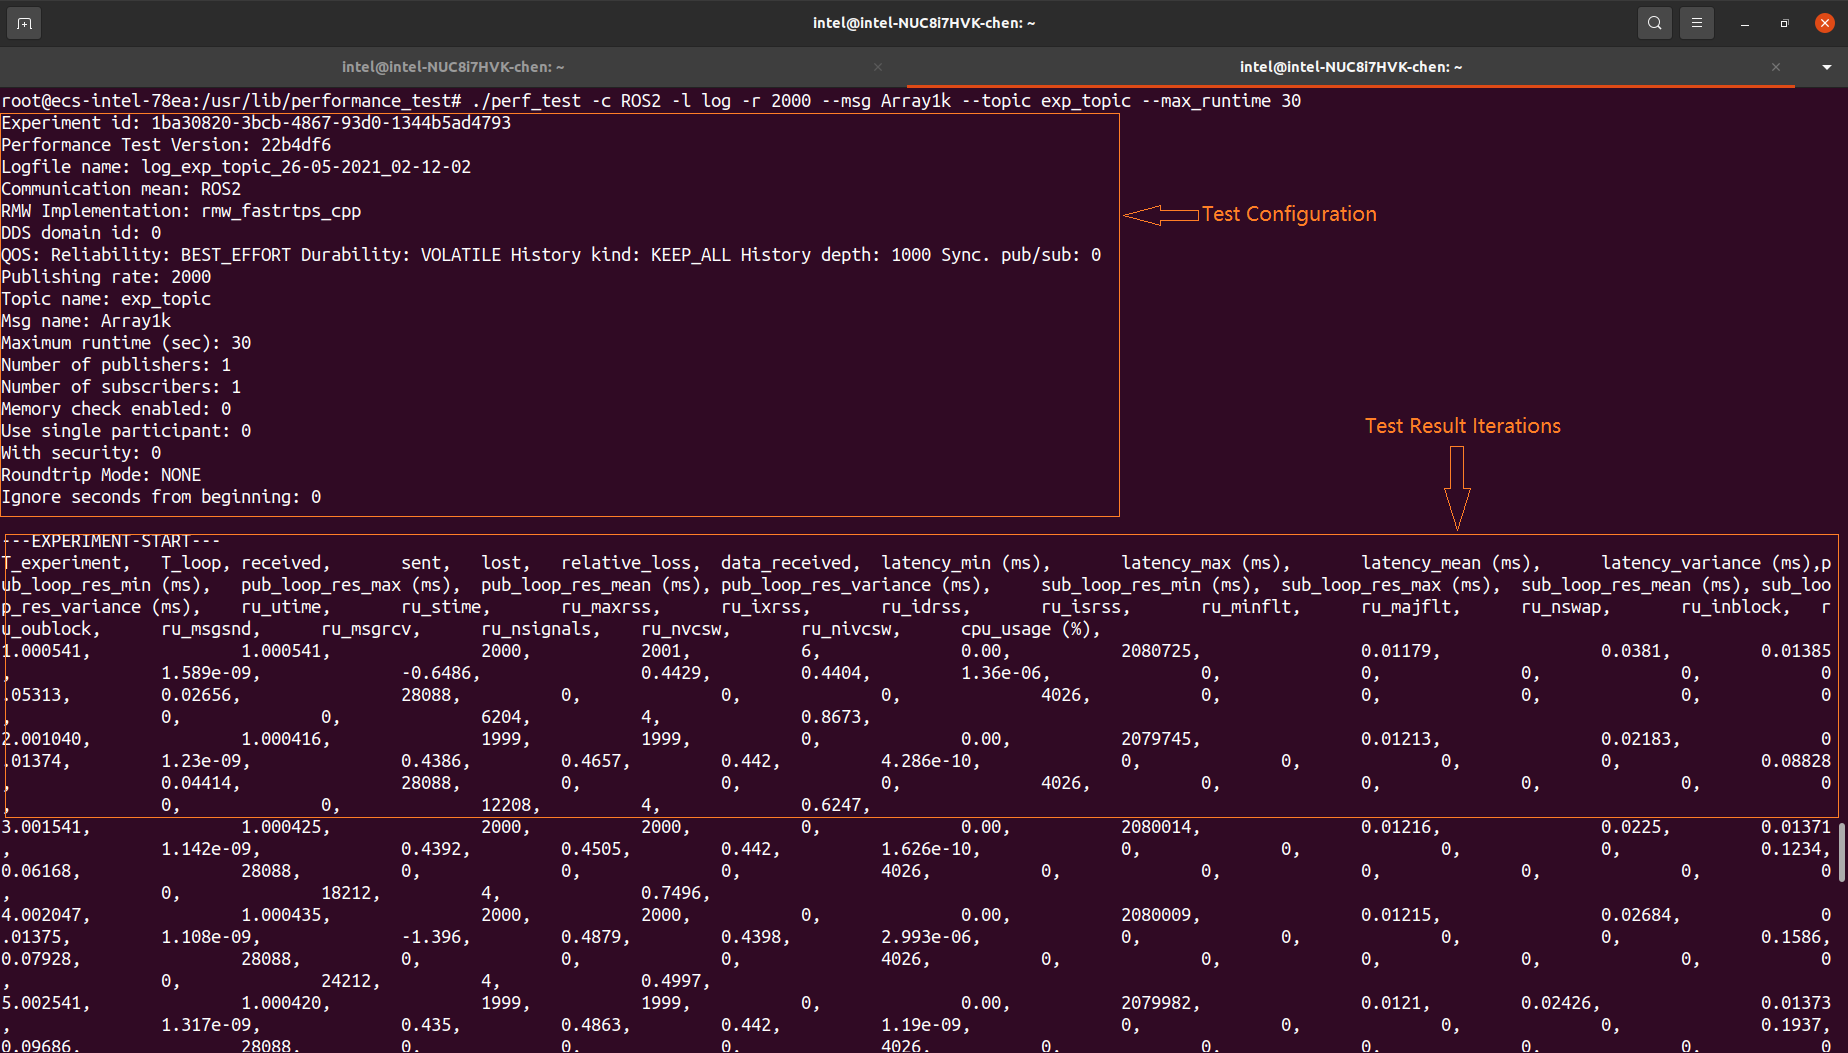
Run the following commands (an example) to test the ROS2 performance based on the default DDS (eProsima FastDDS) pub/sub execution.
$ source /opt/ros/foxy/ros_setup.bash
$ ros2 run performance_test perf_test -o csv -c rclcpp-waitset -l log_waitset_Array1k_10s.csv -r 20 --msg Array1k --topic topic_1k_1 --keep-last --use-rt-prio 49 --history-depth 10 --max-runtime 10
ROS2 Integration Sanity Checks
This section explains the integration sanity test for ECI ROS2 related components.
ROS System Test Requirements

ROS Requirements - Ubuntu Host PC
Component |
Description |
|---|---|
Hardware Platform |
Any platform with Ubuntu 20.04 installed. |
ROS2 Core |
ROS2 Core packages, which can be installed from ROS2 sources. |
RViz2 |
ROS2 visualization tool, which can be installed from ROS2 sources. |
Gazebo |
ROS2 Simulation tool, which can be installed from ROS2 sources. |
Teleop |
ROS2 package, which controls the robot remotely via keyboard. |
ROS Requirements - ECI Target System
Component |
Description |
|---|---|
ROS2 Core and DDS |
ROS2 Core packages with DDS implementation, which are provided
by the the |
ROS2 Applications |
ROS2 key applications providing mapping and localization (SLAM)
planning and control (Navigation, Moveit), which are provided
by the |
Motion Control Gateway |
Communication gateway and data bridge between ROS2 system and
Real-time motion control system, which is provided by the
|
RViz2 |
ROS2 visualization tool, which is used by some sanity checks by default. Refer to section: Install ROS UI Components |
ROS Environment Setup
Set up ECI Target System

Install the ROS2 packages if not already installed (see Install Robot Operating System Software).
Verify that the required ROS2 packages (such as
ros_core,launch_ros, andros2pkg) exist.$ source /opt/ros/foxy/setup.bash $ ros2 pkg list | egrep '(ros2|ros_core|launch_ros)'
The following is a possible output:
launch_ros
ros2action
ros2cli
ros2component
ros2doctor
ros2interface
ros2launch
ros2lifecycle
ros2multicast
ros2node
ros2param
ros2pkg
ros2run
ros2service
ros2topic
ros_core
sros2
sros2_cmake
Verify the ROS environment work status:
$ source /opt/ros/foxy/setup.bash
The expected result is that the file
/opt/ros/foxy/setup.bashexists and there are no error when executing the above command.
Set up Ubuntu Host PC

Install Ubuntu 20.04 on the host PC.
Install ROS2 foxy on Ubuntu-Debian or run the following scripts:
# Authorize gpg key with apt
$ sudo apt-get update && sudo apt-get install -y git curl gnupg2 lsb-release &&\
  curl http://repo.ros2.org/repos.key | sudo apt-key add -
# Add the repository to sources list
$ sudo sh -c 'echo "deb [arch=amd64,arm64] http://packages.ros.org/ros2/ubuntu `lsb_release -cs` main" > /etc/apt/sources.list.d/ros2-latest.list'
# Install development tools and ROS tools
$ sudo apt-get update && sudo apt install -y \
  build-essential \
  cmake \
  libbullet-dev \
  python3-flake8 \
  python3-pip \
  python3-pytest-cov \
  python3-rosdep \
  python3-setuptools \
  wget
# Install ROS 2 packages
$ sudo apt-get update && sudo apt-get install -y ros-foxy-desktop
Install Gazebo11:
# if you set up a proxy
$ curl -sSL http://get.gazebosim.org|sed 's/apt-key adv --keyserver keyserver.ubuntu.com --recv-keys D2486D2DD83DB69272AFE98867170598AF249743/apt-key adv --keyserver keyserver.ubuntu.com --keyserver-options http-proxy=$http_proxy --recv-keys D2486D2DD83DB69272AFE98867170598AF249743/g'|sh
# else
$ curl -sSL http://get.gazebosim.org | sh

$ sudo apt-get update && sudo apt-get install -y ros-foxy-gazebo-dev \
  ros-foxy-gazebo-msgs \
  ros-foxy-gazebo-msgs-dbgsym \
  ros-foxy-gazebo-plugins \
  ros-foxy-gazebo-plugins-dbgsym \
  ros-foxy-gazebo-ros \
  ros-foxy-gazebo-ros-dbgsym \
  ros-foxy-gazebo-ros-pkgs
Install ROS2 key packages:
# Install dependencies
$ sudo apt-get update && sudo apt-get install -y \
  git \
  google-mock \
  libceres-dev \
  liblua5.3-dev \
  libboost-dev \
  libboost-iostreams-dev \
  libprotobuf-dev \
  protobuf-compiler \
  libcairo2-dev \
  libpcl-dev \
  python3-sphinx \
  python3-vcstool \
  python3-colcon-common-extensions
#Install Cartographer
$ sudo apt-get update && sudo apt-get install -y \
  ros-foxy-cartographer \
  ros-foxy-cartographer-ros \
  ros-foxy-cartographer-ros-dbgsym \
  ros-foxy-cartographer-ros-msgs
# Install Navigation2
$ sudo apt-get update && sudo apt-get install -y \
  ros-foxy-navigation2 \
  ros-foxy-nav2-bringup
# Install TurtleBot3
$ mkdir -p ~/turtlebot3_ws/src
$ cd ~/turtlebot3_ws/
$ wget https://raw.githubusercontent.com/ROBOTIS-GIT/turtlebot3/ros2/turtlebot3.repos
$ sed -i 's/ros2-devel/foxy-devel/g' turtlebot3.repos ##replace all ros2 branch to foxy-devel
$ vcs import src < turtlebot3.repos
$ source /opt/ros/foxy/setup.bash
$ colcon build --symlink-install
Save the bash command for setup:
$ echo 'source /opt/ros/foxy/setup.bash' >> ~/.bashrc
$ echo 'source ~/turtlebot3_ws/install/setup.bash' >> ~/.bashrc
$ echo 'export ROS_DOMAIN_ID=31' >> ~/.bashrc
$ source ~/.bashrc
Set up Network
Connect the Test PC and Host PC to the same network and make sure that both PCs can ping each other. You can use either a LAN or WLAN.
Note: WLAN may require additional network configuration, which is not in the scope of this document.
ROS2 - Sanity Checks
The following section is applicable to:
Important
The expected results are only samples. It is possible that you might see messages printed in a different order, different process or thread information and warnings. The sanity checks are a success if the processes do not exit.
Sanity Check 1: ROS Running Environment Setup
Run the following commands:
$ source /opt/ros/foxy/setup.sh
$ export ROS_DOMAIN_ID=30
Note: If “30” is used by other ROS systems, change
ROS_DOMAIN_IDto another number (lesser than 255).Expected Result:
The script is correctly executed without any “Error” or “Warning” outputs being printed on the terminal.
Sanity Check 2: ROS2 Command Execution Check
Make sure that Sanity Check 1: ROS Running Environment Setup executes correctly.
If step 1 executes correctly, run the following command in the same terminal:
$ ros2 --help
Expected Result:
The command is correctly executed without any “Error” or “Warning” outputs being printed. The command also prints information similar to the following:
Command Outputs:
root@eci-intel-25d7:~# ros2 --help
usage: ros2 [-h] Call `ros2 <command> -h` for more detailed usage. ...

ros2 is an extensible command-line tool for ROS 2.

optional arguments:
  -h, --help            show this help message and exit

Commands:
  action     Various action related sub-commands
  component  Various component related sub-commands
  daemon     Various daemon related sub-commands
  interface  Show information about ROS interfaces
  launch     Run a launch file
  lifecycle  Various lifecycle related sub-commands
  multicast  Various multicast related sub-commands
  node       Various node related sub-commands
  param      Various param related sub-commands
  pkg        Various package related sub-commands
  run        Run a package specific executable
  security   Various security related sub-commands
  service    Various service related sub-commands
  test       Run a ROS2 launch test
  topic      Various topic related sub-commands

  Call `ros2 <command> -h` for more detailed usage.
Note: The output might differ based on the version of the integrated ROS.
Sanity Check 3: ROS2 Communication Check
Make sure that Sanity Check 1: ROS Running Environment Setup executes correctly.
If step 1 executes correctly, run the following command in the same terminal:
$ ros2 topic pub /chatter std_msgs/String "data: Hello ECI"
Expected Result:
The command is correctly executed without any “Error” or “Warning” outputs being printed. The command also prints information similar to the following:
sh-5.0# source /opt/ros/foxy/setup.sh
sh-5.0# ros2 topic pub /chatter std_msgs/String "data: Hello ECI"
publisher: beginning loop
publishing #1: std_msgs.msg.String(data='Hello ECI')
publishing #2: std_msgs.msg.String(data='Hello ECI')
publishing #3: std_msgs.msg.String(data='Hello ECI')
publishing #4: std_msgs.msg.String(data='Hello ECI')
publishing #5: std_msgs.msg.String(data='Hello ECI')
publishing #6: std_msgs.msg.String(data='Hello ECI')
Open a new terminal and execute Sanity Check 1: ROS Running Environment Setup.
In the second terminal (terminal opened in step 3), run the following command if step 3 executes correctly:
$ ros2 topic echo /chatter
Tip
If you receive a message
WARNING: topic [/chatter] does not appear to be published yet, make sure that the environment variableROS_DOMAIN_IDhas been properly set to the same value in both terminal environments.Expected Result:
The command is correctly executed without any “Error” or “Warning” outputs being printed. The command also prints information similar to the following:
sh-5.0# ros2 topic echo /chatter
data: Hello ECI
---
data: Hello ECI
---
data: Hello ECI
---
Sanity Check 4: Navigation2 Launch Check
Important
This example requires a graphical Desktop Environment and ROS UI components to function properly. Complete section Install ROS UI Components before proceeding further.
Make sure that Sanity Check 1: ROS Running Environment Setup executes correctly.
If step 1 executes correctly, run the following command in the same terminal:
$ export TURTLEBOT3_MODEL=waffle
$ ros2 launch turtlebot3_navigation2 navigation2.launch.py use_sim_time:=True autostart:=True
Expected Result:
Navigation stack starts correctly, without exiting.

Note: Since Navigation is currently in Idle status, it is normal to see warnings/errors such as
Waiting for xxxx [service|server]orTime out ...or...tf error: ....[bt_navigator-7] [INFO] [1607067383.422534950] [bt_navigator_rclcpp_node]: Waiting for "global_costmap/clear_entirely_global_costmap" service [bt_navigator-7] [INFO] [1607067383.422589829] [bt_navigator_rclcpp_node]: "ClearGlobalCostmap-Subtree" BtServiceNode initialized [bt_navigator-7] [INFO] [1607067383.427102038] [bt_navigator_rclcpp_node]: Waiting for "spin" action server [bt_navigator-7] [INFO] [1607067383.427317616] [bt_navigator_rclcpp_node]: "Spin" BtActionNode initialized [bt_navigator-7] [INFO] [1607067383.433162780] [bt_navigator_rclcpp_node]: Waiting for "wait" action server [bt_navigator-7] [INFO] [1607067383.433352841] [bt_navigator_rclcpp_node]: "Wait" BtActionNode initialized [lifecycle_manager-9] [INFO] [1607067383.433790244] [lifecycle_manager_navigation]: Configuring waypoint_follower [waypoint_follower-8] [INFO] [1607067383.433976703] [waypoint_follower]: Configuring [lifecycle_manager-9] [INFO] [1607067383.449495492] [lifecycle_manager_navigation]: Activating controller_server [controller_server-4] [INFO] [1607067383.449637024] [controller_server]: Activating [controller_server-4] [INFO] [1607067383.449659646] [local_costmap.local_costmap]: Activating [controller_server-4] [INFO] [1607067383.449669836] [local_costmap.local_costmap]: Checking transform [controller_server-4] [INFO] [1607067383.449680783] [local_costmap.local_costmap]: Timed out waiting for transform from base_link to odom to become available, tf error: Invalid frame ID "odom" passed to canTransform argument target_frame - frame does not exist [controller_server-4] [INFO] [1607067383.949742206] [local_costmap.local_costmap]: Timed out waiting for transform from base_link to odom to become available, tf error: Invalid frame ID "odom" passed to canTransform argument target_frame - frame does not exist
Sanity Check 5: SLAM Launch Check
Make sure that Sanity Check 1: ROS Running Environment Setup executes correctly.
If step 1 executes correctly, run the following command in the same terminal:
$ ros2 launch turtlebot3_cartographer cartographer.launch.py use_sim_time:=True
Expected Result:
Cartographer starts correctly.
Note: Since Cartographer is currently in Idle status, it is normal to see warnings/errors. The following is a sample result:
[INFO] [launch]: All log files can be found below /home/root/.ros/log/2020-09-25-04-56-52-691691-intel-rt-corei7-64-14812
[INFO] [launch]: Default logging verbosity is set to INFO
[INFO] [cartographer_node-1]: process started with pid [14821]
[INFO] [occupancy_grid_node-2]: process started with pid [14822]
[cartographer_node-1] [WARN] [rcl.logging_rosout]: Publisher already registered for provided node name. If this is due to multiple nodes with the same name then all logs for that logger name will go out over the existing publisher. As soon as any node with that name is destructed it will unregister the publisher, preventing any further logs for that name from being published on the rosout topic.
[occupancy_grid_node-2] [WARN] [occupancy_grid_node]: submap_slices and last_frame_id is empty
[occupancy_grid_node-2] [WARN] [occupancy_grid_node]: submap_slices and last_frame_id is empty
Sanity Check 6: HIWIN 6-axis Robotic Arm Demo Launch Check
Important
This example requires a graphical Desktop Environment and ROS UI components to function properly. Complete section Install ROS UI Components before proceeding further.
In the first terminal (terminal A), run the following commands:
$ sudo apt install curl pciutils plcopen-databus libshmringbuf-dev libshmringbuf mc-gateway-hiwin
$ sudo taskset -c X /opt/plcopen/plc_rt_robot_arm_rtmotion
Note:
Xis the ID of the CPU core isolated in thecmdlineof grub. For ECI kernel command line, by default,Xcan be “1” or “3”.In another terminal (terminal B), build and run the HIWIN ROS2 container:
$ # Follow https://docs.docker.com/config/daemon/systemd/ to config docker proxy
$ cd ~ && mkdir -p hiwin-docker && cd hiwin-docker
$ cp /usr/include/shmringbuf.h .
$ cp /usr/lib/x86_64-linux-gnu/libshmringbuf.so* .
$ cp /opt/plcopen/mc-gateway/hiwin/Dockerfile .
$ cp -r /opt/plcopen/mc-gateway/hiwin .
$ docker build -f Dockerfile -t hiwin-docker-foxy .
$ # Add arguments "--build-arg http_proxy=http://<proxy ip>:<proxy port>" and
$ # "--build-arg https_proxy=http://<proxy ip>:<proxy port>" to build behind proxy.
$ # Use "docker images" command to check the generated docker image. The output should be:
$ # REPOSITORY          TAG                 IMAGE ID            CREATED             SIZE
$ # hiwin-docker-foxy   latest              d300b723f944        3 minutes ago       3.88GB
$ # moveit/moveit2      foxy-source         b128e0bcbed9        5 weeks ago         3.68GB
$ cd ~
$ curl -o gui-docker https://raw.githubusercontent.com/ros-planning/moveit/master/.docker/gui-docker && chmod +x gui-docker
$ # Add "-x http://proxy-server:port" to set "curl" proxy
$ ./gui-docker --rm -it -v /dev:/dev --ipc=host --name=moveit hiwin-docker-foxy /bin/bash
$ source install/setup.bash # Command in docker container
$ ros2 run run_hiwin_plc run_hiwin_plc # Command in docker container
In the third terminal (terminal C), run the following commands:
$ cd ~ && ./gui-docker -c moveit
$ source install/setup.bash # Command in docker container
$ ros2 launch run_hiwin_plc run_hiwin_plc.launch.py # Command in docker container
Expected Result:
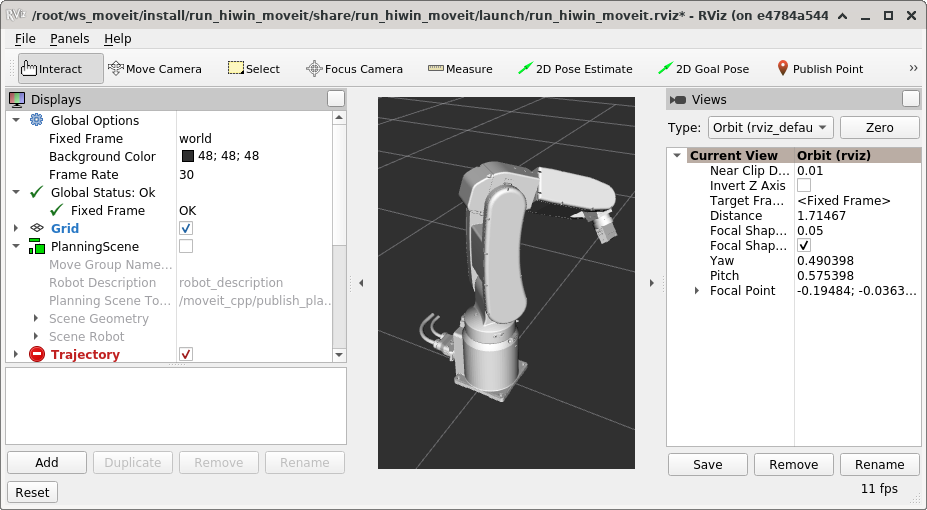
MoveIt2 and other ROS2 nodes start correctly without exiting, and the RViz GUI is active and showing a robot arm moving periodically.
Tip
If no messages are displayed on the third terminal, make sure that the environment variable
ROS_DOMAIN_IDhas been properly set to the same value in both terminal environments.Note: The commands are correctly executed without any “Error” outputs being printed (some warnings might be printed due to missing data). The following is a sample result:
[INFO] [launch]: All log files can be found below /home/root/.ros/log/2020-12-01-06-23-24-352240-ecs-intel-4273-3533
[INFO] [launch]: Default logging verbosity is set to INFO
/usr/share/hiwin_robot_moveit_config/xacros/hiwin_robot_and_gripper.urdf
/usr/share/hiwin_robot_moveit_config/srdf/hiwin_robot.srdf
/usr/share/hiwin_robot_moveit_config/config/kinematics.yaml
/usr/share/run_hiwin_plc/launch/run_hiwin_plc.launch.py:25: YAMLLoadWarning: calling yaml.load() without Loader=... is deprecated, as the default Loader is unsafe. Please read https://msg.pyyaml.org/load for full details.
  return yaml.load(file)
/usr/share/run_hiwin_moveit/config/controllers.yaml
/usr/share/hiwin_robot_moveit_config/config/ompl_planning.yaml
[INFO] [robot_state_publisher-1]: process started with pid [3535]
[INFO] [static_transform_publisher-2]: process started with pid [3537]
[INFO] [run_hiwin_moveit-3]: process started with pid [3539]
……
[run_hiwin_moveit-3] [INFO] [1606803829.707921557] [moveit_cpp_demo]: Trajectory status: 1
[run_hiwin_moveit-3] [INFO] [1606803831.708016640] [moveit_cpp_demo]: Set goal 2
[run_hiwin_moveit-3] [INFO] [1606803831.708051094] [moveit_cpp_demo]: Plan to goal
[run_hiwin_moveit-3] [INFO] [1606803831.708563914] [moveit.ompl_planning.model_based_planning_context]: Planner configuration 'manipulator' will use planner 'geometric::RRTConnect'. Additional configuration parameters will be set when the planner is constructed.
 [run_hiwin_moveit-3] [INFO] [1606803831.723452924] [ompl]: /usr/src/debug/ompl/1.5.0-1-r0/git/src/ompl/geometric/planners/rrt/src/RRTConnect.cpp:354 - manipulator/manipulator: Created 5 states (2 start + 3 goal)
[run_hiwin_moveit-3] [INFO] [1606803831.723565262] [ompl]: /usr/src/debug/ompl/1.5.0-1-r0/git/src/ompl/tools/multiplan/src/ParallelPlan.cpp:135 - ParallelPlan::solve(): Solution found by one or more threads in 0.000756 seconds
[run_hiwin_moveit-3] [INFO] [1606803831.726168559] [ompl]: /usr/src/debug/ompl/1.5.0-1-r0/git/src/ompl/geometric/src/SimpleSetup.cpp:179 - SimpleSetup: Path simplification took 0.002559 seconds and changed from 3 to 2 states
[run_hiwin_moveit-3] [INFO] [1606803831.728662079] [moveit_cpp_demo]: Sending the trajectory for execution
Sanity Check 7: RRBot 2-axis Robotic Arm Demo Launch Check
Important
This example requires a graphical Desktop Environment and ROS UI components to function properly. Complete section Install ROS UI Components before proceeding further.
In the first terminal (terminal A), run the following commands:
$ sudo apt install curl pciutils plcopen-databus libshmringbuf-dev libshmringbuf mc-gateway-rrbot
$ sudo taskset -c X /opt/plcopen/plc_rt_rrbot
Note:
Xis the ID of the CPU core isolated in thecmdlineof grub. For ECI kernel command line, by default,Xcan be “1” or “3”.In another terminal (terminal B), build and run the RRBot ROS2 container:
$ # Follow https://docs.docker.com/config/daemon/systemd/ to config docker proxy
$ cd ~ && mkdir -p rrbot-docker && cd rrbot-docker
$ cp /usr/include/shmringbuf.h .
$ cp /usr/lib/x86_64-linux-gnu/libshmringbuf.so* .
$ cp /opt/plcopen/mc-gateway/rrbot/Dockerfile .
$ cp -r /opt/plcopen/mc-gateway/rrbot .
$ cp /opt/plcopen/mc-gateway/rrbot/001-Change-controller-manager-to-singlethreadedexecutor.patch .
$ docker build -f Dockerfile -t rrbot-docker-foxy .
$ # Add arguments "--build-arg http_proxy=http://<proxy ip>:<proxy port>" and
$ # "--build-arg https_proxy=http://<proxy ip>:<proxy port>" to build behind proxy.
$ # Use "docker images" command to check the generated docker image. The output should be:
$ # REPOSITORY          TAG                 IMAGE ID            CREATED             SIZE
$ # rrbot-docker-foxy   latest              706da896d9fe        7 seconds ago       3.84GB
$ # moveit/moveit2      foxy-source         b128e0bcbed9        5 weeks ago         3.68GB
$ cd ~
$ curl -o gui-docker https://raw.githubusercontent.com/ros-planning/moveit/master/.docker/gui-docker && chmod +x gui-docker
$ # Add "-x http://proxy-server:port" to set "curl" proxy
$ ./gui-docker --rm -it -v /dev:/dev --ipc=host --name=moveit rrbot-docker-foxy /bin/bash
$ source install/setup.bash # Command in docker container
$ ros2 launch rrbot_bringup rrbot_moveit_demo.launch.py # Command in docker container
Expected Result:
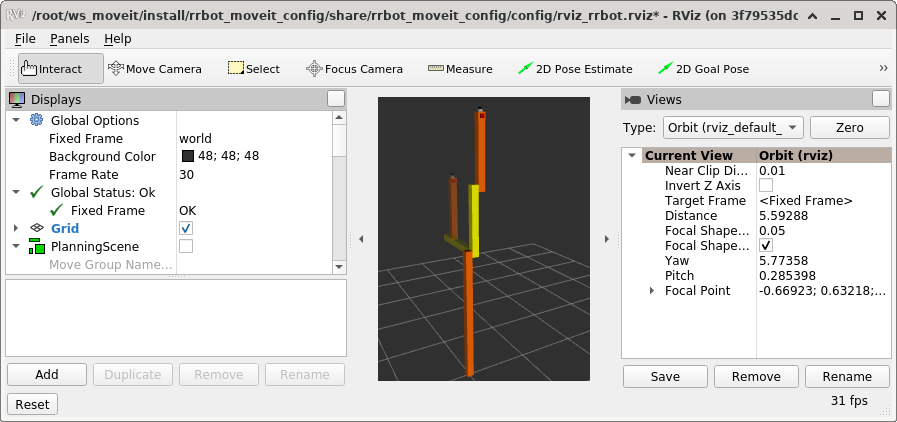
MoveIt2 and other ROS2 nodes start correctly, without exiting.
Note: Replace
/opt/plcopen/plc_rt_rrbotwith/opt/plcopen/plc_rt_rrbot_igh -n <path_to_ethercat_eni_file>to run this demo with two EtherCAT servos.Note: The commands are correctly executed without any “Error” outputs being printed (some warnings might be printed due to missing data). The following is a sample result:
[INFO] [launch]: All log files can be found below /root/.ros/log/2022-03-09-18-35-23-491029-2c3d06ed879c-62
[INFO] [launch]: Default logging verbosity is set to INFO
[INFO] [robot_state_publisher-1]: process started with pid [64]
[INFO] [rviz2-2]: process started with pid [66]
[INFO] [run_moveit_cpp-3]: process started with pid [68]
[INFO] [ros2_control_node-4]: process started with pid [79]
[INFO] [ros2 run controller_manager spawner.py joint_trajectory_controller-5]: process started with pid [82]
[INFO] [ros2 run controller_manager spawner.py joint_state_broadcaster-6]: process started with pid [85]
[robot_state_publisher-1] Parsing robot urdf xml string.
[robot_state_publisher-1] Link base_link had 1 children
[robot_state_publisher-1] Link link1 had 1 children
[robot_state_publisher-1] Link link2 had 3 children
[robot_state_publisher-1] Link camera_link had 1 children
[robot_state_publisher-1] Link camera_link_optical had 0 children
[robot_state_publisher-1] Link hokuyo_link had 0 children
[robot_state_publisher-1] Link tool_link had 0 children
……
[run_moveit_cpp-3] [INFO] [1646850933.957900579] [moveit_cpp_demo]: arm.execute()
[run_moveit_cpp-3] [INFO] [1646850933.958014839] [moveit_ros.trajectory_execution_manager]: Validating trajectory with allowed_start_tolerance 0.01
[run_moveit_cpp-3] [INFO] [1646850933.961465153] [moveit_ros.trajectory_execution_manager]: Starting trajectory execution ...
[run_moveit_cpp-3] [INFO] [1646850933.961516544] [moveit.simple_controller_manager.follow_joint_trajectory_controller_handle]: sending trajectory to joint_trajectory_controller
[ros2_control_node-4] [INFO] [1646850933.961809177] [joint_trajectory_controller]: Received new action goal
[ros2_control_node-4] [INFO] [1646850933.961854996] [joint_trajectory_controller]: Accepted new action goal
[run_moveit_cpp-3] [INFO] [1646850933.972377391] [moveit.simple_controller_manager.follow_joint_trajectory_controller_handle]: joint_trajectory_controller started execution
[run_moveit_cpp-3] [INFO] [1646850933.972410502] [moveit.simple_controller_manager.follow_joint_trajectory_controller_handle]: Goal request accepted!
[ros2_control_node-4] [INFO] [1646850936.278047163] [joint_trajectory_controller]: Goal reached, success!
[run_moveit_cpp-3] [INFO] [1646850936.279264357] [moveit.simple_controller_manager.follow_joint_trajectory_controller_handle]: Controller joint_trajectory_controller successfully finished
[run_moveit_cpp-3] [INFO] [1646850936.308323717] [moveit_ros.trajectory_execution_manager]: Completed trajectory execution with status SUCCEEDED ...
Sanity Check 8: AMR Demo Launch Check
Important
This example requires a graphical Desktop Environment and ROS UI components to function properly. Complete section Install ROS UI Components before proceeding further.
In the first terminal (terminal A), run the following commands:
$ sudo apt install plcopen-databus libshmringbuf-dev libshmringbuf mc-gateway-amr
$ sudo taskset -c X /opt/plcopen/plc_rt_amr_rtmotion
Note:
Xis the ID of the CPU core isolated in thecmdlineof grub. For ECI kernel command line, by default,Xcan be “1” or “3”.Note:
/opt/plcopen/plc_rt_amr_rtmotion_symgis the application sample of real-time four Mecanum EtherCAT chassis.In another terminal (terminal B), build and run the AMR ROS2 container:
$ # Follow https://docs.docker.com/config/daemon/systemd/ to config docker proxy
$ cd ~ && mkdir -p amr-docker && cd amr-docker
$ cp /usr/include/shmringbuf.h .
$ cp /usr/lib/x86_64-linux-gnu/libshmringbuf.so* .
$ cp /opt/plcopen/mc-gateway/amr/Dockerfile .
$ cp -r /opt/plcopen/mc-gateway/amr .
$ docker build -f Dockerfile -t amr-docker-foxy .
$ # Add arguments "--build-arg http_proxy=http://<proxy ip>:<proxy port>" and
$ # "--build-arg https_proxy=http://<proxy ip>:<proxy port>" to build behind proxy.
$ # Use "docker images" command to check the generated docker image. The output should be:
$ # REPOSITORY          TAG                 IMAGE ID            CREATED             SIZE
$ # amr-docker-foxy     latest              d90c41bed538        5 minutes ago       3.93GB
$ # moveit/moveit2      foxy-source         b128e0bcbed9        5 weeks ago         3.68GB
$ cd ~
$ docker run --rm -it -v /dev:/dev --ipc=host --name=amr amr-docker-foxy /bin/bash
$ # Use "--device=/dev/ttyUSB0" argument to connect some USB devices, such as 2D Lidar.
$ source ~/ws_amr/install/setup.bash # Command in docker container
$ ros2 launch agvm agvm_base.launch.py # Command in docker container
Expected Result:
ROS2 nodes start correctly, without exiting.
Note: Since the joystick is disconnected, it is normal to see the error
[ERROR] [1657850097.527093048] [agvm_joystick_node]: Cannot open /dev/input/js0 -1!.Note: The commands are correctly executed without other “Error” messages being displayed (some warnings might be displayed due to missing data). The following is a sample result:
[INFO] [launch]: All log files can be found below /root/.ros/log/2022-07-15-01-54-57-311770-d2d206ef9a2c-117
[INFO] [launch]: Default logging verbosity is set to INFO
[INFO] [robot_state_publisher-1]: process started with pid [119]
[INFO] [joint_state_publisher-2]: process started with pid [121]
[INFO] [agvm_plcshm_node-3]: process started with pid [123]
[INFO] [agvm_joystick_node-4]: process started with pid [125]
[INFO] [ydlidar_node-5]: process started with pid [127]
[robot_state_publisher-1] Parsing robot urdf xml string.
[robot_state_publisher-1] Link base_link had 1 children
[robot_state_publisher-1] Link base_scan had 0 children
……
[agvm_plcshm_node-3] [INFO] [1657850097.490716583] [agvm_plcshm_node]: AgvmPlcShmNode initial complete.
[agvm_plcshm_node-3] [INFO] [1657850097.500794279] [agvm_plcshm_node]: AGV cmd: 0.000000 0.000000 0.000000
[agvm_plcshm_node-3] [INFO] [1657850097.500855464] [agvm_plcshm_node]: AGV pose: 0.000000 0.000000 345.860687
[agvm_plcshm_node-3] [INFO] [1657850097.500876573] [agvm_plcshm_node]: AGV vel: 0.000000 0.000000 345860.687500
[agvm_plcshm_node-3] [INFO] [1657850097.500895089] [agvm_plcshm_node]: AGV mOdom: 0.000000 0.000000 34586.068726
[agvm_plcshm_node-3]
In the third terminal (terminal C), run the following command:
$ ros2 topic pub -1 /cmd_vel geometry_msgs/msg/Twist "{linear: {x: -0.1}, angular: {z: -0.1}}"
Note:
linear: {x: -0.1}is the linear velocity(m/s) for AMR,angular: {x: -0.1}is the angular velocity(rad/s) for AMR.Expected Result:
Variables
AGV cmd/pose/vel/mOdomin terminal B console will be refreshed.