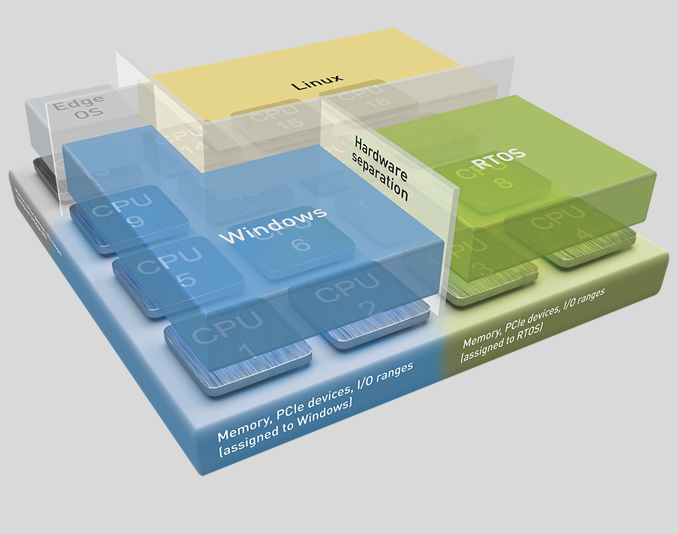
Real-Time Systems Hypervisor (RTH)
Real-Time Systems* Hypervisor (RTH) is a Type I (bare-metal) Hypervisor commercially available for 10+ years to meet the most stringent Industrial real-time performance and Workload consolidated usecase across Intel® Xeon® processors, Intel® Core™ processors, and Intel Atom® processors.
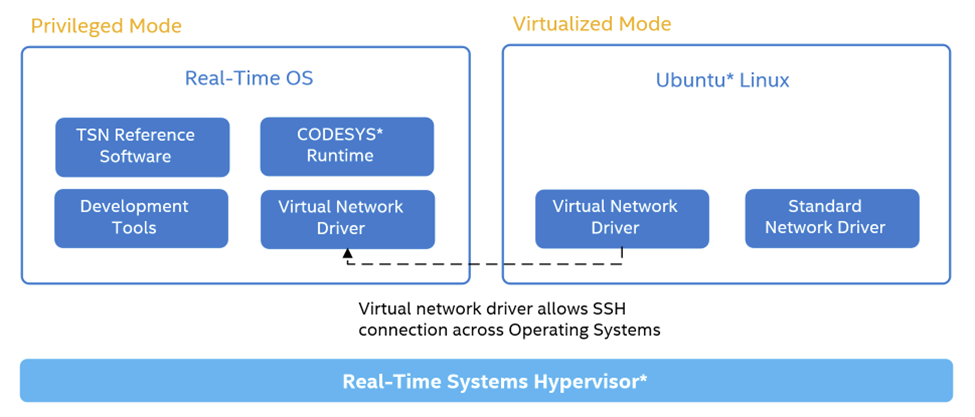
When focusing on Determinism, the RTH Privileged-Mode allows 0-us added latencies and a tight resource partitioning over a wide range of real-time operating systems:
Direct Hardware Access
Use of standard drivers
Secure separation
Temporal isolation of Workloads
When focusing on desktop rendering and composition UX, the RTH Virtualization-mode brings simple and flexible graphics passthrough over a wide range of desktop operating systems:
Not tied to any OS or hardware
No customization required
Easy installation
Intel® Edge Controls for Industrial (Intel® ECI or ECI) supports Linux* kernel images for RTS Hypervisor R5.5.00.28607 as Debian* 11 (Bullseye) packages.
Attention
The RTH releases are independent of the ECI release lifecycle. Current version of ECI supports RTS Hypervisor R5.5.00.28607.
The RTH officially supports Intel® Time Coordinated Computing on 12th and 11th Gen Intel® Core™ processors and Intel Atom® x6000E Series processors (For more information, read Software SRAM).
For more information on the product, contact info@real-time-systems.com.
RTH with ECI - Get Started
The RTH is a ready-to-use, out-of-the-box hypervisor that can be installed easily for enabling industry-graded virtualization over a very large set of Intel® platforms across processors families (Intel Atom® processors, Intel® Core™ processors, and Intel® Xeon® processors).
RTH Prerequisites
Important
For the two-month renewable evaluation license of RTH (RTH-Release_R5.5.00.xxxxx.zip), contact info@real-time-systems.com.
RTH Terminology
Term |
Description |
|---|---|
RTH |
Real-Time Systems Hypervisor refers to as Type I (bare-metal)
|
GPOS |
Hypervised operating system (OS) are referred to as Virtualized-Mode operating system or GPOS. This is equivalent to VM or Guest OS in other hypervisor terminology. |
POS |
Since RTH is a Type 1 hypervisor, the OS runtime in which the RTH allows “Direct Hardware Access” is referred to as Privileged-Mode operating system (POS). |
RTH Resources
For help and support, refer to the following:
Note: If you are using or planning to use an alternative GPOS, RTOS, or both supported by RTS Hypervisor , send an email to info@real-time-systems.com for further directions.
Install RTH with ECI
The following section is applicable to:

Implement the Recommended ECI BIOS Optimizations.
Install Linux Desktop Environment of your choice.
Copy the RTH License to
/boot/rth/license.txtImportant
For the two-month renewable evaluation license of RTH (
RTH-Release_R5.5.00.xxxxx.zip), contact info@real-time-systems.com.List the RTH Deb packages available for installation:
$ sudo apt list | grep -e rts-hypervisor -e ^rth-.* -e librth.* -e .*rth.*module.* -e grep -e .*vnet.*module.*
The following is the expected output for the Debian 11 (Bullseye) ECI APT repository:
rth-virt-dkms/unknown,now 2.3.01 all [installed,automatic]
rth-tools/unknown,now 2.3.01 amd64 [installed,automatic]
rts-hypervisor/unknown,now 5.5.00.28607-bullseye amd64 [installed]
rth-pos-rt/unknown,now 5.5.00.28607-eci-bullseye amd64 [installed]
rth-pos-xe/unknown 5.5.00.28607-eci-bullseye amd64
rth-utils/unknown 5.5.00.28607-bsp-2.3.00.15570-bullseye amd64
librth/unknown 5.5.00.28607-bsp-2.3.00.15570-bullseye amd64
vnetdrv-module-intel-rt/unknown 5.5.00.28607-bsp-2.3.00.15570 amd64
vnetdrv-module-intel-xenomai/unknown 5.5.00.28607-bsp-2.3.00.15570 amd64
rthbasedrv-module-intel-rt/unknown 5.5.00.28607-bsp-2.3.00.15570 amd64
rthbasedrv-module-intel-xenomai/unknown 5.5.00.28607-bsp-2.3.00.15570 amd64
Install the
eci-rthmeta-package. This package provides the build environment for ECI to create and maintain a consistent set of RTH Debian packages and resolve runtime dependencies.$ sudo apt install eci-rth
The following is the expected output for Debian 11 (Bullseye) ECI APT repository:
Reading package lists... Done
Building dependency tree... Done
Reading state information... Done
The following additional packages will be installed:
eci-rth-packages
The following NEW packages will be installed:
eci-rth eci-rth-packages
0 upgraded, 2 newly installed, 0 to remove and 5 not upgraded.
Need to get 1176 kB of archives.
After this operation, 1240 kB of additional disk space will be used.
Do you want to continue? [Y/n]
...
Selecting previously unselected package eci-rth-packages.
Preparing to unpack .../eci-rth-packages_1.0_amd64.deb ...
Unpacking eci-rth-packages (1.0) ...
Selecting previously unselected package eci-rth.
Preparing to unpack .../archives/eci-rth_1.0_amd64.deb ...
Unpacking eci-rth (1.0) ...
Setting up eci-rth-packages (1.0) ...
Setting up eci-rth (1.0) ...
Install the RTH Virtualized-Mode GPOS drivers and tools :
$ sudo apt install rth-virt-dkms
RTH Virtual Ethernet Network and RTH Base kernel modules are automatically compiled and installed for Linux GPOS to bind to RTH on every boot. The following is the expected output for the Debian 11 (Bullseye) ECI APT repository:
Reading package lists... Done
Building dependency tree... Done
Reading state information... Done
The following packages were automatically installed and are no longer required:
iptables-persistent netfilter-persistent
Use 'apt autoremove' to remove them.
The following additional packages will be installed:
rth-tools    The following NEW packages will be installed:
rth-tools rth-virt-dkms
0 upgraded, 2 newly installed, 0 to remove and 5 not upgraded.
Need to get 65.8 kB of archives.
After this operation, 376 kB of additional disk space will be used.
Do you want to continue? [Y/n]
Get:1 http://192.168.1.171:8080 isar/main amd64 rth-virt-dkms all 2.3.01 [37.4 kB]
Get:2 http://192.168.1.171:8080 isar/main amd64 rth-tools amd64 2.3.01 [28.4 kB]
Fetched 65.8 kB in 0s (0 B/s)
debconf: delaying package configuration, since apt-utils is not installed
Selecting previously unselected package rth-virt-dkms.
(Reading database ... 222663 files and directories currently installed.)
Preparing to unpack .../rth-virt-dkms_2.3.01_all.deb ...
Unpacking rth-virt-dkms (2.3.01) ...
Selecting previously unselected package rth-tools.
Preparing to unpack .../rth-tools_2.3.01_amd64.deb ...
Unpacking rth-tools (2.3.01) ...
Setting up rth-virt-dkms (2.3.01) ...
Loading new rth-virt-2.3.01 DKMS files...
Building for 5.10.115-rt67-intel-ese-standard-lts-rt+
Building initial module for 5.10.115-rt67-intel-ese-standard-lts-rt+
Done.

rthBaseDrvVirt.ko:
Running module version sanity check.
- Original module
- No original module exists within this kernel
- Installation
- Installing to /lib/modules/5.10.115-rt67-intel-ese-standard-lts-rt+/updates/dkms/

vnetDrvVirt.ko:
Running module version sanity check.
- Original module
- No original module exists within this kernel
- Installation
- Installing to /lib/modules/5.10.115-rt67-intel-ese-standard-lts-rt+/updates/dkms/

depmod...

Backing up initrd.img-5.10.115-rt67-intel-ese-standard-lts-rt+ to /boot/initrd.img-5.10.115-rt67-intel-ese-standard-lts-rt+.old-dkms
Making new initrd.img-5.10.115-rt67-intel-ese-standard-lts-rt+
(If next boot fails, revert to initrd.img-5.10.115-rt67-intel-ese-standard-lts-rt+.old-dkms image)
update-initramfs....

DKMS: install completed.
Setting up rth-tools (2.3.01) ...
Install the RTS Hypervisor binaries and ECI configuration templates:
$ sudo apt install rts-hypervisor
The following is the expected output for the Debian 11 (Bullseye) ECI APT repository:
Reading package lists... Done
Building dependency tree... Done
Reading state information... Done
The following NEW packages will be installed:
rts-hypervisor
0 upgraded, 1 newly installed, 0 to remove and 5 not upgraded.
Need to get 1,174 kB of archives.
After this operation, 1,226 kB of additional disk space will be used.
Get:1 http://192.168.1.171:8080 isar/main amd64 rts-hypervisor amd64 5.5.00.28607-bullseye [1,174 kB]
Fetched 1,174 kB in 0s (49.2 MB/s)
debconf: delaying package configuration, since apt-utils is not installed
Selecting previously unselected package rts-hypervisor.
(Reading database ... 222710 files and directories currently installed.)
Preparing to unpack .../rts-hypervisor_5.5.00.28607-bullseye_amd64.deb ...
Unpacking rts-hypervisor (5.5.00.28607-bullseye) ...
Setting up rts-hypervisor (5.5.00.28607-bullseye) ...
Note: You can modify the template file
/boot/rth/Linux_Linux64.txtto match with the specific partitioning of Intel Atom® processors, Intel® Core™ processors, and Intel® Xeon® processors.Install the RTH Privileged-Mode RTOS ECI Linux image and Grub entries:
$ sudo apt install rth-pos-rt
The following is the expected output for the Debian 11 (Bullseye) ECI APT repository:
Reading package lists... Done
Building dependency tree... Done
Reading state information... Done
The following NEW packages will be installed:
rth-pos-rt
0 upgraded, 1 newly installed, 0 to remove and 5 not upgraded.
Need to get 288 MB of archives.
After this operation, 293 MB of additional disk space will be used.
Get:1 http://192.168.1.171:8080 isar/main amd64 rth-pos-rt amd64 5.5.00.28607-eci-bullseye [288 MB]
Fetched 288 MB in 5s (56.9 MB/s)
debconf: delaying package configuration, since apt-utils is not installed
Selecting previously unselected package rth-pos-rt.
(Reading database ... 222722 files and directories currently installed.)
Preparing to unpack .../rth-pos-rt_5.5.00.28607-eci-bullseye_amd64.deb ...
Unpacking rth-pos-rt (5.5.00.28607-eci-bullseye) ...
Setting up rth-pos-rt (5.5.00.28607-eci-bullseye) ...
Generating grub configuration file ...
Found background image: /usr/share/images/desktop-base/desktop-grub.png
Found linux image: /boot/vmlinuz-5.10.115-rt67-intel-ese-standard-lts-rt+
Found initrd image: /boot/initrd.img-5.10.115-rt67-intel-ese-standard-lts-rt+
Found linux image: /boot/vmlinuz-5.10.115-linux-intel-acrn-sos+
Found initrd image: /boot/initrd.img-5.10.115-linux-intel-acrn-sos+
Found linux image: /boot/vmlinuz-5.10.100-intel-ese-standard-lts-dovetail+
Found initrd image: /boot/initrd.img-5.10.100-intel-ese-standard-lts-dovetail+
Adding boot menu entry for UEFI Firmware Settings ...
done
Modify the Grub entries manually in Grub template files
/etc/grub.d/42-rth-pos-rt-linux,/etc/grub.d/43-rth-pos-xe-linux, or using therth-grub-setup.shhelper scripts:$ sudo /usr/libexec/rth-pos-updates/rth-grub-setup.sh pos-rt
The following is the expected output for
rth-pos-rt:Start updating pos-rt RTS Hypervisor configuration files SOURCE /dev/nvme0n1p2 /boot/rth/pos-rt/initrd-mbLinux64-no-sfs.gz not present. Skipping. update-grub config on RTH GPOS. done. Generating grub configuration file ... Found background image: /usr/share/images/desktop-base/desktop-grub.png Found linux image: /boot/vmlinuz-5.10.115-rt67-intel-ese-standard-lts-rt+ Found initrd image: /boot/initrd.img-5.10.115-rt67-intel-ese-standard-lts-rt+ Found linux image: /boot/vmlinuz-5.10.115-linux-intel-acrn-sos+ Found initrd image: /boot/initrd.img-5.10.115-linux-intel-acrn-sos+ Found linux image: /boot/vmlinuz-5.10.100-intel-ese-standard-lts-dovetail+ Found initrd image: /boot/initrd.img-5.10.100-intel-ese-standard-lts-dovetail+ Found linux image: /boot/vmlinuz-5.10.115-rt67-intel-ese-standard-lts-rt+ Found initrd image: /boot/initrd.img-5.10.115-rt67-intel-ese-standard-lts-rt+ Found linux image: /boot/vmlinuz-5.10.115-linux-intel-acrn-sos+ Found initrd image: /boot/initrd.img-5.10.115-linux-intel-acrn-sos+ Found linux image: /boot/vmlinuz-5.10.100-intel-ese-standard-lts-dovetail+ Found initrd image: /boot/initrd.img-5.10.100-intel-ese-standard-lts-dovetail+ Adding boot menu entry for UEFI Firmware Settings ... done Grub entries updates. Done. (ONLY visible on the next RTH system REBOOT/SHUTDOWN (e.g. sudo rth -sysreboot or sudo rth -sysshutdown)
Important
Note that, by default, ECI RTH POS package installs on Ramdisk Mounted Root Filesystem using
root=/dev/ramand RTHsystem.sfsrootfs on[/OS/1/RUNTIME/0].Restart the system. From the Grub menu, select the Intel® ECI and RTH Linux boot entries:
$ rebootThe following is the expected output for RTH boot log:

Then, the GPOS kernel boot log is displayed:
Log in to the desktop UI as
eci-user (passwd=eci-user):$ sudo apt install intel-gpu-tools $ glxgears
The following is the expected output when running Intel® Graphics 3D-rendered applications, such as
glxgears, on RTH Virtualization-mode GPOS UI Desktop environment:
RTH Best Known Methods (BKM)
Section |
Description |
|---|---|
This section describes the procedure to configure |
|
This section describes Windows* installation as virtualized-mode GPOS RTH OS/0 configuration. |
RTH with ECI - Optimized Privileged-mode Linux
ECI and RTH offer out-of-the-box Debian GNU/Linux images IEC-61131-3 PLCopen control-ready environment.
With RTH privileged-mode Linux real-time runtime, automation engineers have direct hardware access without adding the extra latency caused by Hypervisor runtime (that is, no vmm entry/exit IA instruction) ,
The eci-rth meta-package makes generic assumptions about the desired POS PREEMPT-RT (rth-pos-rt) or Xenomai*/Cobalt 3.1 (rth-pos-xe) Linux OS. Modification to the RTH configuration templates /boot/rth/pos-rt/Linux_Linux64_<nvme0n1pY|sdY>.txt or /boot/rth/pos-xe/Linux_Linux64_<nvme0n1pY|sdY>.txt may be necessary for customizing the POS.
- Linux PREEMPT-RT Linux kernel with patch allows for a fully preemptible kernel.
In ECI privileged-mode default configuration, the Real-time OS (RTOS) 5.4-rt runtime is mounted on the RAM as ramdisk (that is, both kernel and rootfs) to improve execution latency performance and software resiliency. For more information, see the Wiki page (Note that the Wiki page is being migrated to The Linux Foundation Wiki).
- Xenomai/Cobalt 3.1 Linux kernel allows for a fully preemptible and low-latency IRQ co-kernel approach.
In ECI privileged-mode user configuration, the Xenomai real-time extension to Linux 5.4-rt runtime is mounted on RAM as ramdisk (that is, both kernel and rootfs) to improve execution latency performance and software resiliency.
- PLCopen IEC 611131-3 Linux x86_64 control runtime system allows any IA platform to operate as an IEC 61131-3-compliant industrial controller.
In ECI privileged-mode default configuration, the PLC control runtime is built in o the Linux RTOS runtime.
- Time Sensitive Networking (TSN) Reference Software for Linux on Intel Ethernet Controller supporting IEEE 802.1AS, IEEE 802.1Q-2018 (
Qbv,Qbu, and so on) hardware offloading. In ECI privileged-mode default configuration, RTH assigns i225-LM i210-IT discrete or integrated TSN GbE devices to Linux RTOS privileged OS runtime to enable TSN endpoint hardware capability.
- Time Sensitive Networking (TSN) Reference Software for Linux on Intel Ethernet Controller supporting IEEE 802.1AS, IEEE 802.1Q-2018 (
- RTH Virtual Ethernet Network - Virtual Network controller (veth) driver is emulated by the Real-time Hypervisor.
In ECI privileged-mode default configuration, the virtual-Ethernet controller (
vnet.ko) Linux kernel module is enabled automatically during boot in privileged Linux RTOS runtime and has to be installed manually on Virtualized OS runtime to communicate over standard Ethernet network protocols (UPD, TCP, ICMP, and so on) between both runtime operating systems.
The following section is applicable to:

Helper Scripts to Update POS
ECI provides helper scripts, which simplify the administration of RTH POS images under a console. These scripts are in the /usr/libexec/rth-pos-updates/ directory.
Note: These scripts make generic assumptions about the desired POS configuration. You might need to modify the scripts to Modification to a script may be necessary to customize the POS. For more information, refer to POS Disks and Partitions.
The following table lists the scripts and their usage.
Launch Script Name
Use Case
Default Image Location
rth-pos-overlayfs-setup.sh <pos-xe|pos-rt>This script installs a Privileged-Mode OS rootfs. It is best suited for ECI targets.
Note:
pos-rtandpos-xeare dedicated partition namespaces to mount POS rootfs asoverlayFS
/boot/rth/pos-rt/initrd-mbLinux64.gz/boot/rth/pos-xe/initrd-mbLinux64.gz
rth-grub-setup.sh <pos-xe|pos-rt>This script launches grub updates and RTH configuration. It is best suited for ECI Privileged-OS targets.
/etc/grub.d/42-rth-pos-rt-linux/etc/grub.d/43-rth-pos-xe-linux
ECI built Debian packages rth-pos-xe, rth-pos-rt resolve runtime dependencies with grub configuration entries, RTH optimized Intel multiboot kernel and Debian 11 (Bullseye) rootfs images optimized in size:
List the runtime dependencies:
$ sudo apt-cache show rth-pos-xe
The following shows the output:
Package: rth-pos-xe
Version: 5.5.00.28607-eci-bullseye
Architecture: amd64
Maintainer: ECI Maintainer <eci.maintainer@intel.com>
Installed-Size: 296286
Depends: rts-hypervisor, squashfs-tools, cpio, gzip, grub-efi
Multi-Arch: foreign
Priority: extra
Section: lib
Filename: pool/main/r/rth-pos-xe/rth-pos-xe_5.5.00.28607-eci-bullseye_amd64.deb
Size: 298319424
SHA256: 692d3c57a5bf28fb2926f6d36deba150b4a5fb1aac964f6243f1801039c0ecbb
SHA1: 1674d147135f4e378906dded846f0a64ae802be5
MD5sum: 6ae261e296ea895215f541cf6fcce8e0
Description: Real-Time System (RTS) Hypervisor rev >= 5.3 Linux RTH Linux IA64 privileged OS runtime
Description-md5: 65df6357658f87761d466e01244a790e
To view the contents of the Deb packages, download the packages:
$ sudo apt-get download rth-pos-xe && dpkg -c ./rth-pos-xe*.deb
drwxr-xr-x root/root         0 2022-10-01 15:29 ./
drwxr-xr-x root/root         0 2022-10-01 15:29 ./boot/
drwxr-xr-x root/root         0 2022-10-01 15:29 ./boot/rth/
drwxr-xr-x root/root         0 2022-10-01 15:29 ./boot/rth/pos-xe/
-rw-r--r-- root/root 291698714 2022-10-01 15:29 ./boot/rth/pos-xe/initrd-mbLinux64.gz
-rw-r--r-- root/root  11676488 2022-10-01 15:29 ./boot/rth/pos-xe/mbLinuz
drwxr-xr-x root/root         0 2022-10-01 15:29 ./etc/
drwxr-xr-x root/root         0 2022-10-01 15:29 ./etc/grub.d/
-rwxr-xr-x root/root      1313 2022-10-01 15:29 ./etc/grub.d/43-rth-pos-xe-linux
drwxr-xr-x root/root         0 2022-10-01 15:29 ./root/
-rwxr-xr-x root/root        29 2022-10-01 15:29 ./root/hello-rth-pos-xe.sh
drwxr-xr-x root/root         0 2022-10-01 15:29 ./usr/
drwxr-xr-x root/root         0 2022-10-01 15:29 ./usr/share/
drwxr-xr-x root/root         0 2022-10-01 15:29 ./usr/share/doc/
drwxr-xr-x root/root         0 2022-10-01 15:29 ./usr/share/doc/rth-pos-xe/
-rw-r--r-- root/root       187 2022-10-01 15:28 ./usr/share/doc/rth-pos-xe/changelog.Debian.gz
Install the Deb packages:
$ sudo apt install rth-pos-xe
To provision the
rth-pos-xeimage on to a dedicated RTH partition as overlayFS *rootfs*, check for a the partition:$ parted /dev/nvme0n1 print
Model: INTEL SSDPEKKW128G8 (nvme)
Disk /dev/nvme0n1: 128GB
Sector size (logical/physical): 512B/512B
Partition Table: gpt
Disk Flags:

Number  Start   End     Size    File system  Name     Flags
1      1049kB  39.8MB  38.8MB  fat16        boot     boot, esp
2      59.8MB  73.5GB  73.4GB  ext4         root
3      73.5GB  115GB   41.9GB               windows  msftdata
4      115GB   120GB   4194MB  ext4         pos-rt
5      120GB   124GB   4194MB  ext4         pos-xe
Run the following command to provision:
$ sudo /usr/libexec/rth-pos-updates/rth-pos-overlayfs-setup.sh pos-xe
Start updating pos-xe RTS Hypervisor configuration files
/dev/nvme0n1p5: LABEL="pos-xe" UUID="7766dd9c-3891-47b2-bcb9-c712f9722c6d" BLOCK_SIZE="4096" TYPE="ext4" PARTLABEL="pos-xe" PARTUUID="af06ad62-d64c-426a-8305-0753486d7d8f"
Found pos-xe ext4 partition /dev/nvme0n1p5...
Extracting system.sfs from /boot/rth/pos-xe/initrd-mbLinux64.gz...
578387 blocks
5843 blocks
pos-xe/system.sfs to partition /dev/nvme0n1p5. Done.
Update the Grub configuration:
$ sudo /usr/libexec/rth-pos-updates/rth-grub-setup.sh pos-xe
Start updating pos-xe RTS Hypervisor configuration files
SOURCE
/dev/nvme0n1p2
/boot/rth/pos-xe/initrd-mbLinux64-no-sfs.gz not present.  Skipping.
update-grub config on RTH GPOS. done.
Generating grub configuration file ...
Found background image: /usr/share/images/desktop-base/desktop-grub.png
Found linux image: /boot/vmlinuz-5.10.115-rt67-intel-ese-standard-lts-rt+
Found initrd image: /boot/initrd.img-5.10.115-rt67-intel-ese-standard-lts-rt+
Found linux image: /boot/vmlinuz-5.10.115-linux-intel-acrn-sos+
Found initrd image: /boot/initrd.img-5.10.115-linux-intel-acrn-sos+
Found linux image: /boot/vmlinuz-5.10.100-intel-ese-standard-lts-dovetail+
Found initrd image: /boot/initrd.img-5.10.100-intel-ese-standard-lts-dovetail+
Found linux image: /boot/vmlinuz-5.10.115-rt67-intel-ese-standard-lts-rt+
Found initrd image: /boot/initrd.img-5.10.115-rt67-intel-ese-standard-lts-rt+
Found linux image: /boot/vmlinuz-5.10.115-linux-intel-acrn-sos+
Found initrd image: /boot/initrd.img-5.10.115-linux-intel-acrn-sos+
Found linux image: /boot/vmlinuz-5.10.100-intel-ese-standard-lts-dovetail+
Found initrd image: /boot/initrd.img-5.10.100-intel-ese-standard-lts-dovetail+
Adding boot menu entry for UEFI Firmware Settings ...
done
Grub entries updates. Done. (ONLY visible on the next RTH system REBOOT/SHUTDOWN (e.g. sudo rth -sysreboot or sudo rth -sysshutdown)
POS Runtime Memory Size
ECI makes generic assumptions about the desired POS Memory setting. Modification to the RTH configuration templates /boot/rth/Linux_Linux64.txt or /boot/rth/WindowsEFI_Linux64.txt may be necessary for customizing the POS on [/SYSTEM].
The following code initializes the RTH parameters for POS device memory protection, physical memory size, and data locality:
[/SYSTEM]
     "IOMMU" = uint32: 1 # Activate IOMMU for all OSs
...
[/OS/1]

    "name"          = "Privileged-RTOS"
    "boot_priority" = uint32: 1
    "memory_size"   = uint64: 0x80000000      # 2048 MB
    "CPU"           = bytelist: 3,4           # e.g. two CPUs: bytelist: 3, 4
    "virtual_MMU"             = uint32: 1
    "restricted_IO"           = uint32: 1
...
Note: It might be impossible for RTH to activate IOMMU for all operating system due to the default BIOS setting VT-d = Disabled. Make sure that the setting is set to VT-d = Enabled on the machine.
$ readtrace -o 1
...
Init IOMMU
IOMMU configured but not present or disabled in BIOS.
Support for device memory protection and physical memory relocation disabled.
...
POS Disks and Partitions
ECI makes generic assumptions about the desired NVME or SATA disk drive partition assignment considering pos-rt and pos-xe namespaces. You might need to modify the RTH configuration templates /boot/rth/pos-rt/Linux_Linux64_<nvme0n1pY|sdY>.txt or /boot/rth/pos-rt/WindowsEFI_Linux64_<nvme0n1pY|sdY>.txt to customize POS on NVME or SATA disk drive partition assignment.
Important
NVMe Drive assignment feature is not supported if your hardware configures the NVMe controller bar above 4 GB. Sometimes, server grade hardware does not fulfill this requirement in its default configuration. Typically, this behavior can be configure within BIOS settings:
[On commercial UEFI BIOS vendor] under Advanced > PCI configuration > Memory Mapped I/O above 4GB [Disabled]
[On TGL UP3 RVP Intel UEFI BIOS] under Intel Advanced Menu > System Agent Configruation > Above 4G [Disabled]
RTH does not support eMMC Integrated controller partition assignment.
In the following configuration steps, it is assumed that the a POS installation running on NVME disk has created distinct EXT4 dedicated partitions :
check if RTH has detected any NVME or SATA disk controller
$ readtrace -o 1
The expected output should be similar to the following:
...
NVMe (1/0/0) (Vendor:0x8086 Device:0xF1A5) - no drive sharing configured
...
locate GPOS rootfs
/GPT partition and POS labels :$ blkid -o list
In this example respective
pos-xeandpos-rtlabels are set onto/dev/nvme0n1p4and/dev/nvme0n1p3GPT partition :device fs_type label mount point UUID ------------------------------------------------------------------------------------------------------------------ /dev/nvme0n1p1 vfat /boot/efi D473-9F49 /dev/nvme0n1p2 ext4 / / ae1a66a5-ee9c-4573-9249-dd207ffa6248 /dev/nvme0n1p4 ext4 pos-xe (not mounted) b3c0531b-2cec-47da-ab21-6a0a928e55c9 /dev/nvme0n1p5 ext4 pos-rt (not mounted) a4b56194-8688-4b73-b8e1-58f6bc88b72b /dev/nvme0n1 (in use) /dev/nvme0n1p3 (not mounted)
identify PCI path corresponding to the desired GPT partitions to map to :
$ ls -l /dev/disk/by-path/
The expected output should be similar to the following:
total 0
lrwxrwxrwx 1 root root 13 Sep  7 14:58 pci-0000:01:00.0-nvme-1 -> ../../nvme0n1
lrwxrwxrwx 1 root root 15 Sep  7 14:58 pci-0000:01:00.0-nvme-1-part1 -> ../../nvme0n1p1
lrwxrwxrwx 1 root root 15 Sep  7 14:58 pci-0000:01:00.0-nvme-1-part2 -> ../../nvme0n1p2
lrwxrwxrwx 1 root root 15 Sep  7 14:58 pci-0000:01:00.0-nvme-1-part3 -> ../../nvme0n1p3
lrwxrwxrwx 1 root root 15 Sep  7 14:58 pci-0000:01:00.0-nvme-1-part4 -> ../../nvme0n1p4
lrwxrwxrwx 1 root root 15 Sep  7 14:58 pci-0000:01:00.0-nvme-1-part5 -> ../../nvme0n1p5
Edit to the RTH configuration file to assign NVME disk partitions :
...
[/DRIVE/0]

"default"   = uint32: 0   # default is OS/0
"bus"       = uint32: 1   # 1 0 0   0x8086 0xF1A5 NVMe controller
"device"    = uint32: 0   #
"function"  = uint32: 0   #
...
Reboot the system after adding the extra keys to the RTH configuration file. Then, check whether the change are applied:
$ readtrace -o 0
The expected output should be similar to the following:
NVMe (1/0/0) (Vendor:0x8086 Device:0xF1A5) - Write Cache: enabled
    Drive assignment for namespace 1 (GPT):
    Partition | OS | Start Sector |   End Sector | Type
            0 |  0 |         2048 |        38911 | 0xEF EFI System
            1 |  0 |        59392 |    152413430 | 0x83 Linux filesystem
            2 |  0 |    152414208 |    230539263 | 0x07 Microsoft Basic Data
            3 |  1 |    234444800 |    238350335 | 0x83 Linux filesystem
            4 |  0 |    238350336 |    246163455 | 0x83 Linux filesystem
...
Decide the method to mount and boot POS rootfs:
This approach uses overlayfs kernel capability to allow a minimalist RTH initramfs that mounts a system.sfs located in [/DRIVE/0/PARTITION/3] as POS [/OS/1] diskroot filesystem diskroot=/dev/hda4, allowing Linux RAM initialization with a full system RAM size.
Important
The privileged-mode kernel is built with CONFIG_OVERLAYFS=y for the ECI initramfs to contain privileged-mode OS root filesystems (that is, rootfs) as single tree.
$ vi /boot/rth/pos-rt/Linux_Linux64_nvme0n1p4.txt
...
[/OS/1]

    "name"          = "Privileged RTOS"
    "boot_priority" = uint32: 2             # start second
    "memory_size"   = uint64: 0x80000000    # 2000 MB
    "virtual_MMU"   = uint32: 1             # set to 1 to restrict memory access
    "restricted_IO" = uint32: 1             # set to 1 to restrict I/O access
    "CPU"           = bytelist: 3,4           # e.g. two CPUs: bytelist: 3, 4

    "virtual_COM-to-log_port" = uint32 : 0x3F8
    "trace_partition_number" = uint32: 1    # write log to /SHM/1

    [/OS/1/RUNTIME/0]

        "bootline" = "diskroot=/dev/hda4 ip=192.168.2.2:::::vnet0  debug=all verbose=all random.trust_cpu=on console=tty0 console=ttyS0,115200n8"
        "image_0"  = "mbLinuz64"
        "image_1"  = "initrd-mbLinux64.gz"
...
[/DRIVE/0]

"default"   = uint32: 0   # default is OS/0
"bus"       = uint32: 1   # 1 0 0   0x8086 0xF1A5 NVMe controller
"device"    = uint32: 0   #
"function"  = uint32: 0   #

    [/DRIVE/0/PARTITION/3]
    "OS" = uint32: 1   # assigned to OS/1
...
Note:
The
eci-rthmeta-package makes generic assumptions about the desired NVME or SATA disk drive partition assignment consideringpos-rtandpos-xenamespaces. Modification to the RTH configuration templates POS rootfssystem.sfsor the predefinedpos-rtEXT4 partition (for example/dev/nvme0n1p4) or manual update from/boot/rth/pos-rt/initrd-mbLinux64.gzto/boot/rth/pos-rt/initrd-mbLinux64-no-sfs.gz(approximately 850 KB in size) should proceed with the following steps:$ cd /boot/rth/pos-rt/ $ gunzip initrd-mbLinux64.gz $ mkdir initramfs-tmp $ cd initramfs-tmp/ $ cpio -i -d -H newc --no-absolute-filenames < ../initrd-mbLinux64 $ cd .. $ diskroot=nvme0n1p4 $ mkdir -p /mnt/tmp-`basename $diskroot` $ mount /dev/$diskroot /mnt/tmp-`basename $diskroot` $ dd if=initramfs-tmp/system.sfs of=/mnt/tmp-`basename $diskroot`/system.sfs status=none $ rm initramfs-tmp/system.sfs $ gzip initrd-mbLinux64 $ cd initramfs-tmp/ $ find . | cpio -H newc -o > ../initrd-mbLinux64-no-sfs $ cd .. $ cat initrd-mbLinux64-no-sfs | gzip > initrd-mbLinux64-no-sfs.gzModification to the ECI Grub configuration templates
/etc/grub.d/42-rth-pos-rt-linuxor/etc/grub.d/43-rth-pos-xe-linuxmay be necessary for customizing GRUB multiboot entries (for example, module2). If you change the name of the POS images, make sure that you follow the naming convention, for example,initrd-mbLinux64-no-sfs.gz,Linux_Linux64_<diskroot>.txt, andmbLinuz.$ vi /etc/grub.d/42-rth-pos-rt-linux ... menuentry "ECI-R (RTS Hypervisor) GPOS GNU/Debian Desktop and POS Preempt-RT Linux" { search --no-floppy --fs-uuid --set=root ae1a66a5-ee9c-4573-9249-dd207ffa6248 multiboot2 /boot/rth/rthx86 module2 /boot/rth/license.txt module2 /boot/rth/pos-rt/Linux_Linux64_nvme0n1p4.txt echo "Loading POS multi-boot Linux Preempt-RT bootable [OVERLAYFS] images..." module2 /boot/rth/pos-rt/mbLinuz mbLinuz64 module2 /boot/rth/pos-rt/initrd-mbLinux64-no-sfs.gz initrd-mbLinux64.gz echo "Loading [ROOTFS] GPOS GNU/Debian Desktop bootable images ..." module2 /vmlinuz vmlinuz.lnk module2 /initrd.img initramfs.lnk ... $ update-grub $ rth -sysreboot && reboot
This approach does NOT require any RTH initramfs (that is, no “image_1” in RTH configuration). However, the flattened rootfs contents are extracted onto a dedicated disk GPT partition and mounted as the root=/dev/nvme0n1p4 partition to mount POS flat rootfs for [/OS/1/RUNTIME/0].
$ vi /boot/rth/pos-rt/Linux_Linux64_nvme0n1p4.txt
...
[/OS/1]

    "name"          = "Privileged RTOS"
    "boot_priority" = uint32: 2             # start second
    "memory_size"   = uint64: 0x80000000    # 2000 MB
    "virtual_MMU"   = uint32: 1             # set to 1 to restrict memory access
    "restricted_IO" = uint32: 1             # set to 1 to restrict I/O access
    "CPU"           = bytelist: 3,4           # e.g. two CPUs: bytelist: 3, 4

    "virtual_COM-to-log_port" = uint32 : 0x3F8
    "trace_partition_number" = uint32: 1    # write log to /SHM/1

    [/OS/1/RUNTIME/0]

        "bootline" = "root=/dev/nvme0n1p4 ip=192.168.2.2:::::vnet0  debug=all verbose=all random.trust_cpu=on console=tty0 console=ttyS0,115200n8"
        "image_0"  = "mbLinuz64"
...
[/DRIVE/0]

"default"   = uint32: 0   # default is OS/0
"bus"       = uint32: 1   # 1 0 0   0x8086 0xF1A5 NVMe controller
"device"    = uint32: 0   #
"function"  = uint32: 0   #

    [/DRIVE/0/PARTITION/3]
    "OS" = uint32: 1   # assigned to OS/1
...
The eci-rth meta-package makes generic assumptions about the desired NVME or SATA disk drive partition assignment considering pos-rt and pos-xe namespaces. Modification to the ECI POS rootfs system.sfs or the predefined pos-rt and pos-xe LABEL partition or manual create a minimal mknod should proceed with the following steps:
$ cd /boot/rth/
$ gunzip initrd-mbLinux64.gz
$ mkdir initramfs-tmp
$ cd initramfs-tmp/
$ cpio -i -d -H newc --no-absolute-filenames < ../initrd-mbLinux64
$ cd ..
$ gzip initrd-mbLinux64
$ diskroot=nvme0n1p4
$ mkdir -p /mnt/tmp-`basename $diskroot`
$ mount /dev/$diskroot /mnt/tmp-`basename $diskroot`
$ unsquashfs -d /mnt/tmp-`basename $diskroot` -f initramfs-tmp/system.sfs
$ cd /mnt/tmp-`basename $diskroot`/dev/
$ mknod null    c 1 3
$ mknod zero    c 1 5
$ mknod random  c 1 8
$ mknod urandom c 1 9
$ mknod tty     c 5 0
$ mknod console c 5 1
$ mknod ptmx    c 5 2
$ mkdir pts
$ mknod ttyS0   c 4 64
$ umount /mnt/tmp-`basename $diskroot`
$ rm -rf initramfs-tmp
Modification to the ECI Grub templates /etc/grub.d/42-rth-pos-rt-linux or /etc/grub.d/43-rth-pos-xe-linux may be necessary for customizing GRUB multiboot entries (for example, module2). If you make changes to the image names, make sure to adhere to the naming convention, for example, initrd-mbLinux64-no-sfs.gz , Linux_Linux64_<diskroot>.txt and mbLinuz.
$ vi /etc/grub.d/42-rth-pos-rt-linux
...
menuentry "ECI-R (RTS Hypervisor) GPOS GNU/Debian Desktop and POS Preempt-RT Linux" {
    search --no-floppy --fs-uuid --set=root ae1a66a5-ee9c-4573-9249-dd207ffa6248
    multiboot2 /boot/rth/rthx86
    module2 /boot/rth/license.txt
    module2 /boot/rth/pos-rt/Linux_Linux64_nvme0n1p4.txt
    echo "Loading POS multi-boot Linux Preempt-RT bootable [FLATROOTFS] images..."
    module2 /boot/rth/pos-rt/mbLinuz mbLinuz64
    echo "Loading [ROOTFS] GPOS GNU/Debian Desktop bootable images ..."
    module2 /vmlinuz vmlinuz.lnk
    module2 /initrd.img initramfs.lnk
    ...
$ update-grub
$ rth -sysreboot && reboot
This approach does NOT require any dedicated disk GPT partition, mounted as the root=/dev/ram to mount POS system.sfs rootfs for [/OS/1/RUNTIME/0].
verify that the size of below 4 GB addressable space portions of contiguous RAM available at boot time are large enough to load the POS
initrd-mbLinux64.gzimage :$ readtrace -o 1
For example, Intel® Core™ i5-6500TE system has 2 GB RAM space available between
0x000000100000 - 0x000077DD0FFF$ readtrace -o 1 ... Init memory start - end (size ) type 0 0x000000000000 - 0x000000057FFF (0x000000058000) 0x01 1 0x000000058000 - 0x000000058FFF (0x000000001000) 0x02 2 0x000000059000 - 0x00000009EFFF (0x000000046000) 0x01 3 0x00000009F000 - 0x0000000FFFFF (0x000000061000) 0x02 4 0x000000100000 - 0x000077DD0FFF (0x000077CD1000) 0x01 5 0x000077DD1000 - 0x000077DD1FFF (0x000000001000) 0x04 6 0x000077DD2000 - 0x000077DD2FFF (0x000000001000) 0x02 7 0x000077DD3000 - 0x00007E44BFFF (0x000006679000) 0x01 8 0x00007E44C000 - 0x00007E78AFFF (0x00000033F000) 0x02 9 0x00007E78B000 - 0x00007E8FAFFF (0x000000170000) 0x01 10 0x00007E8FB000 - 0x00007EFE5FFF (0x0000006EB000) 0x04 11 0x00007EFE6000 - 0x00007F3A6FFF (0x0000003C1000) 0x02 12 0x00007F3A7000 - 0x00007F3FEFFF (0x000000058000) 0x14 13 0x00007F3FF000 - 0x00007F3FFFFF (0x000000001000) 0x01 14 0x00007F400000 - 0x00008FFFFFFF (0x000010C00000) 0x02 15 0x0000E0000000 - 0x0000EFFFFFFF (0x000010000000) 0x02 16 0x0000FE000000 - 0x0000FE010FFF (0x000000011000) 0x02 17 0x0000FEC00000 - 0x0000FEC00FFF (0x000000001000) 0x02 18 0x0000FED00000 - 0x0000FED00FFF (0x000000001000) 0x02 19 0x0000FEE00000 - 0x0000FEE00FFF (0x000000001000) 0x02 20 0x0000FF000000 - 0x0000FFFFFFFF (0x000001000000) 0x02 21 0x000100000000 - 0x00026DFFFFFF (0x00016E000000) 0x01 Available RAM total: 7877 MB Available RAM below 4 GB: 2021 MB
Important
The amount of contiguous RAM available below 4 GB available for RTH mount ECI POS
initrd-mbLinux64.gzloaded as ramdisk is limited on UEFI IA64 firmware :... Init memory start - end (size ) type 0 0x000000000000 - 0x00000009EFFF (0x00000009F000) 0x01 1 0x00000009F000 - 0x0000000FFFFF (0x000000061000) 0x02 2 0x000000100000 - 0x000030A5DFFF (0x00003095E000) 0x01 3 0x000030A5E000 - 0x000030A5EFFF (0x000000001000) 0x02 4 0x000030A5F000 - 0x0000338BCFFF (0x000002E5E000) 0x01 5 0x0000338BD000 - 0x0000338BDFFF (0x000000001000) 0x02 6 0x0000338BE000 - 0x0000400C7FFF (0x00000C80A000) 0x01 7 0x0000400C8000 - 0x00004012BFFF (0x000000064000) 0x14 8 0x00004012C000 - 0x000043B30FFF (0x000003A05000) 0x02 9 0x000043B31000 - 0x000043BB3FFF (0x000000083000) 0x04 10 0x000043BB4000 - 0x000043C4EFFF (0x00000009B000) 0x03 11 0x000043C4F000 - 0x000043C4FFFF (0x000000001000) 0x01 12 0x000043C50000 - 0x000047FFFFFF (0x0000043B0000) 0x02 13 0x000049A00000 - 0x00004F3FFFFF (0x000005A00000) 0x02 14 0x0000FED20000 - 0x0000FED7FFFF (0x000000060000) 0x02 15 0x0000FF400000 - 0x0000FFFFFFFF (0x000000C00000) 0x02 16 0x000100000000 - 0x0002B0BFFFFF (0x0001B0C00000) 0x01 Available RAM total: 7948 MB Available RAM below 4 GB: 1024 MB ...
Below a summary of limitations user might face on those Intel® platforms :
ECI Meta-package
Description
Size
Bootable
rth-pos-rtPOS initramfs file
initrd-mbLinux64.gz(includingsystem.sfs)168 MB
OK
201 MB
OK
234 MB
NOK
Edit RTH configuration file to specify the POS
initrd-mbLinux64.gzimage to mount as ramdisk :$ vi /boot/rth/Linux_Linux64.txt
[/OS/1]

    "name"          = "Privileged RTOS"
    "boot_priority" = uint32: 2             # start second
    "memory_size"   = uint64: 0x80000000    # 2000 MB
    "virtual_MMU"   = uint32: 1             # set to 1 to restrict memory access
    "restricted_IO" = uint32: 1             # set to 1 to restrict I/O access
    "CPU"           = bytelist: 3,4           # e.g. two CPUs: bytelist: 3, 4

    "virtual_COM-to-log_port" = uint32 : 0x3F8
    "trace_partition_number" = uint32: 1    # write log to /SHM/1

    [/OS/1/RUNTIME/0]

        "bootline" = "diskroot=/dev/ram ip=192.168.2.2:::::vnet0  debug=all verbose=all random.trust_cpu=on console=tty0 console=ttyS0,115200n8"
        "image_0"  = "mbLinuz64"
        "image_1"  = "initrd-mbLinux64.gz"
...
Edit Grub configuration file to specific the POS
initrd-mbLinux64.gzimage to load as RTH ramdisk into contiguous RAM available below 4 GB :$ vi /etc/grub.d/42-rth-pos-rt-linux && update-grub
menuentry "ECI-R (RTS Hypervisor) GPOS GNU/Debian Desktop and POS Preempt-RT Linux" {
    search --no-floppy --fs-uuid --set=root ae1a66a5-ee9c-4573-9249-dd207ffa6248
    multiboot2 /boot/rth/rthx86
    module2 /boot/rth/license.txt
    module2 /boot/rth/Linux_Linux64.txt
    echo "Loading POS multi-boot Linux Preempt-RT bootable [RAMFS] images..."
    module2 /boot/rth/pos-rt/mbLinuz mbLinuz64
    module2 /boot/rth/pos-rt/initrd-mbLinux64.gz initrd-mbLinux64.gz
    echo "Loading [ROOTFS] GPOS GNU/Debian Desktop bootable images ..."
    module2 /vmlinuz vmlinuz.lnk
    module2 /initrd.img initramfs.lnk
    ...
Reboot the system after adding the extra keys to the RTH configuration file. Then, check whether the change are applied:
$ readtrace -o 1
For example
initrd-mbLinux64.gz(md5sum 1B8C8B8059DC02C8E1EEDB8766602A1FA5A4510F) ramdisk prior to RTH POS/OS/1.4589745D2A52272BB4F5BCFC4AE45309B872F469 A04BB9AED48127C8BC794B2737A2E241B0053C85 9AB3786B9DDF28AC5287125D9D53850527BB4C9F 944F860A5FDF5EDD3B1D2B363D578F22BF8E42D1 vmlinuz 45BB561269A6232C9C4776F4FA994904EE51B37F initramfs.img DA2019732E096B1692C59A0B54F57C79CA38FC48 mbLinuz 1B8C8B8059DC02C8E1EEDB8766602A1FA5A4510F initrd-mbLinux64.gz
POS Configured with Intel® Time Coordinated Computing (TCC)
RTH provides built-in Intel® Time Coordinated Computing (Intel® TCC) and Intel® Resource Director Technology (Intel® RDT) support across Intel® Xeon® processors, Intel® Core™ processors, and Intel Atom® processors.
Attention
Intel® Time Coordinated Computing Tools (Intel® TCC Tools) WILL NOT FUNCTION with RTS Hypervisor.
All features are configurable from the RTH configuration file (for example /boot/rth/pos-rt/Linux_Linux64_nvme0n1p4.txt).
GPU and CPU Cores RTH Cache L2/L3 Partitioning
L2 or L3 Last Level of Cache (LLC) memory is shared between multiple IA64 CPUs, by default. Intel® Cache Allocation Technology (Intel® CAT) is IA technology available on Intel processors offering to divide and assign cache to individual CPUs.
[/SYSTEM]
"CPU_resource_partitioning" = uint32: 1
Detect if an Intel IA64 processor supports Intel® CAT, view the Hypervisor log messages.
$ readtrace -o 1
For example, the Intel(R) Core(TM) i5-6500TE CPU processor is featuring :
4 logical CPUs with a total of 4 so called Classes of Service (COS).
12 cache segments available that can be assigned to individual COS.
Cache topology:
    |---------------|
CPU |  1|  2|  3|  4|
    |---------------|
L1d |   |   |   |   |
    |---------------|
L1i |   |   |   |   |
    |---------------|
L2  |   |   |   |   |
    |---------------|
L3  |               |  inclusive
    |---------------|
...
CAT supported on L3 Cache 1 (CPUs 1 - 4):
    Max. Class of Service (COS): 4
    Cache segments             : 12
...
When Intel® TCC or Intel® CAT is detected by RTH, add extra [/OS/1] key
L3_cache_X_segmentsorL2_cache_X_segmentsin the RTH configuration file to change the CPU cache segment partitioning.$ vi /boot/rth/pos-rt/Linux_Linux64_nvme0n1p4.txt [/OS/1] "name" = "Privileged RTOS" "boot_priority" = uint32: 1 "memory_size" = uint64: 0x20000000 # 512 MB "CPU" = bytelist: 3,4 # e.g. two CPUs: bytelist: 3, 4 "virtual_MMU" = uint32: 1 "restricted_IO" = uint32: 1 "L3_cache_1_segments" = bytelist: 1,2,3,4,5,6 "virtual_COM-to-log_port" = uint32: 0x3F8 "trace_partition_number" = uint32: 1 # write log to /SHM/1 [/OS/1/RUNTIME/0] "bootline" = "diskroot=/dev/ram ip=192.168.2.2:::::vnet0 debug=all verbose=all random.trust_cpu=on console=tty0 console=ttyS0,115200n8" "image_0" = "mbLinuz64" "image_1" = "initrd-mbLinux64.gz"Reboot the system after adding the extra keys to the RTH configuration file. Then, check whether the change are applied:
$ readtrace -o 1
The expected output should be similar to the following:
...
Cache allocation:
Package 1
    L3 #1  (12 segments)  6 MB
    OS  0 |      ******|  6 segments = 3 MB
    OS  1 |******      |  6 segments = 3 MB
Certain Intel® processors allow sub-feature called GT_CLOS to restrict the GPU usage of the certain LLC segments by the GPU (available on RTH development_mode only on certain Intel® processors).
$ vi /boot/rth/pos-rt/Linux_Linux64_nvme0n1p4.txt
...
[/SYSTEM]
     "IOMMU" = uint32: 1 # Activate IOMMU for all OSs
     "development_mode" = uint32: 1
     "GPU_cache_restriction" = uint32: 1

$ readtrace -o 1
...
Supported GPU cache restriction settings:
  0: Cache segments: 1 2 3 4 5 6 7 8 9 10 11 12
  1: Cache segments: 7 8 9 10 11 12
  2: Cache segments: 11 12
  3: Cache segments: 12

Cache allocation:
  Package 1
    L3 #1  (12 segments)  6 MB
      OS  0 |      ******|  6 segments = 3 MB
      OS  1 |******      |  6 segments = 3 MB
      GPU   |      ******|  6 segments


.. figure:: assets/rts/overview/TCC_CAT_L3_partitioned.png
   :align: center
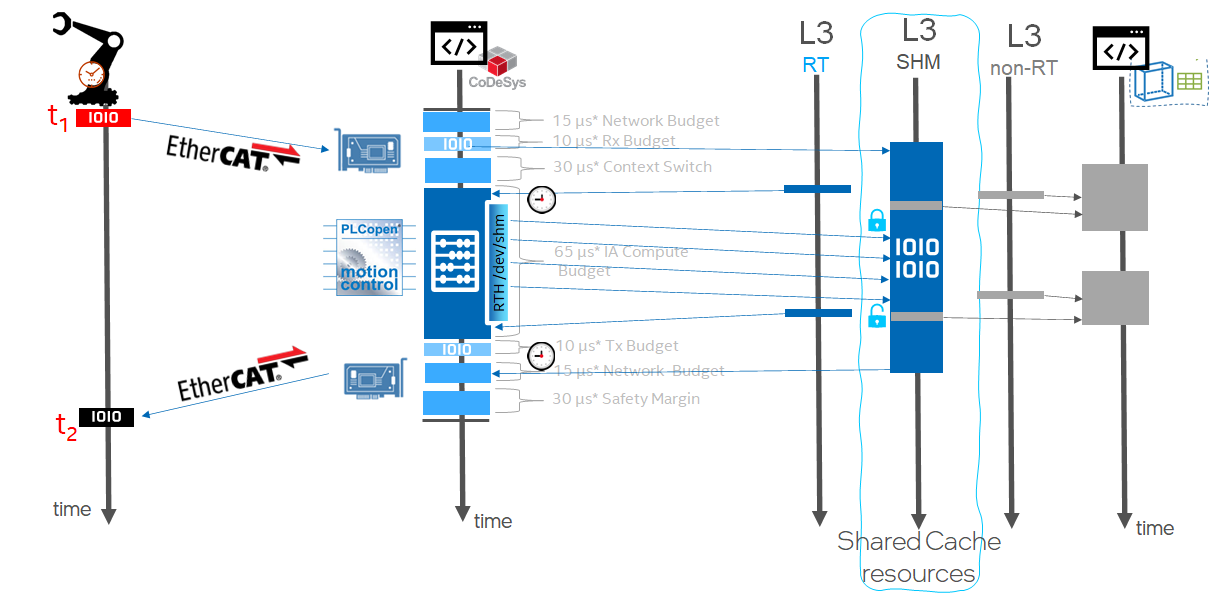
RTH Software SRAM /dev/shm
RTH provides built-in Software SRAM Intel® TCC feature available with 11th and 12th Gen Intel® Core™ and Intel Atom® x6000E Series for achieving low-latency L2 or L3 cache data locality using RTH Application Programming Interface (API) for Shared-Memory device /dev/shm.
Click to view the example
$ vi /boot/rth/pos-rt/Linux_Linux64_nvme0n1p4.txt
...
[/SHM/0]

    "name" = "trace_0"
    "size" = uint64: 0xF000

[/SHM/1]

    "name" = "trace_1"
    "size" = uint64: 0xF000

[/SHM/2]

    "name" = "low-latency"
    "size" = uint64: 0x100000   # one megabyte
    "cache_locked" = uint32: 3 # lock data in the fastest shared cache
...

$ readtrace -o 1
...
    L2 #1  (20 segments)  1.25 MB
      OS  0 |********************|  20 segments = 1.25 MB
    L2 #2  (20 segments)  1.25 MB
      OS  0 |********************|  20 segments = 1.25 MB
    L2 #3  (20 segments)  1.25 MB
      OS  0 |********************|  20 segments = 1.25 MB
    L2 #4  (20 segments)  1.25 MB
      OS  0 |********************|  20 segments = 1.25 MB
    L2 #8  (20 segments)  1.25 MB
      OS  1 |********************|  20 segments = 1.25 MB
    L3 #1  (12 segments)  24 MB
      OS  0   |      ***** | 5 segments = 10 MB
      OS  1   |******      | 6 segments = 12 MB
      SW SRAM |           *| 1 segment = 2 MB

Init time synchronization
Found OS "GPOS"
Found OS "Privileged RTOS"
Init Registry
Setup Operating Systems
Loading "Privileged RTOS"
Shared Memory Partitions
  0 0x00004086D000 - 0x00004087BFFF (0x00000000F000) "trace_0"
  1 0x00004085E000 - 0x00004086CFFF (0x00000000F000) "trace_1“
  2 0x000040080000 - 0x0000400FFFFF (0x000000080000) "low-latency"
/OS/1 Booting runtime 0
/OS/1 Activating Virtual MMU
/OS/1 COM: 000: Linux version 5.4.115-rt57-rts2.2.02.15407-intel-pk-standard+ (builder@f228
Note: For more information on RTS Shared-Memory (SHM) and RTH Application Programming Interface (API) for Linux, Windows, QNX* Neutrino, refer to the RTH Resources or contact info@real-time-systems.com.
RTH Set #AC Split Lock
RTH provides built-in Alignment Check Fault (#AC)) on Split Lock Intel® TCC feature available on recent 12th and 11th Gen Intel® Core™ processors and Intel Atom® x6000E Series processors. To help detect CPU instructions with the LOCK prefix on an unaligned memory location that spans two cache lines, create timing overhead than those CPU instructions operating on aligned memory locations.
Executing an instruction with the LOCK prefix on an unaligned location results in an #AC fault. You can turn the LOCK ON or OFF from the RTH configuration file for an hypervised OS to enable fine-grained control of the feature.
$ vi /boot/rth/pos-rt/Linux_Linux64_nvme0n1p4.txt
...
[/OS/0]
...
"AC_on_split_lock" = uint32: 0
...
[/OS/1]
...
"AC_on_split_lock" = uint32: 1
...
POS Configured with Intel® Ethernet TSN
RTH enables latest Intel® Ethernet integrated or discrete controllers featuring IEEE 802.1Q-2018 Time Sensitive Networking (TSN)
RTH-Mapped GbE PCI Device
ECI makes generic assumptions about the desired PCI assignment of Ethernet devices to pos-rt and pos-xe runtimes. Modification to the ECI RTH configuration templates /boot/rth/<pos-rt|pos-xe>/Linux_Linux64_<nvme0n1pY|sdY>.txt or /boot/rth/<pos-rt|pos-xe>/WindowsEFI_Linux64__<nvme0n1pY|sdY>.txt or /boot/rth/WindowsEFI_Linux64.txt or /boot/rth/Linux_Linux64.txt may be necessary for customizing the TSN Ethernet Device assignment.
RTH configuration file provides entries that assign exclusive access to a PCI devices for POS, based of PCI bus topology position (bus and device number) or simply by the vendor_ID:device_ID key pair.
identify RTH default PCI device assignments.
$ readtrace -o 1
In this example, GPOS default
OS/0gets all Ethernet PCI devices including Intel® Ethernet TSN i225-LM Ethernet Controller PCI devices (Device ID=0x15F2 and Vendor ID=0x8086) and i210 Ethernet Controller PCI devices (Device ID=0x1533 and Vendor ID=0x8086).PCI devices: bus dev func vendor device pin IRQ MSI mode | OS | description 0 0 0 0x8086 0x191F - - n -- | 0 | Host/PCI bridge 0 1 0 0x8086 0x1901 A - y -- | | PCIe Root Port to bus 1 0 2 0 0x8086 0x1912 A 16 y INTx | 0 | Display controller 0 8 0 0x8086 0x1911 A 16 y -- | | Base system peripheral 0 20 0 0x8086 0xA12F A 16 y INTx | 0 | USB xHCI controller 0 20 2 0x8086 0xA131 C 18 y INTx | 0 | Data acquisition controller 0 22 0 0x8086 0xA13A A 16 y INTx | 0 | Simple comm. controller 0 22 3 0x8086 0xA13D D 19 y INTx | 0 | Serial Controller 0 23 0 0x8086 0xA102 A 16 y INTx | 0 | AHCI SATA controller 0 28 0 0x8086 0xA114 A - y -- | | PCIe Root Port to bus 2 0 31 0 0x8086 0xA146 - - n -- | 0 | PCI/ISA bridge 0 31 2 0x8086 0xA121 - - n -- | 0 | Memory controller 0 31 3 0x8086 0xA170 A 16 y INTx | 0 | Audio device 0 31 4 0x8086 0xA123 A 16 n INTx | 0 | SMBus controller 0 31 6 0x8086 0x15B7 A 16 y INTx | 0 | Network controller 1 0 0 0x8086 0x15F2 A 16 y MSI | 0 | Network controller 2 0 0 0x8086 0x1533 A 16 y MSI | 0 | Network controller ...
Edit the RTH configuration template to set the desired PCI devices affinity to the POS :
$ vi /boot/rth/pos-rt/Linux_Linux64_nvme0n1p4.txt
Add the following entries to reassign
[/PCI/*]devices to the[/OS/1]the Privileged-Mode OS:[/PCI] "default" = uint32: 0 # default is GPOS # Device assignment with vendor ID / device ID and MSI Mode [/PCI/0] "OS" = uint32: 1 "vendor_ID" = uint32: 0x8086 "device_ID" = uint32: 0x15f2 # i225-LM Ethernet TSN endpoint "interrupt_mode" = uint32: 2 [/PCI/1] "OS" = uint32: 1 "vendor_ID" = uint32: 0x8086 "device_ID" = uint32: 0x1533 # i210-T1 Ethernet TSN endpoint "interrupt_mode" = uint32: 2 ... [/PCI/6] "OS" = uint32: 1 "vendor_ID" = uint32: 0x8086 "device_ID" = uint32: 0x0D9F # i225-IT Ethernet TSN endpoint "interrupt_mode" = uint32: 2 ...
Reboot your system, then check PCI devices affinity is effectively set to
[OS/1]the Privileged-Mode OS :$ readtrace -o 1
The expected output should be similar to the following:
PCI devices:
bus dev func vendor device pin IRQ MSI mode | OS | description
  0   0  0   0x8086 0x191F  -    -  n   --  |  0 | Host/PCI bridge
  0   1  0   0x8086 0x1901  A    -  y   --  |    | PCIe Root Port to bus 1
  0   2  0   0x8086 0x1912  A   16  y  INTx |  0 | Display controller
  0   8  0   0x8086 0x1911  A   16  y   --  |    | Base system peripheral
  0  20  0   0x8086 0xA12F  A   16  y  INTx |  0 | USB xHCI controller
  0  20  2   0x8086 0xA131  C   18  y  INTx |  0 | Data acquisition controller
  0  22  0   0x8086 0xA13A  A   16  y  INTx |  0 | Simple comm. controller
  0  22  3   0x8086 0xA13D  D   19  y  INTx |  0 | Serial Controller
  0  23  0   0x8086 0xA102  A   16  y  INTx |  0 | AHCI SATA controller
  0  28  0   0x8086 0xA114  A    -  y   --  |    | PCIe Root Port to bus 2
  0  31  0   0x8086 0xA146  -    -  n   --  |  0 | PCI/ISA bridge
  0  31  2   0x8086 0xA121  -    -  n   --  |  0 | Memory controller
  0  31  3   0x8086 0xA170  A   16  y  INTx |  0 | Audio device
  0  31  4   0x8086 0xA123  A   16  n  INTx |  0 | SMBus controller
  0  31  6   0x8086 0x15B7  A   16  y  INTx |  0 | Network controller
  1   0  0   0x8086 0x15F2  A   16  y  MSI  |  1 | Network controller
  2   0  0   0x8086 0x1533  A   16  y  MSI  |  1 | Network controller
PCI memory:
  0   2  0   BAR 0 0x0000DE000000 - 0x0000DEFFFFFF
  0   2  0   BAR 2 0x0000C0000000 - 0x0000CFFFFFFF
  0   8  0   BAR 0 0x0000DF450000 - 0x0000DF450FFF
  0  20  0   BAR 0 0x0000DF430000 - 0x0000DF43FFFF
  0  20  2   BAR 0 0x0000DF44F000 - 0x0000DF44FFFF
  0  22  0   BAR 0 0x0000DF44E000 - 0x0000DF44EFFF
  0  22  3   BAR 1 0x0000DF44D000 - 0x0000DF44DFFF
  0  23  0   BAR 0 0x0000DF448000 - 0x0000DF449FFF
  0  23  0   BAR 1 0x0000DF44C000 - 0x0000DF44C0FF
  0  23  0   BAR 5 0x0000DF44B000 - 0x0000DF44B7FF
  0  31  2   BAR 0 0x0000DF444000 - 0x0000DF447FFF
  0  31  3   BAR 0 0x0000DF440000 - 0x0000DF443FFF
  0  31  3   BAR 4 0x0000DF420000 - 0x0000DF42FFFF
  0  31  4   BAR 0 0x0000DF44A000 - 0x0000DF44A0FF
  0  31  6   BAR 0 0x0000DF400000 - 0x0000DF41FFFF
  1   0  0   BAR 0 0x0000DF200000 - 0x0000DF2FFFFF
  1   0  0   BAR 3 0x0000DF300000 - 0x0000DF303FFF
  2   0  0   BAR 0 0x0000DF000000 - 0x0000DF0FFFFF
  2   0  0   BAR 3 0x0000DF100000 - 0x0000DF103FFF
PCI I/O space:
  0   2  0   BAR 4 0xF000 - 0xF03F
  0  22  3   BAR 0 0xF0A0 - 0xF0A7
  0  23  0   BAR 2 0xF090 - 0xF097
  0  23  0   BAR 3 0xF080 - 0xF083
  0  23  0   BAR 4 0xF060 - 0xF07F
  0  31  4   BAR 4 0xF040 - 0xF05F
  2   0  0   BAR 2 0xE000 - 0xE01F
Confirm that the Privileged-Mode OS
igc.koandigb.kokernel modules have successfully loaded onto the respective :Intel i225-LM Ethernet Controller PCI memory bars region 0
0x0000DF200000 - 0x0000DF2FFFFFand region 30x0000DF300000 - 0x0000DF303FFIntel i210 Ethernet PCIe Controller (PCI memory bar region 0
0x0000DF000000 - 0x0000DF0FFFFF, bar region 30x0000DF100000 - 0x0000DF103FFFFand PCI I/O space bar region 20xE000 - 0xE01),
$ ssh root@192.168.2.2 "lspci --vv"
The expected output should be similar to the following:
01:00.0 Ethernet controller [0200]: Intel Corporation Device [8086:15f2] (rev 01)
    Subsystem: Intel Corporation Device [8086:0000]
    Flags: bus master, fast devsel, latency 0
    Memory at df200000 (32-bit, non-prefetchable) [size=1M]
    Memory at df300000 (32-bit, non-prefetchable) [size=16K]
    Capabilities: [40] Power Management version 3
    Capabilities: [50] MSI: Enable- Count=1/1 Maskable+ 64bit+
    Capabilities: [70] MSI-X: Enable+ Count=5 Masked-
    Capabilities: [a0] Express Endpoint, MSI 00
    Kernel driver in use: igc
    Kernel modules: igc

02:00.0 Ethernet controller [0200]: Intel Corporation I210 Gigabit Network Connection [8086:1533] (rev 03)
    Flags: bus master, fast devsel, latency 0
    Memory at df000000 (32-bit, non-prefetchable) [size=1M]
    I/O ports at e000 [size=32]
    Memory at df100000 (32-bit, non-prefetchable) [size=16K]
    Capabilities: [40] Power Management version 3
    Capabilities: [50] MSI: Enable- Count=1/1 Maskable+ 64bit+
    Capabilities: [70] MSI-X: Enable+ Count=5 Masked-
    Capabilities: [a0] Express Endpoint, MSI 00
    Kernel driver in use: igb
    Kernel modules: igb
Confirm that Linux Linux network interface are mounted successfully on the Privileged-Mode OS .
$ ssh root@192.168.2.2 "ip link show"
The expected output should be similar to the following:
4: enp2s0: <NO-CARRIER,BROADCAST,MULTICAST,UP> mtu 1500 qdisc taprio state DOWN mode DEFAULT group default qlen 1000
    link/ether 00:18:7d:be:11:e7 brd ff:ff:ff:ff:ff:ff
5: enp1s0: <NO-CARRIER,BROADCAST,MULTICAST,UP> mtu 1500 qdisc mq state DOWN mode DEFAULT group default qlen 1000
    link/ether 00:a0:c9:00:00:00 brd ff:ff:ff:ff:ff:ff
RTH Emulated Intel® GbE MSI-X Interrupt
The RTS Hypervisor introduced a new Interrupt Mode "interrupt_mode" = uint32: 3 that enables MSI-X interrupt emulation for devices that support a single MSI interrupt for multiple Ethernet TX and RX hardware queues.
The setting is valid when :
The device has an MSI capability and no MSI-X capability (check with
lspci -vvv)The IOMMU is enabled from UEFI menu (that is, VT-d=enabled)
The PCI device is assigned to an OS running in the Privileged Mode with
virtual_MMUandrestricted_IOactive.
Important
On the following Ethernet controller stmmac-pci.ko kernel module will fail to load with error stmmaceth 0000:00:1e.4 enp0s30f4: stmmac_request_irq: alloc mac MSI -22 (error: -22)
[Endpoint PCI
8086:7aacand8086:7aad] 12th Gen Intel® Core™ S-Series [Alder Lake] Ethernet GbE Time-Sensitive Network Controller[Endpoint PCI
8086:a0ac] 11th Gen Intel® Core™ U-Series and P-Series [Tiger Lake] Ethernet GbE Time-Sensitive Network Controller[Endpoint PCI
8086:4b32and8086:4ba0] Intel® Atom™ x6000 Series [Elkhart Lake] Ethernet GbE Time-Sensitive Network Controller
To avoid that "interrupt_mode" = uint32: 3 is mandatory for enabling multiple queue device IRQ and memory mapping .
Edit the RTH configuration template to set PCI devices affinity to the POS :
$ vi /boot/rth/pos-rt/Linux_Linux64_nvme0n1p4.txt
...
# Device assignment with vendor ID / device ID and MSI-X emulationed Mode
[/PCI/3]
    "OS" = uint32: 1
    "vendor_ID" = uint32: 0x8086
    "device_ID" = uint32: 0x4BA0  # EHL mGbE Ethernet TSN endpoint #1
    "interrupt_mode" = uint32: 3

[/PCI/4]
    "OS" = uint32: 1
    "vendor_ID" = uint32: 0x8086
    "device_ID" = uint32: 0x4B32 # EHL mGbE Ethernet TSN endpoint #2
    "interrupt_mode" = uint32: 3

[/PCI/5]
    "OS" = uint32: 1
    "vendor_ID" = uint32: 0x8086
    "device_ID" = uint32: 0xA0AC # TGL-U mGbE Ethernet TSN endpoint
    "interrupt_mode" = uint32: 3
Reboot your system, then check PCI devices affinity is effectively set to
[OS/1]the Privileged-Mode OS :$ readtrace -o 1
The following outcome :
PCI devices:
bus dev func vendor device pin IRQ MSI mode | OS | description
  0   0  0   0x8086 0x452E  -    -  n   --  |  0 | Host/PCI bridge
  0   2  0   0x8086 0x4571  A   16  y  INTx |  0 | Display controller
  0   8  0   0x8086 0x4511  A   16  y   --  |    | Base system peripheral
  0  16  0   0x8086 0x4B44  A   16  n  INTx |  0 | Serial bus controller
  0  16  1   0x8086 0x4B45  B   17  n  INTx |  0 | Serial bus controller
  0  17  0   0x8086 0x4B96  A   16  y  INTx |  0 | Simple comm. controller
  0  17  1   0x8086 0x4B97  B   17  y  INTx |  0 | Simple comm. controller
  0  19  0   0x8086 0x4B84  A   16  y  INTx |  0 | Serial bus controller
  0  20  0   0x8086 0x4B7D  A   16  y  INTx |  0 | USB xHCI controller
  0  20  2   0x8086 0x4B7F  -    -  n   --  |  0 | Memory controller
  0  21  0   0x8086 0x4B78  A   27  n  INTx |  0 | Serial bus controller
  0  21  2   0x8086 0x4B7A  C   29  n  INTx |  0 | Serial bus controller
  0  21  3   0x8086 0x4B7B  D   30  n  INTx |  0 | Serial bus controller
  0  22  0   0x8086 0x4B70  A   16  y  INTx |  0 | Simple comm. controller
  0  23  0   0x8086 0x4B63  A   16  y  MSI  |    | AHCI SATA controller
  0  25  0   0x8086 0x4B4B  A   31  n  INTx |  0 | Serial bus controller
  0  25  2   0x8086 0x4B4D  C   33  n  INTx |  0 | Simple comm. controller
  0  26  0   0x8086 0x4B47  A   16  n  INTx |  0 | SD Host Controller
  0  26  1   0x8086 0x4B48  B   17  n  INTx |  0 | SD Host Controller
  0  27  0   0x8086 0x4BB9  A   16  y  INTx |  0 | Serial bus controller
  0  27  1   0x8086 0x4BBA  B   17  y  INTx |  0 | Serial bus controller
  0  27  6   0x8086 0x4BBF  C   18  y  INTx |  0 | Serial bus controller
  0  28  0   0x8086 0x4B38  A    -  y   --  |    | PCIe Root Port to bus 1
  0  29  0   0x8086 0x4BB3  A   16  y   --  |    | Base system peripheral
  0  29  1   0x8086 0x4BA0  A   16  y  emul |  1 | Network controller
  0  30  0   0x8086 0x4B28  A   16  n  INTx |  0 | Simple comm. controller
  0  30  1   0x8086 0x4B29  B   17  n  INTx |  0 | Simple comm. controller
  0  30  4   0x8086 0x4B32  A   16  y  emul |  1 | Network controller
  0  31  0   0x8086 0x4B00  -    -  n   --  |  0 | PCI/ISA bridge
  0  31  3   0x8086 0x4B58  A   16  y  INTx |  0 | Audio multimedia device
  0  31  4   0x8086 0x4B23  A   16  n  INTx |  0 | SMBus controller
  0  31  5   0x8086 0x4B24  -    -  n   --  |  0 | Serial bus controller
  1   0  0   0x8086 0x15F2  A   16  y  MSI  |  1 | Network controller
RTH Sanity Check
Sanity Check #1: Communication between Virtualized and Privileged OS Runtimes
The following section is applicable to:
RTH comes with several ways to communicate across operating systems:
Kernel boot
dmesgandjournaldlogs redirectShared memory
Virtual network
This section will explain how to use the virtual network driver, which has been built into the ECI privileged-RT OS runtime and also installed in your virtualized-OS, either Ubuntu* or Windows.
The hypervisor provides the virtual network driver. It operates using standard TCP/IP drivers. For more details, refer to the RTH User guide.
Step 1: Verify whether privileged-mode OS (POS) is loaded successfully
Verify whether the privileged-mode OS redirects all boot log messages to RTH
shm/1:$ cat /proc/cmdline root=/dev/ram ip=192.168.2.2/255.255.255.0 <...> earlyprintk=ttyS0,115200 console=ttyS0,115200n8 debug
Verify whether the
readtracereading ofshm/1containing OS/1 (RT-OS)dmesgandjournaldmessages reports successful boot:Click to view the example
$ readtrace -o 1
Real-Time Hypervisor
Copyright 2006 - 2020 Real-Time Systems GmbH
Version R5.3.01.26202

Init CPU
Init heap
Init registry
Read configuration
WARNING:  DEVELOPMENT MODE ACTIVE.   NOT TO BE USED IN PRODUCTION.
Init memory
   start          - end            (size          ) type
 0 0x000000000000 - 0x000000057FFF (0x000000058000) 0x01
 1 0x000000058000 - 0x000000058FFF (0x000000001000) 0x02
 2 0x000000059000 - 0x00000009EFFF (0x000000046000) 0x01
 3 0x00000009F000 - 0x0000000FFFFF (0x000000061000) 0x02
 4 0x000000100000 - 0x000077DD0FFF (0x000077CD1000) 0x01
 5 0x000077DD1000 - 0x000077DD1FFF (0x000000001000) 0x04
 6 0x000077DD2000 - 0x000077DD2FFF (0x000000001000) 0x02
 7 0x000077DD3000 - 0x00007E44BFFF (0x000006679000) 0x01
 8 0x00007E44C000 - 0x00007E78AFFF (0x00000033F000) 0x02
 9 0x00007E78B000 - 0x00007E8FAFFF (0x000000170000) 0x01
10 0x00007E8FB000 - 0x00007EFE5FFF (0x0000006EB000) 0x04
11 0x00007EFE6000 - 0x00007F3A6FFF (0x0000003C1000) 0x02
12 0x00007F3A7000 - 0x00007F3FEFFF (0x000000058000) 0x14
13 0x00007F3FF000 - 0x00007F3FFFFF (0x000000001000) 0x01
14 0x00007F400000 - 0x00008FFFFFFF (0x000010C00000) 0x02
15 0x0000E0000000 - 0x0000EFFFFFFF (0x000010000000) 0x02
16 0x0000FE000000 - 0x0000FE010FFF (0x000000011000) 0x02
17 0x0000FEC00000 - 0x0000FEC00FFF (0x000000001000) 0x02
18 0x0000FED00000 - 0x0000FED00FFF (0x000000001000) 0x02
19 0x0000FEE00000 - 0x0000FEE00FFF (0x000000001000) 0x02
20 0x0000FF000000 - 0x0000FFFFFFFF (0x000001000000) 0x02
21 0x000100000000 - 0x00026DFFFFFF (0x00016E000000) 0x01
Available RAM total:      7877 MB
Available RAM below 4 GB: 2021 MB
Check license
    company: Intel Deutschland GmbH
    project: Intel ECI 2.0 evaluation until 2021-03-01
Init interrupts
IOMMU detected
Intel(R) Core(TM) i5-6500TE CPU @ 2.30GHz, ID: 06_5EH, stepping: 3H
 * 64-Bit
 * VT-x
 * TPR Shadowing
 * Virtualized APIC access
 * Extended Page Tables (EPT)
 * Unrestricted Guest
 * Speculation Control
CPU microcode revision 0xC2
Detected 4 logical CPUs
Detected 1 physical CPU
Cache topology:
    |---------------|
CPU |  1|  2|  3|  4|
    |---------------|
L1d |   |   |   |   |
    |---------------|
L1i |   |   |   |   |
    |---------------|
L2  |   |   |   |   |
    |---------------|
L3  |               |  inclusive
    |---------------|
4589745D2A52272BB4F5BCFC4AE45309B872F469
A04BB9AED48127C8BC794B2737A2E241B0053C85
9AB3786B9DDF28AC5287125D9D53850527BB4C9F
944F860A5FDF5EDD3B1D2B363D578F22BF8E42D1 vmlinuz
45BB561269A6232C9C4776F4FA994904EE51B37F initramfs.img
DA2019732E096B1692C59A0B54F57C79CA38FC48 mbLinuz
1B8C8B8059DC02C8E1EEDB8766602A1FA5A4510F initrd-mbLinux.gz
OS ID  0 name: "Ubuntu 16.04"
         CPU: 1 2
OS ID  1 name: "ECI-R 1.0 Yocto Poky Linux-rt Intel LTS"
         CPU: 3 4
Init shared memory
Key "security_level" is set to zero.
All guest operating systems have unrestricted API permissions.
Init devices
Date: 2020-12-06
No device with Vendor ID 0x1059 and Device ID 0xA100 present.
PCI devices:
bus dev func vendor device pin IRQ MSI mode | OS | description
  0   0  0   0x8086 0x191F  -    -  n   --  |  0 | Host/PCI bridge
  0   1  0   0x8086 0x1901  A    -  y   --  |    | PCIe Root Port to bus 1
  0   2  0   0x8086 0x1912  A   16  y  INTx |  0 | Display controller
  0   8  0   0x8086 0x1911  A   16  y   --  |    | Base system peripheral
  0  20  0   0x8086 0xA12F  A   16  y  INTx |  0 | USB xHCI controller
  0  20  2   0x8086 0xA131  C   18  y  INTx |  0 | Data acquisition controller
  0  22  0   0x8086 0xA13A  A   16  y  INTx |  0 | Simple comm. controller
  0  22  3   0x8086 0xA13D  D   19  y  INTx |  0 | Serial Controller
  0  23  0   0x8086 0xA102  A   16  y  INTx |  0 | AHCI SATA controller
  0  28  0   0x8086 0xA114  A    -  y   --  |    | PCIe Root Port to bus 2
  0  31  0   0x8086 0xA146  -    -  n   --  |  0 | PCI/ISA bridge
  0  31  2   0x8086 0xA121  -    -  n   --  |  0 | Memory controller
  0  31  3   0x8086 0xA170  A   16  y  INTx |  0 | Audio device
  0  31  4   0x8086 0xA123  A   16  n  INTx |  0 | SMBus controller
  0  31  6   0x8086 0x15B7  A   16  y  INTx |  0 | Network controller
  1   0  0   0x8086 0x15F2  A   16  y  MSI  |  1 | Network controller
  2   0  0   0x8086 0x1533  A   16  y  MSI  |  1 | Network controller
PCI memory:
  0   2  0   BAR 0 0x0000DE000000 - 0x0000DEFFFFFF
  0   2  0   BAR 2 0x0000C0000000 - 0x0000CFFFFFFF
  0   8  0   BAR 0 0x0000DF450000 - 0x0000DF450FFF
  0  20  0   BAR 0 0x0000DF430000 - 0x0000DF43FFFF
  0  20  2   BAR 0 0x0000DF44F000 - 0x0000DF44FFFF
  0  22  0   BAR 0 0x0000DF44E000 - 0x0000DF44EFFF
  0  22  3   BAR 1 0x0000DF44D000 - 0x0000DF44DFFF
  0  23  0   BAR 0 0x0000DF448000 - 0x0000DF449FFF
  0  23  0   BAR 1 0x0000DF44C000 - 0x0000DF44C0FF
  0  23  0   BAR 5 0x0000DF44B000 - 0x0000DF44B7FF
  0  31  2   BAR 0 0x0000DF444000 - 0x0000DF447FFF
  0  31  3   BAR 0 0x0000DF440000 - 0x0000DF443FFF
  0  31  3   BAR 4 0x0000DF420000 - 0x0000DF42FFFF
  0  31  4   BAR 0 0x0000DF44A000 - 0x0000DF44A0FF
  0  31  6   BAR 0 0x0000DF400000 - 0x0000DF41FFFF
  1   0  0   BAR 0 0x0000DF200000 - 0x0000DF2FFFFF
  1   0  0   BAR 3 0x0000DF300000 - 0x0000DF303FFF
  2   0  0   BAR 0 0x0000DF000000 - 0x0000DF0FFFFF
  2   0  0   BAR 3 0x0000DF100000 - 0x0000DF103FFF
PCI I/O space:
  0   2  0   BAR 4 0xF000 - 0xF03F
  0  22  3   BAR 0 0xF0A0 - 0xF0A7
  0  23  0   BAR 2 0xF090 - 0xF097
  0  23  0   BAR 3 0xF080 - 0xF083
  0  23  0   BAR 4 0xF060 - 0xF07F
  0  31  4   BAR 4 0xF040 - 0xF05F
  2   0  0   BAR 2 0xE000 - 0xE01F
Init IOMMU
HPET found. Possible IRQs: 20 21 22 23
COM1: I/O port 0x03F8 IRQ  4 unassigned
COM2: I/O port 0x02F8 IRQ  3 OS 1
COM3: I/O port 0x03E8 IRQ 10 OS 1
COM4: I/O port 0x02E8 IRQ 10 OS 1
COM5: I/O port 0x03E0 IRQ 10 OS 1
COM6: I/O port 0x02E0 IRQ 10 OS 1
AHCI V1.31 controller (0/23/0) (Vendor:0x8086 Device:0xA102):
  Port 0: ATA Disk Drive - Link Speed: GEN3
    No Drive assignment for port 0.
  Port 1: No device
  Port 2: No device
  Port 3: ATA Disk Drive - Link Speed: GEN3
    No Drive assignment for port 3.
/OS/1 "virtual_COM-to-log_port" 0x3F8 is configured but the IRQ of the COM port is also assigned.
Assigned IRQs:
  IRQ | OS ID
    1 |  0
    2 |  0
    3 |  1
    4 |  1
    5 |  0
    6 |  0
    7 |  0
    8 |  0
    9 |  0
   10 |  1
   11 |  0
   12 |  0
   13 |  0
   14 |  0
   15 |  0
   16 |  0
   18 |  0
   19 |  0
I/O port configuration:
start  -  end   ( size ) OS
0x0060 - 0x0060 (0x0001) 0
0x0064 - 0x0064 (0x0001) 0
0x02E0 - 0x02EF (0x0010) 1
0x02F8 - 0x02FF (0x0008) 1
0x03E0 - 0x03EF (0x0010) 1
0x03F8 - 0x03FF (0x0008) 0
0x0CF8 - 0x0CF8 (0x0001) -
0x0CFC - 0x0CFF (0x0004) -
0xE000 - 0xE01F (0x0020) 1
0xF000 - 0xF083 (0x0084) 0
0xF090 - 0xF097 (0x0008) 0
0xF0A0 - 0xF0A7 (0x0008) 0
System Information:
    Manufacturer: "iEi"
    Product Name: "SER0"
Initial CPU frequency:  2300 MHz
Configurable range from 1200 MHz to 2300 MHz in increments of 100 MHz
CPU C1E state disabled
GPU frequency range from 350 MHz to 1000 MHz in increments of 50 MHz
CAT supported on L3 Cache 1 (CPUs 1 - 4):
    Max. Class of Service (COS): 4
    Cache segments             : 12
Supported GPU cache restriction settings:
  0: Cache segments: 1 2 3 4 5 6 7 8 9 10 11 12
  1: Cache segments: 7 8 9 10 11 12
  2: Cache segments: 11 12
  3: Cache segments: 12
Cache allocation:
  Package 1
    L3 #1  (12 segments)  6 MB
      OS  0 |      ******|  6 segments = 3 MB
      OS  1 |******      |  6 segments = 3 MB
      GPU   |      ******|  6 segments
Init time synchronization
Found OS "Ubuntu 20.04"
Found OS "ECI-R 2.0 Yocto Poky Linux-rt Intel LTS"
Init Registry
Setup Operating Systems
Shared Memory Partitions
  0 0x00007E7D8000 - 0x00007E7E6FFF (0x00000000F000) "trace-ubuntu"
  1 0x00007E7C9000 - 0x00007E7D7FFF (0x00000000F000) "trace-yocto"
/OS/1 Booting runtime 0
/OS/1 Activating IOMMU
/OS/1 Activating Virtual MMU
/OS/1 SMI logging enabled
/OS/1 Attempt to read  data from physical address 0x0000000F0000. Redirecting.
/OS/1 Attempt to read  data from physical address 0x0000000F1000. Redirecting.
/OS/1 Attempt to read  data from physical address 0x0000000F2000. Redirecting.
/OS/1 Attempt to read  data from physical address 0x0000000F3000. Redirecting.
/OS/1 Attempt to read  data from physical address 0x0000000F4000. Redirecting.
/OS/1 Attempt to read  data from physical address 0x0000000F5000. Redirecting.
/OS/1 Attempt to read  data from physical address 0x0000000F6000. Redirecting.
/OS/1 Attempt to read  data from physical address 0x0000000F7000. Redirecting.
/OS/1 Attempt to read  data from physical address 0x0000000F8000. Redirecting.
/OS/1 Attempt to read  data from physical address 0x0000000F9000. Redirecting.
/OS/1 Attempt to read  data from physical address 0x0000000FA000. Redirecting.
/OS/1 Attempt to read  data from physical address 0x0000000FB000. Redirecting.
/OS/1 Attempt to read  data from physical address 0x0000000FC000. Redirecting.
/OS/1 Attempt to read  data from physical address 0x0000000FD000. Redirecting.
/OS/1 Attempt to read  data from physical address 0x0000000FE000. Redirecting.
/OS/1 Attempt to read  data from physical address 0x0000000FF000. Redirecting.
/OS/1 COM: 000: Linux version 5.4.59-rt36-rts2.2.00.15195-intel-pk-preempt-rt (oe-user@oe-h
/OS/1 COM: ost) (gcc version 9.3.0 (GCC)) #1 SMP PREEMPT_RT Tue Sep 1 04:58:38 UTC 2020
/OS/1 COM: 000: Command line: root=/dev/ram ip=192.168.2.2/255.255.255.0 console=tty0  cons
/OS/1 COM: ole=ttyS0,115200n8 console=ttyS2,115200n8 debug=all verbose=all tsnep=10.11.12.1
/OS/1 COM: 00/255.255.255.0 qdisc=TAPRIO tsn.vlan=3 rthCtrl=0x1A000000 rthCtrlSize=0xF000 r
/OS/1 COM: thActive pci=conf1 acpi=off
/OS/1 COM: 000: x86/fpu: Supporting XSAVE feature 0x001: 'x87 floating point registers'
...
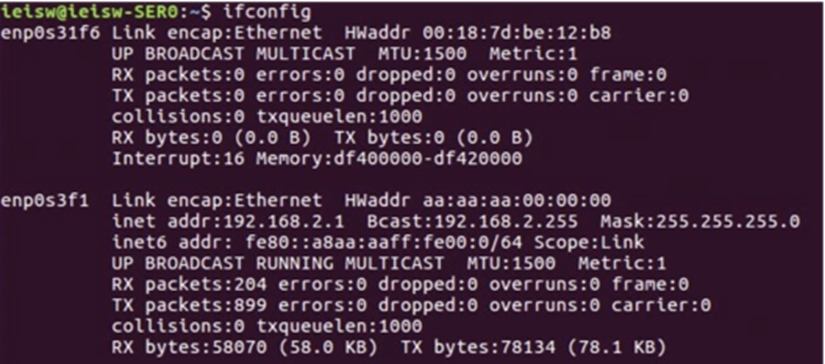
Step 2: Verify the virtual network driver status
Run
ifconfigorip linkand verify whether theenp0s3f1network has an IP address of 192.168.2.1.Note: If the
enp0s3f1device does not have an IP address, assign an address usingsudo ip addr add 192.168.2.1/24 dev enp0s3f1. Depending on your system, the device may also be named asvnet0.
Step 3: SSH from Virtualized-OS to the privileged-OS runtime
SSH from GPOS to the POS runtime using the IP address set in RTH configuration file boot command line
ip=192.168.2.2/255.255.255.0.$ ssh root@192.168.2.2
Note: This IP address was set in the hypervisor configuration file,
/boot/rth/Linux_Linux64.txt. You can change the value, if required. For details on setting the IP address, refer to the RTH User Guide.Note: When prompted, “Are you sure you want to continue connecting (yes/no), type yes.
Verify that you are in the RTOS and not in Ubuntu:
$ uname -r
Note: In this setup, the ECI privileged OS-runtime kernel and root file system (rootfs) are running in RAM to improve performance. Modifications, if any, will be erased on restart. Optionally, you can enable persistent rootfs.
Step 4: Optional - Port forwarding SSH into the ECI RT-OS runtime
While this step is not mandatory to start using ECI, it will be helpful later when you need to debug the RTOS runtime.
In this step, SSH from another system on the same network to the RTOS via the GPOS virtualized-OS using port forwarding.
The port forwarding has already been setup in the installation script. Port 80 for the POS runtime will be mapped to 8080 in GPOS. So to SSH into the RTOS, SSH to your GPOS using root user and port 8080.
$ ssh root@<GPOS local IPv4 Address>:8080
The Ubuntu OS has several other ports that have been forwarded. This configuration was done by the installation script.
Check the port configuration by running the following command in Ubuntu:
$ sudo iptables --list
You should see five rules.
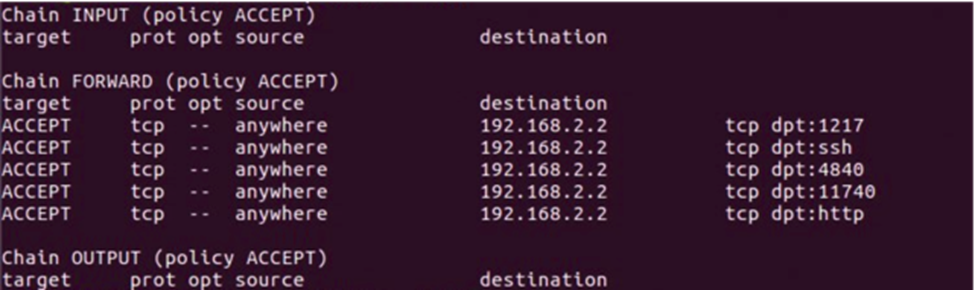
These rules allow you to connect via SSH from another machine to the ECI POS runtime via the GPOS OS (port 80 or SSH in the screen output). The remaining rules: 1217, 4840, 11740, and 9022 (http in the screen output) allow the CODESYS Development System to connect from a Windows machine to the ECI RTOS runtime and for another machine to access the visualization from the CODESYS application.
Note: By default, any i210 device with the Vendor ID of 0x8086 and Device ID of 0x1533 (all i210 devices should have these IDs) has been mapped to the ECI RTOS runtime in the /boot/rth/Linux_Linux64.txt hypervisor configuration file located in /boot/rth (on Ubuntu) or in C:\rth\ (Windows files system).
Sanity Check #2: Manage Privileged-ECI OS Runtime Lifecycle
The following section is applicable to:
RTH comes with several ways to manage each operating system lifecycle independently at runtime (OS-reboot, edit kernel command line):
RTH Event API
HW CPU warm reset reset, CPU halt
OS images reload
OS boot command line edit
This section will explain how to use the RTH tools, which have been built into ECI POS runtime and also installed in your virtualized GPOS.
Step 1: Verify the rthbase driver status
Do the following in a console on the ECI privileged-OS:
Run the
lsmodcommand and verify whether therthbasedrvmodule is loaded in kernel-space.Verify whether the
sudo rth -hcommand returns the help menu ensuring that the x86_64 binaries/bin/rthand/lib/libRth.soare dynamically linked to user-space process.
Do the following in a console on Windows (or Ubuntu) Virtualized-OS:
Run the
lsmodcommand and verify whether thevirtrthbasedrvmodule is loaded in kernel-space.Verify whether the
sudo rth -hcommand returns the help menu ensuring that the x86_64 binaries/bin/rthand/lib/libRth.soare dynamically linked to user-space process.
Step 2: Verify CPU core warm-reset
Do the following in a console on Windows (or Ubuntu) Virtualized-OS:
Verify whether the CPU warm-reset command,
sudo rth -o 1 -resetreturns successful OS/1 reboot of privileged RTOS:$ sudo rth -o 1 -reset
Step 3: Reboot ECI privileged-OS individually
Verify whether the OS/1 shutdown command,
sudo rth -o 1 -shutdown, returns graceful shutdown of privileged RTOS:$ sudo rth -o 1 -halt
Verify whether the OS/1 boot command,
sudo rth -o 1 -boot, returns success boot of privileged RTOS:$ sudo rth -o 1 -boot
Step 4: System reset of all CPUs: Hypervisor, virtualized OS, and privileged-OS
Verify whether the system reboot command,
sudo rth -sysreboot && reboot, return graceful shutdown of the x86_64 target machine (that is, PMIC cold-reset event):$ sudo rth -sysshutdown
Verify whether the system reboot command,
sudo rth -sysreboot && reboot, returns successful reboot of Hypervisor, privileged RT-OS, and virtualized OS:$ sudo rth -sysreboot
Sanity Check #3: Troubleshooting Privileged-ECI OS Runtime
RTH comes with several ways to debug each operating system runtime state:
Redirect Hypervisor and Kernel boot (printk) log messages to a dedicated Ethernet interface
Redirect Kernel boot (printk) log messages and a console to a dedicated COMx/ttySx port
Redirect Kernel debugger (KGDB) and a console to a dedicated COMx/ttySx port
This section will explain how to use the RTH debug tools, which have been built into ECI privileged-RT OS runtime and also installed in your virtualized-OS either Ubuntu or Windows.
Step 1: Find the Ethernet controllers PCI ID
$ lspci | grep Ethernet
00:19.0 Ethernet controller: Intel Corporation Ethernet Connection (2) I218-LM (rev 05)
06:00.0 Ethernet controller: Intel Corporation I210 Gigabit Network Connection (rev 03)
Step 2: Dedicate an Ethernet Port for RTH logging
Edit the RTH configuration file append the following section:
[/LOG]
"bus" = uint32: 0
"device" = uint32: 19
"function" = uint32: 0
"host_IP" = "192.168.100.48"
"target_IP" = "192.168.100.250"
Step 3: Read the log message remotely
From another Linux host machine, read the RTH boot message:
$ sudo apt-get install netcat
$ ip addr add 192.168.100.48/24  eth0
$ netcat -l -u 514