Robotics Diffusion Transformer (RDT)
Robotics Diffusion Transformer (RDT) is the largest bimanual manipulation foundation model with strong generalizability. RDT employs the diffusion transformer as its scalable backbone, with special designs for language-conditioned bimanual manipulation. RDT proposes the Physically Interpretable Unified Action Space, a unified action format for various robots with gripper arms, which enables the model to learn generalizable physical knowledge across diverse robotic datasets.
A RDT pipeline is provided for evaluating the VLA model on the simulation task. This pipeline includes source code optimized with Intel® OpenVINO™ for improved performance, and supports running inference on Intel GPUs (discrete GPU and integrated GPU).
In this tutorial, we will introduce how to setup RDT simulation pipeline.
Simulation Task
We have enabled two tasks in the RDT pipeline using the MUJOCO simulation environment, which is also used in the Imitation Learning - ACT pipeline. A set of datasets has been collected in this environment for fine-tuning the RDT model. You can further modify the simulation tasks to collect additional data for fine-tuning the pre-trained RDT model.
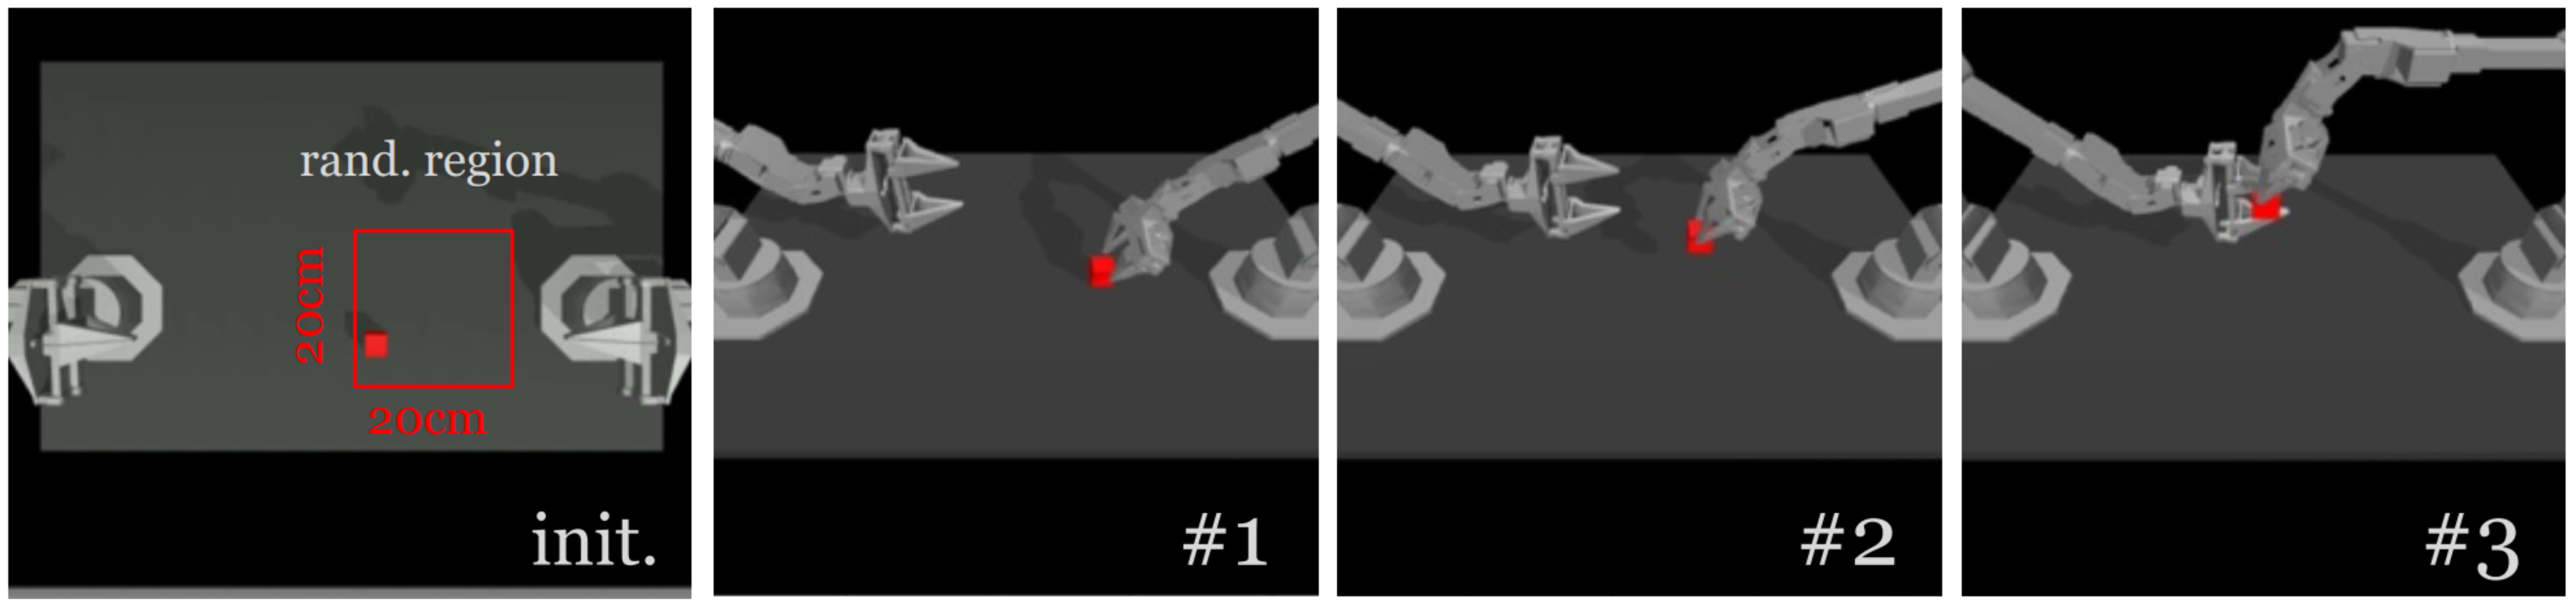
Transfer Cube
Transfer the red cube to the other arm. The right arm touches (#1) and grasps (#2) the red cube, then hands it to the left arm.
Default language instruction: “Use the right robot arm to pick up the red cube and transfer it to the left robot arm.”
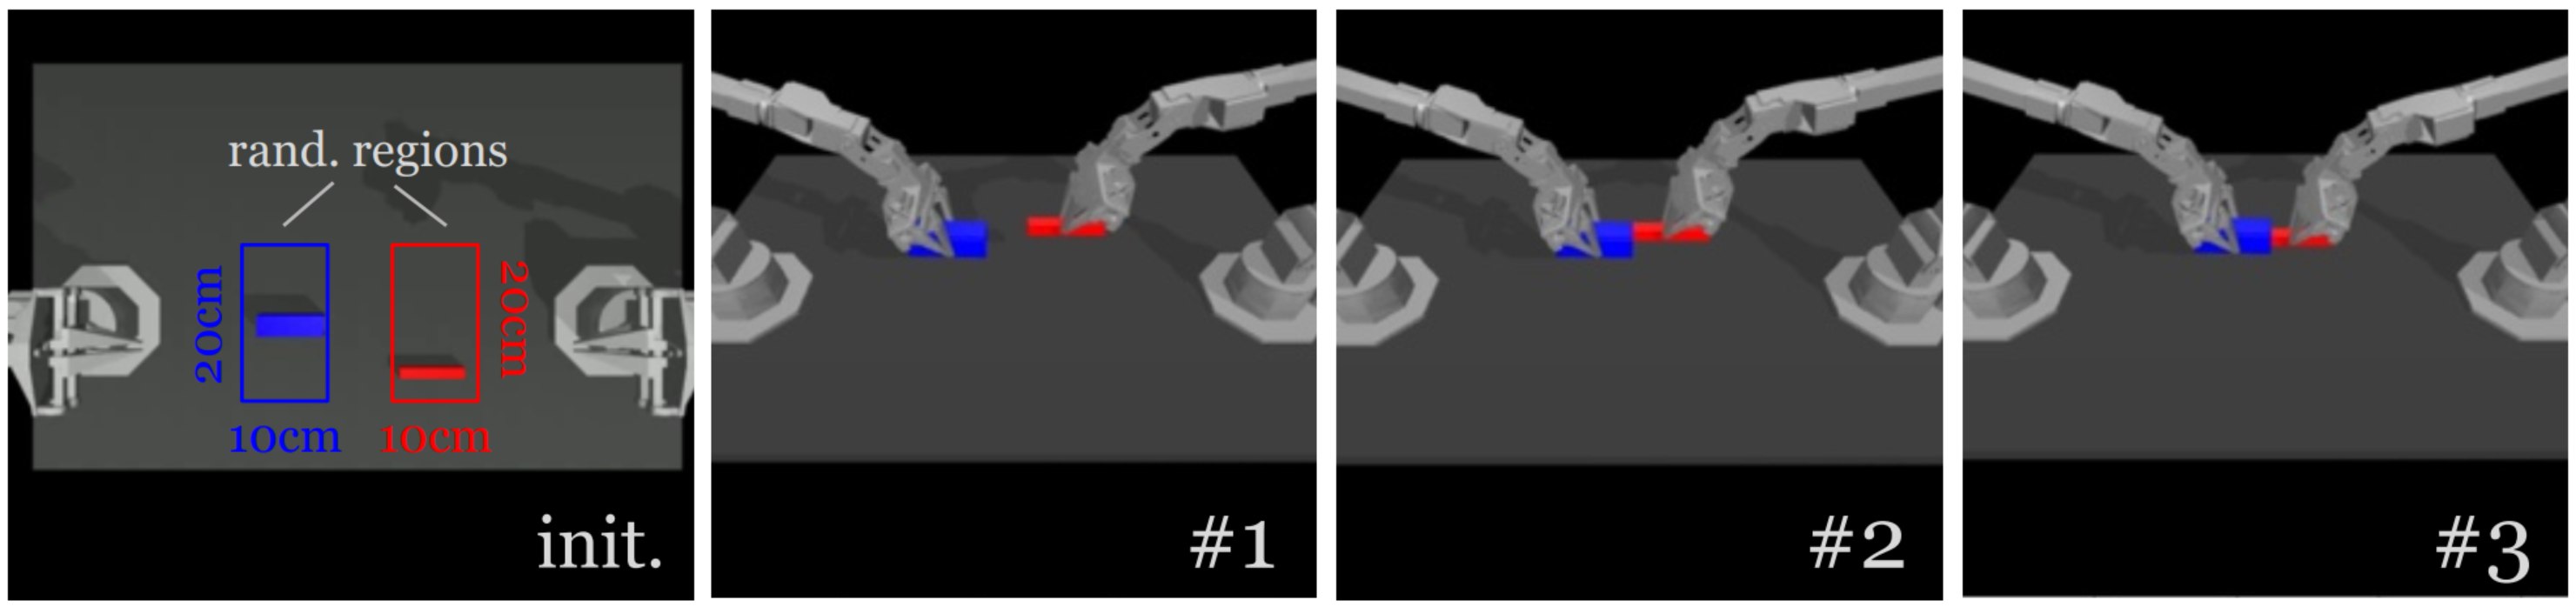
Peg Insertion
Insert the red peg into the blue socket. Both arms grasp (#1), let socket and peg make contact (#2) and insertion.
Default language instruction: “Pick up a red peg and insert into the blue socket with a hole in it.”
Each task consists of 400 steps. The following GIFs demonstrate the two tasks.
Transfer Cube |
Peg Insertion |
Prerequisites
Please make sure you have finished setup steps in Installation & Setup.
Installation
Install RDT package
The Embodied Intelligence SDK provides optimized source code for Intel® OpenVINO™. To get the source code from /opt/rdt-ov/ with the following command:
$ sudo apt install rdt-ov
$ sudo chown -R $USER /opt/rdt-ov/
After installing the rdt-ov package, follow the README.md file in /opt/rdt-ov/ to set up the complete source code environment.
MUJOCO environment setup
The RDT pipeline uses the MUJOCO simulation environment, which is also used in the Imitation Learning - ACT pipeline. So you can copy the MUJOCO environment setup from the ACT pipeline.
Attention
If you haven’t set up the complete source code of the ACT package, please follow Install ACT pipeline of OpenVINO to set up the complete source code environment first.
Next, copy these assets to the RDT pipeline directory as follows:
$ mkdir -p <rdt_SOURCE_CODE_PATH>/eval_sim/assets/mujoco/
$ cp -r <act_SOURCE_CODE_PATH>/assets/* <rdt_SOURCE_CODE_PATH>/eval_sim/assets/mujoco/
Prepare Environment
You can choose to use a Python virtual environment or a Docker container for the RDT pipeline. The following sections will guide you through both methods.
Use Python Virtual Environment
Download and install the Miniforge as follows if you don’t have conda installed on your machine:
$ wget https://github.com/conda-forge/miniforge/releases/latest/download/Miniforge3-Linux-x86_64.sh
$ bash Miniforge3-Linux-x86_64.sh
$ source ~/.bashrc
You can use conda --version to verify you conda installation.
After installation, create a new python environment rdt-ov:
$ conda create -n rdt-ov python=3.11
After installation, activate the rdt-ov Python environment in your current terminal:
$ conda activate rdt-ov
Install the dependencies with the following command:
$ pip install torch==2.2.0 torchvision --index-url https://download.pytorch.org/whl/cpu
$ pip install packaging==24.0
$ cd <rdt_SOURCE_CODE_PATH>
$ pip install -r requirements.txt
$ pip install huggingface_hub==0.23.4 opencv-python==4.10.0.84 numpy==1.26.4 mujoco==3.2.6 dm_control==1.0.26 einops ipython
Install the Intel® OpenVINO™ with the following command:
$ pip install openvino==2025.2
Use Docker Container
If you prefer to use a Docker container, you can build the container from the provided Dockerfile in the project. The Dockerfile is already set up with all the necessary dependencies.
Build the docker image:
$ cd <rdt_SOURCE_CODE_PATH>/docker
$ docker build -t embodied-intelligence-sdk/rdt-1b-ov:latest --build-arg http_proxy=${http_proxy}  --build-arg https_proxy=${https_proxy} .
Note
If you encounter any issues during the Docker pulling, please check your network settings and ensure that the proxy is correctly configured. You can refer to Troubleshooting for more information.
Run the docker container:
Note
Please replace <rdt_SOURCE_CODE_PATH> with the actual path where you have the RDT source code.
$ docker run -it \
    --network host \
    --device /dev/dri \
    -v <rdt_SOURCE_CODE_PATH>:<rdt_SOURCE_CODE_PATH> \
    -v ${HOME}/.cache/:/home/.cache \
    -e USERNAME=${USER} \
    -e RENDER_GID=$(getent group render | cut -d: -f3) \
    -e http_proxy=${http_proxy} \
    -e https_proxy=${https_proxy} \
    --name rdt_test  --rm  embodied-intelligence-sdk/rdt-1b-ov:latest bash
Note
Here is a brief explanation of the command options:
--network hostis to use host network.--device /dev/driis to use host GPU device.-v ${HOME}/.cache/:/home/.cacheis to reuse huggingface model download cache.-e USERNAME=${USER}A user with the same name as the current user will be created, avoiding potential privilege issues with root user.-e RENDER_GID=$(getent group render | cut -d: -f3)is to get host render group id to gain access to GPU device.
Run pipeline
Inference
Download the pre-trained
google/t5-v1_1-xxlmodel from the Hugging Face Hub:$ cd <rdt_SOURCE_CODE_PATH> $ mkdir google & cd google $ sudo apt install git-lft $ GIT_LFS_SKIP_SMUDGE=1 git clone https://hf-mirror.com/google/t5-v1_1-xxl $ cd t5-v1_1-xxl $ git lfs pull
Use the following command to generate the language instruction embedding file. This file will be loaded by the pipeline during inference.
Attention
Since the google/t5-v1_1-xxl model is large, it may take a while to download the model weights. Please ensure you have enough disk space (200G) available and enough RAM (64G) to run the Python script.
Transfer Cube task:
$ cd <rdt_SOURCE_CODE_PATH>
$ python -m eval_sim.language_to_pt --instruction_name "TransferCube-v1" --instruction "Use the right robot arm to pick up the red cube and transfer it to the left robot arm." --device cpu
Peg Insertion task:
$ cd <rdt_SOURCE_CODE_PATH>
$ python -m eval_sim.language_to_pt --instruction_name "PegInsertion-v1" --instruction "Pick up a red peg and insert into the blue socket with a hole in it." --device cpu
After running the above command, you will get two files named text_embed_TransferCube-v1.pt and text_embed_PegInsertion-v1.pt in the <rdt_SOURCE_CODE_PATH> directory.
You can download our fine-tuned weights from this link: Download Link, and then follow the instructions in
<rdt_SOURCE_CODE_PATH>/scripts/convert/README.mdto convert the model to the Intel® OpenVINO™ format.
Note
$ cd <rdt_SOURCE_CODE_PATH>
$ python -m scripts.convert.ov_convert --pretrained <fine-tuned_weights_path> --output_dir ov_ir
After running the above command, you will get a ov_ir directory in the <rdt_SOURCE_CODE_PATH> directory.
You can now run the inference pipeline using the converted Intel® OpenVINO™ model.
Note
Here is a brief explanation of the command options:
MUJOCO_GL=eglenvironment variable can be set to enable EGL rendering, which provides better performance in simulation scenarios.--env-idspecifies the environment ID, which can be eitherTransferCube-v1orPegInsertion-v1.--devicespecifies the device to run the inference on, which can be eitherGPUorCPU.--num-trajspecifies the number of trajectories to run in the simulation environment.--onscreen_rendercan be used to enable onscreen rendering.
$ cd <rdt_SOURCE_CODE_PATH>
$ MUJOCO_GL=egl python -m eval_sim.eval_rdt_aloha_static_ov --env-id "TransferCube-v1" --openvino_ir_path "ov_ir" --device GPU --num-traj 50