Create Windows Image for KVM
This section explains the procedure to create a new Microsoft Windows VM image.
Download Windows and Install Media and Drivers
Download the following assets before proceeding:
Intel® Microsoft Windows 10 graphics DCH driver igfx_win10_100.9316.exe
VirtIO driver for
virtioSCSI and network stable version
Install Windows 10 on VM
The following section is applicable to:

To install Microsoft Windows 10 on VM:
Create Raw Image File
Create an empty raw image named win10.img of size 60G. For example:
$ qemu-img create -f raw win10.img 60G
Install Windows into Image
Run the following command:
$ sudo -E qemu-system-x86_64 --enable-kvm -bios OVMF.fd \
   -smp cores=2 -m 4G \
   -rtc base=localtime,clock=host -usb -device usb-tablet \
   -cdrom ${WIN_ISO} \
   -drive driver=raw,file=win10.img,if=virtio \
   -drive file=${VIRT_IMG},index=3,media=cdrom \
   -net nic,model=virtio -net user,smb=${graphics_driver_path} \
   -netdev user,id=net0,hostfwd=tcp::8082-:8082 -device virtio-net-pci,netdev=net0
Where,
${WIN_ISO}is the path of the pre-downloaded Win10 LTSC ISO image.${VIRT_IMG}is the path of the pre-downloaded VirtIO driver ISO.${directory_of_graphics_driver}is the absolute path of the directory which contains pre-downloaded Intel® graphics driver.
Use
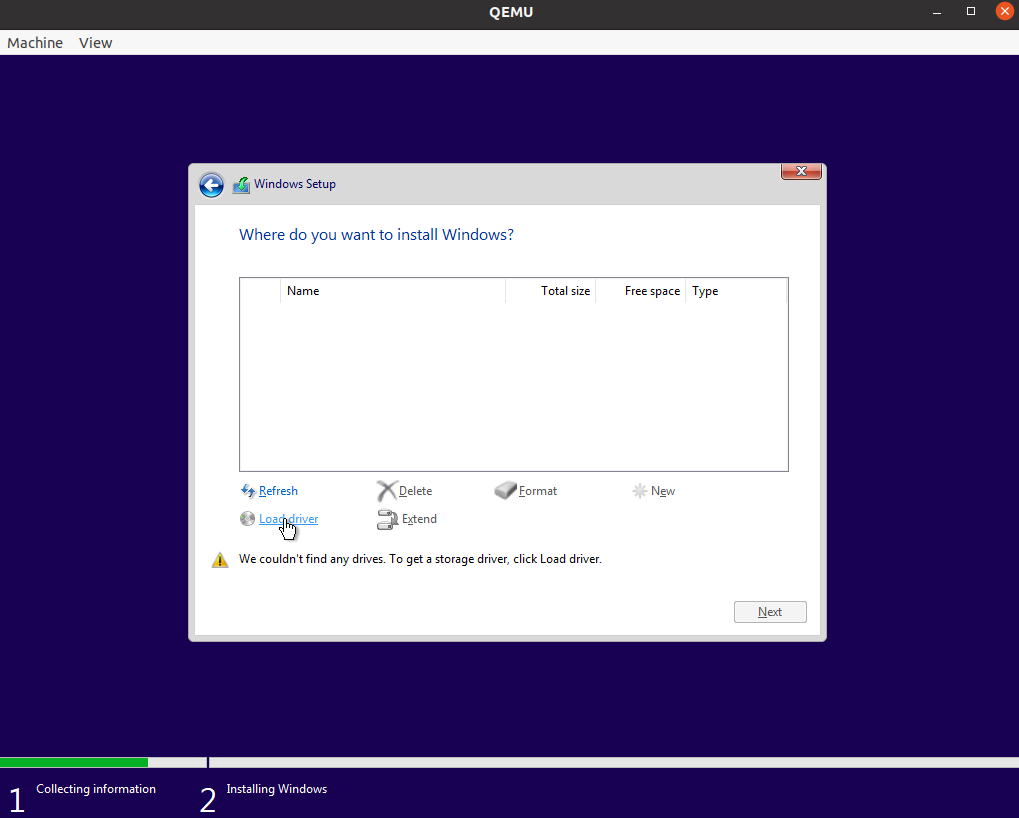
sambato share the driver with the Microsoft Windows VM. Make sure thatsambais installed in the host OS. For example, usesudo apt install sambain Debian.In the QEMU window that appears, click Next to install Microsoft Windows.
When prompted to select the type of installation, choose Custom: Install Windowns only (advanced).

Click Load driver.
Browse and select the
virtioSCSI driver to detect the rawwin10.img. For example, the driver (virtio-win.iso) may locates inE:\viostor\w10\amd64\viostor.infof the CD-ROM.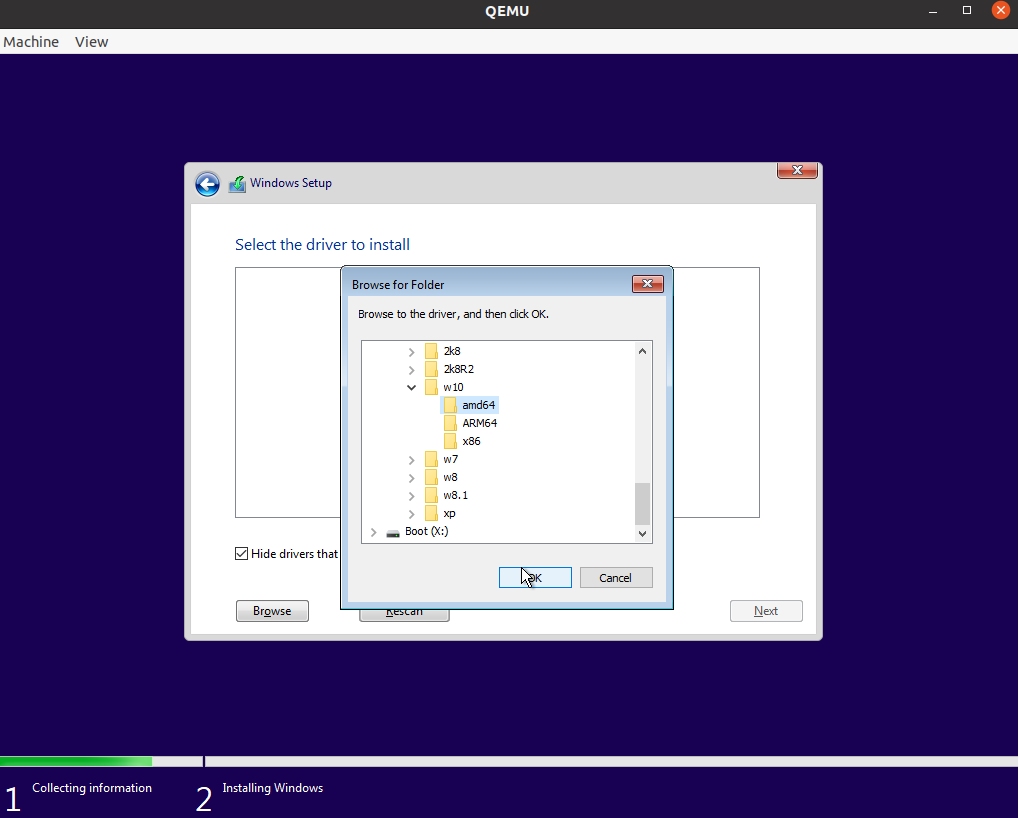
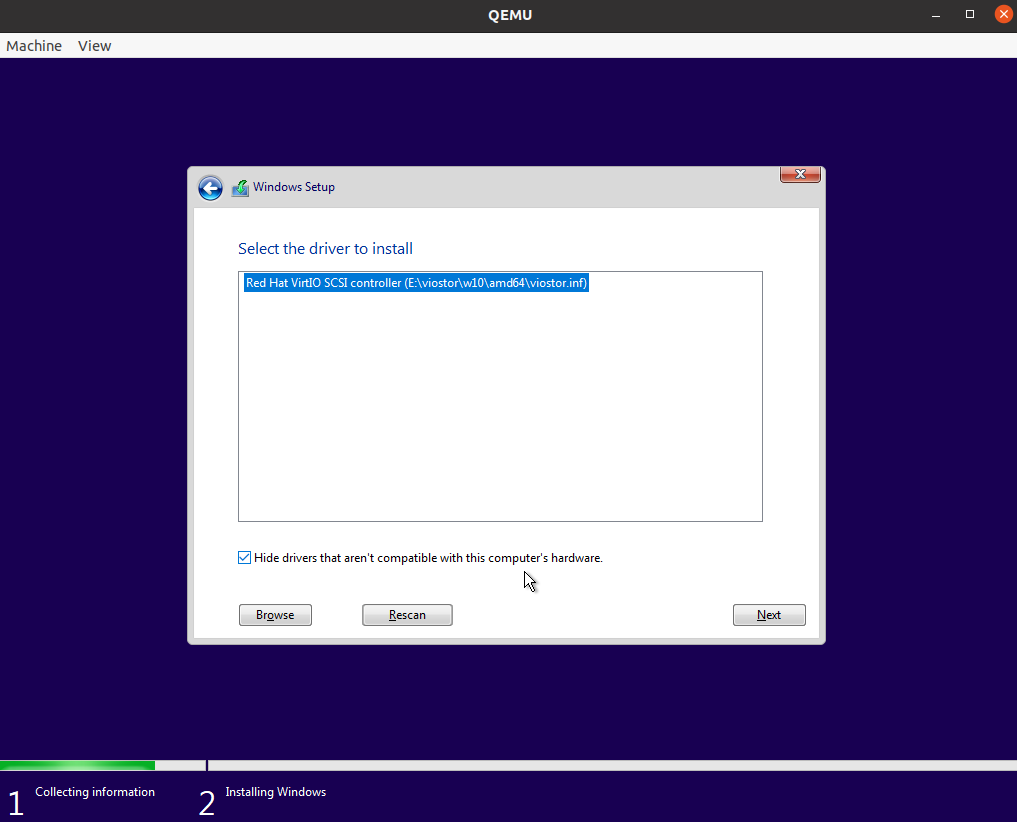
Select the loaded driver. Click Next.
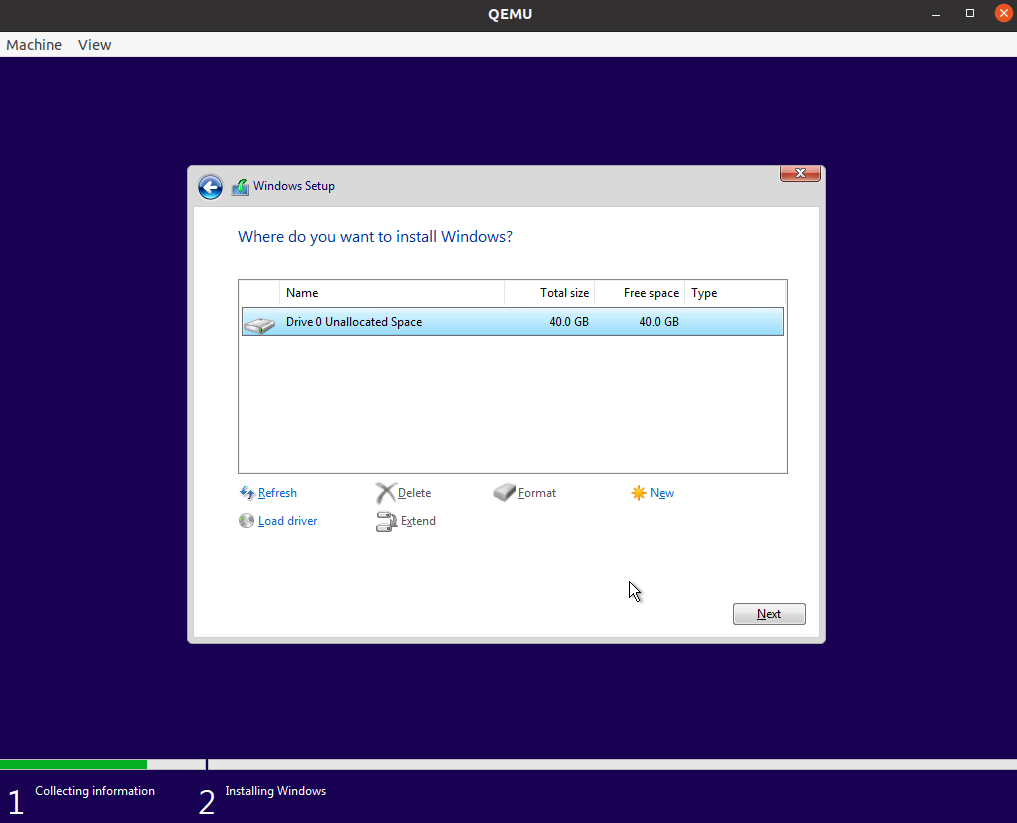
Once the driver is loaded, a disk will be discovered for the Microsoft Windows installation. Click Next to continue.
Once the installation is complete, a Microsoft Windows 10 desktop will be displayed in the QEMU window.
Open the Microsoft Windows Device Manager, and install the
virtio-netdriver from the CDROM (virtio-win.iso).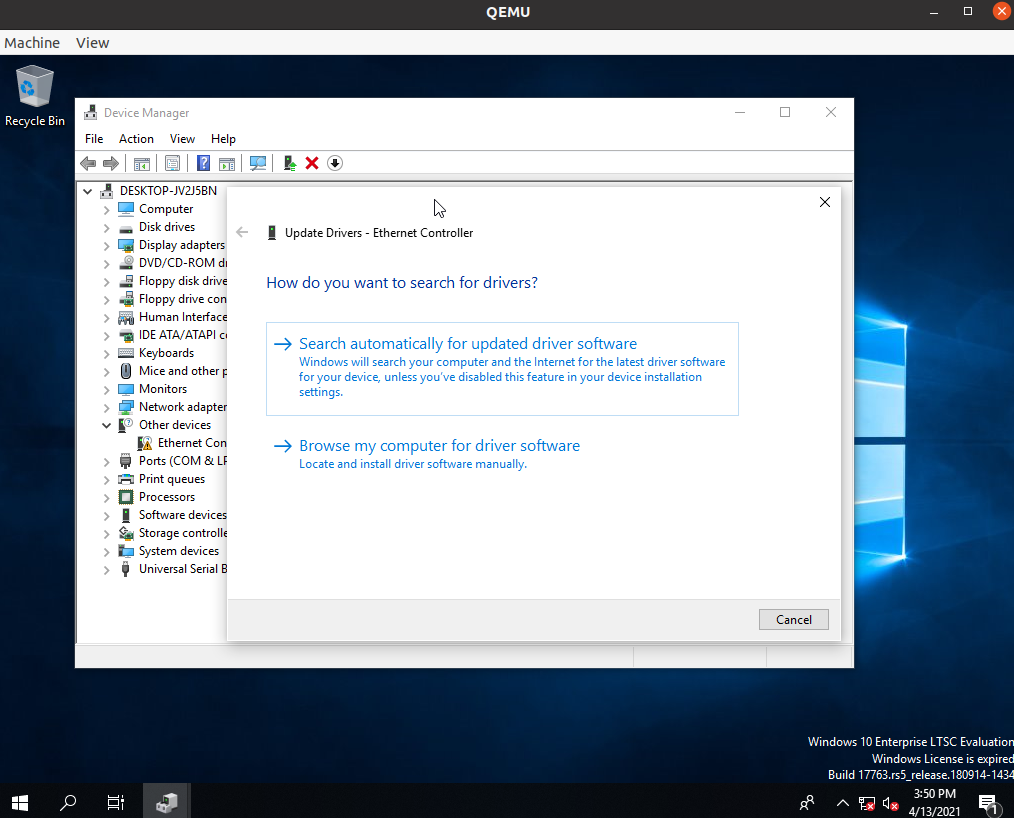
Install Media and Drivers
This section explains the procedure to:
Copy IGD Driver
In previous QEMU commands, the pre-downloaded graphics driver is shared by samba.
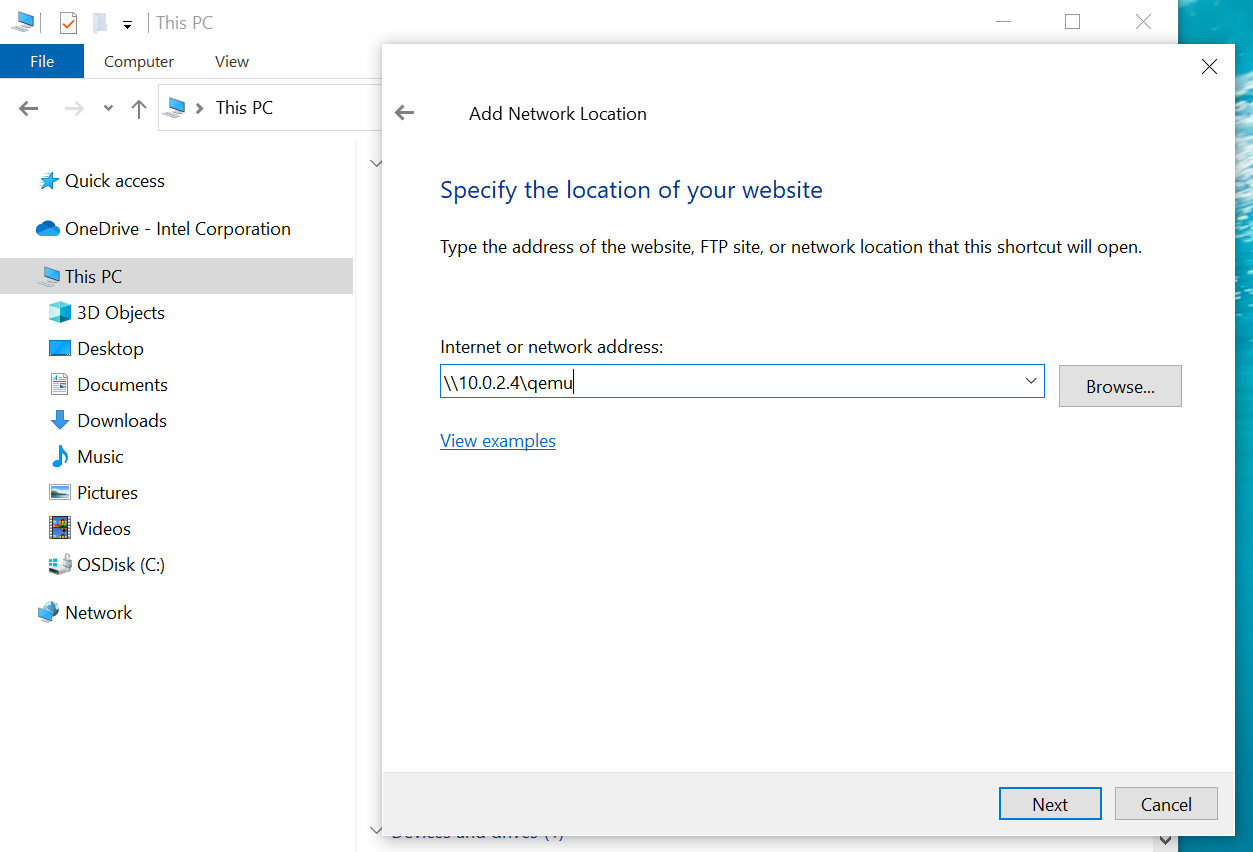
In the Microsoft Windows Explorer, follow the menu path File > This PC > Add Network Location to add the shared folder.
The path is \\10.0.2.4\qemu.
Copy the graphics driver (for example, igfx_win10_100.9316.exe) to a local folder for later use.
Enable Remote Desktop
Search for Remote Desktop in the Microsoft Windows Settings. Turn ON Enable Remote Desktop. Note down This PC name under How to connect to this PC for later use.
Now, shutdown the Microsoft Windows VM.
Install IGD Driver
To install the graphics driver, a GPU needs to be passed through.
Follow Set up QEMU Command to Boot Windows VM to passthrough a graphics device and a NIC device to the Microsoft Windows VM. Boot the Microsoft Windows VM.
There will not be any display on the monitor yet, as the GPU driver is not yet installed.
Connect the NIC device, which was passed through to the Microsoft Windows VM, directly to the second Microsoft Windows machine. Run a Remote Desktop Conncetion on the second machine and connect to the computer with the PC name from the previous step.
After logging in remotely, run the graphics driver installation program, which you copied to the local folder.
After installing the graphics driver, the local display from the Microsoft Windows VM will appear on the monitor.
Set up QEMU Command to Boot Windows VM
The following section is applicable to:
This section describes the procedure to start a Microsoft Windows VM with KVM hypervisor on Intel® Edge Controls for Industrial (Intel® ECI or ECI).
Basic/Minimal Configuration of KVM
The following is a basic or minimal configuration of KVM:
$ sudo qemu-system-x86_64 -nodefaults -serial mon:stdio \
-name ${vm_name},debug-threads=on \
-machine kernel_irqchip=on \
-enable-kvm \
-bios OVMF.fd \
-cpu host,hv_time \
-smp ${vcpu_num} -m ${mem_size} -mem-prealloc -mem-path /dev/hugepages \
This configuration creates a VM named as ${vm_name} with ${vcpu_num} cores, ${mem_size} memory, full acceleration with KVM in-kernel irqchip support, empowered by hugepage memory. The -nodefaults does not specify a default device, so only one host PCI bridge and one ISA bridge is attached to this VM. debug-threads=on is useful when setting vCPU affinity. For details on setting the vCPU thread affinity, refer to KVM vCPU Affinity. To build OVMF.fd, which is a virtual UEFI binary file, refer to Build OVMF.fd for KVM.
Using Hugepages
Using hugepages in KVM can significantly improve the performance of virtual machines (VMs) by optimizing memory management and access. Here are some reasons why hugepages benefit in a virtual environment in KVM:
Reduce TLB pressure
Cause less page table overhead
Improve memory performance
Provide contiguous physical memory
Reduce I/O overhead
Provide isolation and dedication
Support for large memory pages
To use hugepages with KVM, the host and the VMs need to be configured to enable and support hugepages.
In host side, set default_hugepagesz=1G hugepagesz=1G hugepages=8 to kernel command line to support 1G hugepages. Make sure that the value of hugepagesz*hugepages does not exceed the size of the physical memory.
In VM side, the following qemu options need to be added into VM start script.
-mem-prealloc -mem-path /dev/hugepages
Passthrough Generic PCI Device on KVM
To passthrough a PCI device via VT-d, make sure that the intel_iommu=on kernel command line parameter is enabled.
Device passthrough requires that the vfio-pci kernel module is loaded, and will bind to the target device. If vfio-pci is not a built-in kernel module, modprobe it after the kernel completes booting.
$ sudo modprobe vfio-pci vfio_iommu_type1
Use the following function to passthrough specific devices and all other devices in the same IOMMU group. The following example shows how to passthrough a USB controller fixed at 0000:00:14.0. You can determine the value ${pci_BDF} using the command lspci.
function vfio_bind()
{
   local bdf dev vendor device
   for bdf in "$@"; do
      echo "vfio bind: $bdf ..."
      for dev in $(ls /sys/bus/pci/devices/$bdf/iommu_group/devices); do
            vendor=$(cat /sys/bus/pci/devices/$dev/vendor)
            device=$(cat /sys/bus/pci/devices/$dev/device)
            if [ -e /sys/bus/pci/devices/$dev/driver ]; then
               echo "    $dev : unbind driver ..."
               sudo sh -c "echo $dev > /sys/bus/pci/devices/$dev/driver/unbind"
            fi
            echo "    $dev : bind to vfio ..."
            sudo sh -c "echo $vendor $device > /sys/bus/pci/drivers/vfio-pci/new_id"
      done
   done
}

$ vfio_bind 0000:00:14.0
Now, the device can be assigned to QEMU. The following parameter will attach the host ${pci_BDF} device, for example the parameter attaches 0000:00:14.0 to the VM PCI bus. Multiple devices can be attached to a VM with different IDs.
-device vfio-pci,host=${pci_BDF}
If the vfio-pci kernel module is not needed for the target device, unbind it so that the VM can bind the original driver back. See the following example of a USB controller fixed at 0000:00:14.0:
$ usb_device=$(cat /sys/bus/pci/devices/0000\:00\:14.0/device)
$ sudo sh -c "echo 0000:00:14.0 > /sys/bus/pci/drivers/vfio-pci/unbind"
$ sudo sh -c "echo 8086 $usb_device >  /sys/bus/pci/drivers/vfio-pci/remove_id"
$ sudo sh -c "echo 0000:00:14.0 > /sys/bus/pci/drivers/xhci_hcd/bind"
Passthrough KVM Graphics Device
GVT-d is special case for Passthrough Generic PCI Device on KVM. For the integrated graphics device (IGD), the first step is to rebind the vfio-pci kernel module as a device driver. Usually, IGD is fixed at 0000:00:02.0.
$ vfio_bind 0000:00:02.0
Passthrough of the IGD is similar to that of a generic PCI device, except for some extra parameters to QEMU.
The
x-igd-gmsproperty sets a value multiplied by 32 as the amount of pre-allocated memory (in units of MB) to support IGD in VGA modes.The
x-igd-opregionproperty exposesopregion(VBT included) to guest driver so that the guest driver could parse display connector information from. This property mandatory for the Microsoft Windows VM to enable display output.
The following command shows the IGD device parameter for QEMU:
-device vfio-pci,host=00:02.0,x-igd-gms=2,id=hostdev0,x-igd-opregion=on,rombar=0
To specify the vBIOS ROM file, append ,romfile=$GOP_file to -device vfio-pci,....
For GOP_file, please refer to Build OVMF.fd for KVM.
Set up KVM Storage Device
It is recommended to use iothread and virtio-blk drive (Red Hat® Enterprise Linux® VirtIO SCSI Disk) since the disk read and write performance is much better than using default QEMU IDE drive.
-object iothread,id=io1 \
-device virtio-blk-pci,drive=disk0,iothread=io1 \
-drive if=none,id=disk0,format=raw,aio=threads,file=${vm_image} \
${vm_image} is the Microsoft Windows image file. Follow this section to create a new Microsoft Windows VM image.
Set up KVM Network Device
An Ethernet or wireless adapter can be assigned to a VM either with emulated Ethernet and network backend or via a generic PCI device passthrough. Refer to Passthrough Generic PCI Device on KVM for exclusive assignment. Attach a virtio Ethernet adapter using TAP network backend with id tap0 and configure the ${BRIDGE_SCRIPT} script .
-netdev tap,id=net0,ifname=tap0,script=${BRIDGE_SCRIPT} -device virtio-net-pci,netdev=net0 \
The following is an example of ${BRIDGE_SCRIPT}, which can support either public bridge or private virtual bridge by setting the switch to the target bridge name.
#!/bin/sh
set -x
switch=br0
ip link set "$1" up
if [ -d /sys/class/net/$switch/bridge/. ]; then
   ip link set "$1" master "$switch"
   exit 0
else
   echo "Error: No bridge for guest interface found."
   exit 1
fi
Example commands to create a public bridge:
$ ip a add 0.0.0.0/255.255.255.0 dev eno1
$ brctl addbr br0
$ brctl addif br0 eno1
$ dhclient br0
Emulate TPM 2.0 Module
Window 11 and the new Windows Server require a TPM (Trusted Platform Module) to be installed to run. Following steps are to emulate the TPM within KVM.
Install swtpm (a software TPM emulator) and swtpm-tool (a set of tools that allow libvirt to interact with the emulator).
$ sudo apt install swtpm swtpm-tool
Use the following function to create an emulated TPM.
TPM=/tmp/emulated_tpm
function tpm_emul_create()
{
   rm -fr $TPM
   mkdir -p $TPM
   swtpm socket --tpmstate dir=${TPM} \
           --ctrl type=unixio,path=${TPM}/swtpm-sock \
           --tpm2 &
}
Once /tmp/emulated_tpm is created, only need to add below qemu options in VM start script.
-chardev socket,id=chrtpm,path=${TPM}/swtpm-sock \
-tpmdev emulator,id=tpm0,chardev=chrtpm \
-device tpm-tis,tpmdev=tpm0
KVM Miscellaneous Set up
Enable/Disable ACPI S3/S4 State
-global PIIX4_PM.disable_s3=1 -global PIIX4_PM.disable_s4=1 \
KVM vCPU Affinity
To achieve better real-time performance, isolated CPUs can be bound to a VM vCPU so that the QEMU vCPU thread will always run on the CPU. Enabling debug-threads=on on a VM name as described in Basic/Minimal Configuration of KVM helps to identify whether a QEMU thread is a vCPU thread or a working thread.
First, find the vCPU thread. Run the following command to show the corresponding PID of each vCPU:
$ sudo ps -p ${pid_of_qemu-system-x86_64} -T
Then, use taskset to change the affinity of vCPU threads to a physical CPU.
$ sudo taskset -cp ${vm_vcpu_affinity} ${vm_vcpu_pid}
Enable telnet
To enable telnet, run QEMU with the -monitor telnet:127.0.0.1:port,server,nowait parameters. When the virtual machine is launched, you will be able to access the monitor via telnet:
$ telnet 127.0.0.1 port
After accessing the monitor via telnet, help can see all commands for using.
Enable VNC
To enable VNC, run QEMU with the -vnc :X parameters to redirect the VGA display to the VNC session. Substitute X for the port number of the display (0 is to listen on 5900, 1 on 5901…). If not sure, you can read the port number via info vnc in monitor.
KVM Recommended Configurations
The following command is recommended for booting a Microsoft Windows VM with IDV GVT-d. It is recommended to login from another machine and execute the commands from a remote terminal since GVT-d will block any output from the host to the screen.
$ sudo qemu-system-x86_64 -nodefaults -serial mon:stdio \
-name ${vm_name},debug-threads=on \
-machine kernel_irqchip=on \
-enable-kvm \
-bios OVMF.fd \
-cpu host,hv_time \
-smp ${vcpu_num} -m ${mem_size} -mem-prealloc -mem-path /dev/hugepages \
-device vfio-pci,host=${pci_BDF_1} \
-device vfio-pci,host=${pci_BDF_2} \
-device vfio-pci,host=00:02.0,x-igd-gms=2,id=hostdev0,x-igd-opregion=on \
-object iothread,id=io1 \
-device virtio-blk-pci,drive=disk0,iothread=io1 \
-drive if=none,id=disk0,format=raw,aio=threads,file=${vm_image} \
-netdev tap,id=net0,ifname=tap0,script=${BRIDGE_SCRIPT} -device virtio-net-pci,netdev=net0 \
-global PIIX4_PM.disable_s3=1 -global PIIX4_PM.disable_s4=1