Industrial Gigabit Multimedia Serial Link™ (GMSL)
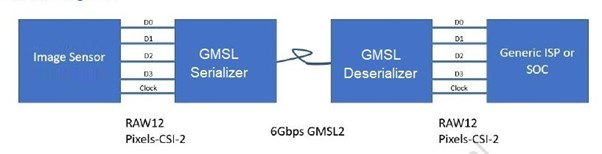
Gigabit Multimedia Serial Link™ (GMSL) cameras use the GMSL and GMSL2 technology to carry high speed video, bidirectional control data, and power over a single coaxial cable.
GMSL uses very popular SerDes technique across telecom, industrial, and cable interconnect applications to meet the growing demand of high data rates, long distance support, and better performance. This serial link technology also performs reliably in the harsh industrial and outside environments to deliver data fast with low latency, providing data transmission over a single coaxial cable or differential pair cables (STP, SPP, etc.) to minimize the number of Input/Output pins and interconnects.
GMSL/FAKRA offers lower power consumption, reduced ESD/EMI noise, lower latency, and longer cable length compared to USB, while providing higher bandwidth compared to Ethernet. Third-party MIPI Camera vendors, including D3 Embedded® and oToBrite® , offers a rich products line of GMSL2 Camera modules for every solution need. The Intel® RealSense™ Depth Camera D457 adds GMSL serializer and FAKRA connector to the Intel RealSense camera modules product line.
The following sections will provide guiding step to interconnect GMSL2 Camera modules to 12th/13th/14th Gen Intel® Core™, such as GMSL2 enabled Axiomtek ROBOX500 , and Intel® Core™ Ultra Series 1 and 2 (Arrow Lake-U/H) based GMSL enabled products, such as SEAVO® Embedded Computer HB03 , Advantech® AFE-R360 series and ASR-A502 series with Advantech® GMSL Input Module Card .
Brief GMSL Add-in-Card design overview
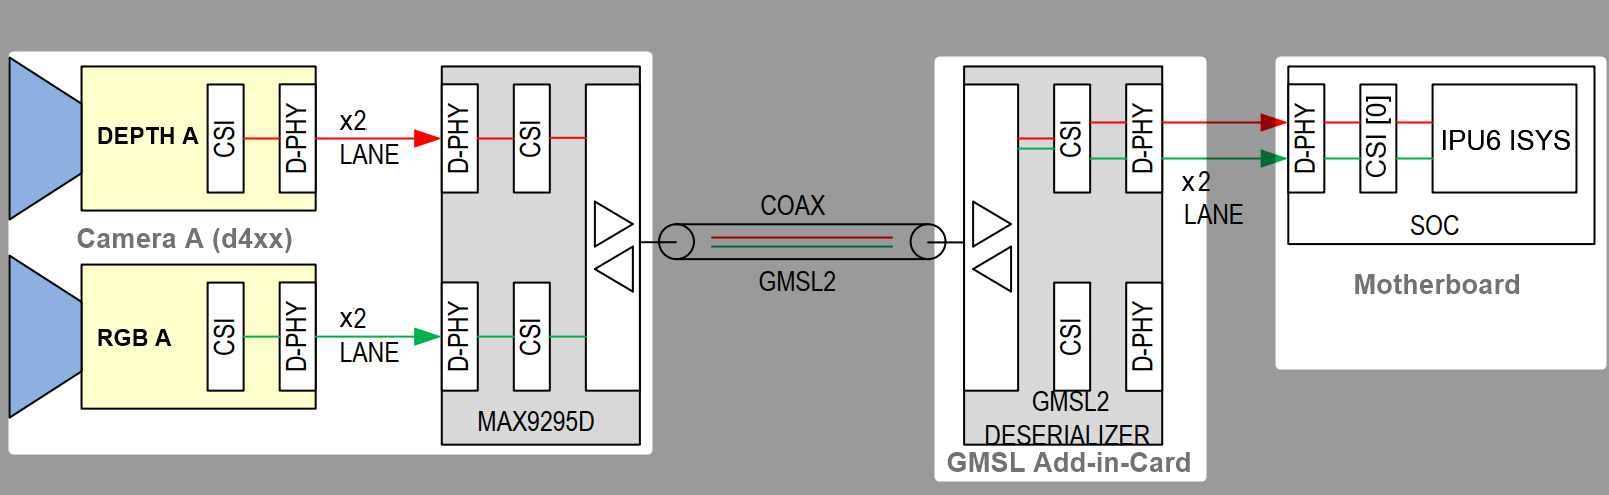
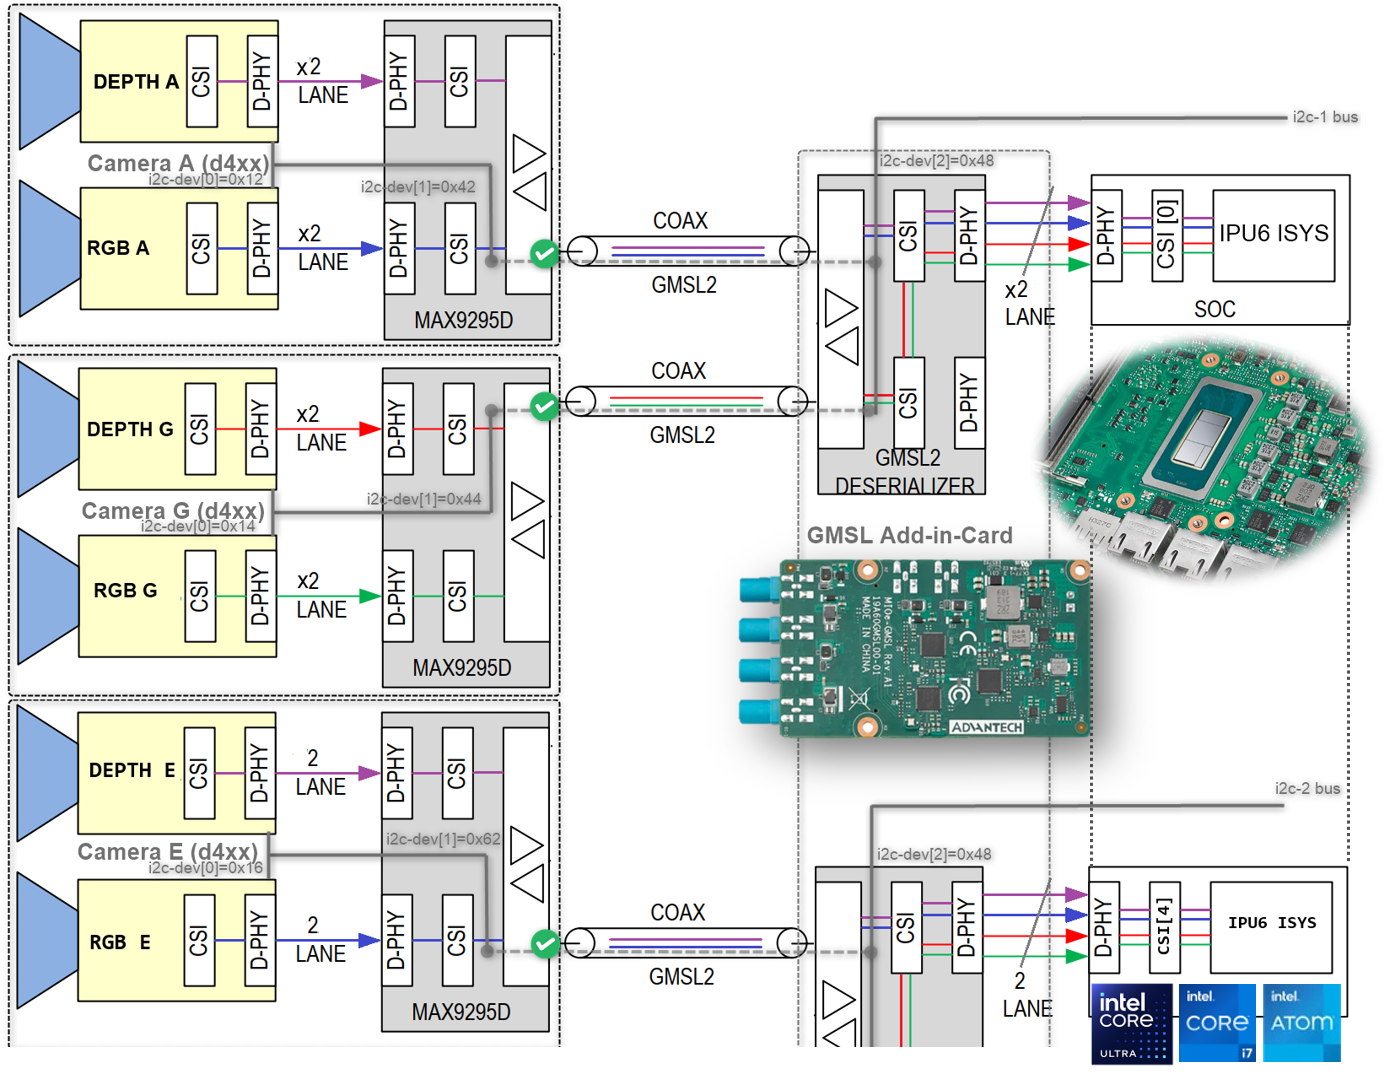
A GMSL product design based Intel® Core™ Ultra Series 1 and 2 (Arrow Lake-U/H) or 12th/13th/14th Gen Intel® Core™ products can be illustrated as followed :
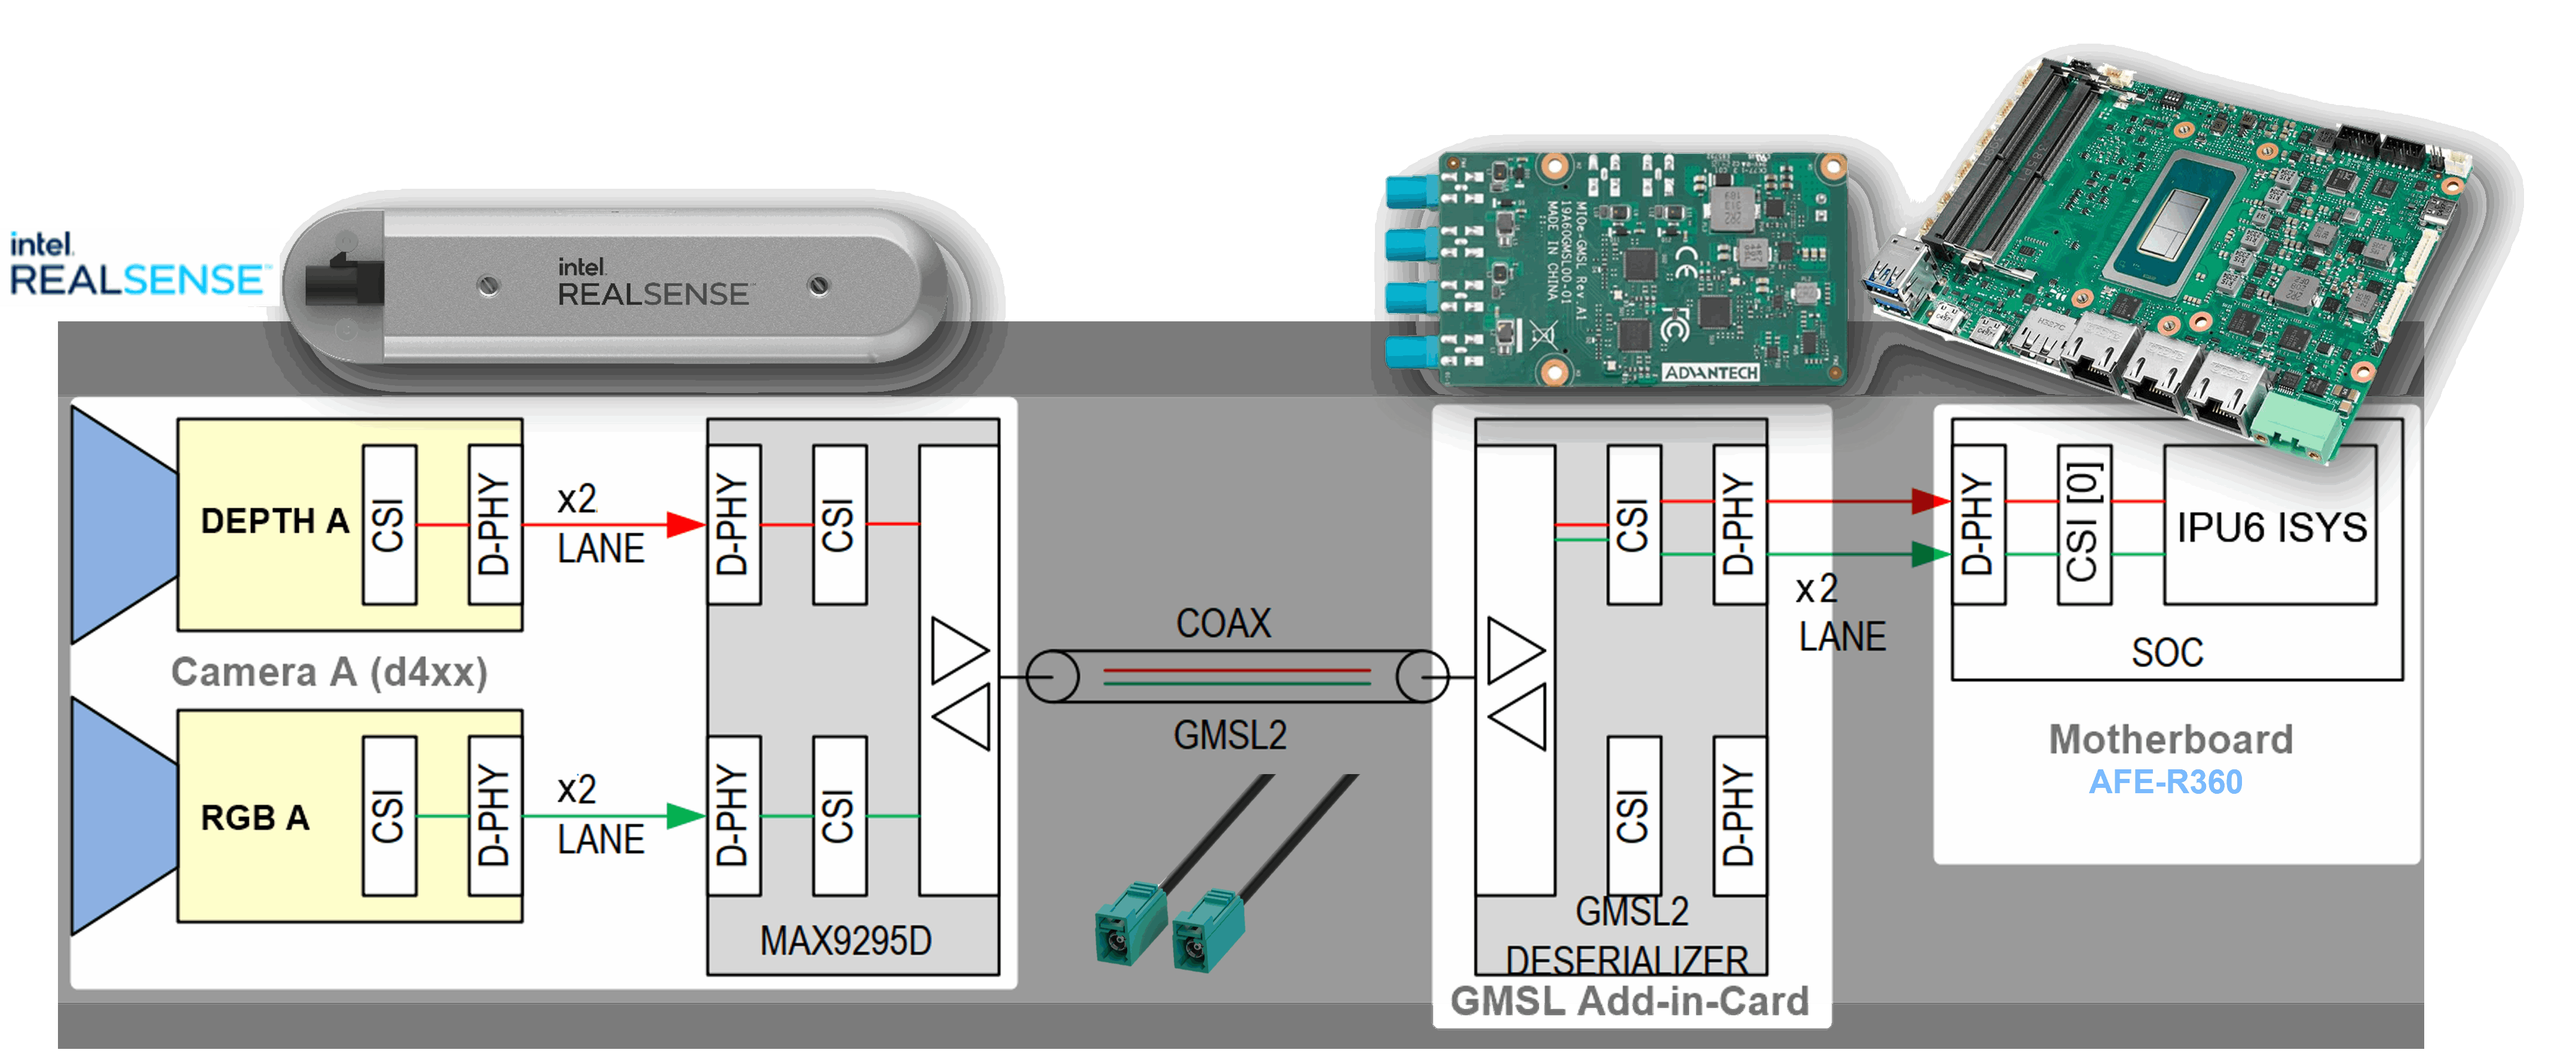
The GMSL2 Camera modules, designed by 3rd Party GMSL2 Camera vendors, combine a Camera Sensor and GMSL2 Serializer (ex. MAX9295)
The Add-in-Card (AIC), designed by either ODM/OEMs or 3rd Party GMSL2 Camera vendors, provide multiple GMSL2 Derializer (ex. MAX9296A)
The |Intel|-based Motherboad, designed by ODM/OEMs, provide Mobile Industry Processor Interface (MIPI) Camera Serial Interface (CSI) interface exposed by Intel® Core™ Ultra Series 1 and 2 (Arrow Lake-U/H) and 12th/13th/14th Gen Intel® Core™ products.
There are two design approaches for GMSL Add-in-Card (AIC) :
Standalone-mode SerDes - Single GMSL Serializer (ex. MAX9295) and Camera Sensor devices per Deserializer (e.g. MAX9296A). Such as Axiomtek ROBOX500 4x GMSL camera interfaces Add-in-Card (AIC).
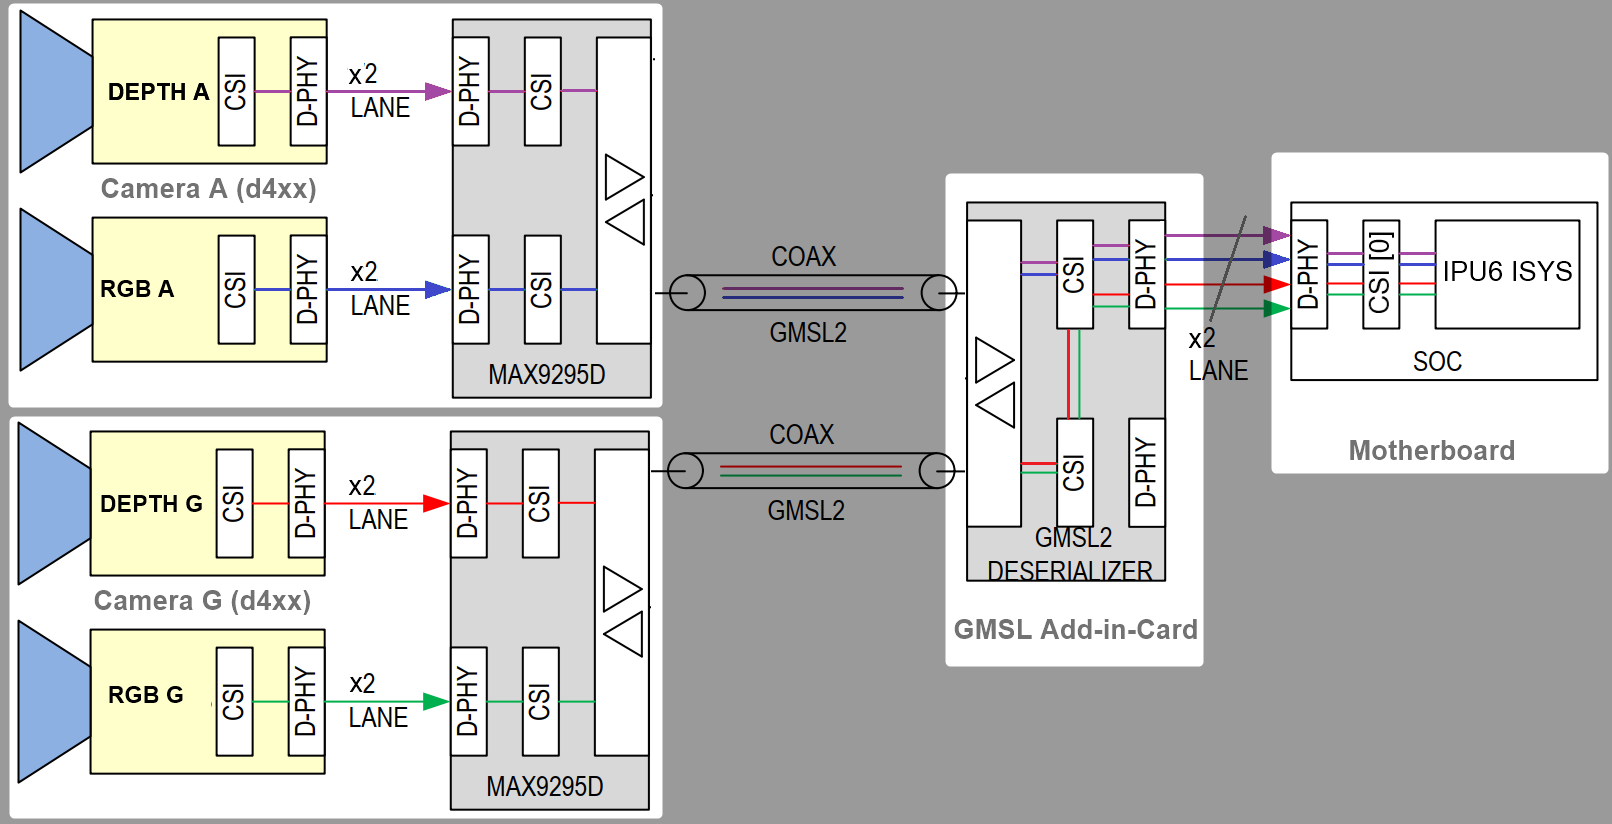
Aggregated-link SerDes - Dual GMSL Serializer (ex. MAX9295) and Camera Sensor devices per Deserialize (e.g. MAX9296A). Such as Axiomtek ROBOX500 8x GMSL camera interfaces or Advantech GMSL Input Module Card , for AFE-R360 series or ASR-A502 series, and SEAVO Embedded Computer HB03 Add-in-Cards (AIC).
It is crucial to understand the SerDes i2c connectivity specific to each ODM/OEM motherboards, Add-in-Cards (AIC) and GMSL2 Camera modules. Illustrated below are all details a user need to learn about I2C communication between a BDF (Bit-Definition File) Linux i2c adapter and GMSL2 i2c devices for the Intel® Core™ Ultra Series 1 and 2 (Arrow Lake-U/H) and 12th/13th/14th Gen Intel® Core™ to detect and configure GMSL capability. (see SerDes i2c mapping for further details)
More details about Mobile Industry Processor Interface (MIPI) Camera Serial Interface (CSI) Gigabit Multimedia Serial Link (GMSL) Add-in Card (AIC) Schematic
Configure Intel® GMSL SerDes ACPI devices
To enable multiple GMSL Cameras for same or different vendors, user need define MIPI Cameras ACPI device from UEFI/BIOS settings.
Review Intel® enabled GMSL2 camera module with its corresponding ACPI devices custom HID:
ACPI custom HID
ACPI Camera module label
Sensor Type
GMSL2 Serializer
Max Resolution
Vendor URL
INTC10CDd4xxOV9782 + D450 Depth
MAX9295
2x (1280x720)
D3000004D3CMCXXX-115-084ISX031
MAX9295
1920x1536
D3 Embedded® sensor Linux drivers package available upon sales@d3embedded.com camera purchase
D3000005D3CMCXXX-106-084IMX390
MAX9295
1920x1080
D3000006D3CMCXXX-089-084AR0234
MAX9295
1280x960
OTOC1031otocamISX031
MAX9295
1920x1536
oToBrite® sensor Linux drivers package available upon sales@otobrite.com camera purchase
OTOC1021otocamISX021
MAX9295
1920x1280
Review the Brief GMSL Add-in-Card design overview, if not already done.
Please refer to each tabs below to understand ODM hardware distinct ACPI Camera device configuration table :
The Advantech GMSL Input Module Card for AFE-R360 series and ASR-A502 series may provide up to 6x GMSL camera interface (FAKRA universal type).
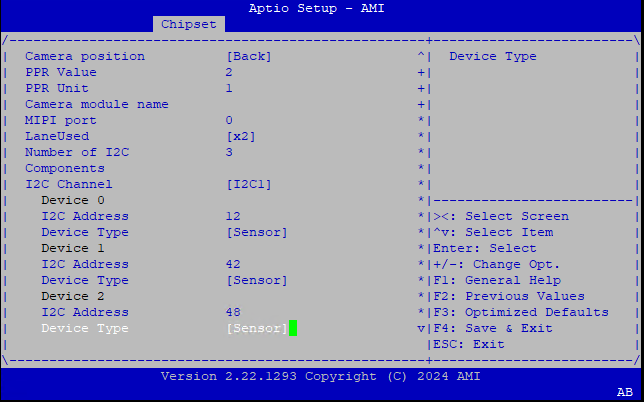
Below an ACPI devices configure example for GMSL2 Intel® RealSense™ Depth Camera D457 :
Aggregated-link SerDes CSI-2 port 0 and 4 and I2C settings for GMSL Add-in-Card (AIC)¶ UEFI Custom Sensor
Camera 1
Camera 2
Camera 3
Camera 4
GMSL Camera suffix
a
g
e
k
Custom HID
INTC10CDINTC10CDINTC10CDINTC10CDPPR Value
2
2
2
2
PPR Unit
1
1
1
1
Camera module label
d4xxd4xxd4xxd4xxMIPI Port (Index)
0
0
4
4
LaneUsed
x2
x2
x2
x2
Number of I2C
3
3
3
3
I2C Channel
I2C1
I2C1
I2C2
I2C2
Device0 I2C Address
12
14
12
14
Device1 I2C Address
42
44
42
44
Device2 I2C Address
48
48
48
48
Below an ACPI devices configure example for D3 Embedded Discovery GMSL2 Camera module :
Aggregated-link SerDes CSI-2 port 0 and 4 and I2C settings for GMSL Add-in-Card (AIC)¶ UEFI Custom Sensor
Camera 1
Camera 2
GMSL Camera suffix
a
e
Custom HID
D3000004D3000004PPR Value
2
2
PPR Unit
2
2
Camera module label
D3CMCXXX-115-084D3CMCXXX-115-084MIPI Port (Index)
0
4
LaneUsed
x2
x2
Number of I2C
3
3
I2C Channel
I2C1
I2C2
Device0 I2C Address
48
48
Device1 I2C Address
42
44
Device2 I2C Address
10
12
Attention
please note, on Advantech® AFE-R360 series the four D3CMCXXX ACPI configuration achieved by
PPR Unit=2also requires settingDevice0for GMSL2 Aggregated-link Deserializer I2C address (e.g. MAX9296A) andDevice2for Sensors I2C address (e.g. ISX031).Below an ACPI devices configure example for D3 Embedded Discovery PRO GMSL2 Camera module :
Aggregated-link SerDes CSI-2 port 0 and 4 and I2C settings for GMSL Add-in-Card (AIC)¶ UEFI Custom Sensor
Camera 1
Camera 2
GMSL Camera suffix
a
e
Custom HID
D3000005D3000005PPR Value
2
2
PPR Unit
2
2
Camera module label
D3CMCXXX-106-084D3CMCXXX-106-084MIPI Port (Index)
0
4
LaneUsed
x2
x2
Number of I2C
3
3
I2C Channel
I2C1
I2C2
Device0 I2C Address
48
48
Device1 I2C Address
42
44
Device2 I2C Address
10
12
Attention
please note, on Advantech® AFE-R360 series the four D3CMCXXX ACPI configuration achieved by
PPR Unit=2also requires settingDevice0for GMSL2 Aggregated-link Deserializer I2C address (e.g. MAX9296A) andDevice2for Sensors I2C address (e.g. ISX031).Below an ACPI devices configure example for oToBrite® oToCAM222 GMSL2 camera modules :
Aggregated-link SerDes CSI-2 port 0 and 4 and I2C settings for GMSL Add-in-Card (AIC)¶ UEFI Custom Sensor
Camera 1
Camera 2
Camera 3
Camera 4
GMSL Camera suffix
a
g
e
k
Custom HID
OTOC1021OTOC1021OTOC1021OTOC1021PPR Value
2
2
2
2
PPR Unit
1
1
1
1
Camera module label
otocamotocamotocamotocamMIPI Port (Index)
0
0
4
4
LaneUsed
x2
x2
x2
x2
Number of I2C
3
3
3
3
I2C Channel
I2C1
I2C1
I2C2
I2C2
Device0 I2C Address
10
11
10
11
Device1 I2C Address
18
19
18
19
Device2 I2C Address
48
48
48
48
Below an ACPI devices configure example for oToBrite® oToCAM223 GMSL2 camera modules :
Aggregated-link SerDes CSI-2 port 0 and 4 and I2C settings for GMSL Add-in-Card (AIC)¶ UEFI Custom Sensor
Camera 1
Camera 2
Camera 3
Camera 4
GMSL Camera suffix
a
g
e
k
Custom HID
OTOC1031OTOC1031OTOC1031OTOC1031PPR Value
2
2
2
2
PPR Unit
1
1
1
1
Camera module label
otocamotocamotocamotocamMIPI Port (Index)
0
0
4
4
LaneUsed
x2
x2
x2
x2
Number of I2C
3
3
3
3
I2C Channel
I2C1
I2C1
I2C2
I2C2
Device0 I2C Address
10
11
10
11
Device1 I2C Address
18
19
18
19
Device2 I2C Address
48
48
48
48
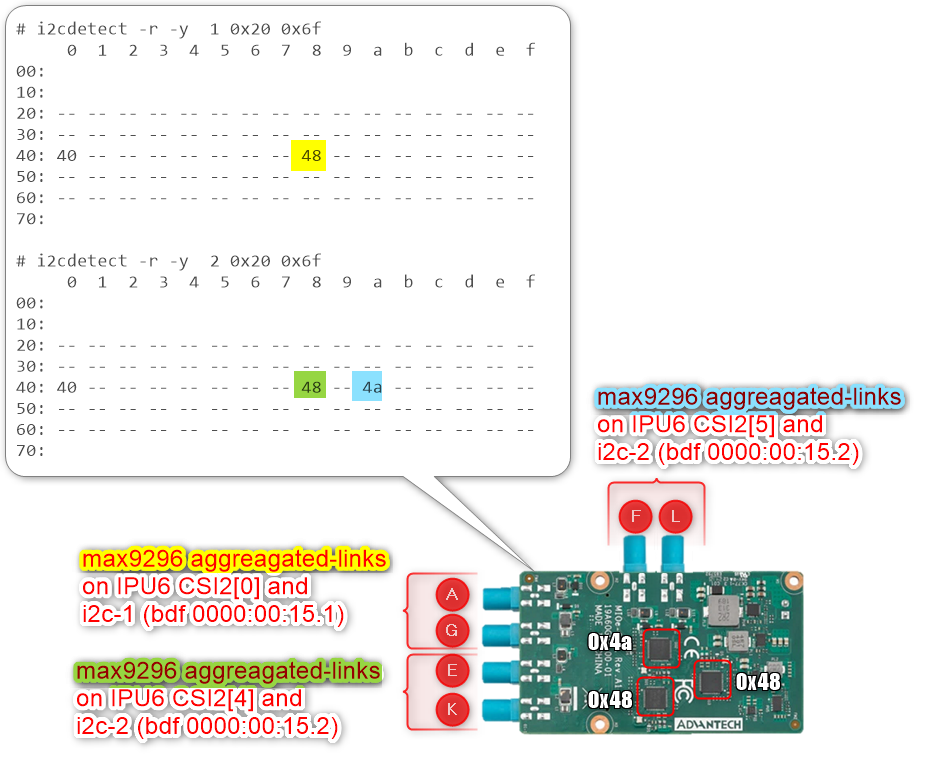
Another example below illustrates how to configure ACPI devices 6x Intel® RealSense™ Depth Camera D457 GMSL2 module :
Aggregated-link SerDes CSI-2 port 0, 4 and 5 and I2C settings for GMSL Add-in-Card (AIC)¶ UEFI Custom Sensor
Camera 1
Camera 2
Camera 3
Camera 4
Camera 5 or N/A 1
Camera 6 or N/A 1
GMSL Camera suffix
a
g
e
f
k
l
Custom HID
INTC10CDINTC10CDINTC10CDINTC10CDINTC10CDINTC10CDPPR Value
2
2
2
2
2
2
PPR Unit
1
1
1
1
1
1
Camera module label
d4xxd4xxd4xxd4xxd4xxd4xxMIPI Port (Index)
0
0
4
5
4
5
LaneUsed
x2
x2
x2
x2
x2
x2
Number of I2C
3
3
3
3
3
3
I2C Channel
I2C1
I2C1
I2C2
I2C2
I2C2
I2C2
Device0 I2C Address
12
14
16
18
12
14
Device1 I2C Address
42
44
62
42
64
44
Device2 I2C Address
48
48
48
4a
48
4a
Attention
For the time being each GMSL2 Aggregated-link Deserializer (e.g. MAX9296A) on the same I2C Channel shall set identical Custom HID and Camera module label tuple matching with GMSL2 Serializer and Camera Sensor devices type.
The Advantech GMSL Input Module Card for AFE-R360 series I2C1 Channel (ex.
INTC10CD) Aggregated-link Deserializer (e.g. MAX9296A) i2c device 0x48 shall set Custom HID (ex.INTC10CD) and Camera module label (exd4xx) tuple for both GMSL Camera suffix a and g, where the other Aggregated-link Deserializer (e.g. MAX9296A) i2c device 0x4a could have a different Custom HID (exINTC1031) and Camera module label (exisx031) tuple on both GMSL Camera suffix e and k.The SEAVO® Embedded Computer HB03 UEFI BIOS
Version: S1132C1133A11allow admin user to configure up to 4x GMSL2 camera interface (FAKRA universal type).Below an ACPI devices configure example for GMSL2 Intel® RealSense™ Depth Camera D457 :
Aggregated-link SerDes CSI-2 port 0 and 4 and I2C settings for GMSL Add-in-Card (AIC)¶ UEFI Custom Sensor
Camera 1
Camera 2
Camera 3
Camera 4
GMSL Camera suffix
a
g
e
k
Custom HID
INTC10CDINTC10CDINTC10CDINTC10CDPPR Value
2
2
2
2
PPR Unit
1
1
1
1
Camera module label
d4xxd4xxd4xxd4xxMIPI Port (Index)
0
0
4
4
LaneUsed
x4
x4
x4
x4
Number of I2C
3
3
3
3
I2C Channel
I2C1
I2C1
I2C0
I2C0
Device0 I2C Address
12
14
12
14
Device1 I2C Address
42
44
42
44
Device2 I2C Address
48
48
48
48
Below an ACPI devices configure example for D3 Embedded Discovery GMSL2 Camera module :
Aggregated-link SerDes CSI-2 port 0 and 4 and I2C settings for GMSL Add-in-Card (AIC)¶ UEFI Custom Sensor
Camera 1
Camera 2
GMSL Camera suffix
a
e
Custom HID
D3000004D3000004PPR Value
2
2
PPR Unit
2
2
Camera module label
D3CMCXXX-115-084D3CMCXXX-115-084MIPI Port (Index)
0
4
LaneUsed
x4
x4
Number of I2C
3
3
I2C Channel
I2C1
I2C0
Device0 I2C Address
48
48
Device1 I2C Address
42
44
Device2 I2C Address
10
12
Attention
please note, on Seavo® HB03 the four D3CMCXXX ACPI configuration achieved by
PPR Unit=2also requires settingDevice0for GMSL2 Aggregated-link Deserializer I2C address (e.g. MAX9296A) andDevice2for Sensors I2C address (e.g. ISX031).Below an ACPI devices configure example for D3 Embedded Discovery PRO GMSL2 Camera module :
Aggregated-link SerDes CSI-2 port 0 and 4 and I2C settings for GMSL Add-in-Card (AIC)¶ UEFI Custom Sensor
Camera 1
Camera 2
GMSL Camera suffix
a
e
Custom HID
D3000005D3000005PPR Value
2
2
PPR Unit
2
2
Camera module label
D3CMCXXX-106-084D3CMCXXX-106-084MIPI Port (Index)
0
4
LaneUsed
x4
x4
Number of I2C
3
3
I2C Channel
I2C1
I2C0
Device0 I2C Address
48
48
Device1 I2C Address
42
44
Device2 I2C Address
10
12
Attention
please note, on Seavo® HB03 four D3CMCXXX ACPI configuration achieved by
PPR Unit=2also requires settingDevice0for GMSL2 Aggregated-link Deserializer I2C address (e.g. MAX9296A) andDevice2for Sensors I2C address (e.g. ISX031).Below an ACPI devices configure example for oToBrite® oToCAM222 GMSL2 camera modules :
Aggregated-link SerDes CSI-2 port 0 and 4 and I2C settings for GMSL Add-in-Card (AIC)¶ UEFI Custom Sensor
Camera 1
Camera 2
Camera 3
Camera 4
GMSL Camera suffix
a
g
e
k
Custom HID
OTOC1021OTOC1021OTOC1021OTOC1021PPR Value
2
2
2
2
PPR Unit
1
1
1
1
Camera module label
otocamotocamotocamotocamMIPI Port (Index)
0
0
4
4
LaneUsed
x4
x4
x4
x4
Number of I2C
3
3
3
3
I2C Channel
I2C1
I2C1
I2C0
I2C0
Device0 I2C Address
10
11
10
11
Device1 I2C Address
18
19
18
19
Device2 I2C Address
48
48
48
48
Below an ACPI devices configure example for oToBrite® oToCAM223 GMSL2 camera modules :
Aggregated-link SerDes CSI-2 port 0 and 4 and I2C settings for GMSL Add-in-Card (AIC)¶ UEFI Custom Sensor
Camera 1
Camera 2
Camera 3
Camera 4
GMSL Camera suffix
a
g
e
k
Custom HID
OTOC1031OTOC1031OTOC1031OTOC1031PPR Value
2
2
2
2
PPR Unit
1
1
1
1
Camera module label
otocamotocamotocamotocamMIPI Port (Index)
0
0
4
4
LaneUsed
x4
x4
x4
x4
Number of I2C
3
3
3
3
I2C Channel
I2C1
I2C1
I2C0
I2C0
Device0 I2C Address
10
11
10
11
Device1 I2C Address
18
19
18
19
Device2 I2C Address
48
48
48
48
Note
please note, GMSL2 Aggregated-link SerDes CSI-2 port 0 and 4 is purposely set to
LaneUsed = x4to improve Intel® IPU6 DPHY signal-integrity problem on SEAVO® Embedded Computer HB03 .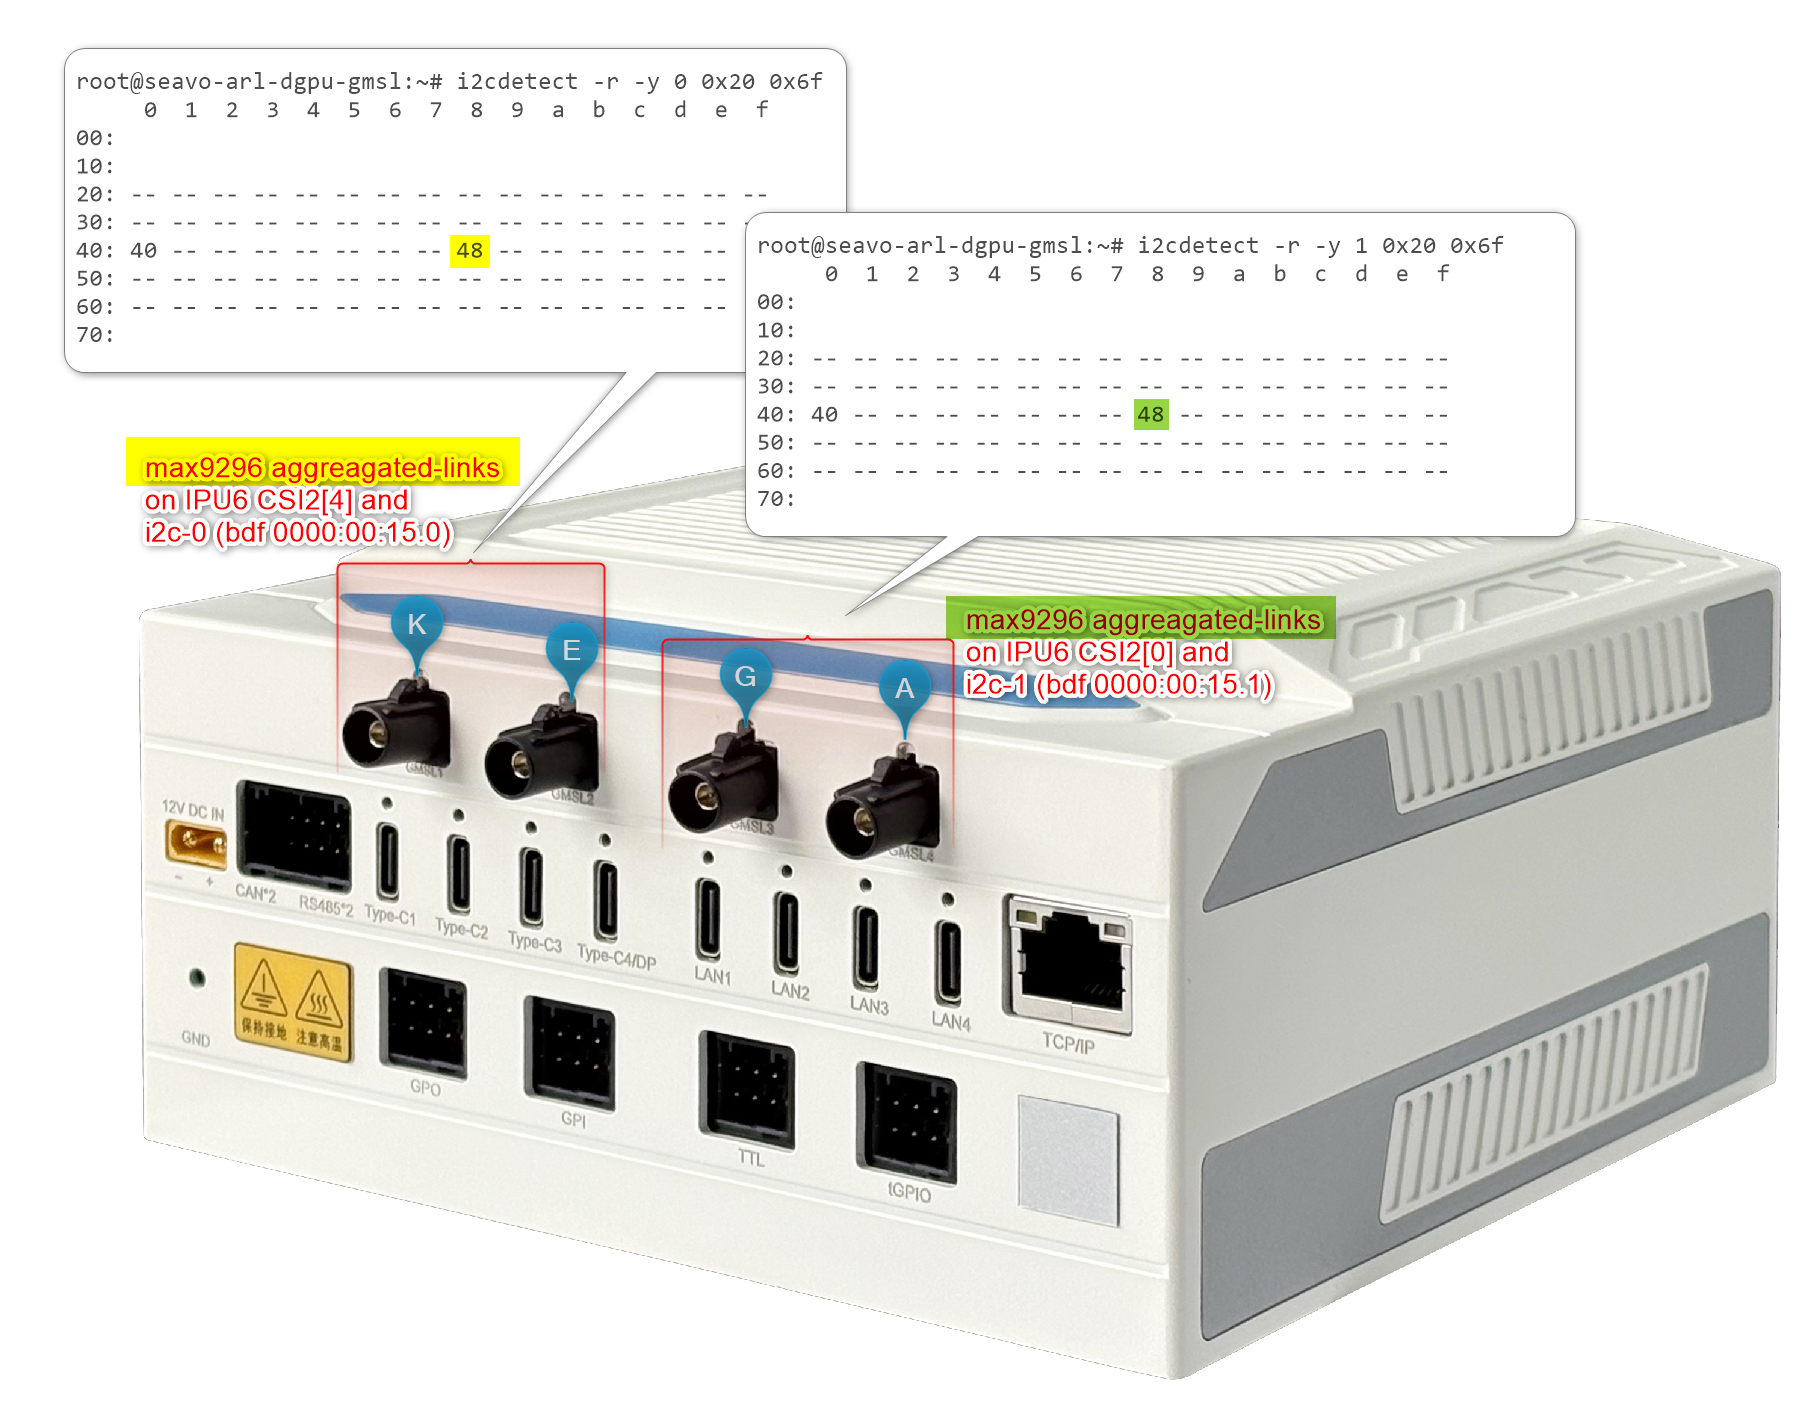
Attention
For the time being each GMSL2 Aggregated-link Deserializer (e.g. MAX9296A) on the same I2C Channel shall set identical Custom HID and Camera module label tuple matching with GMSL2 Serializer and Camera Sensor devices type.
The SEAVO® Embedded Computer HB03 Add-in-Cards (AIC) I2C1 Channel (ex.
INTC10CD) Aggregated-link Deserializer (e.g. MAX9296A) i2c device 0x48 shall set Custom HID (ex.INTC10CD) and Camera module label (exd4xx) tuple for both GMSL Camera suffix a and g, where the other Aggregated-link Deserializer (e.g. MAX9296A) i2c device 0x4a could have a different Custom HID (exINTC1031) and Camera module label (exisx031) tuple on both GMSL Camera suffix e and k.The Axiomtek ROBOX500 may provide either 4x GMSL or 8x GMSL camera interface (FAKRA universal type).
Below an ACPI devices configure example for 4x Intel® RealSense™ Depth Camera D457 GMSL2 module :
Standalone-link SerDes CSI-2 port 0, 1, 2 and 3 and I2C settings for GMSL Add-in-Card (AIC)¶ UEFI Custom Sensor
Camera 1
Camera 2
Camera 3
Camera 4
Camera suffix
a
b
c
d
Custom HID
INTC10CDINTC10CDINTC10CDINTC10CDPPR Value
2
2
2
2
PPR Unit
1
1
1
1
Camera module label
d4xxd4xxd4xxd4xxMIPI Port (Index)
0
1
2
3
LaneUsed
x2
x2
x2
x2
Number of I2C
3
3
3
3
I2C Channel
I2C5
I2C5
I2C5
I2C5
Device0 I2C Address
12
14
16
18
Device1 I2C Address
42
44
62
64
Device2 I2C Address
48
4a
68
6c
Below an ACPI devices configure example of four GMSL2 Camera module from D3 Embedded Discovery:
Aggregated-link SerDes CSI-2 port 0 and 4 and I2C settings for GMSL Add-in-Card (AIC)¶ UEFI Custom Sensor
Camera 1
Camera 2
Camera 3
Camera 4
Camera suffix
a
b
c
d
Custom HID
D3000004D3000004D3000004D3000004PPR Value
2
2
2
2
PPR Unit
1
1
1
1
Camera module label
D3CMCXXX-115-084D3CMCXXX-115-084D3CMCXXX-115-084D3CMCXXX-115-084MIPI Port (Index)
0
1
2
3
LaneUsed
x2
x2
x2
x2
Number of I2C
3
3
3
3
I2C Channel
I2C5
I2C5
I2C5
I2C5
Device0 I2C Address
48
4a
68
6c
Device1 I2C Address
42
44
62
64
Device2 I2C Address
12
14
16
18
Attention
please note, on the Axiomtek® ROBOX500 the 4x D3CMCXXX Camera ACPI configuration is achieved by
PPR Unit=1requires settingDevice0for GMSL2 Aggregated-link Deserializer I2C address (e.g. MAX9296A) andDevice2for Sensors I2C address (e.g. ISX031).Below an ACPI devices configure example of four GMSL2 Camera module from D3 Embedded Discovery PRO :
Aggregated-link SerDes CSI-2 port 0 and 4 and I2C settings for GMSL Add-in-Card (AIC)¶ UEFI Custom Sensor
Camera 1
Camera 2
Camera 3
Camera 4
Camera suffix
a
b
c
d
Custom HID
D3000005D3000005D3000005D3000005PPR Value
2
2
2
2
PPR Unit
1
1
1
1
Camera module label
D3CMCXXX-106-084D3CMCXXX-106-084D3CMCXXX-106-084D3CMCXXX-106-084MIPI Port (Index)
0
1
2
3
LaneUsed
x2
x2
x2
x2
Number of I2C
3
3
3
3
I2C Channel
I2C5
I2C5
I2C5
I2C5
Device0 I2C Address
48
4a
68
6c
Device1 I2C Address
42
44
62
64
Device2 I2C Address
12
14
16
18
Attention
please note, the D3CMCXXX ACPI configuration with
PPR Unit=2requires settingDevice0for GMSL2 Aggregated-link Deserializer I2C address (e.g. MAX9296A) andDevice2for Sensors I2C address (e.g. ISX031).Below an ACPI devices configure example for oToBrite® oToCAM222 GMSL2 camera modules :
Aggregated-link SerDes CSI-2 port 0 and 4 and I2C settings for GMSL Add-in-Card (AIC)¶ UEFI Custom Sensor
Camera 1
Camera 2
Camera 3
Camera 4
GMSL Camera suffix
a
b
c
d
Custom HID
OTOC1021OTOC1021OTOC1021OTOC1021PPR Value
2
2
2
2
PPR Unit
1
1
1
1
Camera module label
otocamotocamotocamotocamMIPI Port (Index)
0
1
2
3
LaneUsed
x2
x2
x2
x2
Number of I2C
3
3
3
3
I2C Channel
I2C5
I2C5
I2C5
I2C5
Device0 I2C Address
10
11
10
11
Device1 I2C Address
18
19
18
19
Device2 I2C Address
48
4a
68
6c
Below an ACPI devices configure example for oToBrite® oToCAM223 GMSL2 camera modules :
Aggregated-link SerDes CSI-2 port 0 and 4 and I2C settings for GMSL Add-in-Card (AIC)¶ UEFI Custom Sensor
Camera 1
Camera 2
Camera 3
Camera 4
GMSL Camera suffix
a
b
c
d
Custom HID
OTOC1031OTOC1031OTOC1031OTOC1031PPR Value
2
2
2
2
PPR Unit
1
1
1
1
Camera module label
otocamotocamotocamotocamMIPI Port (Index)
0
1
2
3
LaneUsed
x2
x2
x2
x2
Number of I2C
3
3
3
3
I2C Channel
I2C5
I2C5
I2C5
I2C5
Device0 I2C Address
10
11
10
11
Device1 I2C Address
18
19
18
19
Device2 I2C Address
48
4a
68
6c

Another example below illustrates how to configure ACPI devices 8x Intel® RealSense™ Depth Camera D457 GMSL2 module :
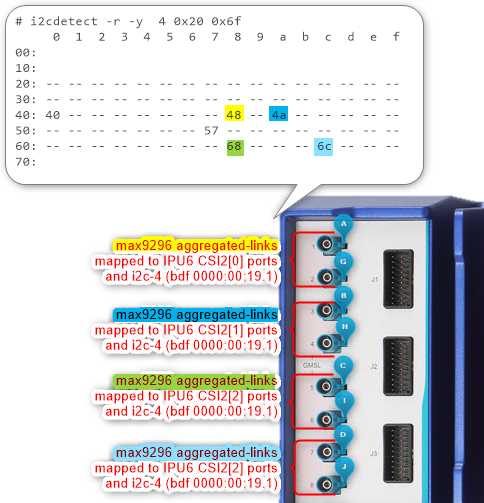
Aggregated-link SerDes CSI-2 port 0, 1, 2 and 3 and I2C settings for GMSL Add-in-Card (AIC)¶ UEFI Custom Sensor
Camera 1
Camera 2
Camera 3
Camera 4
N/A 1
N/A 1
N/A 1
N/A 1
Camera suffix (letter)
a
b
c
d
g
h
i
j
Custom HID
INTC10CDINTC10CDINTC10CDINTC10CDINTC10CDINTC10CDINTC10CDINTC10CDPPR Value
2
2
2
2
2
2
2
2
PPR Unit
1
1
1
1
1
1
1
1
Camera module label
d4xxd4xxd4xxd4xxd4xxd4xxd4xxd4xxMIPI Port (Index)
0
1
2
3
0
1
2
3
LaneUsed
x2
x2
x2
x2
x2
x2
x2
x2
Number of I2C
3
3
3
3
3
3
3
3
I2C Channel
I2C5
I2C5
I2C5
I2C5
I2C5
I2C5
I2C5
I2C5
Device0 I2C Address
12
14
16
18
13
15
17
19
Device1 I2C Address
42
44
62
64
43
45
63
65
Device2 I2C Address
48
4a
68
6c
48
4a
68
6c
Reboot the target system and access the BIOS (press the Delete, Esc, or F2 keys while booting to open the UEFI/BIOS menu).
The following user settings would configure four Intel® RealSense™ Depth Camera D457 by defining custom HID
INTC10CDand Camera module labeld4xxACPI Camera devices (Intel® UEFI firmware vendor might limitMIPI Camera Configurationto 4 ACPI devices maximum) :Intel Advanced Menu ⟶ Power & Performance ⟶ CPU-Power Management Control ⟶ C States ⟶ < Disable > (Note: If enabled, frames-per-second will decrease)
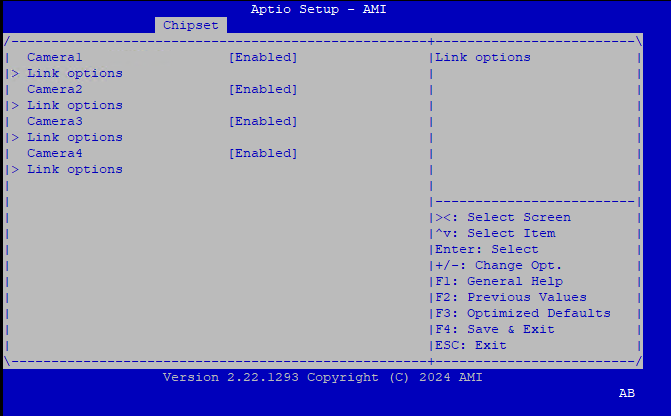
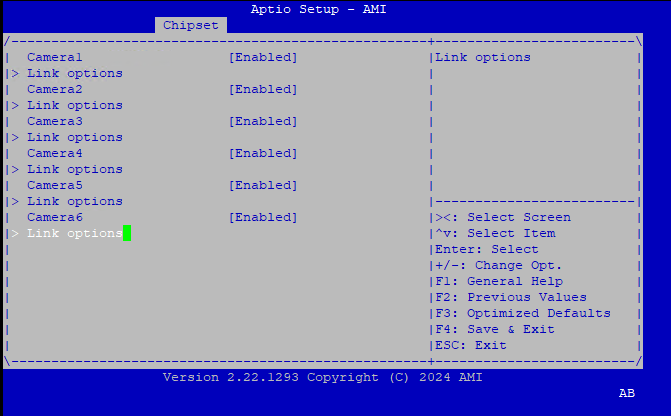
Intel Advanced Menu ⟶ System Agent (SA) Configuration ⟶ MIPI Camera Configuration ⟶ < Enable > (Note: Enable all four or six cameras in this menu)
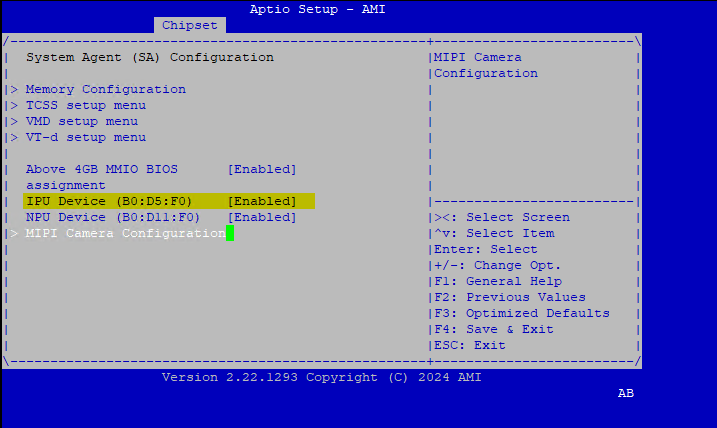
Intel Advanced Menu ⟶ System Agent (SA) Configuration ⟶ MIPI Camera Configuration ⟶ Link Options ⟶ Sensor Model ⟶ User Custom ACPI devices, for example with multiple HID
INTC10CDIntel® RealSense™ Depth Camera D457 GMSL.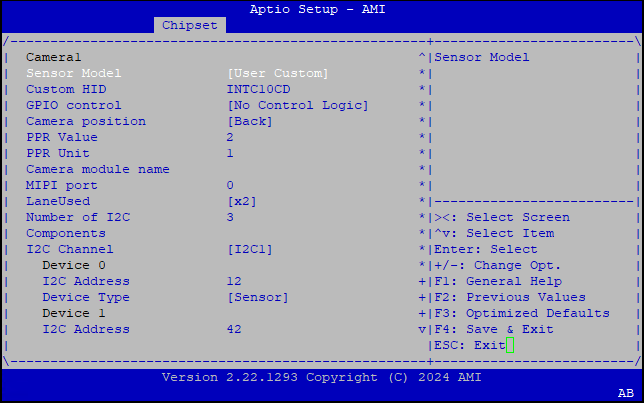
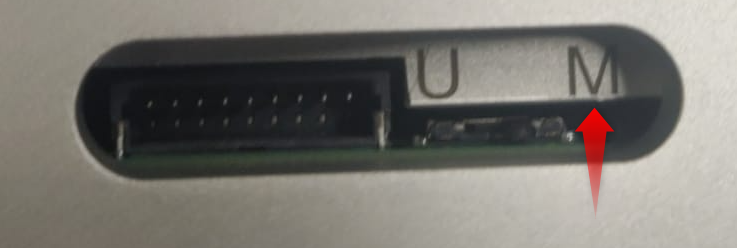
Note
Please make sure MIPI mode is selected at the back of the Intel® RealSense™ Depth Camera D457. Review |Intel| RealSense™ Depth Camera D457 datasheet for more details about the hardware specifics.
Intel® GMSL intel-ipu6 Debian kernel modules (DKMS)
The Intel® IPU6 hardware (6th generation Image Processing Unit) is made up of two components :
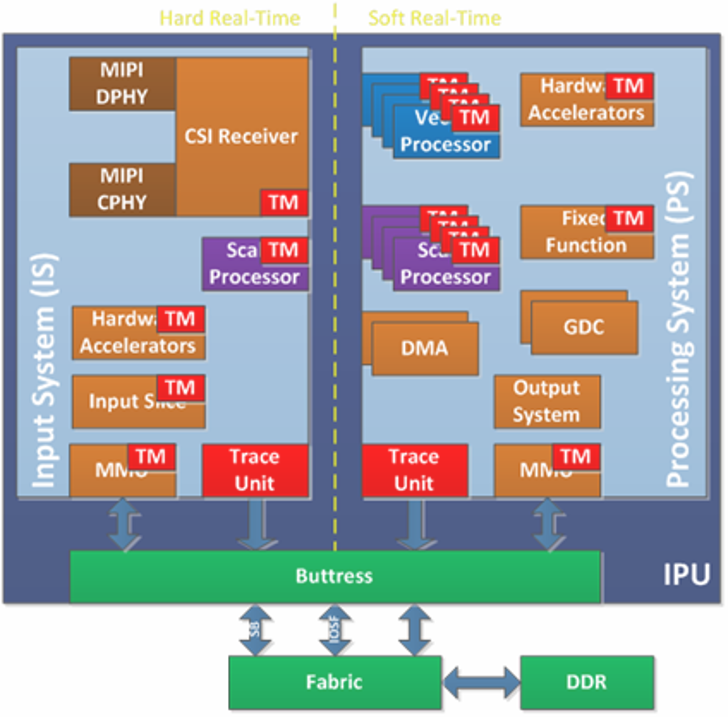
Input System (ISYS) controls MIPI D-PHY/C-PHY, several MIPI CSI-2 receivers and processes the image data from the sensors and outputs the frames to memory.
Processing System (PSYS) programmable media pipeline to perform frame post-treatment (Auto White Balancing AWB, … etc)
Note
User can determine if Intel® IPU6 device is correctly enabled by UEFI Firmware configuration :
$ lspci -nnn | grep media
Below the Intel® IPU6 hardware pciid on 12th/13th/14th Gen Intel® Core™ product.
00:05.0 Multimedia controller [0480]: Intel Corporation Device [8086:a75d]
Below the Intel® IPU6 hardware (6th generation Image Processing Unit) pciid on Intel® Core™ Ultra Series 1 and 2 (Arrow Lake-U/H) product.
00:05.0 Multimedia controller [0480]: Intel Corporation Device [8086:7d19] (rev 04)
Loading the Intel® IPU6 Firmware (6th generation Image Processing Unit) is done during Linux drivers probing phase :
Must be Authenticated by Intel® Converged Security Engine (CSE or CSME).
Initiate DMA operations and MMU address translation access the internal and external system memory through virtual address.
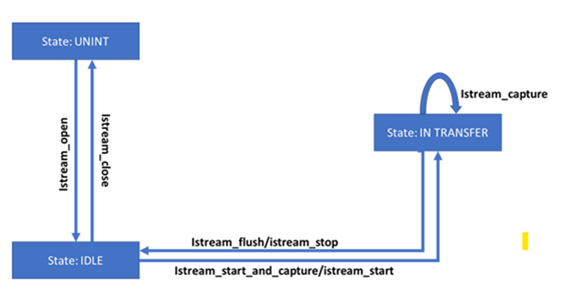
Manage Finite-State Machine (FSM) stream open/close, stream start/stop, stream capture states transitions across all MIPI CSI-2 receivers with 4 virtual-channels (see understand virtual channel for further details)
$ find /usr/ -name ipu6*_fw.bin*
For example, Canonical® Ubuntu® 24.04 (Noble Numbat) distribution should already provide :
/usr/lib/firmware/intel/ipu/ipu6ep_fw.bin.zst
/usr/lib/firmware/intel/ipu/ipu6epadln_fw.bin.zst
/usr/lib/firmware/intel/ipu/ipu6epmtl_fw.bin.zst
/usr/lib/firmware/intel/ipu/ipu6_fw.bin.zst
The Intel® IPU6 Input System (MIPI CSI2 receiver) Linux drivers mainly works as MIPI CSI-2 receiver which receives and processes the image data from the sensors and outputs the frames to memory. It is composed of several kernel modules :
The
ipu6-acpi-*drivers supports camera sensors ACPI devices enumeration.The
intel-ipu6is an IPU6 common driver which does PCI configuration, firmware loading and parsing, firmware authentication, DMA mapping and IPU-MMU (internal Memory mapping Unit) configuration.The
intel-ipu6-isysimplements V4L2, Media Controller and V4L2 sub-device interfaces.Several third-party vendor camera sensors (ex.
d4xx) connected to the IPU6 ISYS through V4L2 sub-device sensor drivers.
See the following links for more information about Intel Image Processing Unit 6 (IPU6) Input System driver and Intel IPU6 Driver
Attention
Intel® Edge Controls for Industrial maintains the intel-ipu6-dkms (branch iotg_ipu6) package, compatible with Debian 12 (Bookworm), Canonical® Ubuntu® 22.04 (Jammy Jellyfish), and Canonical® Ubuntu® 24.04 (Noble Numbat) distributions, featured for Intel® industrial OEM/ODM GMSL AIC product enabling and D457/GMSL camera support. Canonical maintains an identical intel-ipu6-dkms (branch dfsg) package, compatible with Canonical® Ubuntu® 22.04 (Jammy Jellyfish) and Canonical® Ubuntu® 24.04 (Noble Numbat) distribution, featured for Intel® Client OEM/ODM MIPI camera support. Both packages are mutually exclusive.
Please note that Intel® Image Processing Unit 6 (IPU6) Input System driver has been contributed to the kernel.org upstream without initial GMSL2 support.
The section is applicable to:

This section explains the procedure to configure the APT package manager to use the hosted ECI APT repository.
Make sure that you have prepared the target system.
Open a terminal prompt which will be used to execute the remaining steps.
Download the ECI APT key to the system keyring:
$ sudo -E wget -O- https://eci.intel.com/repos/gpg-keys/GPG-PUB-KEY-INTEL-ECI.gpg | sudo tee /usr/share/keyrings/eci-archive-keyring.gpg > /dev/null
ECI provides two types of APT repositories to choose from:
- Dynamic APT repository
This APT repository receives periodic updates, especially when a new version of ECI is released. It contains all the past, current, and future packages from ECI. Use this APT repository if you want to keep your system up-to-date with the latest packages from ECI.
- Static APT repository
This APT repository contains only the packages from a specific ECI version. It is unchanging and will not receive updates. Use this APT repository if you want to prevent future changes to your system.
Add the signed entry to APT sources and configure the APT client to use the ECI APT repository:
$ echo "deb [signed-by=/usr/share/keyrings/eci-archive-keyring.gpg] https://eci.intel.com/repos/$(source /etc/os-release && echo $VERSION_CODENAME) isar main" | sudo tee /etc/apt/sources.list.d/eci.list
$ echo "deb-src [signed-by=/usr/share/keyrings/eci-archive-keyring.gpg] https://eci.intel.com/repos/$(source /etc/os-release && echo $VERSION_CODENAME) isar main" | sudo tee -a /etc/apt/sources.list.d/eci.list
Decide which version of ECI you would like to use. Refer to ECI Supported Distributions to find an ECI version which supports your desired distribution. This example chooses ECI version
3.2:$ export VERSION_ECI="3.2"
Add the signed entry to APT sources and configure the APT client to use the ECI APT repository:
$ echo "deb [signed-by=/usr/share/keyrings/eci-archive-keyring.gpg] https://eci.intel.com/repos/archive/${VERSION_ECI}/$(source /etc/os-release && echo $VERSION_CODENAME) isar main" | sudo tee /etc/apt/sources.list.d/eci.list
$ echo "deb-src [signed-by=/usr/share/keyrings/eci-archive-keyring.gpg] https://eci.intel.com/repos/archive/${VERSION_ECI}/$(source /etc/os-release && echo $VERSION_CODENAME) isar main" | sudo tee -a /etc/apt/sources.list.d/eci.list
Note: The auto upgrade feature in Canonical® Ubuntu® will change the deployment environment over time. If you do not want to auto upgrade, execute the following commands to disable auto upgrade:
$ sudo sed -i "s/APT::Periodic::Update-Package-Lists \"1\"/APT::Periodic::Update-Package-Lists \"0\"/g" "/etc/apt/apt.conf.d/20auto-upgrades"
$ sudo sed -i "s/APT::Periodic::Unattended-Upgrade \"1\"/APT::Unattended-Upgrade \"0\"/g" "/etc/apt/apt.conf.d/20auto-upgrades"
Configure the ECI APT repository to have higher priority over other repositories and pin the version of the libflann packages:
$ sudo bash -c 'echo -e "Package: *\nPin: origin eci.intel.com\nPin-Priority: 1000" > /etc/apt/preferences.d/isar'
$ sudo bash -c 'echo -e "\nPackage: libflann*\nPin: version 1.19.*\nPin-Priority: -1\n\nPackage: flann*\nPin: version 1.19.*\nPin-Priority: -1" >> /etc/apt/preferences.d/isar'
Update the APT sources lists:
$ sudo apt update
Setup the Intel® GMSL SerDes ACPI devices configuration.
Install Intel IPU6 Linux firmware, available from the ECI repository, which combines both the Debian 12 (Bookworm), Canonical® Ubuntu® 22.04 (Jammy Jellyfish), Canonical® Ubuntu® 24.04 (Noble Numbat) firmware officially maintained packages and intel/ipu6-camera-bins latest Out-of-Tree (OOT) Intel® IPU6 firmware blobs.
$ sudo apt install firmware-misc-nonfree firmware-linux
For example, on Debian 12 (Bookworm) distribution, using the ECI repository should display:
$ sudo apt-cache policy firmware-misc-nonfree
firmware-misc-nonfree:
Installed: 20230804-3-intel-iotg
Candidate: 20230804-3-intel-iotg
Version table:
*** 20230804-3-intel-iotg 1000
      1000 https://eci.intel.com/repos/bookworm isar/main amd64 Packages
$ sudo apt install linux-firmware
For example, on Canonical® Ubuntu® 22.04 (Jammy Jellyfish) distribution, using the ECI repository should display:
$ sudo apt-cache policy linux-firmware
linux-firmware:
Installed: 20220329.git681281e4-0ubuntu3.37-intel-iotg.eci7
Candidate: 20220329.git681281e4-0ubuntu3.37-intel-iotg.eci7
Version table:
*** 20220329.git681281e4-0ubuntu3.37-intel-iotg.eci7 1000
      1000 https://eci.intel.com/repos/jammy isar/main amd64 Packages
      1000 https://eci.intel.com/repos/jammy isar/main i386 Packages
   20220329.git681281e4-0ubuntu3.36-intel-iotg.eci7 1000
      1000 https://eci.intel.com/repos/jammy isar/main amd64 Packages
      1000 https://eci.intel.com/repos/jammy isar/main i386 Packages
   20220329.git681281e4-0ubuntu3.36-intel-iotg.eci5 1000
      1000 https://eci.intel.com/repos/jammy isar/main amd64 Packages
      1000 https://eci.intel.com/repos/jammy isar/main i386 Packages
   20220329.git681281e4-0ubuntu3.36-intel-iotg.eci4 1000
      1000 https://eci.intel.com/repos/jammy isar/main amd64 Packages
      1000 https://eci.intel.com/repos/jammy isar/main i386 Packages
   20220329.git681281e4-0ubuntu3.31-intel-iotg.eci4 1000
      1000 https://eci.intel.com/repos/jammy isar/main amd64 Packages
      1000 https://eci.intel.com/repos/jammy isar/main i386 Packages
   20220329.git681281e4-0ubuntu3.29-intel-iotg.eci3 1000
      1000 https://eci.intel.com/repos/jammy isar/main amd64 Packages
      1000 https://eci.intel.com/repos/jammy isar/main i386 Packages
   20220329.git681281e4-0ubuntu3.18-intel-iotg.eci2 1000
      1000 https://eci.intel.com/repos/jammy isar/main amd64 Packages
      1000 https://eci.intel.com/repos/jammy isar/main i386 Packages
   20220329.git681281e4-0ubuntu3.9-intel-iotg.a9d9951351 1000
      1000 https://eci.intel.com/repos/jammy isar/main amd64 Packages
      1000 https://eci.intel.com/repos/jammy isar/main i386 Packages
   20220329.git681281e4-0ubuntu3.7-intel-iotg.a9d9951351 1000
      1000 https://eci.intel.com/repos/jammy isar/main amd64 Packages
      1000 https://eci.intel.com/repos/jammy isar/main i386 Packages
   20220329.git681281e4-0ubuntu3.6-intel-iotg.a9d9951351 1000
      1000 https://eci.intel.com/repos/jammy isar/main amd64 Packages
      1000 https://eci.intel.com/repos/jammy isar/main i386 Packages
   20220329.git681281e4-0ubuntu3.5-intel-iotg.a9d9951351 1000
      1000 https://eci.intel.com/repos/jammy isar/main amd64 Packages
      1000 https://eci.intel.com/repos/jammy isar/main i386 Packages
   20220329.git681281e4-0ubuntu3.37 500
      500 http://tw.archive.ubuntu.com/ubuntu jammy-updates/main amd64 Packages
      500 http://tw.archive.ubuntu.com/ubuntu jammy-updates/main i386 Packages
      500 http://security.ubuntu.com/ubuntu jammy-security/main amd64 Packages
      500 http://security.ubuntu.com/ubuntu jammy-security/main i386 Packages
      100 /var/lib/dpkg/status
   20220329.git681281e4-0ubuntu1 500
      500 http://tw.archive.ubuntu.com/ubuntu jammy/main amd64 Packages
      500 http://tw.archive.ubuntu.com/ubuntu jammy/main i386 Packages
$ sudo apt install linux-firmware
For example, on Canonical® Ubuntu® 24.04 (Noble Numbat) distribution, using the ECI repository should display:
$ sudo apt-cache policy linux-firmware
linux-firmware:
Installed: 20240318.git3b128b60-0ubuntu2.11-intel-iotg.eci7
Candidate: 20240318.git3b128b60-0ubuntu2.11-intel-iotg.eci7
Version table:
*** 20240318.git3b128b60-0ubuntu2.11-intel-iotg.eci7 1000
      1000 https://eci.intel.com/repos/noble isar/main amd64 Packages
      100 /var/lib/dpkg/status
   20240318.git3b128b60-0ubuntu2.10-intel-iotg.eci4 1000
      1000 https://eci.intel.com/repos/noble isar/main amd64 Packages
   20240318.git3b128b60-0ubuntu2.7-intel-iotg.eci3 1000
      1000 https://eci.intel.com/repos/noble isar/main amd64 Packages
   20240318.git3b128b60-0ubuntu2.6-intel-iotg.eci3 1000
      1000 https://eci.intel.com/repos/noble isar/main amd64 Packages
   20240318.git3b128b60-0ubuntu2.5-intel-iotg.eci3 1000
      1000 https://eci.intel.com/repos/noble isar/main amd64 Packages
   20240318.git3b128b60-0ubuntu2.1-intel-iotg.eci3 1000
      1000 https://eci.intel.com/repos/noble isar/main amd64 Packages
   20240318.git3b128b60-0ubuntu2.13 500
      500 http://archive.ubuntu.com/ubuntu noble-updates/main amd64 Packages
      500 http://archive.ubuntu.com/ubuntu noble-security/main amd64 Packages
   20240318.git3b128b60-0ubuntu2 500
      500 http://archive.ubuntu.com/ubuntu noble/main amd64 Packages
Clean prior
intel_ipu6kernel loaded modules which may collide with DKMS IPU6:$ lsmod | grep intel_ipu6 $ sudo rmmod intel_ipu6 intel_ipu6_psys intel_ipu6_isys
Check if
intel-ipu6-dkmslatest version is candidate$ sudo apt-cache policy intel-ipu6-dkms
For example, on Debian 12 (Bookworm) distribution, using the ECI repository should display:
intel-ipu6-dkms:
Installed: 20241031+iotgipu6-0eci4
Candidate: 20250703+iotgipu6-0eci1
Version table:
   20250703+iotgipu6-0eci1 1000
      1000 https://eci.intel.com/repos/bookworm isar/main amd64 Packages
*** 20241031+iotgipu6-0eci4 1000
      1000 https://eci.intel.com/repos/bookworm isar/main amd64 Packages
   20241031+iotgipu6-0eci3 1000
      1000 https://eci.intel.com/repos/bookworm isar/main amd64 Packages
   20240118+iotgipu6-0eci14 1000
      1000 https://eci.intel.com/repos/bookworm isar/main amd64 Packages
   20240118+iotgipu6-0eci13 1000
      1000 https://eci.intel.com/repos/bookworm isar/main amd64 Packages
   20240118+iotgipu6-0eci12 1000
      1000 https://eci.intel.com/repos/bookworm isar/main amd64 Packages
   20240118+iotgipu6-0eci11 1000
      1000 https://eci.intel.com/repos/bookworm isar/main amd64 Packages
   20240118+iotgipu6-0eci10 1000
      1000 https://eci.intel.com/repos/bookworm isar/main amd64 Packages
   20240118+iotgipu6-0eci9 1000
      1000 https://eci.intel.com/repos/bookworm isar/main amd64 Packages
   20240118+iotgipu6-0eci5 1000
      1000 https://eci.intel.com/repos/bookworm isar/main amd64 Packages
   20230621+iotgipu6-0eci8 1000
      1000 https://eci.intel.com/repos/bookworm isar/main amd64 Packages
   20230621+iotgipu6-0eci3 1000
      1000 https://eci.intel.com/repos/bookworm isar/main amd64 Packages
   20230621+iotgipu6-0eci2 1000
      1000 https://eci.intel.com/repos/bookworm isar/main amd64 Packages
$ sudo apt-cache policy intel-ipu6-dkms
For example, on Canonical® Ubuntu® 22.04 (Jammy Jellyfish) distribution, using the ECI repository should display:
intel-ipu6-dkms:
Installed: 20241031+iotgipu6-0eci4
Candidate: 20250703+iotgipu6-0eci1
Version table:
   20250703+iotgipu6-0eci1 1000
      1000 https://eci.intel.com/repos/jammy isar/main amd64 Packages
*** 20241031+iotgipu6-0eci4 1000
      1000 https://eci.intel.com/repos/jammy isar/main amd64 Packages
   20241031+iotgipu6-0eci3 1000
      1000 https://eci.intel.com/repos/jammy isar/main amd64 Packages
   20240118+iotgipu6-0eci14 1000
      1000 https://eci.intel.com/repos/jammy isar/main amd64 Packages
   20240118+iotgipu6-0eci13 1000
      1000 https://eci.intel.com/repos/jammy isar/main amd64 Packages
   20240118+iotgipu6-0eci12 1000
      1000 https://eci.intel.com/repos/jammy isar/main amd64 Packages
   20240118+iotgipu6-0eci11 1000
      1000 https://eci.intel.com/repos/jammy isar/main amd64 Packages
   20240118+iotgipu6-0eci10 1000
      1000 https://eci.intel.com/repos/jammy isar/main amd64 Packages
   20240118+iotgipu6-0eci9 1000
      1000 https://eci.intel.com/repos/jammy isar/main amd64 Packages
   20240118+iotgipu6-0eci5 1000
      1000 https://eci.intel.com/repos/jammy isar/main amd64 Packages
   20230621+iotgipu6-0eci8 1000
      1000 https://eci.intel.com/repos/jammy isar/main amd64 Packages
   20230621+iotgipu6-0eci3 1000
      1000 https://eci.intel.com/repos/jammy isar/main amd64 Packages
   20230621+iotgipu6-0eci2 1000
      1000 https://eci.intel.com/repos/jammy isar/main amd64 Packages
   0~git202211220708.278b7e3d-0ubuntu0.22.04.1 500
      500 http://tw.archive.ubuntu.com/ubuntu jammy-updates/universe amd64 Packages
      500 http://security.ubuntu.com/ubuntu jammy-security/universe amd64 Packages
$ sudo apt-cache policy intel-ipu6-dkms
For example, on Canonical® Ubuntu® 24.04 (Noble Numbat) distribution, using the ECI repository should display:
intel-ipu6-dkms:
Installed: 20241031+iotgipu6-0eci4
Candidate: 20250703+iotgipu6-0eci1
Version table:
   20250703+iotgipu6-0eci1 1000
      1000 https://eci.intel.com/repos/noble isar/main amd64 Packages
*** 20241031+iotgipu6-0eci4 1000
      1000 https://eci.intel.com/repos/noble isar/main amd64 Packages
   20241031+iotgipu6-0eci3 1000
      1000 https://eci.intel.com/repos/noble isar/main amd64 Packages
   20240118+iotgipu6-0eci14 1000
      1000 https://eci.intel.com/repos/noble isar/main amd64 Packages
   20240118+iotgipu6-0eci13 1000
      1000 https://eci.intel.com/repos/noble isar/main amd64 Packages
   20240118+iotgipu6-0eci12 1000
      1000 https://eci.intel.com/repos/noble isar/main amd64 Packages
   20240118+iotgipu6-0eci11 1000
      1000 https://eci.intel.com/repos/noble isar/main amd64 Packages
   20240118+iotgipu6-0eci10 1000
      1000 https://eci.intel.com/repos/noble isar/main amd64 Packages
   20240118+iotgipu6-0eci9 1000
      1000 https://eci.intel.com/repos/noble isar/main amd64 Packages
   0~git202406240945.aecec2aa-0ubuntu2~24.04.2 500
      500 http://archive.ubuntu.com/ubuntu noble-updates/universe amd64 Packages
   0~git202311240921.07f0612e-0ubuntu2 500
      500 http://archive.ubuntu.com/ubuntu noble/universe amd64 Packages
Note
please note, the Intel® Edge Controls for Industrial
intel-ipu6-dkmsDebian package lifecycle maintains backward and forward compatibility across multiple Debian 12 (Bookworm), Canonical® Ubuntu® 22.04 (Jammy Jellyfish), and Canonical® Ubuntu® 24.04 (Noble Numbat) distribution and Linux kernel image versions: 5.15/lts, 6.1/lts, 6.5, 6.6/lts, 6.8, 6.11 , 6.12/lts and 6.14.We recommend enabling Intel® Edge Controls for Industrial intel-ipu6-dkmsDebian package among Canonical® or/and Intel® Edge Controls for Industrial Linux kernel images¶Linux Kernel images compatibility list
intel-ipu6-dkmsstable versionsImaging Sensor (type) compatibility list
GMSL2 AIC type compatibility list
Intel github.com/intel/ipu6-drivers baseline with Intel® Edge Controls for Industrial patch quilt
Canonical® Ubuntu® 24.04 (Noble Numbat)
6.14.0-xxx-generic,6.12.xx-r0-0eci?,6.11.0-xxxx-generic6.8.0-xxxx-generic20250703+iotgipu6-0eci1D457 (YUV), ISX031 (YUV), IMX390 (RAW) and AR0234 (RAW)
MAX9296
branch
iotg_ipu6commit-id 69d126d1cDebian 12 (Bookworm)
6.12.xx-r0-0eci?6.1.xx-?6.1.xx-r0-0eci?Canonical® Ubuntu® 22.04 (Jammy Jellyfish)
6.12.xx-r0-0eci?,6.8.0-xxxx-generic,6.8.0-xxxx-oem,6.5.0-xxxx-oem,5.15.0-xxx-intel-iotg,5.15.0-xxx-generic,5.15.0-xxx-oem,Canonical® Ubuntu® 24.04 (Noble Numbat)
6.11.0-xxx-oemand6.11.0-xxxx-generic6.8.0-xxxx-generic20241031+iotgipu6-0eci5D457 (YUV), ISX031 (YUV), IMX390 (RAW) and AR0234 (RAW)
MAX9296
branch
iotg_ipu6commit-id 486e8b8e3Debian 12 (Bookworm)
6.1.xx-?,6.1.xx-r0-0eci?Canonical® Ubuntu® 22.04 (Jammy Jellyfish)
6.8.0-xxxx-generic,6.8.0-xxxx-oem,6.5.0-xxxx-oem,5.15.0-xxx-intel-iotg,5.15.0-xxx-generic,5.15.0-xxx-oem,Canonical® Ubuntu® 22.04 (Jammy Jellyfish)
6.5.0-xxxx-generic,5.15.0-xxx-intel-iotg,5.15.0-xxx-generic,5.15.0-xxx-oem,20240118+iotgipu6-0eci14D457 (YUV)
MAX9296
branch
iotg_ipu6commit-id 0196c509fInstall Linux headers and
intel-ipu6-dkmsDebian packages:$ uname -a
Linux p14hl00ubuntu 6.11.0-24-generic #24~24.04.1-Ubuntu SMP PREEMPT_DYNAMIC Tue Mar 25 20:14:34 UTC 2 x86_64 x86_64 x86_64 GNU/Linux$ sudo apt install pahole linux-headers-$(uname -r) intel-ipu6-dkms
Attention
For the time being Linux Device Power Management Core
CONFIG_PM=yis mandatory for initializing and resetting Intel Image Processing Unit 6 (IPU6) Input System (ISYS) successfully.Check with Linux image as the potential to enable GMSL2 by running the following command :
$ grep -n -e "CONFIG_PM=" -e "CONFIG_PM is" /boot/config*
/boot/config-6.12.8-intel-ese-experimental-lts-rt:569:# CONFIG_PM is not set
/boot/config-6.11.0-21-generic:598:CONFIG_PM=y
/boot/config-6.11.0-24-generic:598:CONFIG_PM=y
/boot/config-6.8.0-57-generic:588:CONFIG_PM=y
/boot/config-6.8.0-58-generic:587:CONFIG_PM=y
/boot/config-6.6.58-intel-ese-standard-lts-dovetail:549:# CONFIG_PM is not set
/boot/config-6.6.58-linux-intel-acrn-sos:537:CONFIG_PM=y
/boot/config-6.6.58-rt45-intel-ese-standard-lts-rt:549:# CONFIG_PM is not set
The Intel Image Processing Unit 6 (IPU6) Firmware authentication will fails with the following messages on all
linux-image-intel-rt*andlinux-image-intel-xenomai*, since Linux Device Power Management Core is disabledCONFIG_PM=nto reduce jitter sources for achieving the best real-time performances :[ 159.851400] intel-ipu6 0000:00:05.0: FW authentication failed(-110) [ 159.851605] intel-ipu6: probe of 0000:00:05.0 failed with error -110
Please refer to Restore Device Power-Management Core on Linux PREEMPT_RT kernel Intel image to re-configure
CONFIG_PM=yand re-build identicallinux-image-intel-rtandlinux-image-intel-xenomaifeature-set for GMSL2 enabling. Please note that the resulting LinuxCONFIG_PREEMPT_RT=ykernel runtime will exhibit higher-latency and more jitter sources.For example, on Canonical® Ubuntu® 22.04 (Jammy Jellyfish) distribution, using the ECI repository should display several NEW kernel modules built across all installed kernel headers:
For example, on Canonical® Ubuntu® 22.04 (Jammy Jellyfish) distribution, using the ECI repository should display several NEW kernel modules built across all installed kernel headers:
Loading new ipu6-drivers-20250703+iotgipu6-0eci1 DKMS files...
Building for 6.8.0-1026-oem
Building initial module for 6.8.0-1026-oem
Done.

ar0234.ko.zst:
Running module version sanity check.
- Original module
   - No original module exists within this kernel
- Installation
   - Installing to /lib/modules/6.8.0-1026-oem/updates/dkms/

lt6911uxc.ko.zst:
Running module version sanity check.
- Original module
   - No original module exists within this kernel
- Installation
   - Installing to /lib/modules/6.8.0-1026-oem/updates/dkms/

imx390.ko.zst:
Running module version sanity check.
- Original module
   - No original module exists within this kernel
- Installation
   - Installing to /lib/modules/6.8.0-1026-oem/updates/dkms/

isx031.ko.zst:
Running module version sanity check.
- Original module
   - No original module exists within this kernel
- Installation
   - Installing to /lib/modules/6.8.0-1026-oem/updates/dkms/

max9295.ko.zst:
Running module version sanity check.
- Original module
   - No original module exists within this kernel
- Installation
   - Installing to /lib/modules/6.8.0-1026-oem/updates/dkms/

max9296.ko.zst:
Running module version sanity check.
- Original module
   - No original module exists within this kernel
- Installation
   - Installing to /lib/modules/6.8.0-1026-oem/updates/dkms/

serdes.ko.zst:
Running module version sanity check.
- Original module
   - No original module exists within this kernel
- Installation
   - Installing to /lib/modules/6.8.0-1026-oem/updates/dkms/

intel-ipu6-psys.ko.zst:
Running module version sanity check.
- Original module
   - No original module exists within this kernel
- Installation
   - Installing to /lib/modules/6.8.0-1026-oem/updates/dkms/

ipu6-acpi.ko.zst:
Running module version sanity check.
- Original module
   - No original module exists within this kernel
- Installation
   - Installing to /lib/modules/6.8.0-1026-oem/updates/dkms/

ipu6-acpi-pdata.ko.zst:
Running module version sanity check.
- Original module
   - No original module exists within this kernel
- Installation
   - Installing to /lib/modules/6.8.0-1026-oem/updates/dkms/

ipu6-acpi-common.ko.zst:
Running module version sanity check.
- Original module
   - No original module exists within this kernel
- Installation
   - Installing to /lib/modules/6.8.0-1026-oem/updates/dkms/

d4xx-max9295.ko.zst:
Running module version sanity check.
- Original module
   - No original module exists within this kernel
- Installation
   - Installing to /lib/modules/6.8.0-1026-oem/updates/dkms/

d4xx-max9296.ko.zst:
Running module version sanity check.
- Original module
   - No original module exists within this kernel
- Installation
   - Installing to /lib/modules/6.8.0-1026-oem/updates/dkms/

d4xx.ko.zst:
Running module version sanity check.
- Original module
   - No original module exists within this kernel
- Installation
   - Installing to /lib/modules/6.8.0-1026-oem/updates/dkms/

intel-ipu6.ko.zst:
Running module version sanity check.
- Original module
   - No original module exists within this kernel
- Installation
   - Installing to /lib/modules/6.8.0-1026-oem/updates/dkms/

intel-ipu6-isys.ko.zst:
Running module version sanity check.
- Original module
   - No original module exists within this kernel
- Installation
   - Installing to /lib/modules/6.8.0-1026-oem/updates/dkms/
depmod...
Attention
On certain Linux images DKMS will not replace modules that might exactly matches what is already found in kernel.
Loading new ipu6-drivers-20250703+iotgipu6-0eci1 DKMS files...
Building for 6.14.0-29-generic
Building initial module for 6.14.0-29-generic
Done.

...

d4xx.ko.zst:
Running module version sanity check.
- Original module
   - No original module exists within this kernel
- Installation
   - Installing to /lib/modules/6.14.0-29-generic/updates/dkms/

intel-ipu6.ko.zst:
Running module version sanity check.
Module version  for intel-ipu6.ko.zst
exactly matches what is already found in kernel 6.14.0-29-generic.
DKMS will not replace this module.
You may override by specifying --force.

intel-ipu6-isys.ko.zst:
Running module version sanity check.
Module version  for intel-ipu6-isys.ko.zst
exactly matches what is already found in kernel 6.14.0-29-generic.
DKMS will not replace this module.
You may override by specifying --force.
please Make sure DKMS force install overrides prior modules :
$ sudo dkms install --force ipu6-drivers/20250703+iotgipu6-0eci1
...

intel-ipu6.ko.zst:
Running module version sanity check.
- Original module
- Installation
   - Installing to /lib/modules/6.14.0-29-generic/updates/dkms/

intel-ipu6-isys.ko.zst:
Running module version sanity check.
- Original module
- Installation
   - Installing to /lib/modules/6.14.0-29-generic/updates/dkms/
Check the
dkmsstatus by using the following command:$ dkms status
For example, on Canonical® Ubuntu® 22.04 (Jammy Jellyfish) distribution, assuming the kernel module was built against Linux headers from Canonical
5.15.0-*to6.8.0-*, as well as Intel® Edge Controls for Industrial6.12.8-intel-ese-experimental-lts:ipu6-drivers/20250703+iotgipu6-0eci1, 5.15.0-1061-intel-iotg, x86_64: installed ipu6-drivers/20250703+iotgipu6-0eci1, 5.15.0-117-generic, x86_64: installed ipu6-drivers/20250703+iotgipu6-0eci1, 6.5.0-1023-oem, x86_64: installed ipu6-drivers/20250703+iotgipu6-0eci1, 6.8.0-79-generic, x86_64: installed ipu6-drivers/20250703+iotgipu6-0eci1, 6.12.8-intel-ese-experimental-lts, x86_64: installed
For example, on Debian 12 (Bookworm) distribution, assuming the kernel module was built against Linux headers
6.1.80:ipu6-drivers/20250703+iotgipu6-0eci1, 6.1.80-intel-ese-standard-lts, x86_64: installed ipu6-drivers/20250703+iotgipu6-0eci1, 6.12.8-intel-ese-experimental-lts, x86_64: installed
For example, on Canonical® Ubuntu® 24.04 (Noble Numbat) distribution, assuming the kernel module was built against Linux headers from Canonical
6.8.0-*to6.14.0-*, as well as Intel® Edge Controls for Industrial6.12.8-intel-ese-experimental-lts:ipu6-drivers/20250703+iotgipu6-0eci1, 6.8.0-1026-oem, x86_64: installed ipu6-drivers/20250703+iotgipu6-0eci1, 6.11.0-24-generic, x86_64: installed ipu6-drivers/20250703+iotgipu6-0eci1, 6.14.0-29-generic, x86_64: installed ipu6-drivers/20250703+iotgipu6-0eci1, 6.12.8-intel-ese-experimental-lts, x86_64: installed
Verify that
intel_ipu6modules autoload blacklist is set:$ cat /etc/modprobe.d/blacklist-intel-ipu6.conf
For example, on Canonical® Ubuntu® 22.04 (Jammy Jellyfish) distribution, using the ECI repository should display:
# CCG-legacy kernel builtin IPU6 clash with Realsense D4xx driver intel-ipu6-dkms
blacklist intel_ipu6_isys
blacklist intel_ipu6_psys
blacklist intel_ipu6
Verity that
d4xxmodules default configuration is set:$ cat /etc/modprobe.d/d4xx.conf
For example, on Canonical® Ubuntu® 22.04 (Jammy Jellyfish) distribution, using the ECI repository would display:
options d4xx des_addr=0x48,0x4a,0x48,0x4a serdes_bus=1,1,2,2Attention
User need to understand the specifics of Intel® Industrial OEM/ODM GMSL AIC product and Intel® RealSense™ Depth Camera D457 GMSL Initialization sequences.
GMSL AIC board-specific Intel® RealSense™ Depth Camera D457 GMSL /etc/modprobe.d/d4xx.conf¶GMSL AIC scenario
d4xx module user parameters
Description
Axiomtek ROBOX500 SerDes configuration
des_addr=0x48,0x4a,0x68,0x6c serdes_bus=4,4,4,4GMSL2 Add-in-Card (AIC) settings for CSI-2 ports individual Deserializer (e.g. MAX9296A) I2C devices initialization, all accessible on I2C Bus 4 (e.g I2C adapter bdf
0000:00:19.1)Advantech GMSL Input Module SerDes configuration for AFE-R360 series and ASR-A502 series
des_addr=0x48,0x4a,0x48,0x4a serdes_bus=1,1,2,2GMSL2 Add-in-Card (AIC) settings for CSI-2 ports Aggregated Deserializer (e.g. MAX9296A) I2C devices initialization, accessible across both I2C Bus 1 and 2 (respectively I2C adapter bdf
0000:00:15.1and0000:00:15.2).des_addr=0x48,0x4a,0x48,0x4a serdes_bus=0,0,3,3GMSL2 Add-in-Card (AIC) settings for CSI-2 ports Aggregated Deserializer (e.g. MAX9296A) I2C devices initialization, accessible across both I2C Bus 0 and 3 (respectively I2C adapter bdf
0000:00:15.0and0000:00:15.3).des_addr=0x48,0x4a,0x48,0x4a serdes_bus=0,0,1,1GMSL2 Add-in-Card (AIC) settings for CSI-2 ports Aggregated Deserializer (e.g. MAX9296A) I2C devices initialization, accessible across both I2C Bus 0 and 1 (respectively I2C adapter bdf
0000:00:15.0and0000:00:15.1).For example, on Canonical® Ubuntu® 22.04 (Jammy Jellyfish) distribution, the GMSL Add-in-Card (AIC) CSI-2 ports Aggregated Deserializer (e.g. MAX9296A) I2C devices reset sequences, accessible through I2C Bus 1 :
...
[339333.520470] d4xx 1-0012: Probing driver for D45x
[339333.525172] d4xx 1-0012: Apply multiple camera i2c addr setting for bus 1
[339333.532005] d4xx 1-0012: Set max9296@1-0x48 Link reset
[339333.537429] d4xx 1-0012: Set max9296@1-0x4a Link reset
...
Check which
d4xxkernel module version is available:$ sudo modinfo d4xx
For example, on Canonical® Ubuntu® 22.04 (Jammy Jellyfish) distribution, using the ECI repository should display:
filename:       /lib/modules/6.5.0-1025-oem/updates/dkms/d4xx.ko
version:        1.0.2.20
license:        GPL v2
author:         Dmitry Perchanov <dmitry.perchanov@intel.com>
author:         Guennadi Liakhovetski <guennadi.liakhovetski@intel.com>,
                              Nael Masalha <nael.masalha@intel.com>,
                              Alexander Gantman <alexander.gantman@intel.com>,
                              Emil Jahshan <emil.jahshan@intel.com>,
                              Xin Zhang <xin.x.zhang@intel.com>,
                              Qingwu Zhang <qingwu.zhang@intel.com>,
                              Evgeni Raikhel <evgeni.raikhel@intel.com>,
                              Shikun Ding <shikun.ding@intel.com>
description:    Intel RealSense D4XX Camera Driver
srcversion:     6F6EC05CE900476CF91EC7E
alias:          i2c:d4xx-awg
alias:          i2c:d4xx-asr
alias:          i2c:d4xx
alias:          of:N*T*Cintel,d4xxC*
alias:          of:N*T*Cintel,d4xx
depends:        v4l2-async,max9295,max9296,videodev,mc
retpoline:      Y
name:           d4xx
vermagic:       6.5.0-1025-oem SMP preempt mod_unload modversions
sig_id:         PKCS#7
signer:         p14hl00ubuntu Secure Boot Module Signature key
sig_key:        0A:67:AD:6E:B3:A8:C2:4F:A0:AE:10:98:66:8E:41:EB:D4:7A:22:4B
sig_hashalgo:   sha512
…
parm:           sensor_vc:VC set for sensors
               sensor_vc=0,1,2,3,2,3,0,1 (array of ushort)
parm:           serdes_bus:max9295/6 deserializer i2c bus
               serdes_bus=2,2,4,4 (array of ushort)
parm:           des_addr:max9296 deserializer i2c address
               des_addr=0x48,0x4a,0x48,0x4a (array of ushort)
Add the current user to the video and render group:
$ sudo usermod -a -G video $USER
$ sudo usermod -a -G render $USER
Enable ROS2 Intel® RealSense™ Depth Camera D457 GMSL
Intel® Edge Controls for Industrial provides Intel® RealSense™ Depth Camera D457 GMSL implementation on ROS2. Follow these steps to enable the Intel® RealSense™ Depth Camera D457 GMSL implementation on ROS2.
Setup the ROS 2 Humble Hawksbill or ROS 2 Jazzy Jalisco APT repositories.
# download the key to system keyring
$ sudo -E wget -O- https://raw.githubusercontent.com/ros/rosdistro/master/ros.key | sudo tee /usr/share/keyrings/ros-archive-keyring.gpg > /dev/null

# add signed entry to APT sources and configure the APT client to use ROS repository:
$ echo "deb [arch=$(dpkg --print-architecture) signed-by=/usr/share/keyrings/ros-archive-keyring.gpg] http://packages.ros.org/ros2/ubuntu $(source /etc/os-release && echo $VERSION_CODENAME) main" | sudo tee /etc/apt/sources.list.d/ros2.list
Attention
If you are located in the People’s Republic of China, modify the
/etc/hostsfile to directly connect to the raw.githubusercontent server:$ sudo bash -c "echo '185.199.108.133 raw.githubusercontent.com' >> /etc/hosts"
Update the APT sources lists:
$ sudo apt update
Setup the Intel® GMSL intel-ipu6 Debian kernel modules (DKMS).
Install ROS 2 Humble Hawksbill or ROS 2 Jazzy Jalisco RealSense™ runtime library and tools:
$ sudo apt install ros-humble-librealsense2-tools
For example, ROS 2 Humble Hawksbill on Tier1 Canonical® Ubuntu® 22.04 (Jammy Jellyfish) distribution, using the ECI repository should display:
Reading package lists... Done
Building dependency tree... Done
Reading state information... Done
The following additional packages will be installed:
ros-humble-librealsense2 ros-humble-librealsense2-tools ros-humble-librealsense2-udev
0 upgraded, 3 newly installed, 0 to remove and 154 not upgraded.
Need to get 10.3 MB of archives.
After this operation, 1,024 B of additional disk space will be used.
Do you want to continue? [Y/n] y
Get:1 https://eci.intel.com/repos/jammy isar/main amd64 ros-humble-librealsense2-tools amd64 2.55.1-1eci5 [6,062 kB]
Get:2 https://eci.intel.com/repos/jammy isar/main amd64 ros-humble-librealsense2 amd64 2.55.1-1eci5 [4,277 kB]
Get:3 https://eci.intel.com/repos/jammy isar/main amd64 ros-humble-librealsense2-udev amd64 2.55.1-1eci5 [7,012 B]
Fetched 10.3 MB in 6s (1,619 kB/s)
Preparing to unpack .../ros-humble-librealsense2-tools_2.55.1-1eci5_amd64.deb ...
Preparing to unpack .../ros-humble-librealsense2_2.55.1-1eci5_amd64.deb ...
Preparing to unpack .../ros-humble-librealsense2-udev_2.55.1-1eci5_amd64.deb ...
Setting up ros-humble-librealsense2-udev (2.55.1-1eci5) ...

Postinst script activated...
install: invalid user ‘-g’
Permission denied for /home/
Presets deployment:
no src dir
no tgt dir
Presets deployment is skipped
Setting up ros-humble-librealsense2 (2.55.1-1eci5) ...
Setting up ros-humble-librealsense2-tools (2.55.1-1eci5) ...
Attention
Intel® Edge Controls for Industrial maintains the
ros-humble-librealsense2package, compatible with Debian 12 (Bookworm) and Canonical® Ubuntu® 22.04 (Jammy Jellyfish) distributions, featured for Intel® industrial OEM/ODM GMSL AIC product enabling and D457/GMSL camera support. ROS2 maintains an identicalros-humble-librealsense2community package, compatible with the Canonical® Ubuntu® 22.04 (Jammy Jellyfish) distribution. Both packages are mutually exclusive.$ sudo apt install ros-jazzy-librealsense2-tools
For example, ROS 2 Jazzy Jalisco on tier1 Canonical® Ubuntu® 24.04 (Noble Numbat) distribution, using the ECI repository should display:
Reading package lists... Done
Building dependency tree... Done
Reading state information... Done
The following additional packages will be installed:
ros-jazzy-librealsense2 ros-jazzy-librealsense2-tools ros-jazzy-librealsense2-udev
0 upgraded, 3 newly installed, 0 to remove and 154 not upgraded.
Need to get 10.3 MB of archives.
After this operation, 1,024 B of additional disk space will be used.
Do you want to continue? [Y/n] y
Get:1 https://eci.intel.com/repos/noble isar/main amd64 ros-jazzy-librealsense2-tools amd64 2.55.1-1eci5 [6,062 kB]
Get:2 https://eci.intel.com/repos/noble isar/main amd64 ros-jazzy-librealsense2 amd64 2.55.1-1eci5 [4,277 kB]
Get:3 https://eci.intel.com/repos/noble isar/main amd64 ros-jazzy-librealsense2-udev amd64 2.55.1-1eci5 [7,012 B]
Fetched 10.3 MB in 6s (1,619 kB/s)
Preparing to unpack .../ros-jazzy-librealsense2-tools_2.55.1-1eci5_amd64.deb ...
Preparing to unpack .../ros-jazzy-librealsense2_2.55.1-1eci5_amd64.deb ...
Preparing to unpack .../ros-jazzy-librealsense2-udev_2.55.1-1eci5_amd64.deb ...
Setting up ros-jazzy-librealsense2-udev (2.55.1-1eci5) ...

Postinst script activated...
install: invalid user ‘-g’
Permission denied for /home/
Presets deployment:
no src dir
no tgt dir
Presets deployment is skipped
Setting up ros-jazzy-librealsense2 (2.55.1-1eci5) ...
Setting up ros-jazzy-librealsense2-tools (2.55.1-1eci5) ...
Attention
Intel® Edge Controls for Industrial maintains the
ros-jazzy-librealsense2package, compatible with the Canonical® Ubuntu® 24.04 (Noble Numbat) distribution, featured for Intel® industrial OEM/ODM GMSL AIC product enabling and D457/GMSL camera support. ROS2 maintains an identicalros-jazzy-librealsense2community package, compatible with the Canonical® Ubuntu® 24.04 (Noble Numbat) distribution. Both packages are mutually exclusive.Verify that the
system-udevddaemon Intel® RealSense™ ROS2 rules exist:$ cat /lib/udev/rules.d/99-realsense-d4xx-mipi-dfu.rules
For example, on Canonical® Ubuntu® 22.04 (Jammy Jellyfish) distribution, these rules will be triggered when
intel-ipu6-isysandd4xxkernel modules are loaded:# Device rules for Intel RealSense MIPI devices. # DFU rules SUBSYSTEM=="d4xx-class", KERNEL=="d4xx-dfu*", GROUP="video", MODE="0660" # video links for SDK, binding for ipu6 SUBSYSTEM=="video4linux", ATTR{name}=="DS5 mux *", RUN+="/bin/bash -c 'source /opt/ros/humble/setup.bash; rs_ipu6_d457_bind.sh -n > /dev/kmsg; rs-enum.sh -n -q > /dev/kmsg'" # default d4xx link_freq override for MTL ipu6 DWC DPHY SUBSYSTEM=="video4linux", ATTR{name}=="DS5 mux *", ATTRS{device}=="0x7e7*", RUN+="/usr/bin/v4l2-ctl --set-ctrl v4l2_cid_link_freq=1 -d '%E{DEVNAME}'"
Initialize up to four Intel® RealSense™ Depth Camera D457 GMSL drivers and Intel® RealSense™ ROS2 layer:
$ sudo dmesg -n 7
$ sudo modprobe intel-ipu6-isys
$ sudo dmesg | grep -e ipu6 -e d4xx -e max929
For example, on Canonical® Ubuntu® 22.04 (Jammy Jellyfish) distribution, an industrial system equipped with GMSL Aggregated-link AIC would load kernel module and display debug messages:
…
[ 3738.535872] intel-ipu6 0000:00:05.0: IPC reset done
[ 3738.535874] intel-ipu6 0000:00:05.0: cpd file name: intel/ipu6epmtl_fw.bin
[ 3738.536514] intel-ipu6 0000:00:05.0: FW version: 20230925
[ 3738.536516] intel-ipu6 0000:00:05.0: CONFIG_VIDEO_INTEL_IPU_USE_PLATFORMDATA=1
[ 3738.536518] intel-ipu6 0000:00:05.0: CONFIG_VIDEO_INTEL_IPU_PDATA_DYNAMIC_LOADING=1
[ 3738.536519] intel-ipu6 0000:00:05.0: CONFIG_INTEL_IPU6_ACPI=1
…
[ 3738.604894] intel-ipu6-isys intel-ipu6-isys0: creating new i2c subdev for d4xx (address 12, bus 2)
[ 3738.604899] intel-ipu6-isys intel-ipu6-isys0: sensor device on CSI port: 0
[ 3738.633758] d4xx 2-0012: Probing driver for D45x
[ 3738.633783] d4xx 2-0012: Apply multiple camera i2c addr setting for bus 2
[ 3738.633846] max9295 2-0042: [MAX9295]: probing GMSL Serializer
[ 3738.633862] max9295 2-0042: max9295_probe:  success
[ 3738.633873] d4xx 2-0012: Init SerDes a on 2@0x48<->2@0x42
[ 3738.633889] max9296 2-0048: [MAX9296]: probing GMSL Deserializer
[ 3738.633904] max9296 2-0048: max9296_probe:  success
[ 3738.633911] d4xx 2-0012: Address reassignment for d4xx-a 0x10->0x12
[ 3738.633913] d4xx 2-0012: serializer: i2c-2@0x42
[ 3738.633914] d4xx 2-0012: deserializer: i2c-2@0x48
[ 3738.633915] d4xx 2-0012: configure GMSL port A
[ 3738.878857] max9295 2-0042: max9295_setup_control: update address reassignment 0x40->0x42
[ 3738.879227] max9295 2-0042: max9295_write_reg:i2c write failed, 0x0 = 84
[ 3739.388322] d4xx 2-0012: ds5_chrdev_init() class_create
[ 3739.389434] d4xx 2-0012: D4XX Sensor: DEPTH, firmware build: 5.15.0.2
…
[ 3739.394455] intel-ipu6-isys intel-ipu6-isys0: creating new i2c subdev for d4xx (address 14, bus 2)
[ 3739.394457] intel-ipu6-isys intel-ipu6-isys0: sensor device on CSI port: 0
[ 3739.396282] d4xx 2-0014: Probing driver for D45x
[ 3739.396302] d4xx 2-0014: Already configured multiple camera for bus 2
[ 3739.396323] max9295 2-0044: [MAX9295]: probing GMSL Serializer
[ 3739.396339] max9295 2-0044: max9295_probe:  success
[ 3739.396348] d4xx 2-0014: MAX9296 found device on 2@0x48
[ 3739.396350] d4xx 2-0014: MAX9296 AGGREGATION found device on 0x48
[ 3739.396351] d4xx 2-0014: Init SerDes g on 2@0x48<->2@0x44
[ 3739.396353] d4xx 2-0014: Address reassignment for d4xx-g 0x10->0x14
[ 3739.396356] d4xx 2-0014: serializer: i2c-2@0x44
[ 3739.396357] d4xx 2-0014: deserializer: i2c-2@0x48
[ 3739.396358] d4xx 2-0014: configure GMSL port B
[ 3739.642803] max9295 2-0044: max9295_setup_control: update address reassignment 0x40->0x44
[ 3740.041384] d4xx 2-0014: D4XX Sensor: DEPTH, firmware build: 5.14.0.0
…
[ 3740.046373] intel-ipu6-isys intel-ipu6-isys0: creating new i2c subdev for d4xx (address 16, bus 3)
[ 3740.046377] intel-ipu6-isys intel-ipu6-isys0: sensor device on CSI port: 4
[ 3740.058743] d4xx 3-0016: Probing driver for D45x
[ 3740.058765] d4xx 3-0016: Apply multiple camera i2c addr setting for bus 3
[ 3740.058796] max9295 3-0062: [MAX9295]: probing GMSL Serializer
[ 3740.058813] max9295 3-0062: max9295_probe:  success
[ 3740.058822] d4xx 3-0016: MAX9296 found device on 2@0x48
[ 3740.058824] d4xx 3-0016: MAX9296 found device on 2@0x48
[ 3740.058826] d4xx 3-0016: Init SerDes e on 3@0x48<->3@0x62
[ 3740.058844] max9296 3-0048: [MAX9296]: probing GMSL Deserializer
[ 3740.058859] max9296 3-0048: max9296_probe:  success
[ 3740.058868] d4xx 3-0016: Address reassignment for d4xx-e 0x10->0x16
[ 3740.058873] d4xx 3-0016: serializer: i2c-3@0x62
[ 3740.058875] d4xx 3-0016: deserializer: i2c-3@0x48
[ 3740.058877] d4xx 3-0016: configure GMSL port A
[ 3740.302841] max9295 3-0062: max9295_setup_control: update address reassignment 0x40->0x62
…
[ 3740.819040] intel-ipu6-isys intel-ipu6-isys0: creating new i2c subdev for d4xx (address 18, bus 3)
[ 3740.819043] intel-ipu6-isys intel-ipu6-isys0: sensor device on CSI port: 4
[ 3740.820809] d4xx 3-0018: Probing driver for D45x
[ 3740.820830] d4xx 3-0018: Already configured multiple camera for bus 3
[ 3740.820849] max9295 3-0064: [MAX9295]: probing GMSL Serializer
[ 3740.820869] max9295 3-0064: max9295_probe:  success
[ 3740.820877] d4xx 3-0018: MAX9296 found device on 2@0x48
[ 3740.820879] d4xx 3-0018: MAX9296 found device on 2@0x48
[ 3740.820881] d4xx 3-0018: MAX9296 found device on 3@0x48
[ 3740.820882] d4xx 3-0018: MAX9296 AGGREGATION found device on 0x48
[ 3740.820884] d4xx 3-0018: Init SerDes k on 3@0x48<->3@0x64
[ 3740.820886] d4xx 3-0018: Address reassignment for d4xx-k 0x10->0x18
[ 3740.820888] d4xx 3-0018: serializer: i2c-3@0x64
[ 3740.820889] d4xx 3-0018: deserializer: i2c-3@0x48
[ 3740.820891] d4xx 3-0018: configure GMSL port B
[ 3741.062811] max9295 3-0064: max9295_setup_control: update address reassignment 0x40->0x64
…
video4Linux (v4l2) sub-devices
d4xxare created with the appropriate SerDes and Camera devices addressing space assignment.Note
Intel® Industrial OEM/ODM GMSL AIC product using Aggregated-link SerDes may allow more than four GMSL cameras, such as Intel® RealSense™ Depth Camera D457.
To Extend UEFI firmware provider limit on Camera Sensor Custom ACPI devices, the Intel® IPU6
intel-ipu6-isysdriver expose a debug filesystem interface (debugFS)/sys/kernel/debug/intel-ipu6/isys/new_deviceand/sys/kernel/debug/intel-ipu6/isys/delete_devicefor informed users to create and enabled new v4l2 i2c sub-devices on GMSL2 Aggregated-link SerDes.$ cat /sys/kernel/debug/intel-ipu6/isys/new_device IPU CSI2 new device binding <csi port> <lanes> <device name> <i2c-designware adapter> <sensor i2c> <ser i2c> <des i2c>
For example on Canonical® Ubuntu® 22.04 (Jammy Jellyfish) or Canonical® Ubuntu® 24.04 (Noble Numbat) distribution, the Advantech GMSL Input Module Card for AFE-R360 series supporting up to 6 cameras through Aggregated Deserializer (e.g. MAX9296A), accessible through I2C Bus 3 :
Aggregated-link SerDes CSI-2 port 4 and 5 and I2C settings for GMSL Add-in-Card (AIC) via IPU6 debugFS¶ Intel® IPU6 debugFS entry
Camera 5
Camera 6
Camera suffix
k
l
<csi port>4
5
<lanes>2
2
<device name>d4xxd4xx<i2c-designware adapter>(I2C BFD index)2
2
<sensor i2c>18
14
<ser i2c>64
44
<des i2c>48
4a
An admin user would connect two extra Intel® RealSense™ Depth Camera D457 GMSL on Add-in-Card (AIC) specific port and manually initialize GMSL Aggregated-link SerDes as followed :
$ echo "4 2 d4xx 2 0x18 0x64 0x48" | sudo tee /sys/kernel/debug/intel-ipu6/isys/new_device
$ echo "5 2 d4xx 2 0x14 0x44 0x4a" | sudo tee /sys/kernel/debug/intel-ipu6/isys/new_device
For example, on Canonical® Ubuntu® 22.04 (Jammy Jellyfish), Canonical® Ubuntu® 24.04 (Noble Numbat) and Debian 12 (Bookworm) distributions, these commands will be triggered when
intel-ipu6-isysandd4xxkernel modules are loaded:... [ 90.732838] intel-ipu6-isys intel-ipu6-isys0: isys_new_device_set function running val:4 2 d4xx 2 0x18 0x64 0x48 [ 90.744446] intel-ipu6-isys intel-ipu6-isys0: res:8, port:4, lanes:2, name:d4xx, adapter:2, sens:0x18, ser:0x64, des:0x48 [ 90.755350] intel-ipu6-isys intel-ipu6-isys0: got i2c bus id 3 for adapter 2 (bdf ) [ 90.762972] intel-ipu6-isys intel-ipu6-isys0: creating new i2c subdev for d4xx (address 18, bus 3) [ 90.771886] intel-ipu6-isys intel-ipu6-isys0: sensor device on CSI port: 4/8, isys 00000000cbf83554 [ 90.793552] d4xx 3-0018: Probing driver for D45x [ 90.798172] d4xx 3-0018: Already configured multiple camera for bus 3 [ 90.804609] max9295 3-0064: [MAX9295]: probing GMSL Serializer [ 90.810429] max9295 3-0064: max9295_probe: success [ 90.815292] d4xx 3-0018: MAX9296 found device on 2@0x48 [ 90.820501] d4xx 3-0018: MAX9296 found device on 3@0x48 [ 90.825699] d4xx 3-0018: MAX9296 AGGREGATION found device on 0x48 [ 90.831762] d4xx 3-0018: MAX9296 found device on 3@0x4a [ 90.836966] d4xx 3-0018: Init SerDes k on 3@0x48<->3@0x64 [ 90.842345] d4xx 3-0018: Address reassignment for d4xx-k 0x10->0x18 [ 90.848588] d4xx 3-0018: serializer: i2c-3@0x64 [ 90.853110] d4xx 3-0018: deserializer: i2c-3@0x48 [ 90.857798] d4xx 3-0018: configure GMSL port B [ 91.105760] max9295 3-0064: max9295_setup_control: update address reassignment 0x40->0x64 [ 91.620465] d4xx 3-0018: D4XX Sensor: DEPTH, firmware build: 5.14.0.0 ... [ 167.202883] intel-ipu6-isys intel-ipu6-isys0: isys_new_device_set function running val:5 2 d4xx 2 0x14 0x44 0x4a [ 167.214482] intel-ipu6-isys intel-ipu6-isys0: res:8, port:5, lanes:2, name:d4xx, adapter:2, sens:0x14, ser:0x44, des:0x4a [ 167.225393] intel-ipu6-isys intel-ipu6-isys0: got i2c bus id 3 for adapter 2 (bdf ) [ 167.233006] intel-ipu6-isys intel-ipu6-isys0: creating new i2c subdev for d4xx (address 14, bus 3) [ 167.241914] intel-ipu6-isys intel-ipu6-isys0: sensor device on CSI port: 5/8, isys 00000000cbf83554 [ 167.265410] d4xx 3-0014: Probing driver for D45x [ 167.270023] d4xx 3-0014: Already configured multiple camera for bus 3 [ 167.276457] max9295 3-0044: [MAX9295]: probing GMSL Serializer [ 167.282278] max9295 3-0044: max9295_probe: success [ 167.287143] d4xx 3-0014: MAX9296 found device on 2@0x48 [ 167.292346] d4xx 3-0014: MAX9296 found device on 3@0x48 [ 167.297544] d4xx 3-0014: MAX9296 found device on 3@0x4a [ 167.302748] d4xx 3-0014: MAX9296 AGGREGATION found device on 0x4a [ 167.308811] d4xx 3-0014: MAX9296 found device on 3@0x48 [ 167.314009] d4xx 3-0014: Init SerDes l on 3@0x4a<->3@0x44 [ 167.319384] d4xx 3-0014: Address reassignment for d4xx-l 0x10->0x14 [ 167.325625] d4xx 3-0014: serializer: i2c-3@0x44 [ 167.330143] d4xx 3-0014: deserializer: i2c-3@0x4a [ 167.334831] d4xx 3-0014: configure GMSL port B [ 167.581756] max9295 3-0044: max9295_setup_control: update address reassignment 0x40->0x44 [ 168.096855] d4xx 3-0014: D4XX Sensor: DEPTH, firmware build: 5.13.1.53 ...
An admin can also cleanup prior GMSL Aggregated-link SerDes as followed :
$ echo "4 2 d4xx 2 0x18 0x64 0x48" | sudo tee /sys/kernel/debug/intel-ipu6/isys/delete_device
$ echo "5 2 d4xx 2 0x14 0x44 0x4a" | sudo tee /sys/kernel/debug/intel-ipu6/isys/delete_device
Alternatively admin user may use
systemd-udevdinstead to set Add-in-Card (AIC) specific rules and to auto-trigger GMSL Aggregated-link SerDes initialization as followed :$ vi /etc/udev/rules.d/98-realsense-d4xx-mipi-gmsl-aic.rules
For example, on Canonical® Ubuntu® 22.04 (Jammy Jellyfish), Canonical® Ubuntu® 24.04 (Noble Numbat) and Debian 12 (Bookworm) distributions, these rules will be triggered when
intel-ipu6-isysandd4xxkernel modules are loaded:# Enabling d457 Aggregated-link GMSL Camera K and L on Intel MTL ipu6 MIPI-CSI2 port 4 and 5. SUBSYSTEM!="video4linux", GOTO="persistent_d4xx_bind" ATTR{name}=="DS5 mux e", ATTRS{device}=="0x7e7*", RUN+="/bin/bash -c 'echo "4 2 d4xx 2 0x18 0x64 0x48" | sudo tee /sys/kernel/debug/intel-ipu6/isys/new_device'" ATTR{name}=="DS5 mux f", ATTRS{device}=="0x7e7*", RUN+="/bin/bash -c 'echo "5 2 d4xx 2 0x14 0x44 0x4a" | sudo tee /sys/kernel/debug/intel-ipu6/isys/new_device'" LABEL="persistent_d4xx_bind"
For example on Canonical® Ubuntu® 22.04 (Jammy Jellyfish), Canonical® Ubuntu® 24.04 (Noble Numbat) or Debian 12 (Bookworm) distributions, the Axiomtek ROBOX500 8x GMSL camera interfaces Add-in-Card (AIC) supporting up to 8 cameras through Aggregated Deserializer (e.g. MAX9296A), accessible through I2C Bus 5 (bdf index 4):
Aggregated-link SerDes CSI-2 port 0, 1, 2, 3 and I2C settings for GMSL Add-in-Card (AIC) via IPU6 debugFS¶ Intel® IPU6 debugFS entry
Camera 5
Camera 6
Camera 7
Camera 8
Camera suffix
g
h
i
j
<csi port>0
1
2
3
<lanes>2
2
2
2
<device name>d4xxd4xxd4xxd4xx<i2c-designware adapter>(I2C BFD index)4
4
4
4
<sensor i2c>13
15
17
18
<ser i2c>43
45
63
65
<des i2c>48
4a
68
6c
An admin user would connect four extra Intel® RealSense™ Depth Camera D457 GMSL on Add-in-Card (AIC) specific port and manually initialize GMSL Aggregated-link SerDes as followed :
$ echo "0 2 d4xx 4 0x13 0x43 0x48" | sudo tee /sys/kernel/debug/intel-ipu6/isys/new_device
$ echo "1 2 d4xx 4 0x15 0x45 0x4a" | sudo tee /sys/kernel/debug/intel-ipu6/isys/new_device
$ echo "2 2 d4xx 4 0x17 0x63 0x68" | sudo tee /sys/kernel/debug/intel-ipu6/isys/new_device
$ echo "3 2 d4xx 4 0x19 0x65 0x6c" | sudo tee /sys/kernel/debug/intel-ipu6/isys/new_device
An admin can also cleanup prior GMSL Aggregated-link SerDes as followed :
$ echo "0 2 d4xx 4 0x13 0x43 0x48" | sudo tee /sys/kernel/debug/intel-ipu6/isys/delete_device
$ echo "1 2 d4xx 4 0x15 0x45 0x4a" | sudo tee /sys/kernel/debug/intel-ipu6/isys/delete_device
$ echo "2 2 d4xx 4 0x17 0x63 0x68" | sudo tee /sys/kernel/debug/intel-ipu6/isys/delete_device
$ echo "3 2 d4xx 4 0x19 0x65 0x6c" | sudo tee /sys/kernel/debug/intel-ipu6/isys/delete_device
Verify that the
system-udevddaemon has effectively triggered Intel® RealSense™ rules (see V4L2_CID_LINK_FREQ):$ sudo dmesg | tail -n 20
For example, on Canonical® Ubuntu® 22.04 (Jammy Jellyfish), Canonical® Ubuntu® 24.04 (Noble Numbat) and Debian 12 (Bookworm) distributions, an industrial system equipped with GMSL Aaggregated-Link AIC would bind all four Intel® RealSense™ Depth Camera D457 GMSL sensors to
/dev/media0and set specificV4L2_CID_LINK_FREQfor Intel® Core™ Ultra Series 1 and 2 (Arrow Lake-U/H):… [155995.756565] Bind DS5 mux a .. [155995.768666] Bind DS5 mux e .. [155995.780141] Bind DS5 mux g .. [155995.812403] Bind DS5 mux k .. [155996.075652] d4xx 1-0014: user-modified V4L2_CID_LINK_FREQ index val=7 to user-val=1 [155996.079927] d4xx 3-0018: user-modified V4L2_CID_LINK_FREQ index val=7 to user-val=1 [155996.085679] d4xx 3-0016: user-modified V4L2_CID_LINK_FREQ index val=7 to user-val=1 [155996.086060] d4xx 1-0012: user-modified V4L2_CID_LINK_FREQ index val=7 to user-val=1
Admin user may also decide to edit those
d4xxGMSL rules, then load and trigger manually as followed:$ sudo udevadm control --reload-rules $ sudo udevadm trigger --subsystem-match="video4linux"
Setup ROS 2 Humble Hawksbill or ROS 2 Jazzy Jalisco workspace:
$ source /opt/ros/humble/setup.bash
$ source /opt/ros/jazzy/setup.bash
Verify that the v4l2 media controller has enumerated all Intel® RealSense™ Depth Camera D457 GMSL (see V4L2 Media Controller):
$ rs-enum.sh -n
For example, on Canonical® Ubuntu® 22.04 (Jammy Jellyfish), Canonical® Ubuntu® 24.04 (Noble Numbat) and Debian 12 (Bookworm) distributions, an industrial system equipped with GMSL Aggregated-link AIC would enumerate four Intel® RealSense™ Depth Camera D457 GMSL with four sensors, each linked to a v4l2 video device:
…
Bus     Camera  Sensor  Node Type       Video Node      RS Link
ipu6   0       ir      Streaming       /dev/video6     /dev/video-rs-ir-0
ipu6   0       depth   Streaming       /dev/video2     /dev/video-rs-depth-0
ipu6   0       imu     Streaming       /dev/video7     /dev/video-rs-imu-0
ipu6   0       color   Streaming       /dev/video4     /dev/video-rs-color-0
ipu6   4       ir      Streaming       /dev/video70    /dev/video-rs-ir-4
ipu6   4       depth   Streaming       /dev/video66    /dev/video-rs-depth-4
ipu6   4       imu     Streaming       /dev/video71    /dev/video-rs-imu-4
ipu6   4       color   Streaming       /dev/video68    /dev/video-rs-color-4
ipu6   6       ir      Streaming       /dev/video12    /dev/video-rs-ir-6
ipu6   6       depth   Streaming       /dev/video8     /dev/video-rs-depth-6
ipu6   6       imu     Streaming       /dev/video13    /dev/video-rs-imu-6
ipu6   6       color   Streaming       /dev/video10    /dev/video-rs-color-6
ipu6   10      ir      Streaming       /dev/video76    /dev/video-rs-ir-10
ipu6   10      depth   Streaming       /dev/video72    /dev/video-rs-depth-10
ipu6   10      imu     Streaming       /dev/video77    /dev/video-rs-imu-10
ipu6   10      color   Streaming       /dev/video74    /dev/video-rs-color-10
Check the v4l2 video device control settings for a particular Intel® RealSense™ Depth Camera D457 GMSL sensor:
$ v4l2-ctl -d /dev/video-rs-depth-4 -l
For example, on Canonical® Ubuntu® 22.04 (Jammy Jellyfish), Canonical® Ubuntu® 24.04 (Noble Numbat) and Debian 12 (Bookworm) distributions, an industrial system equipped with GMSL aggregated-link AIC would display Intel® RealSense™ Depth Camera D457 GMSL sensors v4l2 control settings:
User Controls

      isys_be_soc_compression 0x00981983 (bool)   : default=0 value=0
         query_virtual_channel 0x00981984 (intmenu): min=0 max=5 default=0 value=0 (8446998111854607 0x1e028001e0200f) flags=volatile, execute-on-write
            set_virtual_channel 0x00981985 (int64)  : min=0 max=65535 step=1 default=0 value=0
         enumerate_graph_link 0x00981986 (int)    : min=0 max=4 step=1 default=0 value=1

Camera Controls

                  auto_exposure 0x009a0901 (menu)   : min=0 max=3 default=3 value=3 (Aperture Priority Mode) flags=volatile, execute-on-write
         exposure_time_absolute 0x009a0902 (u32)    : min=1 max=200000 step=1 default=33000 value=33000 flags=volatile, execute-on-write
                        logger 0x009a4000 (u8)     : min=0 max=0 step=1 default=0 dims=[1024] flags=read-only, volatile, has-payload
            laser_power_on_off 0x009a4001 (bool)   : default=1 value=1 flags=volatile, execute-on-write
            manual_laser_power 0x009a4002 (int)    : min=0 max=360 step=30 default=150 value=150 flags=volatile, execute-on-write
               get_depth_calib 0x009a4003 (u8)     : min=0 max=0 step=1 default=0 dims=[256] flags=read-only, volatile, has-payload
               set_depth_calib 0x009a4004 (u8)     : min=0 max=4294967295 step=1 default=240 dims=[256] flags=has-payload
               get_coeff_calib 0x009a4005 (u8)     : min=0 max=0 step=1 default=0 dims=[512] flags=read-only, volatile, has-payload
               set_coeff_calib 0x009a4006 (u8)     : min=0 max=4294967295 step=1 default=240 dims=[512] flags=has-payload
                     fw_version 0x009a4007 (u32)    : min=0 max=0 step=1 default=0 dims=[1] flags=read-only, volatile, has-payload
                           gvd 0x009a4008 (u8)     : min=0 max=0 step=1 default=0 dims=[239] flags=read-only, volatile, has-payload
                     ae_roi_get 0x009a4009 (u8)     : min=0 max=0 step=1 default=0 dims=[8] flags=read-only, volatile, has-payload
                     ae_roi_set 0x009a400a (u8)     : min=0 max=4294967295 step=1 default=240 dims=[8] flags=has-payload
               ae_setpoint_get 0x009a400b (int)    : min=0 max=0 step=1 default=0 value=1000 flags=read-only, volatile
               ae_setpoint_set 0x009a400c (int)    : min=0 max=4095 step=1 default=0 value=0
               erb_eeprom_read 0x009a400d (u8)     : min=0 max=4294967295 step=1 default=240 dims=[1020] flags=has-payload
               ewb_eeprom_write 0x009a400e (u8)     : min=0 max=4294967295 step=1 default=240 dims=[1020] flags=has-payload
                           hwmc 0x009a400f (u8)     : min=0 max=4294967295 step=1 default=240 dims=[1028] flags=has-payload
         pwm_frequency_selector 0x009a4016 (int)    : min=0 max=1 step=1 default=1 value=0 flags=volatile, execute-on-write
                        hwmc_rw 0x009a4020 (u8)     : min=0 max=4294967295 step=1 default=240 dims=[1024] flags=volatile, has-payload, execute-on-write

Image Source Controls

                  analogue_gain 0x009e0903 (int)    : min=16 max=248 step=1 default=16 value=16 flags=volatile, execute-on-write
Check the v4l2 video device control settings for a particular Intel® RealSense™ Depth Camera D457 GMSL mux:
$ sudo dmesg | grep V4L2_CID_LINK_FREQ
$ v4l2-ctl -l -d $(media-ctl -e "DS5 mux e")
For example, on Canonical® Ubuntu® 22.04 (Jammy Jellyfish), Canonical® Ubuntu® 24.04 (Noble Numbat) and Debian 12 (Bookworm) distributions, an industrial system equipped with GMSL Aggregated-link AIC would display Intel® RealSense™ Depth Camera D457 GMSL mux v4l2 control v4l2_cid_link_freq settings is set to Intel® Core™ Ultra Series 1 and 2 (Arrow Lake-U/H) recommended values:
[155996.075652] d4xx 1-0014: user-modified V4L2_CID_LINK_FREQ index val=7 to user-val=1
[155996.079927] d4xx 3-0018: user-modified V4L2_CID_LINK_FREQ index val=7 to user-val=1
[155996.085679] d4xx 3-0016: user-modified V4L2_CID_LINK_FREQ index val=7 to user-val=1
[155996.086060] d4xx 1-0012: user-modified V4L2_CID_LINK_FREQ index val=7 to user-val=1
…
User Controls

         query_virtual_channel 0x00981984 (intmenu): min=0 max=5 default=0 value=-1 flags=volatile, execute-on-write
            set_virtual_channel 0x00981985 (int64)  : min=0 max=65535 step=1 default=0 value=0

Image Processing Controls

            v4l2_cid_link_freq 0x009f0901 (intmenu): min=0 max=10 default=7 value=1 (720000000 0x2aea5400)
Check the v4l2 video device memory mapped streaming from Intel® RealSense™ Depth Camera D457 GMSL sensor:
$ v4l2-ctl -d /dev/video-rs-depth-4 --set-fmt-video=width=640,height=480
$ v4l2-ctl -d /dev/video-rs-depth-4 --stream-mmap
For example, on Canonical® Ubuntu® 22.04 (Jammy Jellyfish) distribution, an industrial system equipped with GMSL Aggregated-link AIC would streaming from Intel® RealSense™ Depth Camera D457 GMSL sensor at 30fps:
<<<<<<<<<<<<<<<<<<<<<<<<<<<<< 29.09 fps, dropped buffers: 2
<<<<<<<<<<<<<<<<<<<<<<<<<<<<<< 29.55 fps
<<<<<<<<<<<<<<<<<<<<<<<<<<<<<< 29.70 fps
<<<<<<<<<<<<<<<<<<<<<<<<<<<<<< 29.78 fps
<<<<<<<<<<<<<<<<<<<<<<<<<<<<<< 29.83 fps
...
Press CTRL + C to exit.
Execute some of the Intel® RealSense™ Depth Camera D457 GMSL tools and examples, such as :
$ rs-enumerate-devices -S
For example, on Canonical® Ubuntu® 22.04 (Jammy Jellyfish), Canonical® Ubuntu® 24.04 (Noble Numbat) and Debian 12 (Bookworm) distributions, an industrial system equipped with GMSL aggregated-link AIC would display Intel® RealSense™ Depth Camera D457 GMSL sensors information:
Device info:
   Name                          :     Intel RealSense D457
   Serial Number                 :     241122302438
   Firmware Version              :     5.13.1.53
   Recommended Firmware Version  :     5.16.0.1
   Physical Port                 :     /dev/video-rs-depth-4
   Debug Op Code                 :     15
   Advanced Mode                 :     YES
   Product Id                    :     ABCD
   Camera Locked                 :     YES
   Product Line                  :     D400
   Asic Serial Number            :     250343110714
   Firmware Update Id            :     250343110714
   Dfu Device Path               :     /dev/d4xx-dfu-4
…
Or alternatively :
$ rs-enumerate-devices -s
For example, on Canonical® Ubuntu® 22.04 (Jammy Jellyfish), Canonical® Ubuntu® 24.04 (Noble Numbat) and Debian 12 (Bookworm) distributions, an industrial system equipped with GMSL AIC 6x aggregated-link port would list Intel® RealSense™ Depth Camera D457 GMSL Serial Number :
Device Name                   Serial Number       Firmware Version
Intel RealSense D457          235422300702        5.13.1.53
Intel RealSense D457          242422303887        5.14.0
Intel RealSense D457          241122304825        5.15.0.2
Intel RealSense D457          241122305312        5.14.0
Intel RealSense D457          234322308437        5.13.1.53
Intel RealSense D457          234222302547        5.13.1.53
Single Intel® RealSense™ Depth Camera sensor streaming sanity check test, as below :
$ rs-depthFor example, on Canonical® Ubuntu® 22.04 (Jammy Jellyfish), Canonical® Ubuntu® 24.04 (Noble Numbat) and Debian 12 (Bookworm) distributions, an industrial system equipped with GMSL aggregated-link AIC would display Intel® RealSense™ Depth Camera D457 GMSL sensors command-line test:
There are 1 connected RealSense devices.

Using device 0, an Intel RealSense D457
   Serial number: 241122302438
   Firmware version: 5.13.1.53


                                                   n:
                                                            :
                                             :::
                                    . .      n:hn   n..
                                                      :.
                                 .:    .n  .n.
               .               .   .                 .
                  ..            :n. .n                .
               .h:h
                  hXB
                        nn
               .. ::   :WWB.          nBh:  nB:
            :n::        :         .: .:.                 h
            hB.          nn       :n                       .n
            :XB   ::      :    :                   .Bh :.
               BX                                       .. .:
               ..                                         .:
                                 .
                        .       ..
…
Multiple Intel® RealSense™ Depth and Color Camera sensors streaming sanity check test, as below :
$ rs-multicamFor example, on Canonical® Ubuntu® 22.04 (Jammy Jellyfish), Canonical® Ubuntu® 24.04 (Noble Numbat) and Debian 12 (Bookworm) distributions, an industrial system equipped with GMSL Standalone-mode AIC would display 8 video simultaneous streams at 30fps from Intel® RealSense™ Depth Camera D457 GMSL sensors (see GMSL Virtual Channel design contraints):
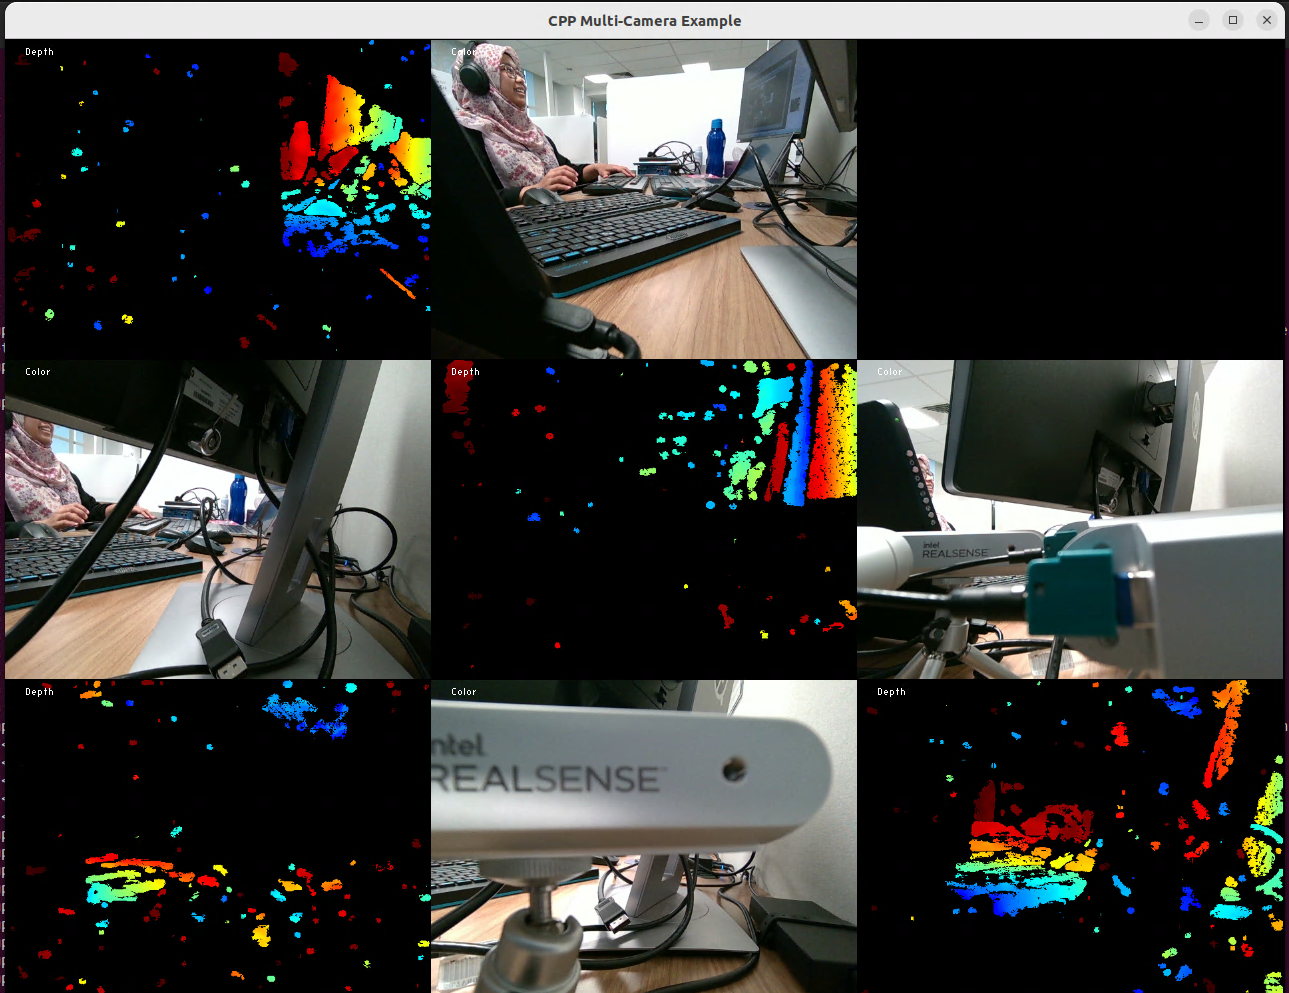
Another example, on Canonical® Ubuntu® 22.04 (Jammy Jellyfish), Canonical® Ubuntu® 24.04 (Noble Numbat) and Debian 12 (Bookworm) distributions, an industrial system equipped with GMSL aggregated-link AIC would display 16 video simultaneous streams at 30fps from Intel® RealSense™ Depth Camera D457 GMSL sensors (see GMSL Virtual Channel design contraints):
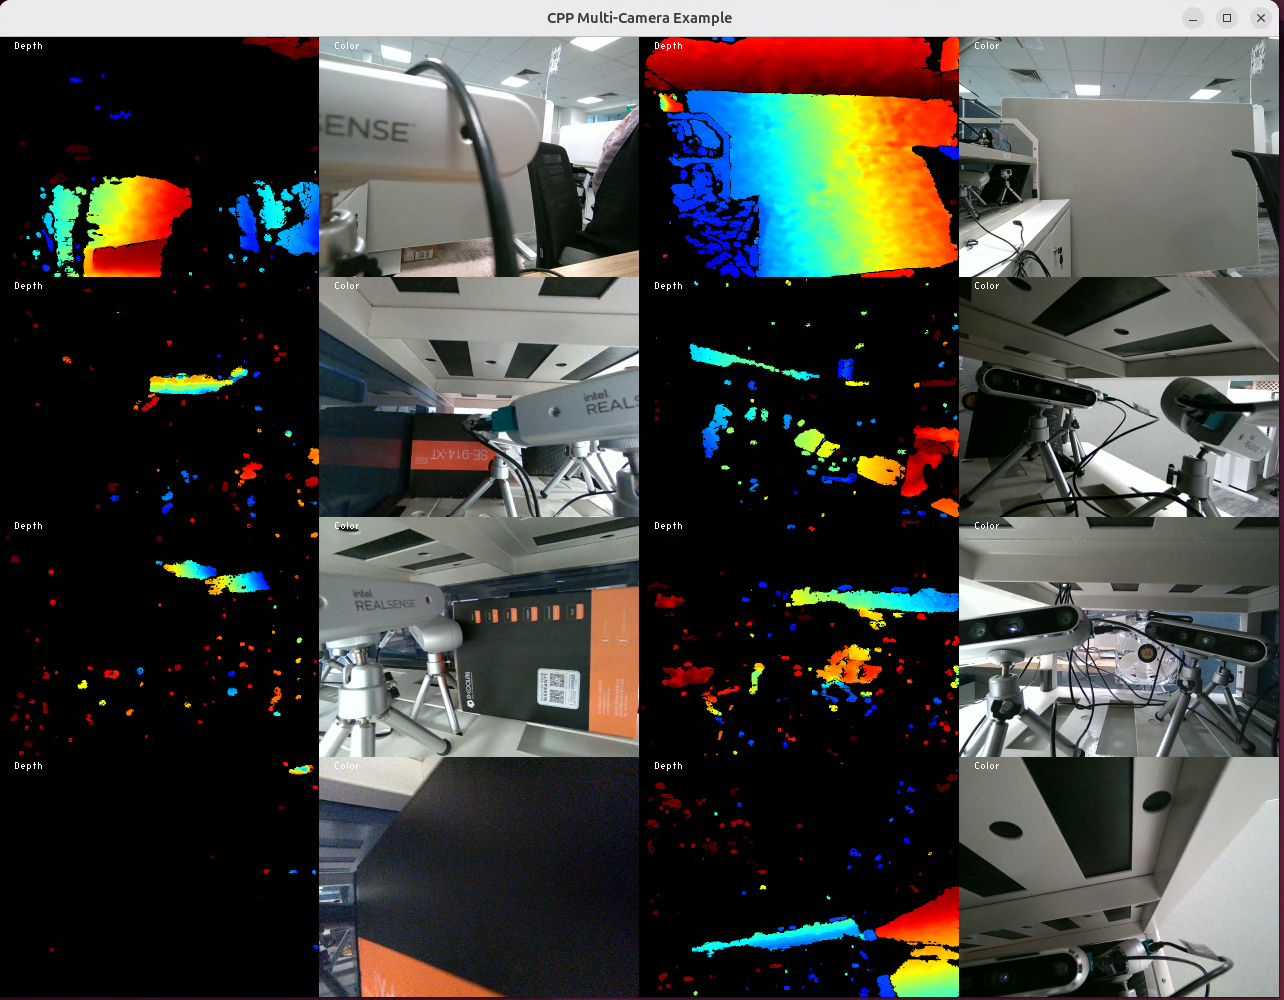
All Intel® RealSense™ Camera sensor control and enabling test, as below :
$ realsense-viewerFor example, on Canonical® Ubuntu® 22.04 (Jammy Jellyfish), Canonical® Ubuntu® 24.04 (Noble Numbat) and Debian 12 (Bookworm) distributions, an industrial system equipped with GMSL aggregated-link AIC would display several Intel® RealSense™ Depth Camera D457 GMSL sensors (see GMSL Virtual Channel design contraints):
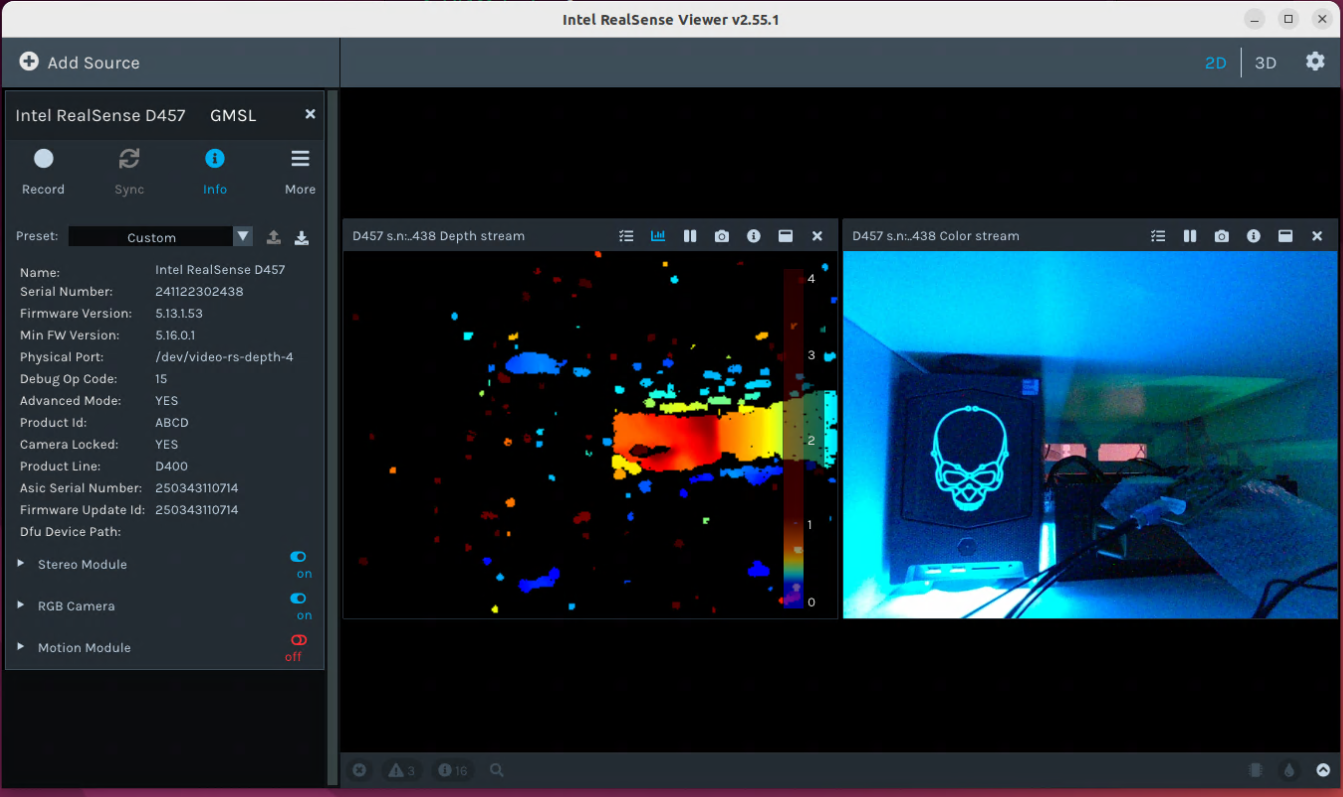
Enable GStreamer v4l2src plugin with Intel® RealSense™ RGB Camera D457 source
GStreamer (aka GST) is a popular library for constructing graphs of media-handling components. GStreamer is released under the LGPL. Its base plugins video source v4l2src implementations can be used for enabling GMSL2 camera streams.
Follow these alternative to stream the Intel® RealSense™ Depth Camera D457 GMSL Camera source in a GStreamer pipeline.
Setup the Intel® GMSL intel-ipu6 Debian kernel modules (DKMS).
Install ROS 2 Humble Hawksbill or ROS 2 Jazzy Jalisco RealSense™ UDEV rules - see Enable ROS2 Intel® RealSense™ Depth Camera D457 GMSL.
Install GStreamer runtime libraries and tools from the ECI APT and officially maintained Canonical® Ubuntu® 24.04 (Noble Numbat), Canonical® Ubuntu® 22.04 (Jammy Jellyfish) and Debian 12 (Bookworm) Linux distributions repositories:
$ sudo apt install gstreamer1.0-tools libgstreamer1.0-0 gstreamer1.0-plugins-base libgstreamer-plugins-base1.0-0
For example, on Canonical® Ubuntu® 24.04 (Noble Numbat) distribution, using the ECI repository should display:
Reading package lists... Done
Building dependency tree... Done
Reading state information... Done
libgstreamer1.0-0 is already the newest version (1.24.2-1).
libgstreamer1.0-0 set to manually installed.
gstreamer1.0-plugins-base is already the newest version (1.24.2-1ubuntu0.1).
gstreamer1.0-plugins-base set to manually installed.
libgstreamer-plugins-base1.0-0 is already the newest version (1.24.2-1ubuntu0.1).
libgstreamer-plugins-base1.0-0 set to manually installed.
The following NEW packages will be installed:
gstreamer1.0-tools v4l2-relayd
0 upgraded, 2 newly installed, 0 to remove and 32 not upgraded.
...
Do you want to continue? [Y/n] y
Get:1 http://archive.ubuntu.com/ubuntu noble/main amd64 gstreamer1.0-tools amd64 1.24.2-1 [67.1 kB]
Get:2 http://archive.ubuntu.com/ubuntu noble/universe amd64 v4l2-relayd amd64 0.1.2-0ubuntu3 [10.5 kB]
Once installation check GST
v4l2srcvideo input streaming from a single Intel® RealSense™ camera D457 GMSL RGB sensor$ DISPLAY=:0 gst-launch-1.0 -e -v v4l2src device=/dev/video-rs-color-0 ! 'video/x-raw, width=640, height=480, format=YUY2, pixel-aspect-ratio=1/1, framerate=30/1' ! videoconvert ! xvimagesink
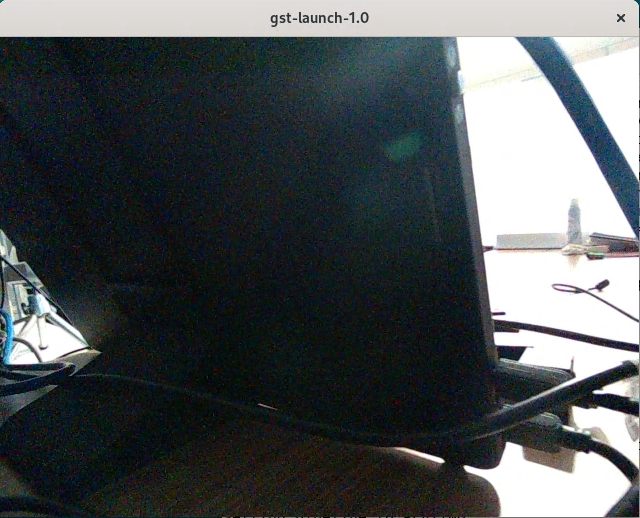
Compose GST
v4l2srcvideo pipeline input streaming from multiple Intel® RealSense™ camera D457 GMSL RGB sensors (see GMSL Virtual Channel design contraints)$ DISPLAY=:0 gst-launch-1.0 -e -v \ v4l2src device=/dev/video-rs-color-0 ! 'video/x-raw, width=640, height=480, format=YUY2, pixel-aspect-ratio=1/1, framerate=30/1' ! comp.sink_0 \ v4l2src device=/dev/video-rs-color-6 ! 'video/x-raw, width=640, height=480, format=YUY2, pixel-aspect-ratio=1/1, framerate=30/1' ! comp.sink_1 \ compositor name=comp \ sink_0::xpos=0 sink_0::ypos=0 sink_0::width=640 sink_0::height=480 sink_0::zorder=1 \ sink_1::xpos=640 sink_1::ypos=0 sink_1::width=640 sink_1::height=480 sink_1::zorder=2 ! videoconvert ! xvimagesink
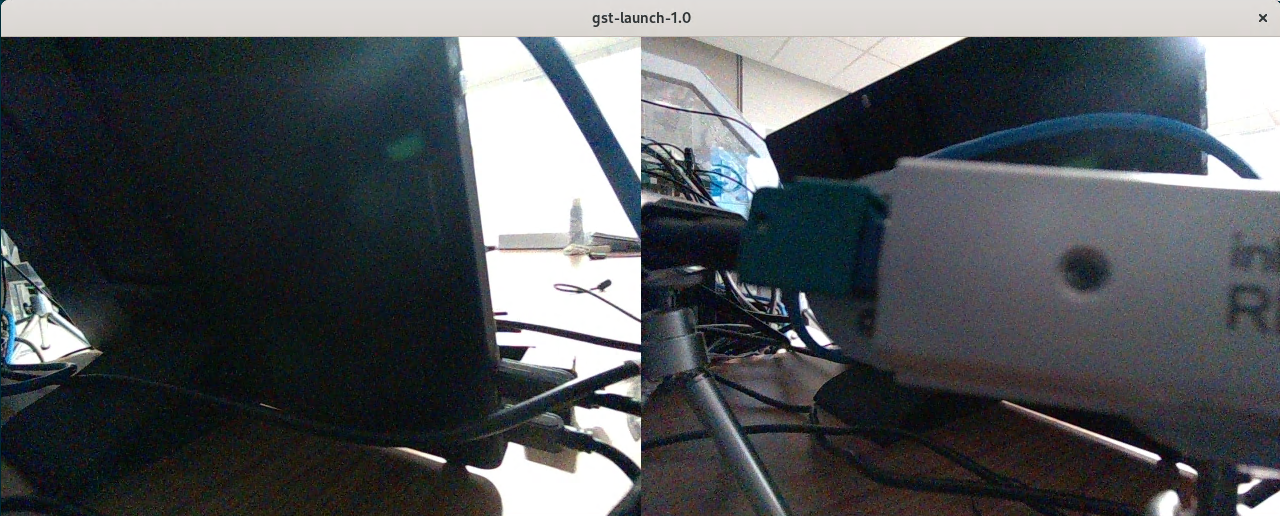
Enable GStreamer icamerasrc plugin with Intel® RealSense™ RGB Camera D457 source
Intel® Edge Controls for Industrial incrementally provides the Intel IPU6 GStreamer icamerasrc plugin implementations to extend GMSL2 camera multi-vendors supports, including Intel® RealSense™ Depth Camera D457 GMSL.
Follow these alternative to stream the Intel® RealSense™ Depth Camera D457 GMSL Camera source in a GStreamer pipeline.
Setup the Intel® GMSL intel-ipu6 Debian kernel modules (DKMS).
Install ROS 2 Humble Hawksbill or ROS 2 Jazzy Jalisco RealSense™ UDEV rules - see Enable ROS2 Intel® RealSense™ Depth Camera D457 GMSL.
Install GStreamer Intel IPU6 runtime libraries and tools from the ECI APT and officially maintained Canonical® Ubuntu® 24.04 (Noble Numbat) , Canonical® Ubuntu® 22.04 (Jammy Jellyfish) and Debian 12 (Bookworm) Linux distributions repositories :
$ sudo apt install gstreamer1.0-icamera gstreamer1.0-tools libgstreamer1.0-0 gstreamer1.0-plugins-base libgstreamer-plugins-base1.0-0
For example, on Canonical® Ubuntu® 24.04 (Noble Numbat) distribution, using the ECI repository should display:
Reading package lists... Done
Building dependency tree... Done
Reading state information... Done
libgstreamer1.0-0 is already the newest version (1.24.2-1).
libgstreamer1.0-0 set to manually installed.
gstreamer1.0-plugins-base is already the newest version (1.24.2-1ubuntu0.1).
gstreamer1.0-plugins-base set to manually installed.
libgstreamer-plugins-base1.0-0 is already the newest version (1.24.2-1ubuntu0.1).
libgstreamer-plugins-base1.0-0 set to manually installed.
The following package was automatically installed and is no longer required:
grub-pc-bin
Use 'apt autoremove' to remove it.
The following additional packages will be installed:
libbroxton-ia-pal-ipu6ep0 libbroxton-ia-pal-ipu6epmtl0 libbroxton-ia-pal0 libcamhal-common libcamhal0 libgcss-ipu6ep0 libgcss-ipu6epmtl0 libgcss0 libgsticamerainterface-1.0-1 libia-aiq-ipu6ep0 libia-aiq-ipu6epmtl0 libia-aiq0 libia-aiqb-parser-ipu6ep0
libia-aiqb-parser-ipu6epmtl0 libia-aiqb-parser0 libia-bcomp-ipu6ep0 libia-bcomp-ipu6epmtl0 libia-bcomp0 libia-cca-ipu6ep0 libia-cca-ipu6epmtl0 libia-cca0 libia-ccat-ipu6ep0 libia-ccat-ipu6epmtl0 libia-ccat0 libia-cmc-parser-ipu6ep0 libia-cmc-parser-ipu6epmtl0
libia-cmc-parser0 libia-coordinate-ipu6ep0 libia-coordinate-ipu6epmtl0 libia-coordinate0 libia-dvs-ipu6ep0 libia-dvs-ipu6epmtl0 libia-dvs0 libia-emd-decoder-ipu6ep0 libia-emd-decoder-ipu6epmtl0 libia-emd-decoder0 libia-exc-ipu6ep0 libia-exc-ipu6epmtl0
libia-exc0 libia-isp-bxt-ipu6ep0 libia-isp-bxt-ipu6epmtl0 libia-isp-bxt0 libia-lard-ipu6ep0 libia-lard-ipu6epmtl0 libia-lard0 libia-log-ipu6ep0 libia-log-ipu6epmtl0 libia-log0 libia-ltm-ipu6ep0 libia-ltm-ipu6epmtl0 libia-ltm0 libia-mkn-ipu6ep0
libia-mkn-ipu6epmtl0 libia-mkn0 libia-nvm-ipu6ep0 libia-nvm-ipu6epmtl0 libia-nvm0 v4l2-relayd
The following NEW packages will be installed:
gstreamer1.0-icamera gstreamer1.0-tools libbroxton-ia-pal-ipu6ep0 libbroxton-ia-pal-ipu6epmtl0 libbroxton-ia-pal0 libcamhal-common libcamhal0 libgcss-ipu6ep0 libgcss-ipu6epmtl0 libgcss0 libgsticamerainterface-1.0-1 libia-aiq-ipu6ep0 libia-aiq-ipu6epmtl0
libia-aiq0 libia-aiqb-parser-ipu6ep0 libia-aiqb-parser-ipu6epmtl0 libia-aiqb-parser0 libia-bcomp-ipu6ep0 libia-bcomp-ipu6epmtl0 libia-bcomp0 libia-cca-ipu6ep0 libia-cca-ipu6epmtl0 libia-cca0 libia-ccat-ipu6ep0 libia-ccat-ipu6epmtl0 libia-ccat0
libia-cmc-parser-ipu6ep0 libia-cmc-parser-ipu6epmtl0 libia-cmc-parser0 libia-coordinate-ipu6ep0 libia-coordinate-ipu6epmtl0 libia-coordinate0 libia-dvs-ipu6ep0 libia-dvs-ipu6epmtl0 libia-dvs0 libia-emd-decoder-ipu6ep0 libia-emd-decoder-ipu6epmtl0
libia-emd-decoder0 libia-exc-ipu6ep0 libia-exc-ipu6epmtl0 libia-exc0 libia-isp-bxt-ipu6ep0 libia-isp-bxt-ipu6epmtl0 libia-isp-bxt0 libia-lard-ipu6ep0 libia-lard-ipu6epmtl0 libia-lard0 libia-log-ipu6ep0 libia-log-ipu6epmtl0 libia-log0 libia-ltm-ipu6ep0
libia-ltm-ipu6epmtl0 libia-ltm0 libia-mkn-ipu6ep0 libia-mkn-ipu6epmtl0 libia-mkn0 libia-nvm-ipu6ep0 libia-nvm-ipu6epmtl0 libia-nvm0 v4l2-relayd
0 upgraded, 60 newly installed, 0 to remove and 32 not upgraded.
Need to get 14.2 MB of archives.
After this operation, 64.6 MB of additional disk space will be used.
Do you want to continue? [Y/n] y
Get:1 https://eci.intel.com/apt-repos/ECI/noble isar/main amd64 libgcss-ipu6ep0 amd64 20250703+iotgipu6-0eci1 [153 kB]
Get:2 https://eci.intel.com/apt-repos/ECI/noble isar/main amd64 libgcss-ipu6epmtl0 amd64 20250703+iotgipu6-0eci1 [153 kB]
Get:3 https://eci.intel.com/apt-repos/ECI/noble isar/main amd64 libgcss0 amd64 20250703+iotgipu6-0eci1 [152 kB]
Get:4 https://eci.intel.com/apt-repos/ECI/noble isar/main amd64 libia-log-ipu6ep0 amd64 20250703+iotgipu6-0eci1 [7,362 B]
Get:5 https://eci.intel.com/apt-repos/ECI/noble isar/main amd64 libia-aiqb-parser-ipu6ep0 amd64 20250703+iotgipu6-0eci1 [14.2 kB]
...
Get:55 https://eci.intel.com/apt-repos/ECI/noble isar/main amd64 libgsticamerainterface-1.0-1 amd64 20250703+iotgipu6-0eci1 [5,162 B]
Get:56 https://eci.intel.com/apt-repos/ECI/noble isar/main amd64 gstreamer1.0-icamera amd64 20250703+iotgipu6-0eci1 [80.3 kB]
Get:57 http://archive.ubuntu.com/ubuntu noble/main amd64 gstreamer1.0-tools amd64 1.24.2-1 [67.1 kB]
Get:58 http://archive.ubuntu.com/ubuntu noble/universe amd64 v4l2-relayd amd64 0.1.2-0ubuntu3 [10.5 kB]
Get:59 https://eci.intel.com/apt-repos/ECI/noble isar/main amd64 libcamhal-common all 20250703+iotgipu6-0eci1 [5,852 kB]
Get:60 https://eci.intel.com/apt-repos/ECI/noble isar/main amd64 libcamhal0 amd64 20250703+iotgipu6-0eci1 [1,595 kB]
Fetched 14.2 MB in 3s (4,949 kB/s)
Extracting templates from packages: 100%
Selecting previously unselected package libgcss-ipu6ep0.
(Reading database ... 211783 files and directories currently installed.)
Preparing to unpack .../00-libgcss-ipu6ep0_20250703+iotgipu6-0eci1_amd64.deb ...
Unpacking libgcss-ipu6ep0 (20250703+iotgipu6-0eci1) ...
Selecting previously unselected package libgcss-ipu6epmtl0.
Preparing to unpack .../01-libgcss-ipu6epmtl0_20250703+iotgipu6-0eci1_amd64.deb ...
Unpacking libgcss-ipu6epmtl0 (20250703+iotgipu6-0eci1) ...
Selecting previously unselected package libgcss0.
Preparing to unpack .../02-libgcss0_20250703+iotgipu6-0eci1_amd64.deb ...
Unpacking libgcss0 (20250703+iotgipu6-0eci1) ...
Selecting previously unselected package libia-log-ipu6ep0.
Preparing to unpack .../03-libia-log-ipu6ep0_20250703+iotgipu6-0eci1_amd64.deb ...
...
Setting up libia-cca-ipu6epmtl0 (20250703+iotgipu6-0eci1) ...
Setting up libia-cca0 (20250703+iotgipu6-0eci1) ...
Setting up libia-cca-ipu6ep0 (20250703+iotgipu6-0eci1) ...
Setting up libcamhal0 (20250703+iotgipu6-0eci1) ...
Setting up gstreamer1.0-icamera (20250703+iotgipu6-0eci1) ...
Processing triggers for man-db (2.12.0-4build2) ...
Processing triggers for libc-bin (2.39-0ubuntu8.3) ...
Attention
Intel® Edge Controls for Industrial maintains the
gstreamer1.0-icamerapackage and all its Intel IPU6 runtime library dependencies (e.g.libgsticamerainterface-1.0-1,libcamhal0,…) , compatible with Debian 12 (Bookworm), Canonical® Ubuntu® 22.04 (Jammy Jellyfish) and Canonical® Ubuntu® 24.04 (Noble Numbat) distributions, for featuring Intel® industrial OEM/ODM GMSL AIC product enabling, including Intel® RealSense™ camera D457 GMSL support. Debian 11 (Bullseye) is not supported.Once installation has finished Verify that the IPU6 XML configuration file
/etc/camera/*/sensors/d4xx.xmlcomprehend thed4xxIntel® RealSense™ camera D457 GMSL RGB sensors source :$ gst-inspect-1.0 icamerasrc
For example, on Canonical® Ubuntu® 24.04 (Noble Numbat) distribution, using the ECI repository should display providing
/etc/camera/ipu6epmtl/sensors/d4xx.xmlIPU6 XML configuration for :... device-name : The input devices name queried from HAL flags: readable, writable Enum "GstCamerasrcDeviceName" Default: 0, "d4xx-rgb-a" (0): d4xx-rgb-a - d457 GMSL sensor A (1): d4xx-rgb-b - d457 GMSL sensor B (2): d4xx-rgb-e - d457 GMSL sensor E (3): d4xx-rgb-f - d457 GMSL sensor F (4): d4xx-rgb-g - d457 GMSL sensor G (5): d4xx-rgb-h - d457 GMSL sensor H (6): d4xx-rgb-k - d457 GMSL sensor K (7): d4xx-rgb-l - d457 GMSL sensor L ...
Set GST
icamerasrcvideo input streaming from a single Intel® RealSense™ camera D457 GMSL RGB sensor$ DISPLAY=:0 gst-launch-1.0 -e -v icamerasrc buffer-count=10 printfps=true device-name=d4xx-rgb-a ! 'video/x-raw, width=640, height=480, format=YUY2, pixel-aspect-ratio=1/1, framerate=30/1' ! videoconvert ! xvimagesink
Compose GST
icamerasrcvideo pipeline input streaming from multiple Intel® RealSense™ camera D457 GMSL RGB sensors (see GMSL Virtual Channel design contraints)$ DISPLAY=:0 gst-launch-1.0 -e -v \ icamerasrc buffer-count=10 printfps=true device-name=d4xx-rgb-a ! 'video/x-raw, width=640, height=480, format=YUY2, pixel-aspect-ratio=1/1, framerate=30/1' ! videoconvert ! xvimagesink \ icamerasrc buffer-count=10 printfps=true device-name=d4xx-rgb-g ! 'video/x-raw, width=640, height=480, format=YUY2, pixel-aspect-ratio=1/1, framerate=30/1' ! videoconvert ! xvimagesink
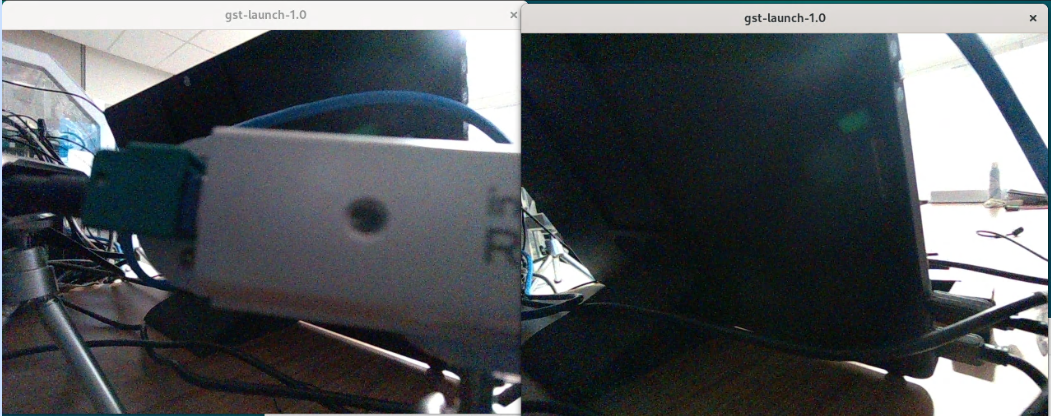
GMSL Troubleshooting
HOW TO rebuild intel-ipu6-dkms Debian package locally
The intel-ipu6-dkms source package version 20250703+iotgipu6 maintained by the Intel® Edge Controls for Industrial engineering team contains Debian build rules and patch quilt on top of the open-source ipu6-drivers (branch iotg_ipu6 - commit-id 69d126d1c as baseline).
Before completing Enable ROS2 Intel® RealSense™ Depth Camera D457 GMSL, download the Debian source package to review the ECI maintained patch series:
$ sudo apt source intel-ipu6-dkms
$ cd ipu6-drivers-20250703+iotgipu6 && tree debian/patches/
For example, on Canonical® Ubuntu® 22.04 (Jammy Jellyfish) distribution,
intel-ipu6-dkmssource package contains the following patch quilt maintained by Intel® Edge Controls for Industrial engineering team:debian/patches/ ├── 0001-ar0234-revert-driver-removal.patch ├── 0002-lt6911uxc-lt6911uxe-revert-driver-removal.patch ├── 0003-imx390-revert-imx390-and-ti96x-driver-removal.patch ├── 0004-d4xx-revert-driver-removal.patch ├── 0005-d4xx-Update-d4xx.c-driver-to-match-RealSense-latest-.patch ├── 0006-i2c-add-AXIOMTEK-r4xx-support.patch ├── 0007-build-drop-inlined-vsc-builds.patch ├── 0008-ivsc-import-headers.patch ├── 0009-ivsc-load-symbols-by-kprobe.patch ├── 0010-fix-ftbfs-v5.19.patch ├── 0011-ipu-psys-enable-iosys_map-on-intel-lts-5.15.patch ├── 0012-d4xxx-add-RS5-v4l2-headers-overrides-for-meta-buffer.patch ├── 0013-Restrict-DKMS-build-to-Linux-kernel-versions-5.10-5..patch ├── 0014-ipu6-ipu-isys-video-video-node-support-for-camera-su.patch ├── 0015-ipu6-acpi-pdata-enable-selective-debug-messages.patch ├── 0016-ipu-isys-ipu-psys-improve-kernel-version-check-compa.patch ├── 0017-d4xx-force-uapi-isys-headers-include.patch ├── 0018-videodev2-camera-formats-6.1.patch ├── 0019-ipu-isys-video-align-to-v4l2-api-6.1.patch ├── 0020-ipu-isys-fix-VIDIOC_G_PARM-invalid-argument.patch ├── 0021-dkms-add-linux-6.5-6.6-and-6.8-header-build.patch ├── 0022-max929x-add-kernel-6.5-support.patch ├── 0023-d4xx-add-kernel-6.5-support.patch ├── 0024-isys-video-add-support-for-kernel-6.5.patch ├── 0025-Kernel-6.6.15-release-for-Ubuntu-216.patch ├── 0026-d4xx-force-uapi-isys-headers-include.patch ├── 0027-isys-video-turn-.-gs-_frame_interval-into-pad-operat.patch ├── 0028-dkms-add-debug-symbols-simplify-debug.patch ├── 0029-isys-video-fix-6.x-kernel-oops-on-per-vc-callbacks.patch ├── 0030-d4xx-add-V4L2_CID_LINK_FREQ-support-MTL-DPHY.patch ├── 0031-dkms-add-imx390-module-build.patch ├── 0032-d4xx-ignore-DS5_CAMERA_CID_HWMC_RW-empty-data-ioctl.patch ├── 0033-d4xx-fix-aggredated-mode-max9296-device-removal.patch ├── 0034-d4xx-add-csi2-4-and-5-ports-mapping-shift-aggregated.patch ├── 0035-ipu-isys-fix-per-vc-start-stop-link_validation-skip-.patch ├── 0036-d4xx-fix-query-sensor-info-failed-on-port-e.patch ├── 0037-d4xx-apply-v4l2-ctl-csi2-link_freq-override-to-mux-o.patch ├── 0038-max9295-increase-delay-to-settle-link.patch ├── 0039-ipu-isys-init-both-v4l2-isys-pdata-and-new_device.patch ├── 0040-ipu6-acpi-extend-spdata-upto-6-cameras-acpi-subdevs.patch ├── 0041-dkms-build-kernel-module-btf-info.patch ├── 0042-ipu-isys-fix-stream-stop-and-close-state-transition.patch ├── 0043-isys-queue-avoid-unecessary-start-reset-on-serdes.patch ├── 0044-isys-queue-add-gracefull-streamoff-when-eof-misses.patch ├── 0045-ipu6-acpi-align-to-linux-v6.8-uapi.patch ├── 0046-ipu6-v4l2-fix-v6.8-get-set-frame-interval.patch ├── 0047-d4xx-avoid-G_FMT-error-on-missing-Y210.patch ├── 0048-isys-video-fix-v5.15-v4l2-vidioc-hangs.patch ├── 0049-d4xx-avoid-v4l2-subdev-unregistery-page-fault.patch ├── 0050-isys-video-avoid-missed-v4l2-subdev-ops-calls.patch ├── 0051-isys-video-let-v4l2-set-default-colorspace.patch ├── 0052-max9295-Isolate-D4XX-changes.patch ├── 0053-max9296-Isolate-D4XX-changes.patch ├── 0054-d4xx-Enable-hacks-in-max929x.patch ├── 0055-max9295-Expose-MFP-IO.patch ├── 0056-d4xx-crankup-V4L2_CID_LINK_FREQ-setpoints-up-2500Mbp.patch ├── 0057-imx390-crankup-V4L2_CID_LINK_FREQ-setpoints-up-2500M.patch ├── 0058-ar0234-crankup-V4L2_CID_LINK_FREQ-setpoints-up-2500M.patch ├── 0059-psys-fix-dkms-build-path-and-add-6.1x-forward-compat.patch ├── 0060-isys-fix-dkms-build-path-and-add-6.1x-forward-compat.patch ├── 0061-lt6911uxc-align-linux-6.1x-v4l2-uapi.patch ├── 0062-lt6911uxe-align-linux-6.1x-v4l2-uapi.patch ├── 0063-ipu6-isys-add-sysfs-delete-gmsl-device.patch ├── 0064-max929x-add-serdes-debug-and-monitoring-helper-scrip.patch ├── 0065-ipu6-isys-video-revert-the-start_stream_firmware-to-.patch ├── 0066-max9295-Force-port_sel.patch ├── 0067-ipu6-acpi-pdata-Header-guard.patch ├── 0068-acpi-pdata-add-ISX031-custom-HID.patch ├── 0069-acpi-pdata-add-AR0234-custom-HID.patch ├── 0070-max9296-setup-control-fallback-for-serializer-invali.patch ├── 0071-d4xx-serdes-setup-fallback-on-invalid-serializer-sou.patch ├── 0072-ipu6-acpi-fix-PDATA-parsing-inconsistency-add-serdes.patch ├── 0073-ipu6-acpi-autoincrement-i2c-sensor-and-serializer-pd.patch ├── 0074-ipu6-acpi-detected-aggregated-link-serdes-add-namesp.patch ├── 0075-d4xx-add-acpi-pdata-aggregated-link-detection.patch ├── 0076-ipu6-acpi-add-otocam22x-custom-HID.patch ├── 0077-ipu6-acpi-Add-D3CM-ISX031-IMX390-and-AR0234.patch ├── 0078-ipu-isys-video-add-timeout-on-initial-STREAM_CAPTURE.patch ├── 0079-d4xx-fix-pdata-aggregrated-link-detection.patch ├── 0080-dkms-add-linux-6.12-build-support.patch ├── 0081-d4xx-max929x-add-realsense2-driver-specific-namespac.patch ├── 0082-isx031-dkms-build-intel-max92x-serdes-v4l2-backward-.patch ├── 0083-dkms-add-linux-6.14-build-compat.patch └── series
Build the
intel-ipu6-dkmsDebian package locally on the device:$ sudo apt install debhelper dh-modaliases quilt $ dpkg-buildpackage
For example, on Canonical® Ubuntu® 22.04 (Jammy Jellyfish) distribution,
intel-ipu6-dkmsthedpkg-buildpackagecommand would output:dpkg-buildpackage: info: source package ipu6-drivers dpkg-buildpackage: info: source version 20250703+iotgipu6-0eci1 dpkg-buildpackage: info: source distribution UNRELEASED dpkg-buildpackage: info: source changed by ECI Maintainer <eci.maintainer@intel.com> dpkg-buildpackage: info: host architecture amd64 dpkg-source --before-build . debian/rules clean dh clean --with dkms debian/rules override_dh_clean make[1]: Entering directory '/home/user/IPU6_CEED-ENG-RELEASE/ipu6-drivers' rm -f debian/intel-ipu6-dkms.install dh_clean make[1]: Leaving directory '/home/user/IPU6_CEED-ENG-RELEASE/ipu6-drivers' dpkg-source -b . dpkg-source: warning: no source format specified in debian/source/format, see dpkg-source(1) dpkg-source: info: using source format '1.0' dpkg-source: warning: native package version may not have a revision dpkg-source: warning: source directory 'ipu6-drivers' is not <sourcepackage>-<upstreamversion> 'ipu6-drivers-20241031+iotgipu6' dpkg-source: info: building ipu6-drivers in ipu6-drivers_20250703+iotgipu6-0eci1.tar.gz dpkg-source: info: building ipu6-drivers in ipu6-drivers_20250703+iotgipu6-0eci1.dsc debian/rules binary dh binary --with dkms … dpkg-deb: building package 'intel-ipu6-dkms' in '../intel-ipu6-dkms_20250703+iotgipu6-0eci1_amd64.deb'. dpkg-genbuildinfo -O../ipu6-drivers_20250703+iotgipu6-0eci1_amd64.buildinfo dpkg-genchanges -O../ipu6-drivers_20250703+iotgipu6-0eci1_amd64.changes dpkg-genchanges: info: including full source code in upload dpkg-source --after-build .
Install Linux headers and
intel_ipu6DKMS Debian packages:$ sudo apt install linux-headers-$(uname -r) $ sudo apt reinstall -f ../intel-ipu6-dkms_20250703+iotgipu6-0eci1_amd64.deb
Attention
Intel® Edge Controls for Industrial maintains the
intel-ipu6-dkms(branchiotg_ipu6) package, compatible with Debian 12 (Bookworm), Canonical® Ubuntu® 22.04 (Jammy Jellyfish), and Canonical® Ubuntu® 24.04 (Noble Numbat) distribution kernel image versions: 5.15/lts, 6.1/lts, 6.5, 6.6/lts, 6.8, 6.11, 6.12/lts and 6.14. During installation, the dynamic kernel module build will ignore other Linux kernel versions.For example, on Canonical® Ubuntu® 22.04 (Jammy Jellyfish) distribution, using the ECI repository should display several NEW kernel modules built across all installed kernel headers:
Loading new ipu6-drivers-20250703+iotgipu6-0eci1 DKMS files...
Building for 6.8.0-1026-oem
Building initial module for 6.8.0-1026-oem
Done.

ar0234.ko.zst:
Running module version sanity check.
- Original module
   - No original module exists within this kernel
- Installation
   - Installing to /lib/modules/6.8.0-1026-oem/updates/dkms/

lt6911uxc.ko.zst:
Running module version sanity check.
- Original module
   - No original module exists within this kernel
- Installation
   - Installing to /lib/modules/6.8.0-1026-oem/updates/dkms/

imx390.ko.zst:
Running module version sanity check.
- Original module
   - No original module exists within this kernel
- Installation
   - Installing to /lib/modules/6.8.0-1026-oem/updates/dkms/

isx031.ko.zst:
Running module version sanity check.
- Original module
   - No original module exists within this kernel
- Installation
   - Installing to /lib/modules/6.8.0-1026-oem/updates/dkms/

max9295.ko.zst:
Running module version sanity check.
- Original module
   - No original module exists within this kernel
- Installation
   - Installing to /lib/modules/6.8.0-1026-oem/updates/dkms/

max9296.ko.zst:
Running module version sanity check.
- Original module
   - No original module exists within this kernel
- Installation
   - Installing to /lib/modules/6.8.0-1026-oem/updates/dkms/

serdes.ko.zst:
Running module version sanity check.
- Original module
   - No original module exists within this kernel
- Installation
   - Installing to /lib/modules/6.8.0-1026-oem/updates/dkms/

intel-ipu6-psys.ko.zst:
Running module version sanity check.
- Original module
   - No original module exists within this kernel
- Installation
   - Installing to /lib/modules/6.8.0-1026-oem/updates/dkms/

ipu6-acpi.ko.zst:
Running module version sanity check.
- Original module
   - No original module exists within this kernel
- Installation
   - Installing to /lib/modules/6.8.0-1026-oem/updates/dkms/

ipu6-acpi-pdata.ko.zst:
Running module version sanity check.
- Original module
   - No original module exists within this kernel
- Installation
   - Installing to /lib/modules/6.8.0-1026-oem/updates/dkms/

ipu6-acpi-common.ko.zst:
Running module version sanity check.
- Original module
   - No original module exists within this kernel
- Installation
   - Installing to /lib/modules/6.8.0-1026-oem/updates/dkms/

d4xx-max9295.ko.zst:
Running module version sanity check.
- Original module
   - No original module exists within this kernel
- Installation
   - Installing to /lib/modules/6.8.0-1026-oem/updates/dkms/

d4xx-max9296.ko.zst:
Running module version sanity check.
- Original module
   - No original module exists within this kernel
- Installation
   - Installing to /lib/modules/6.8.0-1026-oem/updates/dkms/

d4xx.ko.zst:
Running module version sanity check.
- Original module
   - No original module exists within this kernel
- Installation
   - Installing to /lib/modules/6.8.0-1026-oem/updates/dkms/

intel-ipu6.ko.zst:
Running module version sanity check.
- Original module
   - No original module exists within this kernel
- Installation
   - Installing to /lib/modules/6.8.0-1026-oem/updates/dkms/

intel-ipu6-isys.ko.zst:
Running module version sanity check.
- Original module
   - No original module exists within this kernel
- Installation
   - Installing to /lib/modules/6.8.0-1026-oem/updates/dkms/
depmod...
Attention
On certain Linux images DKMS will not replace modules that might exactly matches what is already found in kernel.
Loading new ipu6-drivers-20250703+iotgipu6-0eci1 DKMS files...
Building for 6.14.0-29-generic
Building initial module for 6.14.0-29-generic
Done.

...

d4xx.ko.zst:
Running module version sanity check.
- Original module
   - No original module exists within this kernel
- Installation
   - Installing to /lib/modules/6.14.0-29-generic/updates/dkms/

intel-ipu6.ko.zst:
Running module version sanity check.
Module version  for intel-ipu6.ko.zst
exactly matches what is already found in kernel 6.14.0-29-generic.
DKMS will not replace this module.
You may override by specifying --force.

intel-ipu6-isys.ko.zst:
Running module version sanity check.
Module version  for intel-ipu6-isys.ko.zst
exactly matches what is already found in kernel 6.14.0-29-generic.
DKMS will not replace this module.
You may override by specifying --force.
please Make sure DKMS force install overrides prior modules :
$ sudo dkms install --force ipu6-drivers/20250703+iotgipu6-0eci1
...

intel-ipu6.ko.zst:
Running module version sanity check.
- Original module
- Installation
   - Installing to /lib/modules/6.14.0-29-generic/updates/dkms/

intel-ipu6-isys.ko.zst:
Running module version sanity check.
- Original module
- Installation
   - Installing to /lib/modules/6.14.0-29-generic/updates/dkms/
Load the locally built
intel-ipu6-isyskernel modules:$ sudo modprobe intel-ipu6-isys
Complete the steps to Enable ROS2 Intel® RealSense™ Depth Camera D457 GMSL.
HOW TO get and set V4L2_CID_LINK_FREQ controls
Intel® RealSense™ Depth Camera D457 GMSL for 12th/13th/14th Gen Intel® Core™ and Intel® Core™ Ultra based product have different CSI2 link frequency ranges, or GMSL AIC manufacturer design may also support higher or lower GMSL CSI2 bus frequency.
The V4L2_CID_LINK_FREQ API is used to select the Intel® RealSense™ Depth Camera D457 GMSL mux CSI2 bus frequency.
|
Intel® RealSense™ Depth Camera D457 GMSL |
0 |
|
1 |
|
2 |
|
3 |
|
4 |
|
5 |
|
6 |
|
7 |
|
8 |
|
9 |
|
10 |
|
11 |
|
12 |
|
13 |
|
14 |
|
15 |
|
v4l2-ctl possible v4l2_cid_link_freq output are enumerated from the link_freq_menu_items (see intel-ipu6-dkms source package drivers/media/i2c/d4xx.c)
$ dmesg | grep V4L2_CID_LINK_FREQ
$ v4l2-ctl -L -d $(media-ctl -e "DS5 mux a")
Even though
D4XX_LINK_FREQ_720MHZis the recommended Intel® Core™ Ultra Series 1 and 2 (Arrow Lake-U/H) CSI2 bus frequency, orD4XX_LINK_FREQ_300MHZis the default 12th/13th/14th Gen Intel® Core™ CSI2 bus frequency, the Intel platform board manufacturer design may support higher or lower CSI2 bus frequency.[339340.875309] d4xx 2-0016: user-modified V4L2_CID_LINK_FREQ index val=12 to user-val=6 [339340.897126] d4xx 1-0012: user-modified V4L2_CID_LINK_FREQ index val=12 to user-val=6 [339340.897260] d4xx 1-0014: user-modified V4L2_CID_LINK_FREQ index val=12 to user-val=6 [339340.908722] d4xx 2-0012: user-modified V4L2_CID_LINK_FREQ index val=12 to user-val=6 … ... Image Processing Controls v4l2_cid_link_freq 0x009f0901 (intmenu): min=0 max=15 default=12 value=6 (720000000 0x2aea5400) 0: 1250000000 (0x4a817c80) 1: 1125000000 (0x430e2340) 2: 1000000000 (0x3b9aca00) 3: 900000000 (0x35a4e900) 4: 840000000 (0x32116200) 5: 750000000 (0x2cb41780) 6: 720000000 (0x2aea5400) 7: 600000000 (0x23c34600) 8: 576000000 (0x22551000) 9: 480000000 (0x1c9c3800) 10: 450000000 (0x1ad27480) 11: 360000000 (0x15752a00) 12: 300000000 (0x11e1a300) 13: 288000000 (0x112a8800) 14: 240000000 (0xe4e1c00) 15: 22500000 (0x15752a0)Informed admin user may override the Intel® RealSense™ Depth Camera D457 GMSL mux link frequency a using the following
v4l2-ctl --set-ctrlcommand.$ sudo v4l2-ctl --set-ctrl v4l2_cid_link_freq=2 -d $(media-ctl -e "DS5 mux a") $ sudo dmesg | grep V4L2_CID_LINK_FREQ $ v4l2-ctl -l -d $(media-ctl -e "DS5 mux a")For example, if highest
D4XX_LINK_FREQ_1000MHZis supported by certain GMSL AIC boards manufacturer:[342833.473930] d4xx 1-0012: user-modified V4L2_CID_LINK_FREQ index val=6 to user-val=2 … User Controls query_virtual_channel 0x00981984 (intmenu): min=0 max=5 default=0 value=-1 flags=volatile, execute-on-write set_virtual_channel 0x00981985 (int64) : min=0 max=65535 step=1 default=0 value=0 Image Processing Controls v4l2_cid_link_freq 0x009f0901 (intmenu): min=0 max=15 default=12 value=2 (1000000000 0x3b9aca00)
HOW TO reset, bind and display V4L2 Media Controller
Intel® Edge Controls for Industrial ROS2 Intel® RealSense™ packages provide V4L2 media controller Intel® RealSense™ Depth Camera D457 GMSL binding scripts, so 12th/13th/14th Gen Intel® Core™ and Intel® Core™ Ultra Series 1 and 2 (Arrow Lake-U/H) Platform IPU6 can be interconnected in a variety of ways to obtain the desired functionality.
To configure these Intel® IPU6 hardware blocks, the intel-ipu6-dkms debian package provides intel_ipu6.ko, intel_ipu6_isys.ko and d4xx kernel module V4L2 kernel API support for Intel® RealSense™ Depth Camera D457 GMSL. It provides detailed information about the V4L2 media device and allows them to be interconnected in a dynamic and complex way at runtime, all from userspace.
Below are a few basic manual steps for users to verify the V4L2 Media Controller binding between Intel® RealSense™ Depth Camera D457 GMSL to 12th/13th/14th Gen Intel® Core™ and Intel® Core™ Ultra Series 1 and 2 (Arrow Lake-U/H) CSI2 interfaces.
After completing Enable ROS2 Intel® RealSense™ Depth Camera D457 GMSL, an admin user may reset prior V4L2 Media Controller setting on default
/dev/media0:$ media-ctl -r -d /dev/media0
Setup ROS 2 Humble Hawksbill or ROS 2 Jazzy Jalisco workspace:
$ source /opt/ros/humble/setup.bash
$ source /opt/ros/jazzy/setup.bash
Manually bind V4L2 Media Controller on all Intel® RealSense™ Depth Camera D457 GMSL muxes available on the system:
$ rs_ipu6_d457_bind.sh -n
$ rs-enum.sh -n
Note
Please keep
-ncommand argument, since currentintel_ipu6_isys.koandd4xxkernel module don’t support V4L2 Media Controller meta-data binding from Intel® RealSense™ Depth Camera D457 GMSL muxes and sensors.For example, on Canonical® Ubuntu® 22.04 (Jammy Jellyfish) distribution, an industrial system equipped with GMSL aggregated-link AIC would enumerate four Intel® RealSense™ Depth Camera D457 GMSL with four sensors, each linked to a v4l2 video device:
…
Bus     Camera  Sensor  Node Type       Video Node      RS Link
ipu6   0       ir      Streaming       /dev/video6     /dev/video-rs-ir-0
ipu6   0       depth   Streaming       /dev/video2     /dev/video-rs-depth-0
ipu6   0       imu     Streaming       /dev/video7     /dev/video-rs-imu-0
ipu6   0       color   Streaming       /dev/video4     /dev/video-rs-color-0
ipu6   4       ir      Streaming       /dev/video70    /dev/video-rs-ir-4
ipu6   4       depth   Streaming       /dev/video66    /dev/video-rs-depth-4
ipu6   4       imu     Streaming       /dev/video71    /dev/video-rs-imu-4
ipu6   4       color   Streaming       /dev/video68    /dev/video-rs-color-4
ipu6   6       ir      Streaming       /dev/video12    /dev/video-rs-ir-6
ipu6   6       depth   Streaming       /dev/video8     /dev/video-rs-depth-6
ipu6   6       imu     Streaming       /dev/video13    /dev/video-rs-imu-6
ipu6   6       color   Streaming       /dev/video10    /dev/video-rs-color-6
ipu6   10      ir      Streaming       /dev/video76    /dev/video-rs-ir-10
ipu6   10      depth   Streaming       /dev/video72    /dev/video-rs-depth-10
ipu6   10      imu     Streaming       /dev/video77    /dev/video-rs-imu-10
ipu6   10      color   Streaming       /dev/video74    /dev/video-rs-color-10
Alternatively, selectively bind V4L2 Media Controller to a specific Intel® RealSense™ Depth Camera D457 GMSL sensors camera mux available on the system:
$ rs_ipu6_d457_bind.sh -n -m e
$ rs-enum.sh -n -m e
Note
Please keep
-ncommand argument, since currentintel_ipu6_isys.koandd4xxkernel module don’t support V4L2 Media Controller meta-data binding from Intel® RealSense™ Depth Camera D457 GMSL muxes and sensors.For example, on Canonical® Ubuntu® 22.04 (Jammy Jellyfish) distribution, an industrial system equipped with GMSL aggregated-link AIC would enumerate four Intel® RealSense™ Depth Camera D457 GMSL with four sensors, each linked to a v4l2 video device:
Bind DS5 mux e ..
Bus     Camera  Sensor  Node Type       Video Node      RS Link
ipu6   4       ir      Streaming       /dev/video77    /dev/video-rs-ir-4
ipu6   4       depth   Streaming       /dev/video73    /dev/video-rs-depth-4
ipu6   4       imu     Streaming       /dev/video78    /dev/video-rs-imu-4
ipu6   4       color   Streaming       /dev/video75    /dev/video-rs-color-4
Report V4L2 Media Controller on
/dev/media0interconnection to Intel® RealSense™ Depth Camera D457 GMSL sensors and muxes:$ rs_ipu6_d457_bind.sh -n -m e && rs-enum.sh -n -m e $ rs_ipu6_d457_bind.sh -n -m l && rs-enum.sh -n -m l $ media-ctl -d /dev/media0 --print-dot | grep -v dashed > ~/media0-ctl-dot-d457-GMSL.txt
For example, importing the
media0-ctl-dot-d457-GMSL.txtcontent into graphviz visual oneline editor would display V4L2 Media Controller linkage of several Intel® RealSense™ Depth Camera D457 GMSL sensors and muxes to Intel® Core™ Ultra Series 1 and 2 (Arrow Lake-U/H) MIPI CSI2 sources on the industrial system equipped GMSL aggregated-link AIC running Canonical® Ubuntu® 22.04 (Jammy Jellyfish) distribution.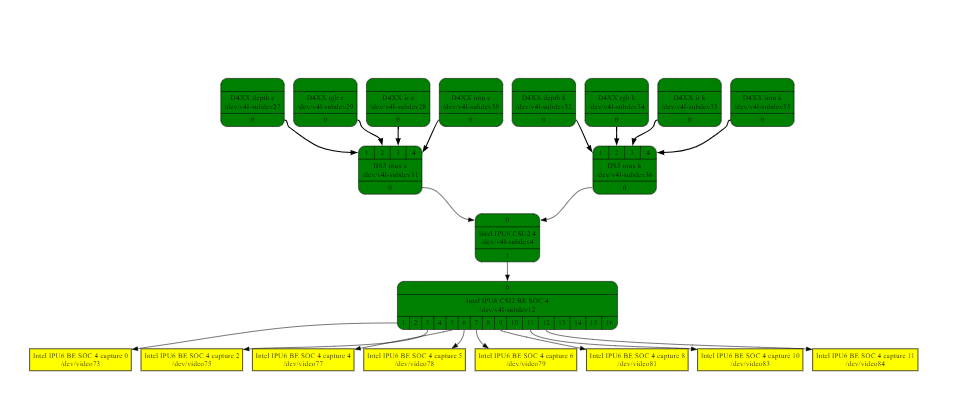
WHAT are V4L2 Media Controller functional constraints of GMSL Aggregated-link SerDes?
When Intel® RealSense™ V4L2 media controller binds multiple Intel® RealSense™ Depth Camera D457 mux using SerDes Aggregated-link (see V4L2 Media Controller), the 12th/13th/14th Gen Intel® Core™ and Intel® Core™ Ultra Series 1 and 2 (Arrow Lake-U/H) Platform IPU6 MIPI CSI-2 interconnections are shared among several Intel® RealSense™ Depth Camera D457 GMSL interfaces.
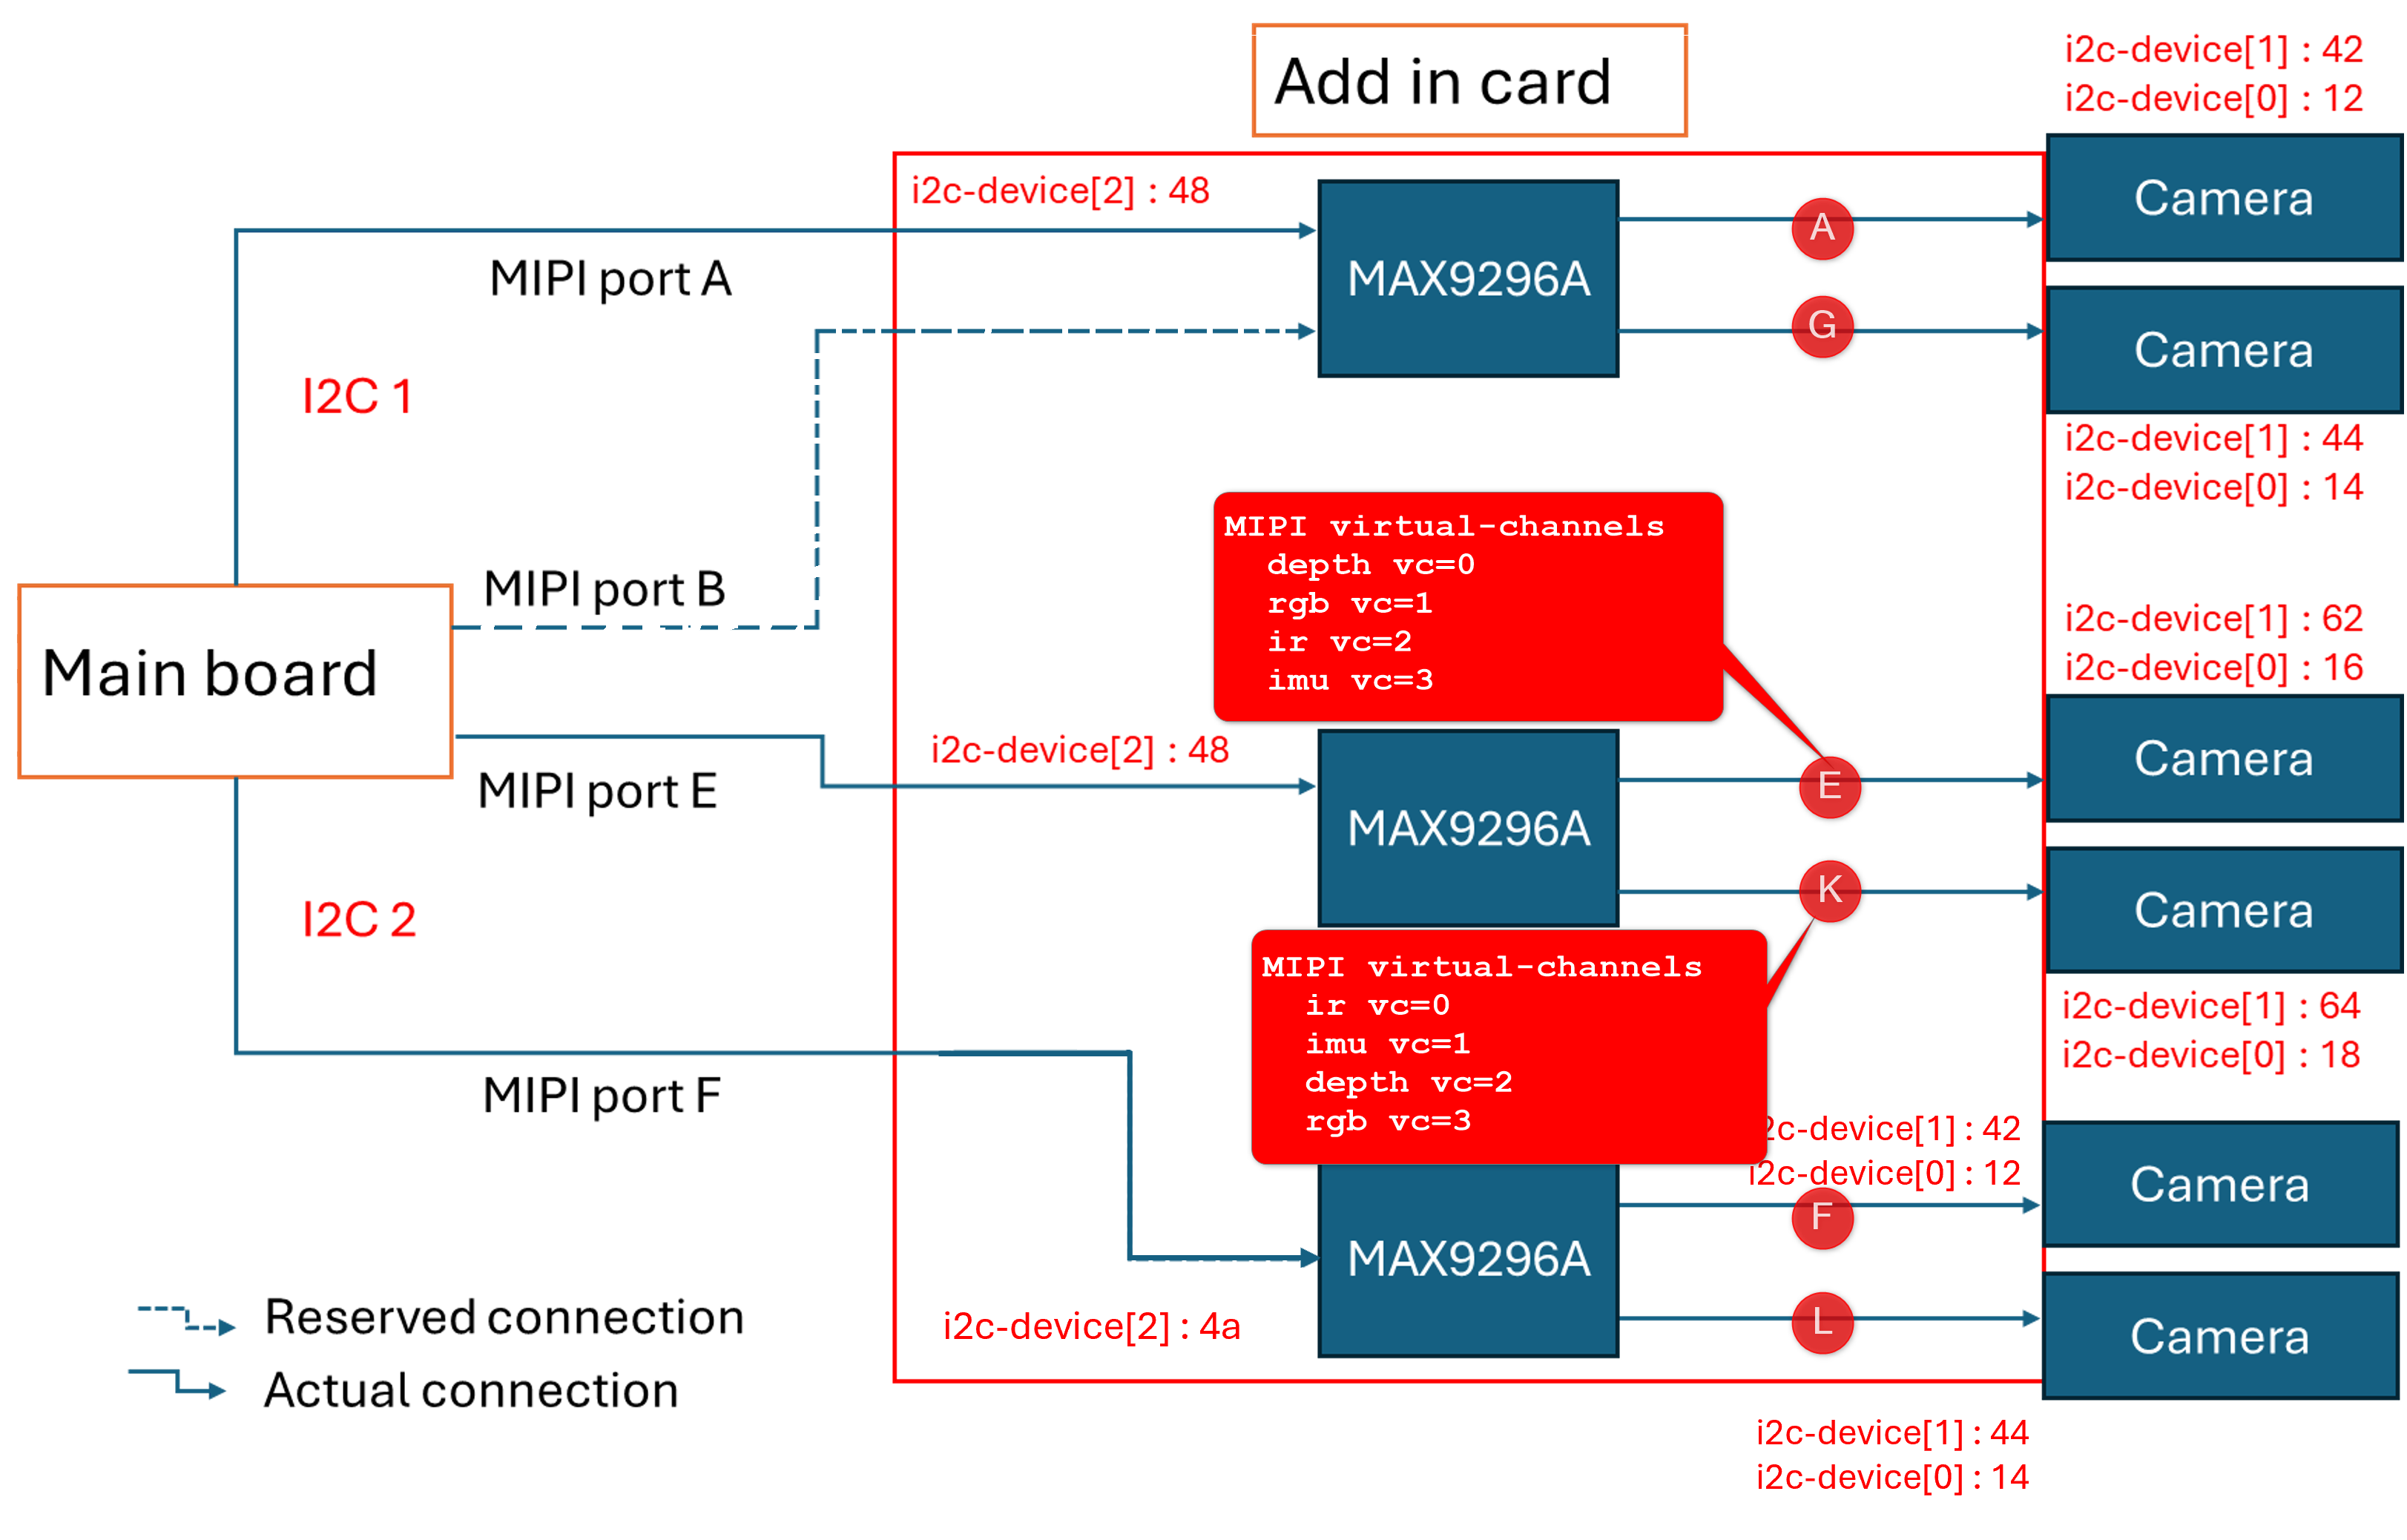
Under GMSL Aggregated SerDes operating mode the
d4xx.komodule must set Virtual Channels (VC) to each Intel® RealSense™ Depth Camera D457 GMSL sensors enumerated, as illustrated below.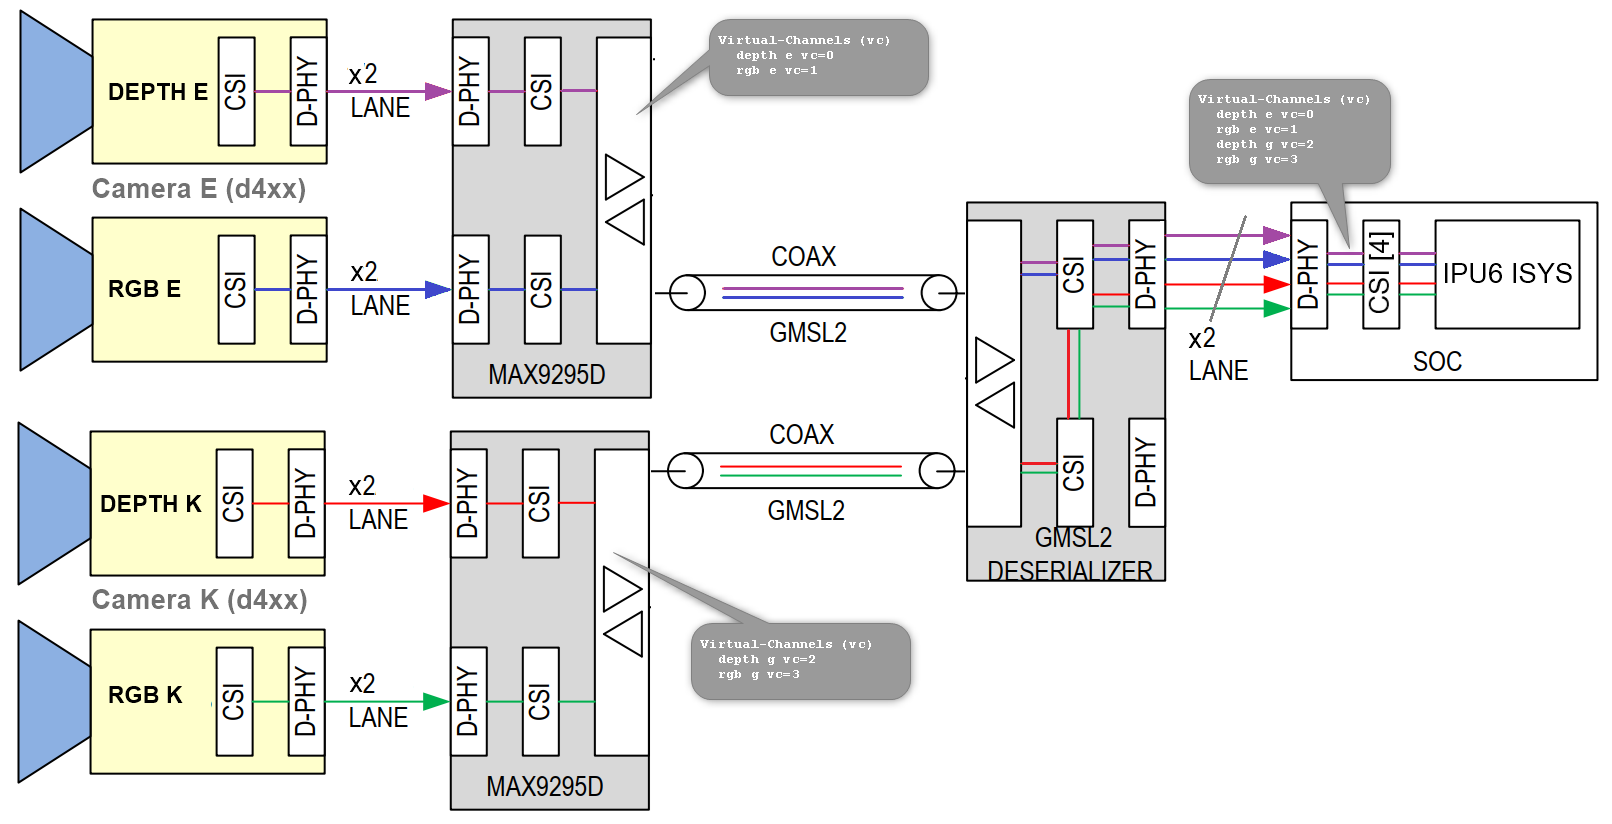
d4xx.kosets Virtual Channels by default for Intel® RealSense™ Depth Camera D457 aggregated-link GMSL on V4L2 Media Controller.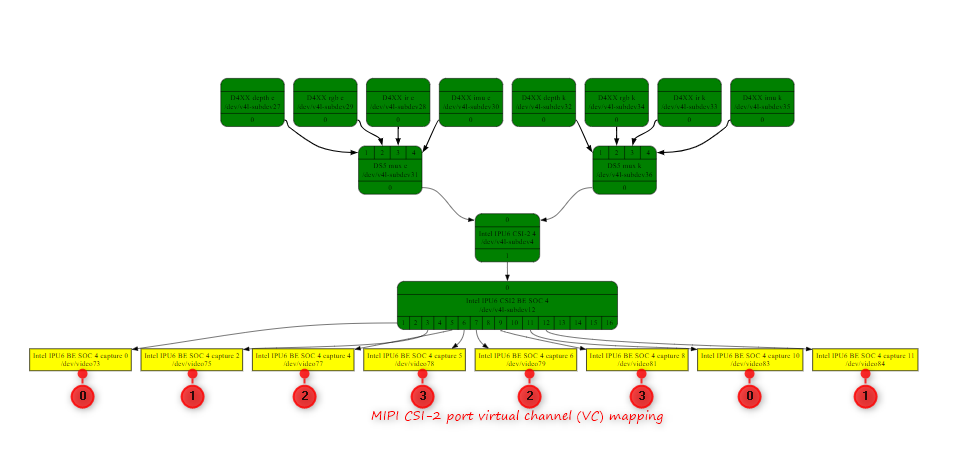
For example, settings Virtual Channels with
sensor_vc=0,1,2,3,2,3,0,1for GMSL Add-in-Card (AIC) MIPI CSI port 4 Aggregated Deserializer (e.g. MAX9296A) can stream video either from dual D457 RGB+DEPTH or dual D457 IMU+IR or single D457 IMU+IR+RGB+DEPTH.
GMSL port
Sensor scenario
Camera suffix
Sensor type
Virtual Channel
V4l2 Node
RS Link
Intel
IPU6 MIPI CSI-2
port 4
Dual D457 Camera streams scenario #1
E
depth + color
vc=0
/dev/video73
/dev/video-rs-depth-4vc=1
/dev/video75
/dev/video-rs-color-4K
color + depth
vc=2
/dev/video81
/dev/video-rs-color-10vc=3
/dev/video79
/dev/video-rs-depth-10Dual D457 Cameras streams scenario #2
E
imu + ir
vc=3
/dev/video78
/dev/video-rs-imu-4vc=2
/dev/video77
/dev/video-rs-ir-4K
ir + imu
vc=1
/dev/video83
/dev/video-rs-ir-10vc=0
/dev/video84
/dev/video-rs-imu-10Single D457 Camera streams scenario
E
imu + ir +depth +color
vc=3
/dev/video78
/dev/video-rs-imu-4vc=2
/dev/video77
/dev/video-rs-ir-4vc=0
/dev/video73
/dev/video-rs-depth-4vc=1
/dev/video75
/dev/video-rs-color-4K
ir + imu +color +depth
vc=1
/dev/video83
/dev/video-rs-ir-10vc=0
/dev/video84
/dev/video-rs-imu-10vc=2
/dev/video81
/dev/video-rs-color-10vc=3
/dev/video79
/dev/video-rs-depth-10Users can override
d4xxmodules the default configuration to achieve alternative virtual channel mapping :$ vi /etc/modprobe.d/d4xx.confFor example, on Canonical® Ubuntu® 22.04 (Jammy Jellyfish) distribution,
/etc/modprobe.d/d4xx.conffile is used to edit SerDes Aggregated-link virtual channel settings :options d4xx des_addr=0x48,0x4a,0x48,0x4a serdes_bus=2,2,3,3 sensor_vc=0,1,2,3,2,3,0,1
HOW TO analyze GMSL V4L2 Media Controller events in a time-view
The catapult time-viewer Intel® Edge Controls for Industrial application and Linux event framework offers tracing capabilities for debugging 12th/13th/14th Gen Intel® Core™ and Intel® Core™ Ultra Series 1 and 2 (Arrow Lake-U/H) Platform IPU6 and i2c interfaces for Intel® RealSense™ Depth Camera D457 GMSL.
Below is a brief overview how Intel® Edge Controls for Industrial catapult is used to visualize V4L2 media controller in time-view to help debugging multiple Intel® RealSense™ Depth Camera D457 stream through GMSL SerDes (see V4L2 Media Controller)
Install the following components from the ECI repository. Setup the ECI repository, then run following command to install this component:
$ sudo apt install catapult catapult-bpf-co-re
For example, on Canonical® Ubuntu® 24.04 (Noble Numbat) distribution, using the ECI repository:
Reading package lists... Done
Building dependency tree... Done
Reading state information... Done
The following NEW packages will be installed:
catapult-bpf-co-re
The following packages will be upgraded:
catapult
1 upgraded, 1 newly installed, 0 to remove and 32 not upgraded.
Need to get 1,057 kB of archives.
After this operation, 296 kB of additional disk space will be used.
Get:1 https://eci.intel.com/apt-repos/ECI/noble isar/main amd64 catapult amd64 3.3-0eci8 [1,013 kB]
Get:2 https://eci.intel.com/apt-repos/ECI/noble isar/main amd64 catapult-bpf-co-re amd64 3.3-0eci8 [44.8 kB]
Fetched 1,057 kB in 3s (422 kB/s)
(Reading database ... 212204 files and directories currently installed.)
Preparing to unpack .../catapult_3.3-0eci8_amd64.deb ...
Unpacking catapult (3.3-0eci8) over (3.3-0eci7) ...
Selecting previously unselected package catapult-bpf-co-re.
Preparing to unpack .../catapult-bpf-co-re_3.3-0eci8_amd64.deb ...
Unpacking catapult-bpf-co-re (3.3-0eci8) ...
Setting up catapult-bpf-co-re (3.3-0eci8) ...
Setting up catapult (3.3-0eci8) ...
Start the following
systemdservices to serve the Catapult REST API from the target on port 8000:$ systemctl enable catapult-restapi@6080.service && systemctl start catapult-restapi@6080.service && systemctl status catapult-restapi@6080.service
For example, on Canonical® Ubuntu® 24.04 (Noble Numbat) distribution, using the ECI repository the systemd service should start Catapult time-viewer REST API:
● catapult-restapi@6080.service - Catapult traceviewer REST API service
   Loaded: loaded (/usr/lib/systemd/system/catapult-restapi@.service; enabled; preset: enabled)
   Drop-In: /usr/lib/systemd/system/service.d
            └─10-override-protect-proc.conf
   Active: active (running) since Tue 2024-11-26 14:53:55 UTC; 2h 54min ago
   Main PID: 865 (restapi_start.p)
      Tasks: 1 (limit: 17109)
   Memory: 46.4M (peak: 67.8M)
      CPU: 2.900s
   CGroup: /system.slice/system-catapult\x2drestapi.slice/catapult-restapi@6080.service
            └─865 /usr/bin/python3 /usr/share/catapult/restapi_start.py -port 6080

Nov 26 14:53:57 eci-intel-319f restapi_start.py[865]: [1732632836.6406283] short-list available kernel trace events...
Nov 26 14:53:57 eci-intel-319f restapi_start.py[865]: [1732632836.6449609] short-list available kernel perf PMU hw-events...
Nov 26 14:53:57 eci-intel-319f restapi_start.py[865]: [1732632836.6452277] short-list available kernel filter functions...
Nov 26 14:53:57 eci-intel-319f restapi_start.py[865]:  * Serving Flask app 'restapi_start'
Nov 26 14:53:57 eci-intel-319f restapi_start.py[865]:  * Debug mode: on
Nov 26 14:53:57 eci-intel-319f restapi_start.py[865]: WARNING: This is a development server. Do not use it in a production deployment. Use a production WSGI server instead.
Nov 26 14:53:57 eci-intel-319f restapi_start.py[865]:  * Running on all addresses (0.0.0.0)
Nov 26 14:53:57 eci-intel-319f restapi_start.py[865]:  * Running on http://127.0.0.1:6080
Nov 26 14:53:57 eci-intel-319f restapi_start.py[865]:  * Running on http://127.0.0.1:6080
Nov 26 14:53:57 eci-intel-319f restapi_start.py[865]: Press CTRL+C to quit
The following section is applicable to any remote Host Microsoft Windows , Linux, …
Open
http://<target ipv4>:6080on commonly use Internet Browser.
Note
Google* Chrome/Chromium or Microsoft* Edge are recommended. Opera* and Safari* browsers were not tried extensively, but are potential alternatives. Firefox* may be slow. Microsoft Internet Explore is incompatible.
Intel® ECI makes generic assumptions that the Linux* IPU6/GMSL devices usage model essentially leverages Linux system-level trace events and user-recorded significant timeline for Intel IPU6 ISYS, i2c bus and Linux
v4l2events representation: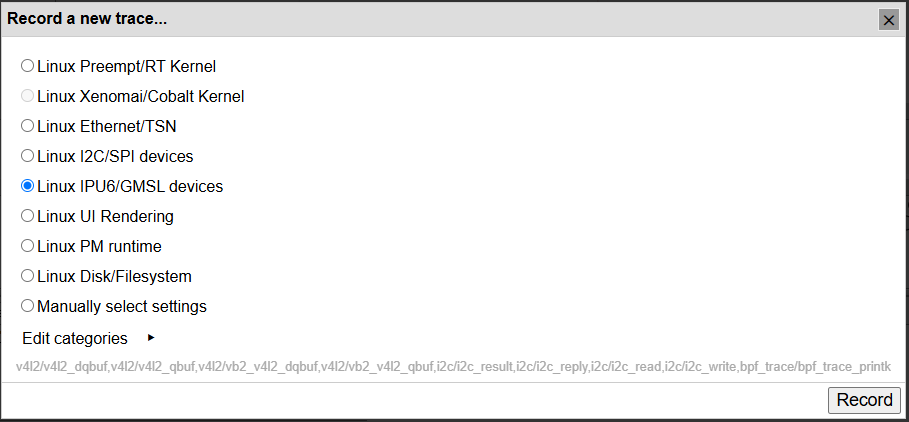
Click Edit categories to view the full trace event configuration details. You can record a trace for manually selected settings instead of the default Linux* IPU6/GMSL devices.
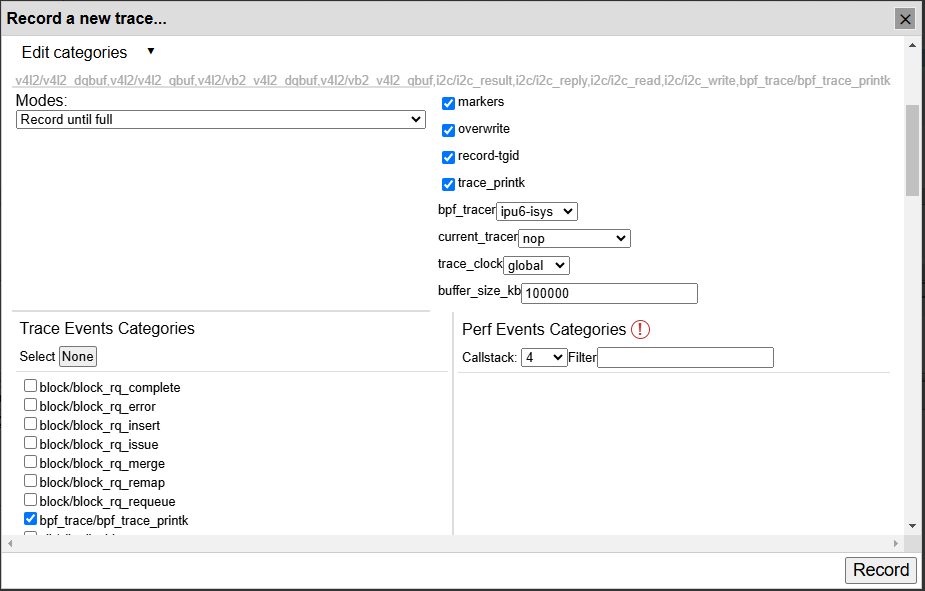
Click Record. The catapult REST API GET call
http://<machine-ipv4>:6080/json/begin_recording?<base64 encoded user-config>will pass the default Linux* IPU6/GMSL devices pre-canned configuration:Linux
v4l2ingress V4l2 frame representation using thev4l2/v4l2_dqbuf,,v4l2/vb2_v4l2_dqbuf,v4l2/vb2_v4l2_qbufandv4l2/v4l2_qbufevents.Linux
i2csubsystems representation using thei2c/i2c_result,i2c/i2c_reply,i2c/i2c_readandi2c/i2c_writeevents.Linux Intel IPU6 driver isys functions call entry-exit and Intel IPU6 firmware interrupts callbacks using the
bpf_trace_printkevents.
Record until full - This mode will display a progress bar corresponding to the full percentage of the trace buffer, polled periodically using Catapult REST API GET call
http://<machine-ipv4>:8000/json/get_buffer_percent_full.
Click Stop. The catapult REST API GET call
http://<machine-ipv4>:6080/json/end_recording_compressed?<base64 encoded compressed-json trace dump>retrieves and renders the trace JSON record onto the time-view UI.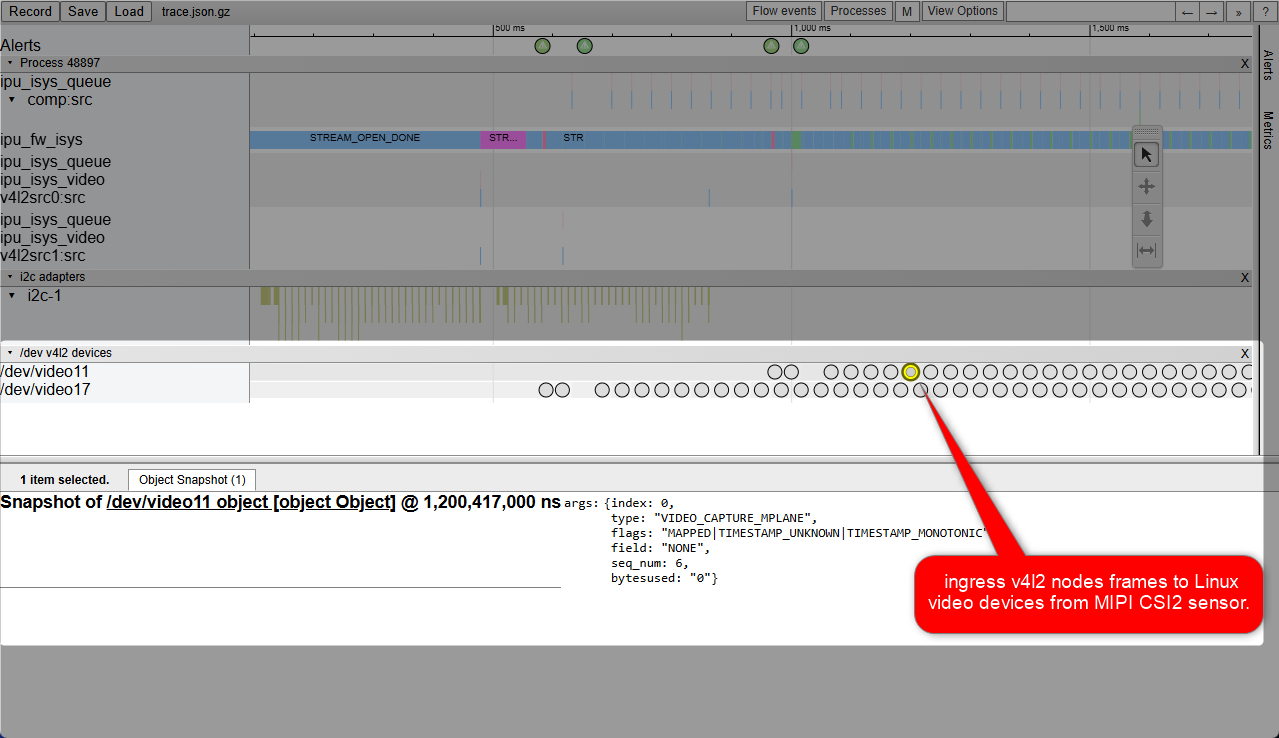
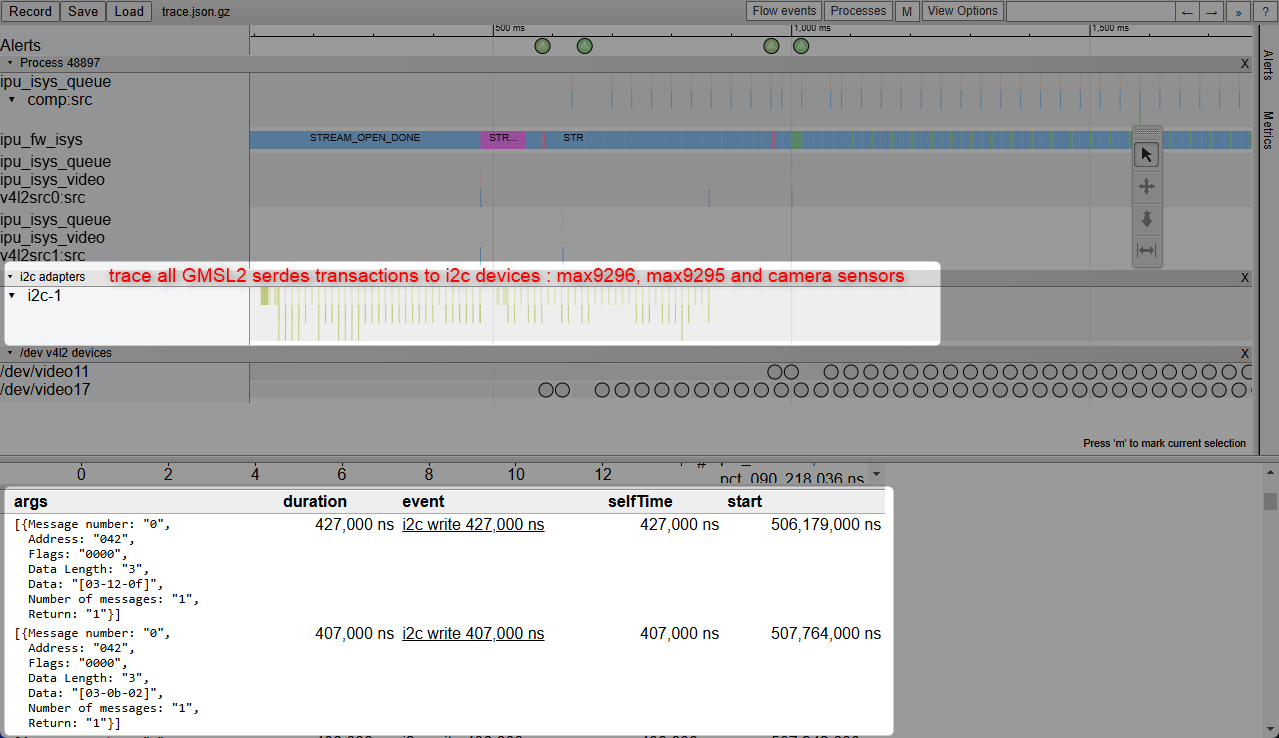
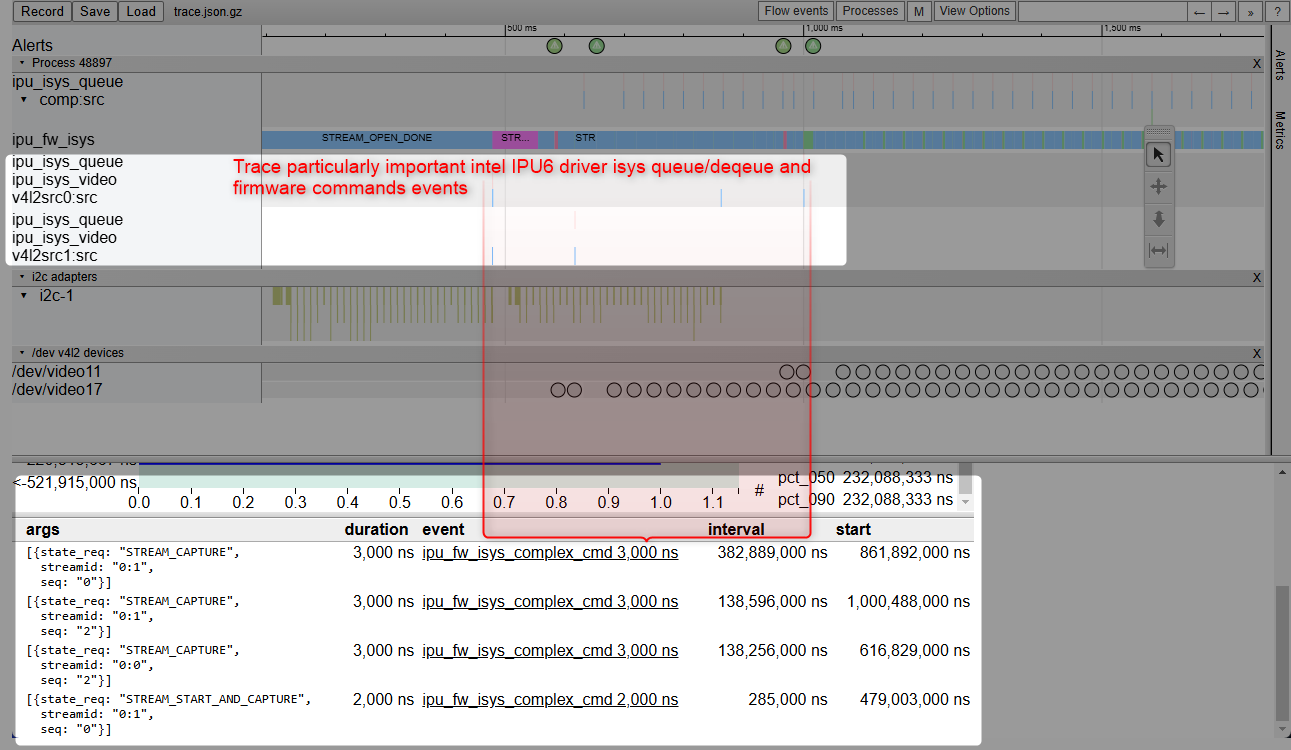
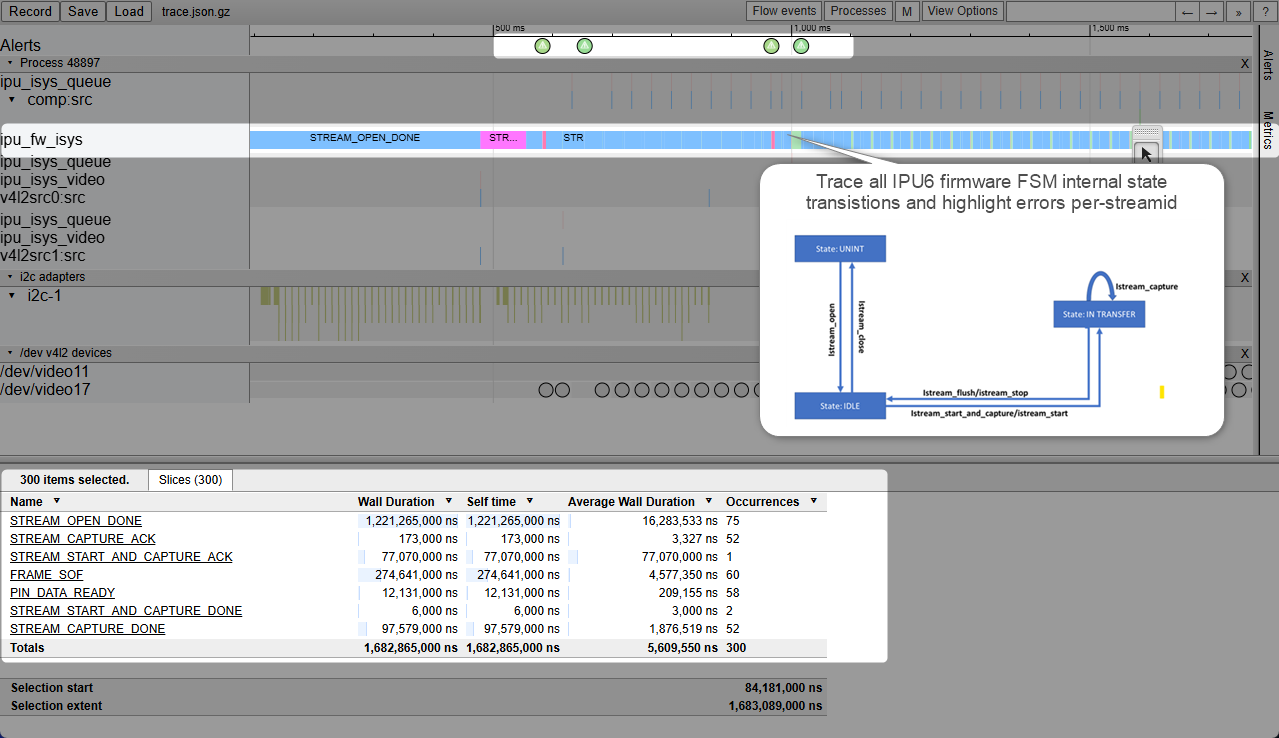
Click the
MMeta-data and?Helper buttons to review navigation options or tracing configuration of the record.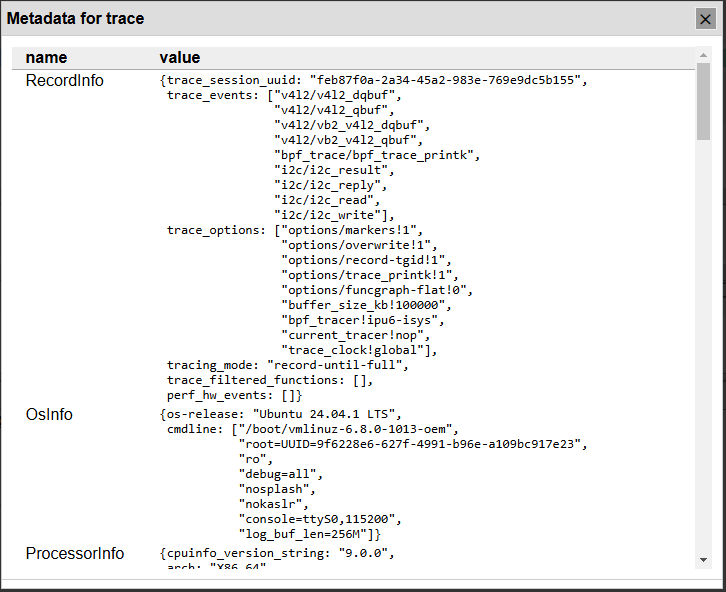
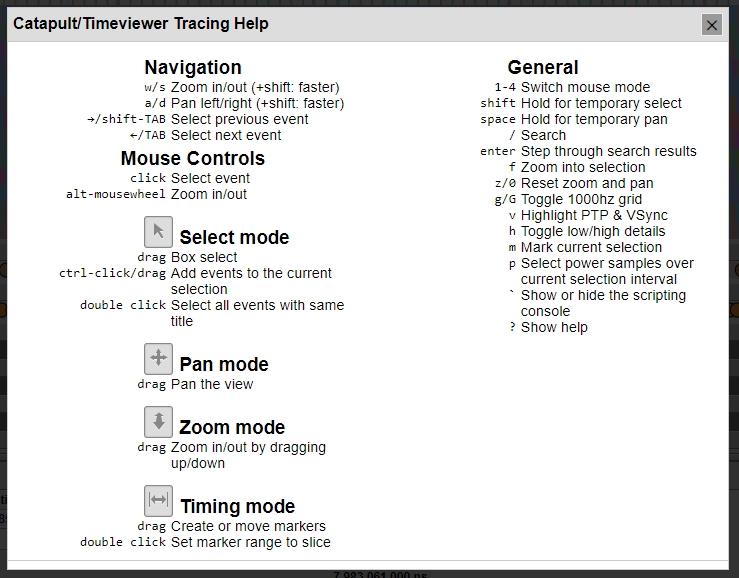
Click Save to archive to the
trace_my-gmsl-usecase.json.gzfor sending file as email attachment, for anyone to open it under ECI HTML catapult timeviewer page, by loading and visualizing all GMSL events timeline for further deep-dive analysis.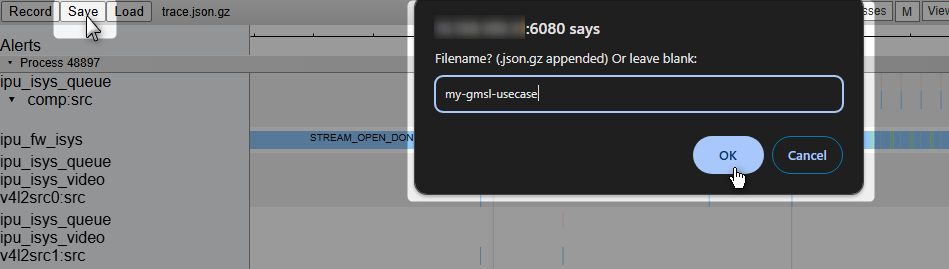
HOW TO detect in i2c bus to GMSL2 Deserializer and Serializer ACPI devices mapping
Below are a few basic manual steps for users to map Linux i2c device and verify that Intel® Core™ Ultra Series 1 and 2 (Arrow Lake-U/H) and 12th/13th/14th Gen Intel® Core™ i2c adapter detect GMSL2 Deserializer (e.g. MAX9296A) out of boot.
Review the Configure Intel® GMSL SerDes ACPI devices, if not already done.
List Linux i2c adapter mounted based of Linux i2c device BDF index
$ sudo apt install i2c-tools
$ ls -l /sys/bus/i2c/devices/
For example, Intel® Core™ Ultra
0000:00:15.xi2c adapter communication are mapped to the Advantech GMSL Input Module Card Deserializer (e.g. MAX9296A)lrwxrwxrwx 1 root root 0 Apr 30 23:39 0-0012 -> ../../../devices/pci0000:00/0000:00:15.0/i2c_designware.0/i2c-0/0-0012 lrwxrwxrwx 1 root root 0 Apr 30 23:39 0-0014 -> ../../../devices/pci0000:00/0000:00:15.0/i2c_designware.0/i2c-0/0-0014 lrwxrwxrwx 1 root root 0 Apr 30 23:39 0-0042 -> ../../../devices/pci0000:00/0000:00:15.0/i2c_designware.0/i2c-0/0-0042 lrwxrwxrwx 1 root root 0 Apr 30 23:39 0-0044 -> ../../../devices/pci0000:00/0000:00:15.0/i2c_designware.0/i2c-0/0-0044 lrwxrwxrwx 1 root root 0 Apr 30 23:39 0-0048 -> ../../../devices/pci0000:00/0000:00:15.0/i2c_designware.0/i2c-0/0-0048 lrwxrwxrwx 1 root root 0 Apr 30 23:38 i2c-0 -> ../../../devices/pci0000:00/0000:00:15.0/i2c_designware.0/i2c-0 lrwxrwxrwx 1 root root 0 Apr 30 23:38 i2c-1 -> ../../../devices/pci0000:00/0000:00:15.1/i2c_designware.1/i2c-1 lrwxrwxrwx 1 root root 0 Apr 30 23:38 i2c-10 -> ../../../devices/pci0000:00/0000:00:02.0/i2c-10 lrwxrwxrwx 1 root root 0 Apr 30 23:38 i2c-11 -> ../../../devices/pci0000:00/0000:00:02.0/i2c-11 lrwxrwxrwx 1 root root 0 Apr 30 23:38 i2c-12 -> ../../../devices/pci0000:00/0000:00:02.0/i2c-12 lrwxrwxrwx 1 root root 0 Apr 30 23:38 i2c-13 -> ../../../devices/pci0000:00/0000:00:02.0/i2c-13 lrwxrwxrwx 1 root root 0 Apr 30 23:38 i2c-14 -> ../../../devices/pci0000:00/0000:00:02.0/i2c-14 lrwxrwxrwx 1 root root 0 Apr 30 23:38 i2c-15 -> ../../../devices/pci0000:00/0000:00:02.0/drm/card1/card1-DP-1/i2c-15 lrwxrwxrwx 1 root root 0 Apr 30 23:38 i2c-16 -> ../../../devices/pci0000:00/0000:00:02.0/drm/card1/card1-DP-2/i2c-16 lrwxrwxrwx 1 root root 0 Apr 30 23:38 i2c-17 -> ../../../devices/pci0000:00/0000:00:02.0/drm/card1/card1-DP-3/i2c-17 lrwxrwxrwx 1 root root 0 Apr 30 23:38 i2c-18 -> ../../../devices/pci0000:00/0000:00:02.0/drm/card1/card1-DP-4/i2c-18 lrwxrwxrwx 1 root root 0 Apr 30 23:38 i2c-2 -> ../../../devices/pci0000:00/0000:00:15.3/i2c_designware.2/i2c-2 lrwxrwxrwx 1 root root 0 Apr 30 23:38 i2c-3 -> ../../../devices/pci0000:00/0000:00:19.0/i2c_designware.3/i2c-3 lrwxrwxrwx 1 root root 0 Apr 30 23:38 i2c-4 -> ../../../devices/pci0000:00/0000:00:19.1/i2c_designware.4/i2c-4 lrwxrwxrwx 1 root root 0 Apr 30 23:38 i2c-5 -> ../../../devices/pci0000:00/0000:00:1f.4/i2c-5 lrwxrwxrwx 1 root root 0 Apr 30 23:38 i2c-6 -> ../../../devices/pci0000:00/0000:00:02.0/i2c-6 lrwxrwxrwx 1 root root 0 Apr 30 23:38 i2c-7 -> ../../../devices/pci0000:00/0000:00:02.0/i2c-7 lrwxrwxrwx 1 root root 0 Apr 30 23:38 i2c-8 -> ../../../devices/pci0000:00/0000:00:02.0/i2c-8 lrwxrwxrwx 1 root root 0 Apr 30 23:38 i2c-9 -> ../../../devices/pci0000:00/0000:00:02.0/i2c-9
Detected a fixed
48or4aDeserializer (e.g. MAX9296A) i2c device across all0000:00:15.xi2c adapter0x20 0x6faddress range :$ i2cdetect -r -y 0 0x20 0x6f $ i2cdetect -r -y 1 0x20 0x6f $ i2cdetect -r -y 2 0x20 0x6f $ i2cdetect -r -y 3 0x20 0x6f
For example, Intel® Core™ Ultra Series 1 and 2 (Arrow Lake-U/H)
0000:00:15.0i2c adapter communication are mapped to the Advantech GMSL Input Module Card Deserializer (e.g. MAX9296A)4ai2c device.0 1 2 3 4 5 6 7 8 9 a b c d e f 00: 10: 20: 20 -- -- -- -- -- -- -- -- -- -- 2b -- -- -- -- 30: -- -- -- -- -- -- -- -- -- -- -- -- -- -- -- -- 40: -- -- -- -- -- -- -- -- -- -- 4a -- -- -- -- -- 50: -- -- -- -- -- -- -- -- -- -- -- -- -- -- -- -- 60: -- -- -- -- -- -- -- -- -- -- -- -- -- -- -- -- 70:
Another example, Intel® Core™ Ultra Series 1 and 2 (Arrow Lake-U/H)
0000:00:15.3i2c adapter communication are mapped to the Advantech GMSL Input Module Card Deserializer (e.g. MAX9296A)48i2c device.0 1 2 3 4 5 6 7 8 9 a b c d e f 00: 10: 20: -- -- -- -- -- -- -- -- -- -- -- -- -- -- -- -- 30: -- -- -- -- -- -- -- -- -- -- -- -- -- -- -- -- 40: -- -- -- -- -- -- -- -- 48 -- -- -- -- -- -- -- 50: -- -- -- -- -- -- -- -- -- -- -- -- -- -- -- -- 60: -- -- -- -- -- -- -- -- -- -- -- -- -- -- -- -- 70:
Correct Configure Intel® GMSL SerDes ACPI devices, if mapping between i2c adapter to Deserializer (e.g. MAX9296A) i2c devices.
HOW TO bind V4L2 Media Controller on 3rd party GMSL2 camera modules?
Below are basic scripts and a few steps for users to bind V4L2 media controller on 3rd party GMSL2 camera modules (for Example ISX031 Camera module), so 12th/13th/14th Gen Intel® Core™ and Intel® Core™ Ultra Series 1 and 2 (Arrow Lake-U/H) Platform IPU6 can be interconnected in a variety of ways to obtain the desired functionality.
Create a script binding V4L2 Media Controller to particular 3rd party GMSL2 camera modules Linux video device, for example ISX031 GMSL2 Camera module
/usr/share/camera/isx031_gmsl_bind.sh:Click to toggle
V4L2 Media Controller ISX031 Camera moduleexample script#!/bin/bash # file: /usr/share/camera/isx031_gmsl_bind.sh # This script used for binding media links of v4l2 subdevice entities # The configuration we had is ISX031 mux and IPU6 entities. # _______ _______ _______ _______ _________ # |depth|->| mux |->|CSI-2|->|BESOC|->|capture| # |_____| |_____| |_____| |_____| |_______| # # Full graph can be viewed on http://magjac.com/graphviz-visual-editor/ # media graph links can be generated by running 'media-ctl --print-dot' # # Dependency: v4l-utils v4l2_util=$(which v4l2-ctl) media_util=$(which media-ctl) if [ -z ${v4l2_util} ]; then echo "v4l2-ctl not found, install with: sudo apt install v4l-utils" exit 1 fi # enable metadata capture nodes for default metadata_enabled=1 while [[ $# -gt 0 ]]; do case $1 in -q|--quiet) quiet=1 shift ;; -m|--mux) shift mux_param=$1 shift ;; -n|--no-metadata) metadata_enabled=0 shift ;; -h|--help) echo "-q -m -n -h" ;; -f) fmt="$2" shift ;; *) quiet=0 shift ;; esac done fmt="${fmt:-[fmt:UYVY8_1X16/1920x1536@1/60 field:none]}" # mapping for ISX031 mux entity to IPU6 BE SOC entity matching. declare -A media_mux_capture_link=( [a]='' [b]='1 ' [c]='2 ' [d]='3 ' [e]='4 ' [f]='5 ' [g]='' [h]='1 ' [i]='2 ' [j]='3 ' [k]='4 ' [l]='5 ') # mapping for ISX031 mux entity to IPU6 CSI-2 entity matching. declare -A media_mux_csi2_link=( [a]=0 [b]=1 [c]=2 [d]=3 [e]=4 [f]=5 [g]=0 [h]=1 [i]=2 [j]=3 [k]=4 [l]=5) # all available ISX031 muxes, each one represent physically connected camera. # muxes a, b, c, d, e, f usually single link cameras # muxes g, h, i, i, k, l is aggregated link cameras, 'a' coupled to 'g' mux_list=${mux_param:-'a b c d e f g h i j k l'} # Find media device. # For case with usb camera plugged in during the boot, # usb media controller will occupy index 0 mdev=$(${v4l2_util} --list-devices | grep -A1 ipu6 | grep media) [[ -z "${mdev}" ]] && exit 0 out() { [[ $quiet -eq 0 ]] && echo -n "${@} " >&2 "${@}" [[ $quiet -eq 0 ]] && echo " RET=$?" >&2 } media_ctl_cmd="${media_util} -d ${mdev}" # media-ctl -r # <- this can be used to clean-up all bindings from media controller # cache media-ctl output dot=$($media_ctl_cmd --print-dot) # ISX031 MUX. Can be {a, b, c, d} + Aggregated {e, f, g, h}. for mux in $mux_list; do is_mux=$(echo "${dot}" | grep "ISX031 mux ${mux}") # skip for non-existing muxes [[ -z $is_mux ]] && continue; [[ $quiet -eq 0 ]] && echo "Bind ISX031 mux ${mux} .. " >&2 csi2_be_soc="CSI2 BE SOC ${media_mux_csi2_link[${mux}]}" csi2="CSI-2 ${media_mux_csi2_link[${mux}]}" # capture pad be_soc_cap="BE SOC ${media_mux_capture_link[${mux}]}capture" cap_pad=0 # bind (enable) link CSI-2 pad 1 to BE-SOC pad 0 out $media_ctl_cmd -l "\"Intel IPU6 ${csi2}\":1 -> \"Intel IPU6 ${csi2_be_soc}\":0[1]" # bind (enable) link ISX031 mux pad 0 to CSI-2 pad 0 out $media_ctl_cmd -l "\"ISX031 mux ${mux}\":0 -> \"Intel IPU6 ${csi2}\":0[1]" # bind link BE-SOC pad 0 to CSI-2 Capture pad 0 out $media_ctl_cmd -l "\"Intel IPU6 ${csi2_be_soc}\":$((${cap_pad}+1)) -> \"Intel IPU6 ${be_soc_cap} $((${cap_pad}+0))\":0[5]" cap_pad=0 if [ "${mux}" \> "f" ]; then cap_pad=6 fi out $media_ctl_cmd -V "\"ISX031 yuv ${mux}\":0 ${fmt}" out $media_ctl_cmd -V "\"ISX031 mux ${mux}\":0 ${fmt}" out $media_ctl_cmd -V "\"Intel IPU6 ${be_soc_cap} $((${cap_pad}+0))\":0 ${fmt}" cap_dev=$($media_ctl_cmd -e "Intel IPU6 ${be_soc_cap} $((${cap_pad}+0))") ln -snf ${cap_dev} /dev/video-isx031-${mux} doneManually bind V4L2 Media Controller on all ISX031 Camera module Linux video device mounted on the system:
$ chmod +x /usr/share/camera/isx031_gmsl_bind.sh
$ /usr/share/camera/isx031_gmsl_bind.sh -n -m f
$ /usr/share/camera/isx031_gmsl_bind.sh -n -m l
Note
Please keep
-ncommand argument, since currentintel_ipu6_isys.koandisx031_gmslkernel module may mot support V4L2 Media Controller meta-data binding.For example, on Canonical® Ubuntu® 22.04 (Jammy Jellyfish) distribution, an industrial system equipped with GMSL aggregated-link would bind ISX031 Camera module, each linked to a Linux video device e.g.
v4l2-subdev:Report V4L2 Media Controller on
/dev/media0interconnection to 3rd party GMSL2 camera modules ISX031 sensors and muxv4l2-subdev:$ media-ctl -d /dev/media0 --print-dot | grep -v dashed > ~/media0-ctl-dot-isx031-gmsl.txt
For example, importing the
media0-ctl-dot-isx031-gmsl.txtcontent into graphviz visual oneline editor would display V4L2 Media Controller linkage of 3rd party GMSL2 camera modules ISX031 sensors and muxv4l2-subdevto Intel® Core™ Ultra Series 1 and 2 (Arrow Lake-U/H) MIPI CSI2 sources on the industrial system equipped GMSL aggregated-link AIC running Canonical® Ubuntu® 22.04 (Jammy Jellyfish) distribution.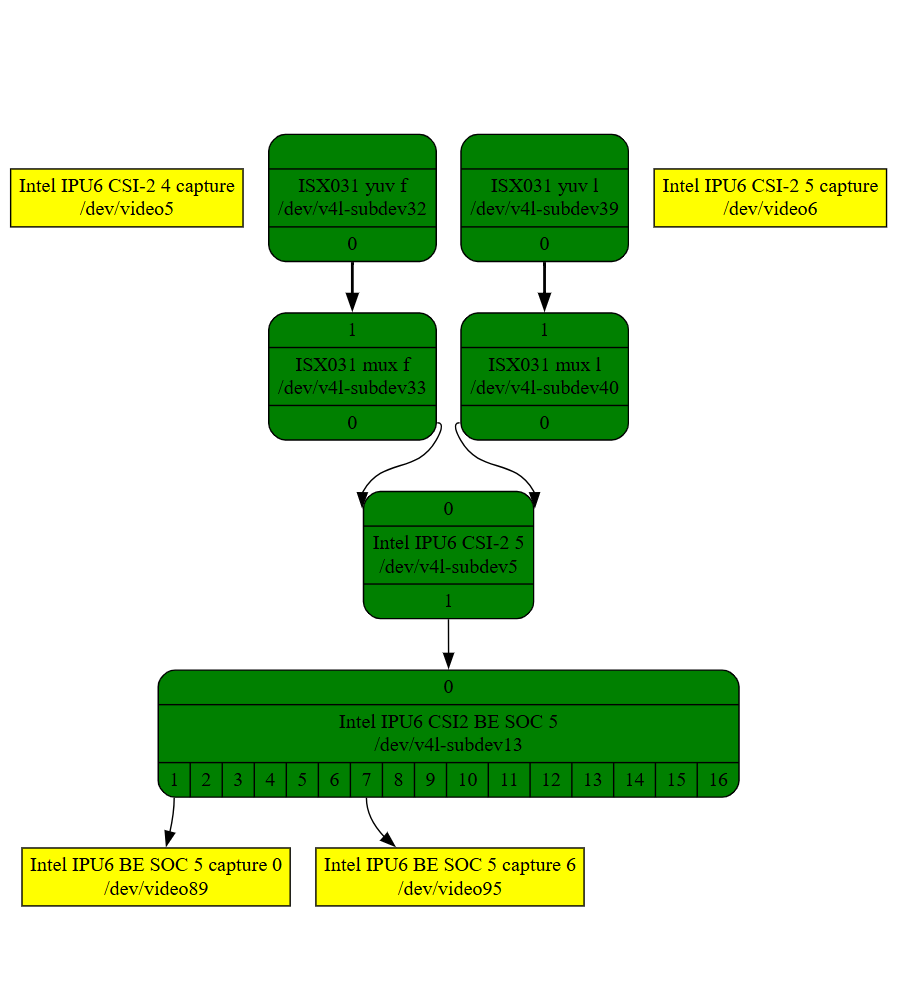
Create udev rules that the
system-udevddaemon would execute upon Linux video device e.g.v4l2-subdevdetection:$ cat /lib/udev/rules.d/99-isx031-gmsl-mipi.rules
For example, on Canonical® Ubuntu® 22.04 (Jammy Jellyfish) distribution, these rules will be triggered when
intel-ipu6-isysandisx031_gmslkernel modules are loaded:# Device rules for 3rd party GMSL2 ISX031 camera modules. # video links for SDK, binding for ipu6 SUBSYSTEM=="video4linux", ATTR{name}=="ISX031 mux *", RUN+="/bin/bash -c '/usr/share/camera/isx031_gmsl_bind.sh -n > /dev/kmsg'" # default isx031 gmsl link_freq override for MTL ipu6 DWC DPHY # (e.g .used udevadm info -a -p $(udevadm info -q path -n $(media-ctl -e "ISX031 mux a")) ) SUBSYSTEM=="video4linux", ATTR{name}=="ISX031 mux *", RUN+="/usr/bin/v4l2-ctl --set-ctrl v4l2_cid_link_freq=1 -d '%E{DEVNAME}'"