Real-time Control with Inference
This application measures performance of inferencing in a closed-loop control application. Inferencing is performed using openVINO on Intel® CPU, GPU, or NPU (Neural Processing Unit) to detect objects and pose. A simulator renders two copies of virtual gears and robot arms. One copy is controlled by the user, while the other copy is controlled by an application executing on a CODESYS software PLC runtime. The goal of the software PLC application is to synchronize the motion of the virtual objects. Closed-loop control is accomplished by using inferencing to measure the position of the objects, transmitting these measurements to the software PLC which uses a PID algorithm to calculate optimal motion adjustments, and transmitting the motion adjustments back to the simulator each cycle.
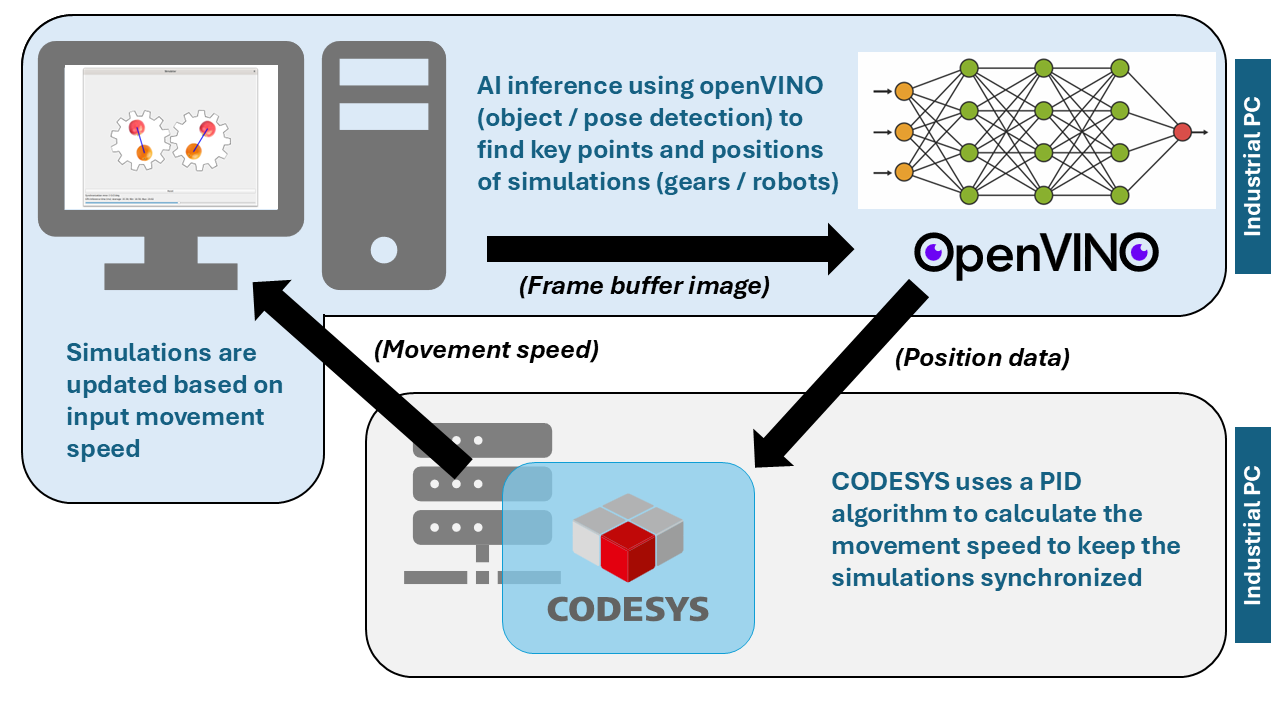
Table of Contents
RT Control with Inference Prerequisites
Procure a system which meets the minimum requirements below:
Specification |
Recommended |
Minimum |
|---|---|---|
Processor |
Intel® Core™ Ultra Processor |
11th Gen Intel® Core™ |
Operating System |
Canonical® Ubuntu® 24.04 (Noble Numbat) |
• Canonical® Ubuntu® 22.04 (Jammy Jellyfish)
• Debian 12 (Bookworm)
|
Linux kernel |
• v6.12 (NPU & GPU)
• v6.6 (NPU & GPU)
|
• v6.1 (GPU only)
• v5.15 (GPU only)
|
Follow Get Started Steps to prepare the system with BIOS optimizations and a real-time Linux environment.
Follow Install Linux Desktop Environment to install a graphical desktop environment (ex: GNOME, Mate, XFCE) if you do not already have one.
Install Intel GPU drivers
If you want to run openVINO inferencing applications on the GPU device of Intel® Core™ processors, you need to install the Intel® GPU driver and compiler tools.
Install the Intel® GPU driver and compiler tools:
$ sudo apt install libze1 libigdgmm12 libigc1 libigdfcl1 intel-opencl-icd libze-intel-gpu1
Install Intel NPU drivers
If you want to run openVINO inferencing applications on the NPU device of Intel® Core™ Ultra processors, you need to install the Intel® NPU driver. If your system does not have an Intel® Core™ Ultra Processor, you should skip this step.
General information on the Intel® NPU driver can be found on the Linux NPU Driver website. The driver consists of the following packages:
intel-driver-compiler-npu: Intel® driver compiler for NPU hardware; the driver compiler enables compilation of openVINO IR models using the Level Zero Graph Extension API.intel-fw-npu: Intel® firmware package for NPU hardware.intel-level-zero-npu: Intel® Level Zero driver for NPU hardware; this library implements the Level Zero API to interact with the NPU hardware.
Note
The installation instructions on the
Linux NPU Driver
website download the *.deb files for these components,
and install the packages from the downloaded files. In consequence, you
will not get any upgrades for these packages without manual interaction.
For this reason, it is better to use packages from an APT package feed,
as it is described in the following section.
The packages of the Intel® NPU driver are provided by the APT package feed, which you have added to your system when you followed the instructions to Install Intel GPU drivers. This APT package feed also provides all dependencies of the Intel® NPU driver packages.
Install the Intel® NPU driver:
$ sudo apt install intel-level-zero-npu intel-driver-compiler-npu
Add your user account to the
rendergroup:$ sudo usermod -a -G render $USER
Set the render group for
acceldevice:$ sudo chown root:render /dev/accel/accel0 $ sudo chmod g+rw /dev/accel/accel0
The previous step must be repeated each time when the module is reloaded or after every reboot. To avoid the manual setup of the group for the
acceldevice, you can configure the followingudevrules:$ sudo bash -c "echo 'SUBSYSTEM==\"accel\", KERNEL==\"accel*\", GROUP=\"render\", MODE=\"0660\"' > /etc/udev/rules.d/10-intel-vpu.rules" $ sudo udevadm control --reload-rules $ sudo udevadm trigger --subsystem-match=accel
Verify that the
/dev/accel/accel0device exists and that the device belongs to therendergroup:$ ls -lah /dev/accel/accel0 crw-rw---- 1 root render 261, 0 Jul 1 13:10 /dev/accel/accel0
Reboot to allow the user group changes to take affect:
$ sudo reboot
Install RT Control with Inference Application
You can install this component from the ECI repository. Setup the ECI repository, then perform either of the following commands to install this component:
Perform either of the following commands to install this component:
![]()
![]()
- Install from meta-package
$ sudo apt install eci-inference-benchmarking
- Install from individual Deb package
$ sudo apt install rt-inference codesys-inference-rt-control codesys-benchmark-scripts
Note
The eci-inference-benchmarking package will install the companion CODESYS runtime and application. You may optionally install the CODESYS assets on a different system (assuming all systems can communicate with each other on the network) with the following packages: codesys-inference-rt-control and codesys-benchmark-scripts.
Setup Python Virtual Environment
This application consists of Python scripts and requires specific Python modules to be installed. The proper method of installing Python modules typically involves creating a Python virtual environment. There are many tools to accomplish this, but this example will use the built-in virtualenv capability of modern Python to achieve this goal.
Install
pipxpackage:$ sudo apt install pipx
Install the Python
virtualenvmodule usingpipx:$ pipx install virtualenv
Add the
virtualenvtool to the environment path:$ pipx ensurepath $ source ~/.bashrc
Setup a Python virtual environment using
virtualenv:Note
This command will create a directory at the current location. Change directory to a location you have write access before executing this command.
$ virtualenv venv_sim
Activate the
venv_simPython virtual environment:$ cd venv_sim $ source bin/activate
Copy the application files into the virtual environment directory:
$ cp -r /opt/benchmarking/rt-inference .
$ cd rt-inference
Install the application Python requirements into the virtual environment:
$ pip install --upgrade pip
$ pip install --no-deps -r requirements.txt
Note
Depending on the system’s network speed, this step may take a few minutes to complete.
Run the RT Control with Inference Application
The simulator provides two types of simulations:
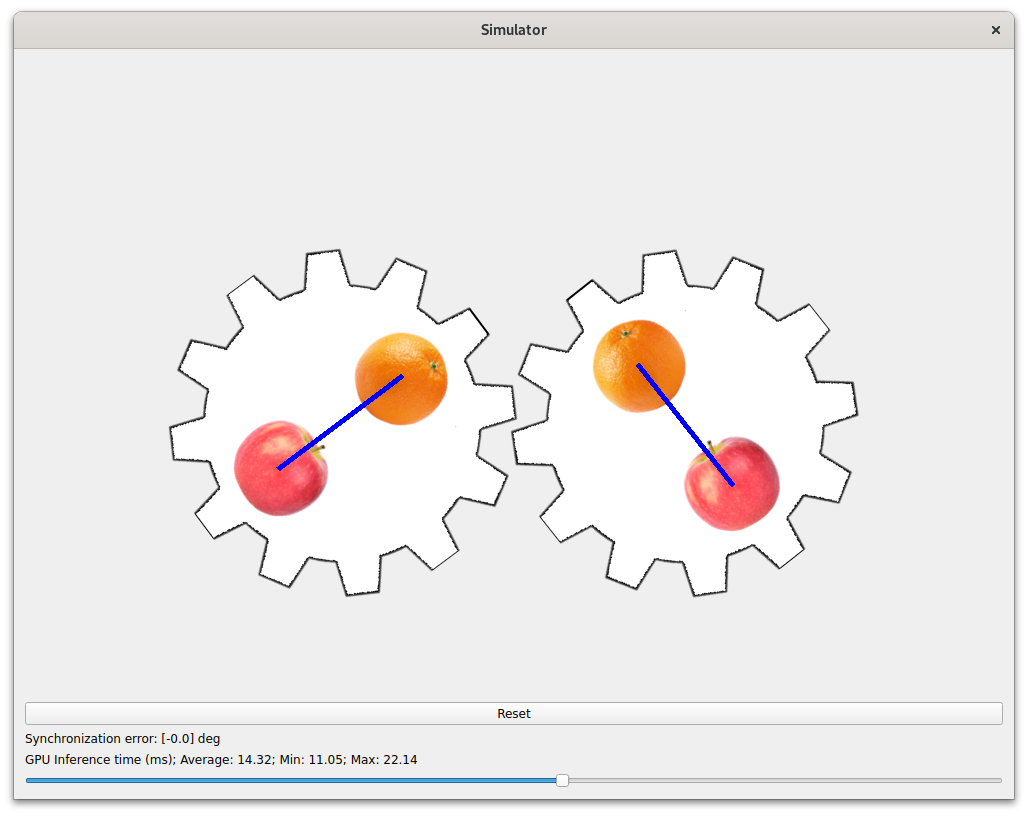
- Gears
This simulation creates two virtual gears which mesh with each other. Each gear has images of an apple and an orange superimposed on it. The open-source YOLOv8 model is converted to openVINO format and used to detect the position of the apples and oranges, which is then used to calculate the position of the gears.
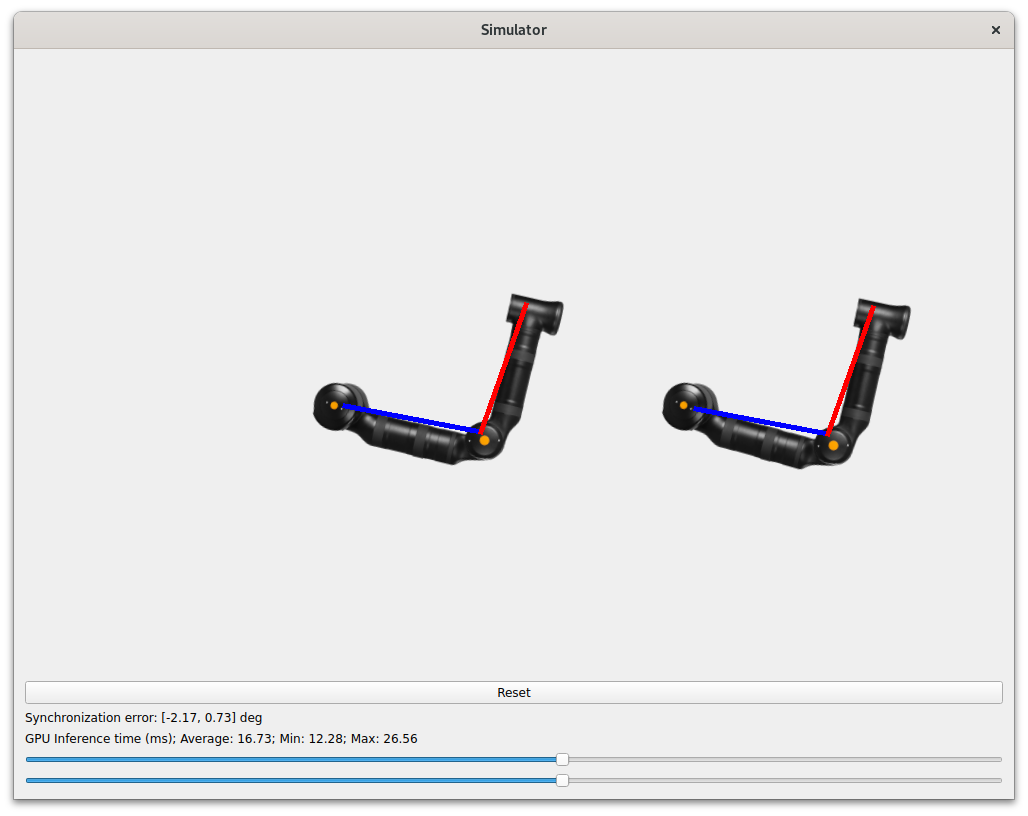
- Robots
This simulation creates two virtual two-segment robot arms which mirror each others movements. A pre-trained model provided with this application is used to perform pose detection on the robot segments, which is then used to calculate the position of the robots.

Launch the application using the
simulator.pyscript:$ ./simulator.pyWhen the application first starts, a configuration page will appear:
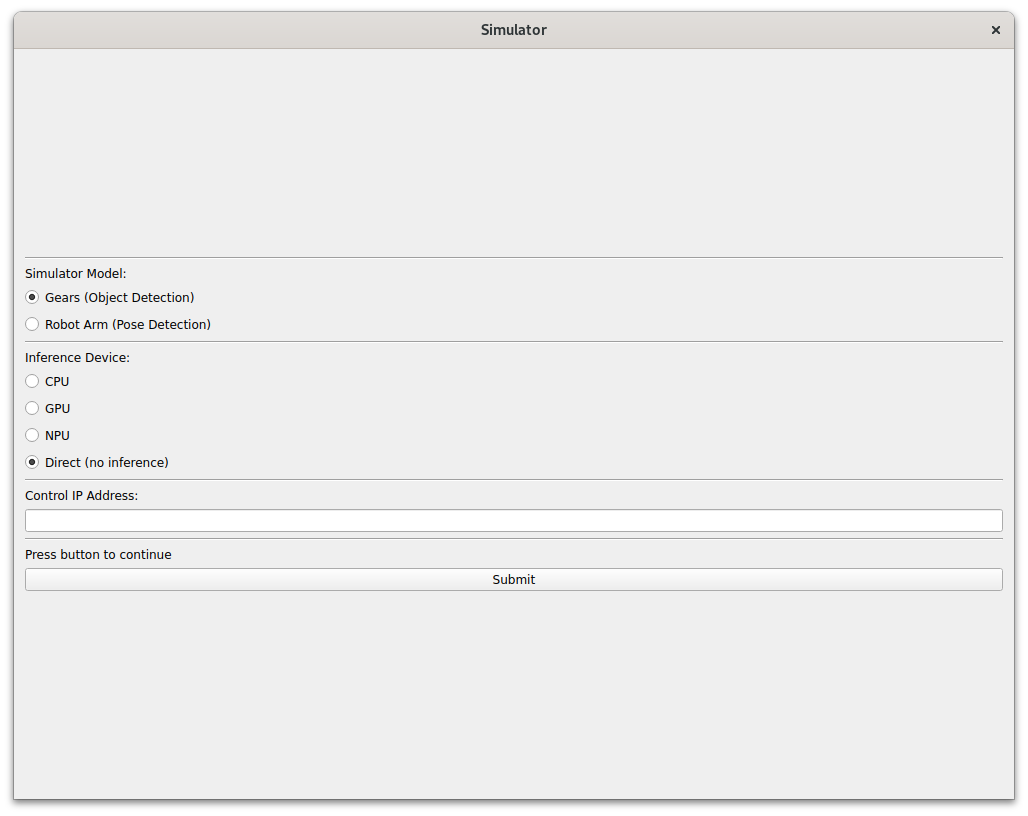
On this page, select which simulation type to run (
Gears, orRobots), and choose an inference device (CPU,GPU,NPU). The ``Direct (no inference)option will not use inference, but instead transmit the actual values to the CODESYS application directly. You may use this option to establish a maximum performance.Note
The inference devices are dynamically populated based on which devices are present on the system.
GPUand / orNPUmay not be present if the devices were not detected. There is a convenience script provided namedcheck_devices.pywhich lists all the available devices for inferencing.In the
Control IP Addressinput field, enter the IP address of the system executing the CODESYS runtime and application. By default, this will be the current system, so enter0.0.0.0. If you installed thecodesys-inference-rt-controlpackage on a different system, then enter that system IP address instead.Click the
Submitbutton to continue. At this point, the simulator will convert the model for use with the selected device (CPU,GPU,NPU). This process can take a few seconds, during which time the Python engine may detect the application as frozen. If this occurs, wait patiently until the simulator resumes execution.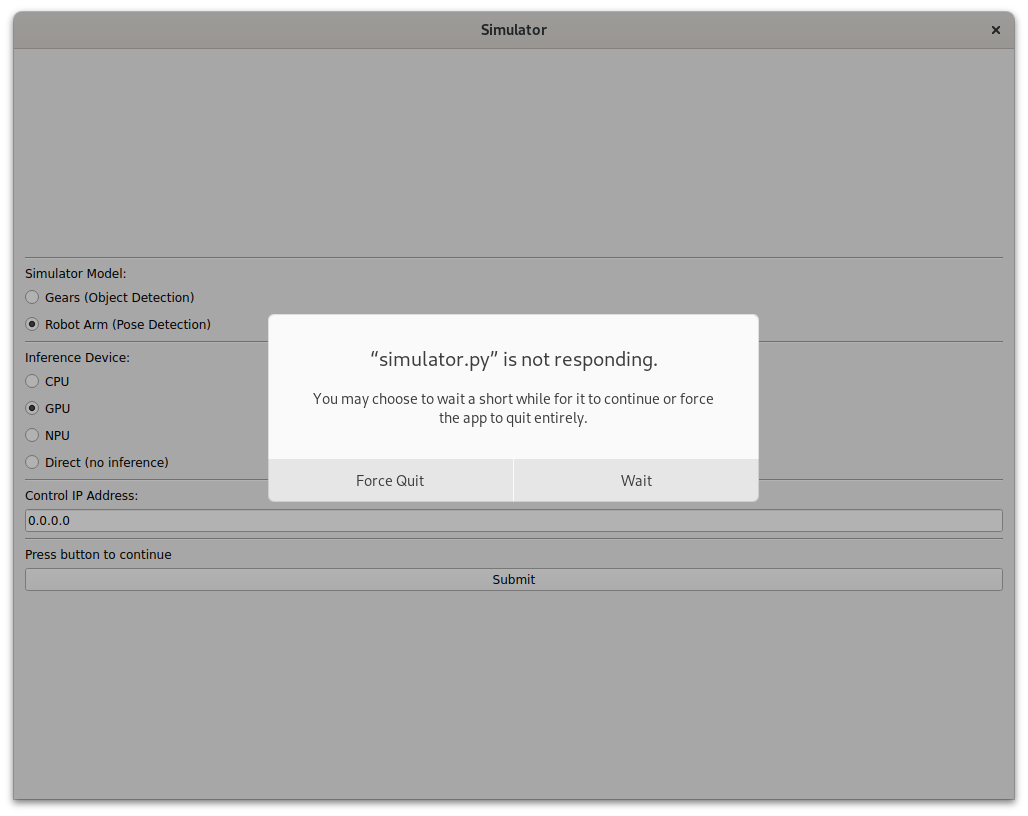
If you choose an inference device, there should be indicator lines drawn onto the virtual objects. These lines indicate the calculated positions based on the inference result. These positions are transmitted to the CODESYS application which will attempt to keep the simulations synchronized.
Execute the
start_codesys_native.shutility script to restart and optimize the CODESYS application:Note
If you installed CODESYS to a different system, execute this script on that system accordingly.
$ sudo /opt/benchmarking/codesys/utility/start_codesys_native.sh
The provided script performs the following runtime optimizations:
Uses Cache Allocation Technology (CAT) to allocate exclusive access of half the last-level cache to isolated cores (typically 1 & 3)
Assigns CODESYS task affinity to isolated cores (typically 1 & 3)
Assigns non-CODESYS task affinity to core 0
Disables kernel machine check interrupt
Increases thread runtime utilization to infinity
When executing the script, not all task affinity can be changed. This is expected behavior. An example output is shown below:
sudo /opt/benchmarking/codesys/utility/start_codesys_native.sh
Stopping unecessary services
Failed to stop ofono.service: Unit ofono.service not loaded.
Failed to stop wpa_supplicant.service: Unit wpa_supplicant.service not loaded.
Failed to stop bluetooth.service: Unit bluetooth.service not loaded.
Stopping Docker Daemon
Warning: Stopping docker.service, but it can still be activated by:
  docker.socket
Stopping Codesys Runtime
Disabling Machine Check
Disabling RT runtime limit
New COS default: 0xff0
Changing CPU affinity of existing interrupts
setting 1 to affine for core 0
setting 4 to affine for core 0
setting 8 to affine for core 0
setting 9 to affine for core 0
setting 12 to affine for core 0
setting 14 to affine for core 0
setting 16 to affine for core 0
setting 18 to affine for core 0
setting 27 to affine for core 0
setting 29 to affine for core 0
setting 120 to affine for core 0
setting 121 to affine for core 0
setting 123 to affine for core 0
setting 124 to affine for core 0
setting 125 to affine for core 0
setting 126 to affine for core 0
taskset: failed to set pid 3's affinity: Invalid argument
taskset: failed to set pid 4's affinity: Invalid argument
taskset: failed to set pid 16's affinity: Invalid argument
taskset: failed to set pid 23's affinity: Invalid argument
Starting Codesys Runtime
Changing affinity of Codesys Runtime tasks
Codesys preparation complete.
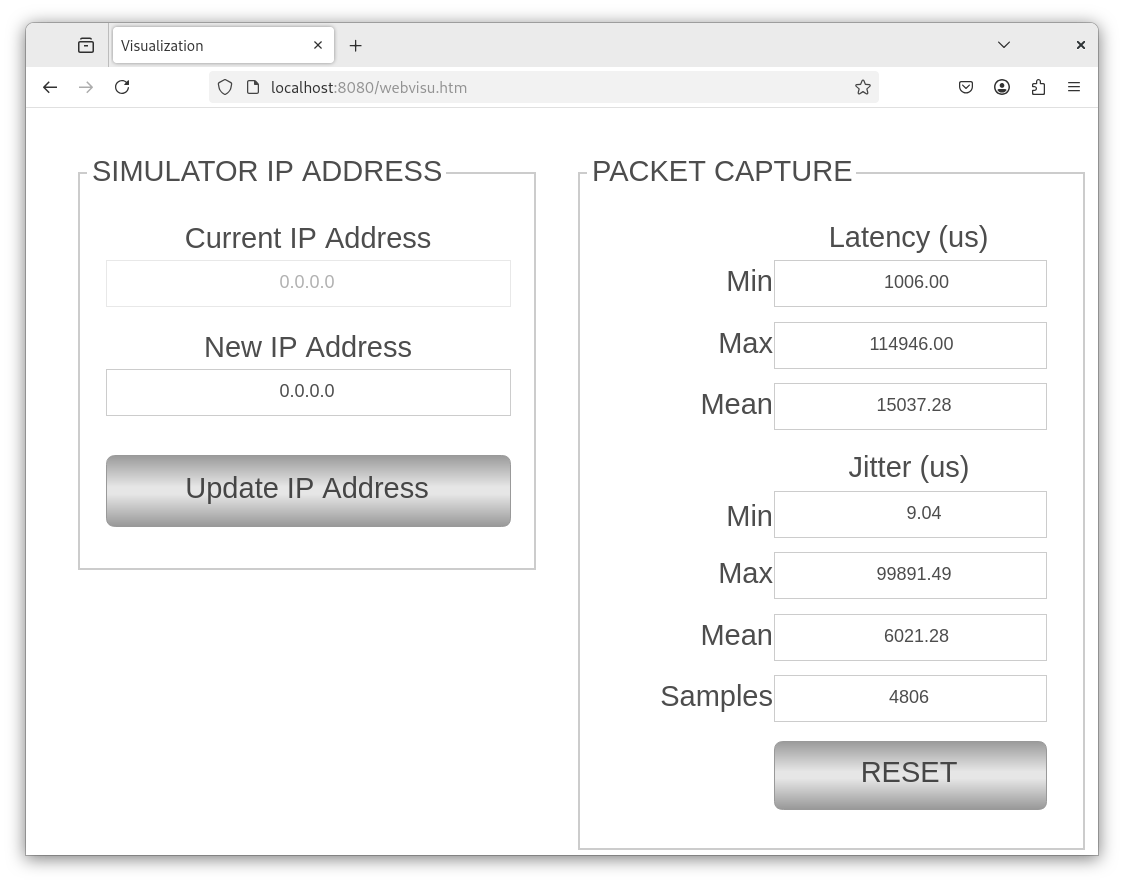
Open a web browser and navigate to http://localhost:8080 (or the IP address of the system with CODESYS installed). If the CODESYS application is running, a page should appear as follows:
If the web page does not appear, perform the previous step again to restart the CODESYS runtime.
Important
If the CODESYS application is executing on a different system than the simulator, use the
New IP Addressinput field and theUpdate IP Addressbutton to update the IP address to that system accordingly.The web page displays the timing statistics of packets received by the simulator. You may press the
RESETbutton to initialize the statistics. Verify that theSamplesvalue is increasing.Tip
If the
Samplesvalue remains zero, then communication between the CODESYS application and the simulator is not occurring. This is typically caused by firewall rules blocking ports. This application uses ports1080and1081over UDP. Ensure that these ports are not in use and are not blocked by the firewall. You may also find that restarting the CODESYS runtime helps.Return to the simulator visualization. On the simulator page, there is one or two slider inputs (depending on the simulation chosen). Move the slider(s) to modify the rotation speed of the object(s). If the inferencing and control application are executing quickly enough, then synchronization of the objects should be possible within 5 degrees.
(Optional) Restart the simulator and choose a different inference device to compare the performance on your system.