ACRN Hypervisor
ACRN™ is a, flexible, lightweight reference hypervisor, built with real-time and safety-criticality in mind, and optimized to streamline embedded development through an open source platform. ACRN defines a device hypervisor reference stack and an architecture for running multiple software subsystems, managed securely, on a consolidated system by means of a virtual machine manager (VMM). It also defines a reference framework implementation for virtual device emulation, called the “ACRN Device Model”.
The ACRN Hypervisor is a Type 1 reference hypervisor stack, running directly on the bare-metal hardware, and is suitable for a variety of IoT and embedded device solutions. The ACRN hypervisor addresses the gap that currently exists between datacenter hypervisors, and hard partitioning hypervisors. The ACRN hypervisor architecture partitions the system into different functional domains, with carefully selected user VM sharing optimizations for IoT and embedded devices.
For the most recent documentation on ACRN, refer to the project documentation.
Attention
The ACRN Hypervisor is actively being developed and has not yet reached maturity. Refer to Validated Hardware Platforms for a list of platforms validated with ACRN. Additional platform support may be limited. For details on the active issues, refer to this list.
ACRN Terminology
Term |
Description |
|---|---|
VM |
Hypervised operating systems (OS) are referred to as virtual machines or VMs. |
Service VM |
Since ACRN is a Type 1 hypervisor, the OS in which the ACRN tools reside is also virtualized. This virtualized OS is commonly referred to as Service VM, Service OS, and SOS. |
User VM |
VMs other than the Service VMs are commonly referred to as User VM, Guest VM, Guest OS, User OS, and UOS. |
ECI ACRN Scenario
The ACRN solutions that ECI provide are generic and designed to be compatible with most applications. Specifically, ECI compiles ACRN with an ACRN Scenario named eci-shared.xml, which defines the following VM configurations:
VM Name |
Memory |
CPU Affinity |
VM Type |
IVSHMEM |
SSRAM |
Passthrough |
|---|---|---|---|---|---|---|
Service VM |
N/A |
0 |
|
N/A |
N/A |
None |
POST_STD_VM1 |
4096M |
0,1,2,3 |
Post-launch, Standard |
hv:/shmem,64` |
Yes |
None |
POST_RT_VM1 |
4096M |
1,2,3 |
Post-launch, Real-time |
|
Yes |
None |
POST_STD_VM2 |
4096M |
0,1,2,3 |
Post-launch, Standard |
|
Yes |
None |
VM Name |
Memory |
CPU Affinity |
VM Type |
IVSHMEM |
SSRAM |
Passthrough |
|---|---|---|---|---|---|---|
Service VM |
N/A |
N/A |
N/A |
N/A |
N/A |
None |
POST_RT_VM1 |
4096M |
2,3 |
Post-launch, Real-time |
None |
No |
None |
POST_RT_VM2 |
4096M |
4,5 |
Post-launch, Real-time |
None |
No |
None |
POST_RT_VM3 |
4096M |
6,7 |
Post-launch, Real-time |
None |
No |
None |
Note: Most VM parameters can be overridden during runtime when invoking the ACRN device manager acrn-dm. See ACRN Device Model Example Parameters for the list of example parameters that can be passed to the acrn-dm tool.
If this eci-shared.xml generic ACRN scenario does not meet your application requirements, create your own ACRN scenario and recompile ACRN. For more information, refer to Compile ACRN for Different Platforms.
ACRN Prerequisites
The following section is applicable to:

To use boot and ACRN, certain BIOS settings need to be configured. Do the following to configure the BIOS settings:
Boot the target system and access the BIOS (typically pressing the delete or F2 keys while booting will open the BIOS menu).
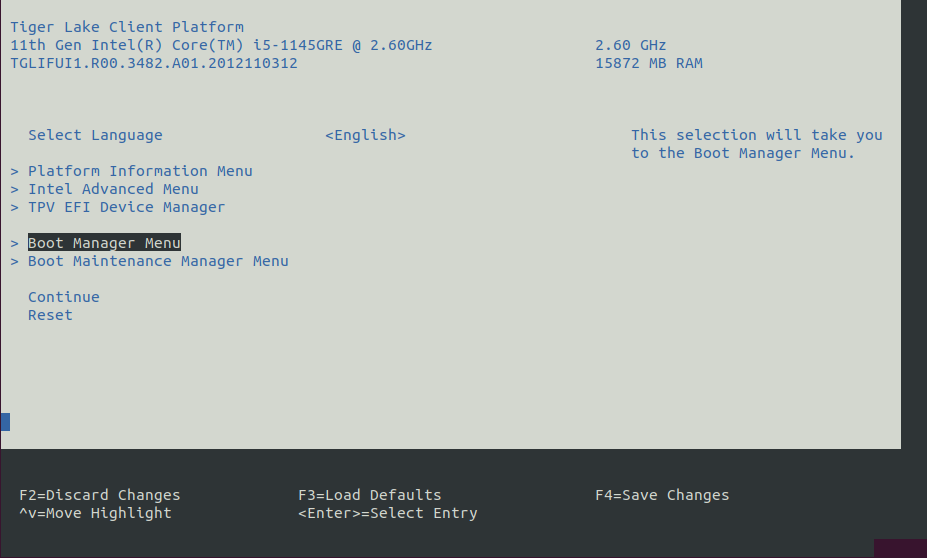
Select Restore Defaults or Load Defaults and then select Save Changes and Reset. As the target system boots, access the BIOS again (as per Step 1).
Modify the BIOS configuration as listed in the following table.
Note: The available configurations depend on the platform, BIOS in use, or both. In this case, modify as many configurations as possible.
Setting Name
Option
Setting Menu
Hyper-Threading
Disabled
Intel Advanced Menu ⟶ CPU Configuration
Intel (VMX) Virtualization
Enabled
Intel Advanced Menu ⟶ CPU Configuration
X2APIC
Disabled
Intel Advanced Menu ⟶ CPU Configuration
Intel(R) SpeedStep
Disabled
Intel Advanced Menu ⟶ Power & Performance ⟶ CPU - Power Management Control
Turbo Mode
Disabled
Intel Advanced Menu ⟶ Power & Performance ⟶ CPU - Power Management Control
C States
Disabled
Intel Advanced Menu ⟶ Power & Performance ⟶ CPU - Power Management Control
RC6 (Render Standby)
Disabled
Intel Advanced Menu ⟶ Power & Performance ⟶ GT - Power Management Control
VT-d
Enabled
Intel Advanced Menu ⟶ System Agent (SA) Configuration
Above 4GB MMIO BIOS assignment
Disabled
Intel Advanced Menu ⟶ System Agent (SA) Configuration
PM Support
Enabled
Intel Advanced Menu ⟶ System Agent (SA) Configuration ⟶ Graphics Configuration
DVMT Pre-Allocated
64M
Intel Advanced Menu ⟶ System Agent (SA) Configuration ⟶ Graphics Configuration
Setting Name
Option
Setting Menu
Hyper-Threading [ALL]
Disable
Socket Configuration ⟶ Processor Configuration
Intel (VMX) Virtualization
Enable
Socket Configuration ⟶ Processor Configuration
Intel VT for Directed I/O (VT-d)
Enable
Socket Configuration ⟶ IIO Configuration
R-link ASPM Support
Disable
Socket Configuration ⟶ IIO Configuration ⟶ RLink
SpeedStep (Pstates)
Disable
Socket Configuration ⟶ Advanced Power Management Configuration ⟶ CPU P State Control
Enable Monitor MWAIT
Disable
Socket Configuration ⟶ Advanced Power Management Configuration ⟶ CPU C State Control
PCH PCI Express Configuration
ASPM : DisabledL2 Substates : DisabledPlatform Configuration ⟶ PCH-IO Configuration ⟶ PCI Express Configuration ⟶ PCI Express Root Port # (for each)
Make sure that the ECI repository is configured to allow downloading of source packages:
$ echo "deb-src [signed-by=/usr/share/keyrings/eci-archive-keyring.gpg] https://eci.intel.com/repos/$(source /etc/os-release && echo $VERSION_CODENAME) isar main" | sudo tee -a /etc/apt/sources.list.d/eci.list
You may optionally select the version of ACRN to install. If you skip this step, the most recent version of ACRN will be automatically selected.
Use the table below to find an ACRN version available for your distribution.
Distribution
Distribution Version
ACRN Version
3.3
3.2
3.1
3.0.1
< Debian >
Debian 12 (Bookworm) .
✔
✔
✔
✔
Debian 11 (Bullseye) .
✔
✔
✔
< Canonical® Ubuntu® >
Canonical® Ubuntu® 24.04 (Noble Numbat) .
✔
Canonical® Ubuntu® 22.04 (Jammy Jellyfish) .
✔
✔
✔
✔
Execute the following commands to pin the ACRN packages to a specific version. Modify
ACRN_VERSIONas necessary. In this example, we pinned the ACRN packages to version 3.3:$ export ACRN_VERSION=3.3 $ sudo -E bash -c 'echo -e "Package: acrn*\nPin: version ${ACRN_VERSION}*\nPin-Priority: 1001\n" > /etc/apt/preferences.d/acrn' $ sudo -E bash -c 'echo -e "Package: grub-acrn\nPin: version ${ACRN_VERSION}*\nPin-Priority: 1001\n" >> /etc/apt/preferences.d/acrn' $ sudo -E bash -c 'echo -e "Package: python3-acrn-board-inspector\nPin: version ${ACRN_VERSION}*\nPin-Priority: 1001\n" >> /etc/apt/preferences.d/acrn' $ sudo apt update
Install ACRN
The following section is applicable to:
Complete the ACRN Prerequisites to configure the target system BIOS and optionally select a specific version of ACRN.
The ACRN Deb packages that ECI provide only support a subset of hardware platforms. Currently, the ACRN Deb packages are compiled for the following platforms:
Vecow* (TGL-U) - SPC-7100 with Intel® Core™ i7-1185GRE processor
OnLogic* K700 - Karbon 700 with Intel® Core™ i7-9700TE processor @ 1.80GHz
iEi* (RPL-S) - TANK-XM811A with Intel® Core™ i7-13700TE processor
ASRock* (EHL) - iEP-5000G Series with Intel® Atom® x6000RE processor
Advantech* (ICL-D) - AIR-500D-T10A1 with Intel® Xeon® D-1746TER processor
Additionally, the ACRN hypervisor is compiled in debug mode so that the ACRN shell is available, but this may not be compatible if the target system does not have a serial port. If your platform is not supported or the ECI ACRN Scenario does not meet your needs, you need to build the ACRN Deb packages. For more details, refer to Compile ACRN for Different Platforms.
Setup the ECI repository to start using the ECI repository. If you have built your own ACRN Deb packages, make sure to host the Deb packages from your local build rather than the Deb packages provided with the ECI release.
Note: Ignore any steps related to BIOS configuration, since these will be different for ACRN.
Complete the ACRN Prerequisites to configure the target system BIOS and optionally select a specific version of ACRN.
Purge any existing ACRN Deb package installations, which might have conflicts with the new Deb packages:
$ sudo apt purge acrn-hypervisor acrn-system grub-acrn
Run either of the following commands to install ACRN:
- Install from meta-package
$ sudo apt install eci-acrn
- Install from individual Deb packages
$ sudo apt install \
  linux-intel-acrn-sos \
  grub-acrn \
  acrn-hypervisor \
  acrnd \
  acrn-devicemodel \
  acrn-system \
  acrn-tools \
  acrn-launch-scripts \
  acrn-lifemngr \
  acrn-dev \
  acrn-ivshmem-tests
You will be prompted to select the board on which ACRN will run. Enter a number corresponding to your hardware platform.
Configuring acrn-hypervisor
---------------------------

Define the board ACRN will be running on. Selecting the wrong board might render your board unusable!

  1. cfl-k700-i7  2. icl-advantech-AIR-500D-Xeon  3. simatic-ipc227g  4. tgl-vecow-spc-7100-Corei7 5. rpl-iei-tank-xm811 6. ehl-asrock-iep-5000g
ACRN hypervisor board selection _
ACRN creates a network bridge named
acrn-br0which it shares with all the VMs by default. Without this bridge, VMs will not have network connectivity. To activateacrn-br0, ensure thesystemd-networkdservice is enabled:$ sudo systemctl enable systemd-networkd
Modify the default GRUB behavior so that the boot menu is not hidden and update the GRUB configuration:
$ sudo sed -i 's/^GRUB_TIMEOUT_STYLE=hidden/GRUB_TIMEOUT_STYLE=menu/' /etc/default/grub
$ sudo sed -i 's/^GRUB_TIMEOUT=0/GRUB_TIMEOUT=5/' /etc/default/grub
$ sudo update-grub
Reboot the system to allow the ACRN hypervisor to load.
$ sudo reboot
When the system reboots and reaches the GRUB menu, there should be new menu entries for ACRN. By default, a menu entry similar to
Debian GNU/Linux, with ACRN hypervisor, with Linux #.#.#-linux-intel-acrn-sos+ (ACRN #.#)should be selected. Select this menu entry to boot ACRN, or wait for GRUB to timeout.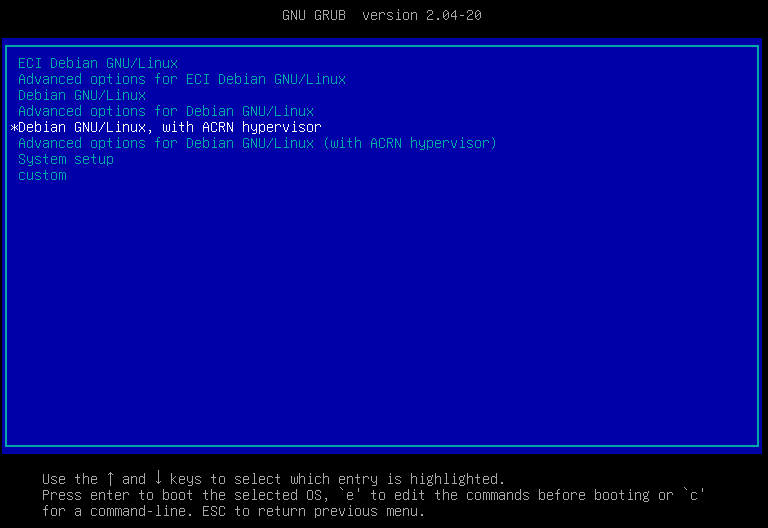
Tip
If you face any issues while booting ACRN, fallback to a non-ACRN GRUB menu entry to boot the system without ACRN.
Login and verify that ACRN hypervisor is active:
$ dmesg | grep ACRN
The output should be similar to the following:
[ 0.000000] Hypervisor detected: ACRNAllow network traffic to be forwarded from VMs to the
acrn-br0network bridge:$ sudo nft add rule ip filter FORWARD iifname "acrn-br0" counter accept
Note:
nftconfiguration does not normally persist after reboot. You might need to re-run this command after rebooting.At this point, ACRN is installed and ready for use. To start using the virtual machines, refer to: Launch Virtual Machines.
Launch Virtual Machines
The following section is applicable to:
ECI provides convenience scripts in the /var/lib/machines/scripts directory, which simplify the process of launching a VM.
Note: These scripts make generic assumptions about the desired configuration. You might need to modify the script to customize the VM. For more information, refer to: ACRN Device Model Example Parameters.
The following table lists the launch scripts and their usage:
Launch Script Name |
Use Case & Behavior |
Default VM Image Location |
|---|---|---|
|
Use Case: This script launches a real-time VM without graphics. It is best suited for real-time OSs such as ECI targets core-bookworm and core-noble.
Behavior: After launching a VM using this script, the script will attempt to connect the active terminal session to the the VM so that it is possible to interact with the VM using the terminal.
|
|
|
Use Case: This script launches a VM without graphics. It is best suited for headless (no graphics) VMs.
Behavior: After launching a VM using this script, the script will attempt to connect the active terminal session to the the VM so that it is possible to interact with the VM using the terminal.
|
|
|
Use Case:This script launches a VM with graphics passthrough. It is best suited for headed (with graphics) VMs.
Behavior
• After launching a VM using this script, the script will detach the active terminal session from the VM so that it remains possible to interact with the ACRN Service VM using the terminal.
• This script will unbind the integrated graphics driver to allow the VM to connect to the monitor. In effect, there will be no output to the monitor unless the VM connects to it. The monitor will not reattach to the Service VM if the VM is stopped.
|
|
|
Use Case: This script launches a Microsoft Windows VM with graphics passthrough. It is best suited for Windows as a Guest.
Behavior:
• After launching a VM using this script, the script will detach the active terminal session from the VM so that it remains possible to interact with the ACRN Service VM using the terminal.
• This script will unbind the integrated graphics driver to allow the VM to connect to the monitor. In effect, there will be no output to the monitor unless the VM connects to it. The monitor will not reattach to the Service VM if the VM is stopped.
|
|
Launch Script Name |
Use Case & Behavior |
Default VM Image Location |
|---|---|---|
|
Use Case: This script launches a real-time VM without graphics. It is best suited for real-time OSs such as ECI targets core-bookworm and core-noble.
Behavior: After launching a VM using this script, the script will attempt to connect the active terminal session to the the VM so that it is possible to interact with the VM using the terminal.
|
|
|
Use Case: This script launches a real-time VM without graphics. It is best suited for real-time OSs such as ECI targets core-bookworm and core-noble.
Behavior: After launching a VM using this script, the script will attempt to connect the active terminal session to the the VM so that it is possible to interact with the VM using the terminal.
|
|
Do the following to use the VM launch scripts:
Verify that a VM image exists at
/var/lib/machines/images. If a VM image does not exist, copy a VM image to/var/lib/machines/images. Rename the VM image according to the above table.Launch a VM using the appropriate script. For example, to launch a non-graphical UOS VM:
$ sudo /var/lib/machines/scripts/launch-uos.sh
Non-graphical UOS VMs will attach their TTY session to the terminal from which the launch script was executed. Consequently, if the terminal session closes, the UOS VM will also be terminated since the parent process it was attached to does not exist anymore. To mitigate this, you can launch the VM as a background process as follows:
$ bash -c "sudo /var/lib/machines/scripts/launch-uos.sh &"
Launch Script Messages
The following are some of the messages that might occur while running the launch script:
Cannot find VM image
If the VM image cannot be located, the launch script will print a message similar to the following:
root@ecs-intel-56f8:/var/lib/machines/scripts# ./launch-uos.sh
Could not find VM image matching pattern:
uos*_vm1.img
Fix this issue by renaming the VM image to match the pattern output by the launch script. In this example, the VM image should exist at
/var/lib/machines/images/uos_vm1.img.
Passthrough Mouse/Keyboard
The launch script may prompt to passthrough mouse/keyboard to the VM. If this is desired, enter y at this prompt. The output similar to the following will appear:
Do you want to automatically assign all mouse/keyboard to VM? [y/N]Note
If mouse/keyboard passthrough is enabled for a VM, the attached mouse and keyboard will be assigned to that VM only. In the event the VM which the mouse/keyboard is attached to is shutdown or stopped, the mouse/keyboard will not be released and will not be available to assign again.
Passthrough Ethernet interface
The launch script may prompt to passthrough an Ethernet interface to the VM. If this is desired, enter y at this prompt. The output similar to the following will appear:
Do you want to passthrough an Ethernet interface to the VM? [y/N]

   ###########################################################################################################################################
   |                  PCI Ethernet Interfaces                                                                                                |
   ===========================================================================================================================================
   | Index  | Interface      | PCI BDF       | PCI VPID   | Name                                                                             |
   ===========================================================================================================================================
   | 0      | N/A            | 0000:01:00.0  | 8086 157b  | Intel Corporation I210 Gigabit Network Connection (rev 03)                       |
   | 1      | N/A            | 0000:02:00.0  | 8086 157b  | Intel Corporation I210 Gigabit Network Connection (rev 03)                       |
   ===========================================================================================================================================

   Enter the Index of the Interface to passthrough to the VM :
Enter a number corresponding to the Index of the desired Ethernet interface to passthrough.
Note
When an Ethernet interface passthrough is selected for a VM, the selected Ethernet interface will no longer be available to the Service OS or other VMs.
VM Limitations and Tips
Please read the following information regarding the limitations and expected behaviors of VMs.
- Stopping RT-VMs
RT-VMs cannot be stopped by the Service VM using the
acrnctltool. Performing ashutdownorrebootcommand within the RT-VM affects the entire system including the Service OS and all running VMs!
- Graphics Passthrough
When using graphics passthrough to a User VM, any attached monitor output will no longer correspond to the Service VM upon launching the User VM. If interaction with the Service VM is desired after launching the User VM, it is advised to establish an SSH connection to the Service VM before starting the User VM so that continued interaction is possible.
Graphics can only be assigned to a single User VM at any given time.
- USB Assignment
USB devices can only be assigned to a single User VM at any given time.
USB devices cannot be assigned to real-time VMs. Only non-realtime VMs support USB assignment.
If the VM to which a mouse/keyboard is attached is shutdown or stopped, the mouse/keyboard will not be released and will not be available for reassignment.
- Sharing VM Images
Do not use the same VM image file (for example,
uos_vm1.img) for running multiple VMs simultaneously. This can produce undefined behavior.
- ECI Images as VMs
If you are using the ECI core-bookworm or core-noble
*.wicimage file as a VM image, be aware that the filesystem partition is generated with only an extra 2GB of empty storage. If you need more than 2GB storage, it is recommended to use KVM to install the ECI image into a VM, and convert it to a format usable by ACRN. Refer to the following section for instructions: Convert KVM images for ACRN
- Insufficient Memory Booting ECI Images
By default, the ECI core-bookworm core-noble images require at least 3GB of RAM to boot in a VM environment since they define
hugepages=1024as a kernel boot parameter (see: ECI Kernel Boot Optimizations). You can reduce the memory required to boot the core-bookworm and core-noble images by reducinghugepageskernel boot parameter or removing it entirely.
ACRN Device Model Example Parameters
The following section is applicable to:
The ACRN device manager acrn-dm is used to manage VMs. It is invoked by the launch virtual machines script located at /var/lib/machines/scripts. Modify these scripts and change the parameters passed to acrn-dm to configure the VM. The following table lists a few examples.
For more information about ACRN Device Model parameters, refer to: ACRN project documentation.
|
This directs ACRN where to look for the VM image to virtualize. |
|
This configures the VM with 2048 MB of memory.
Modify |
|
This configures network virtualization so that tap0 is available within the VM. Change tap0 as necessary. |
|
This configures passthrough of a specific network
controller. Modify |
|
This opens a port 5900 on the Service VM which can be connected to via VNCviewer. |
|
This configures assignment of the mouse/keyboard
to the VM via virtio. Change <To find the input event of mouse>
# cat /proc/bus/input/devices | grep mouse
|
|
This configures assignment of bus 1 USB ports 2, 4, and 5 to the User VM. Change which ports are passed through by modifying this parameter. To determine bus number, run the command: # lsusb -t
Attention Due to current limitations in ACRN, only non real-time VMs support USB assignment! Note: Depending on the system, lsusb may display the Device number and omit the Port number. These are not interchangeable. Note: USB ports can only be assigned to a single User VM at any given time. |
|
This adds a shared memory device of size 128MB
with the name shmem as slot 6 (only the
device type ivshmem is a fixed parameter). The
size and name parameters must be the same
among the |
Compile ACRN for Different Platforms
There are two primary reasons to recompile ACRN:
You need a different ACRN Scenario than the generic
eci-shared.xmlwhich ECI uses in its ACRN solutions. For details, refer to: ECI ACRN Scenario.The platform is not supported out-of-box by ECI ACRN Deb packages.
The following section is applicable to:
This section explains the steps involved in collecting hardware information for ACRN (board XML) and compiling ACRN Deb packages.
Make sure that the target system BIOS configuration meets the ACRN Prerequisites.
Setup the ECI repository to start using the ECI repository.
On the target system, install an ACRN compatible kernel. ECI offers a few kernel options to choose from. Install the kernel that suits your requirements:
Kernel Deb package
Description
linux-intel-acrn-sosStandard distribution Linux kernel with ACRN configs enabled, better for Service OS kernel
linux-intel-rtReal-time Linux kernel with PREEMPT_RT patchset and real-time optimizations, better for RTVM kernel
For this example,
linux-acrn-sosis installed:$ sudo apt install linux-intel-acrn-sos
Create a new directory for the ACRN source and navigate to that directory:
$ mkdir -p acrn-source && cd acrn-source
Install tools, ACRN Board Inspector, and ACRN Deb package dependencies:
$ sudo apt install dpkg-dev \
  python3-acrn-board-inspector \
  debhelper-compat dh-python git libssl-dev libpciaccess-dev \
  libsystemd-dev libevent-dev libxml2-dev libxml2-utils \
  libusb-1.0-0-dev libblkid-dev e2fslibs-dev pkg-config \
  libnuma-dev libsdl2-dev libpixman-1-dev liblz4-tool \
  libdrm-dev libcjson-dev flex bison xsltproc clang-format \
  bc acpica-tools python3-defusedxml python3-tqdm python3-setuptools
Install ACRN source code:
$ apt-get source acrn-hypervisor
After installing the ACRN source, the directory should contain files similar to the following (distribution, version, and commit ID may differ):
acrn-hypervisor-3.3
acrn-hypervisor_3.3-0eci5.dsc
acrn-hypervisor_3.3-0eci5.tar.gz
Go to the
acrn-hypervisor-#.#.#directory:$ cd acrn-hypervisor-*
Run the ACRN Board Inspector, which will examine the hardware platform. Also, a board XML will be generated.
Important
Before running the ACRN Board Inspector, set up your target hardware and BIOS exactly as you want it, including connecting all peripherals, configuring BIOS settings, and adding memory and PCI devices. For example, you must connect all USB devices; otherwise, the Board Inspector will not detect the USB devices for assignment. If you change the hardware or BIOS configuration, or add or remove USB devices, rerun the Board Inspector to generate a new board configuration file.
Create a new directory to hold the ACRN board XML, and run the ACRN Board Inspector to generate the board XML:
$ mkdir -p debian/configs/my-ipc-board
$ sudo acrn-board-inspector --out debian/configs/my-ipc-board/my-ipc-board.xml my-ipc-board
If the ACRN Board Inspector is completed successfully, you should see a message similar to the following:
SUCCESS: Board configuration file debian/configs/my-ipc-board/my-ipc-board.xml generated successfully and saved to /root/acrn-source/acrn-hypervisor-3.3/debian/configs/my-ipc-boardCopy the ECI ACRN Scenario
eci-shared.xmlto the new board config directory:$ cp misc/config_tools/data/cfl-k700-i7/eci-shared.xml debian/configs/my-ipc-board
$ cp misc/config_tools/data/icl-advantech-AIR-500D-Xeon/eci-shared.xml debian/configs/my-ipc-board
The directory structure should be similar to the following:
debian/configs/
|-- README.rst
|-- configurations.mk
`-- my-ipc-board
    |-- eci-shared.xml
    `-- my-ipc-board.xml
Note: If the ECI ACRN Scenario does not meet your needs, use the ACRN Configurator to create a new ACRN scenario. The ACRN Configurator can be installed as a Deb package
acrn-configurator. If you do install theacrn-configuratorDeb package, note that it requires a graphic Desktop Environment to function properly. Canonical® Ubuntu® Desktop and standard Debian already include a graphic Desktop Environment by default, conversely Canonical® Ubuntu® Server does not include a graphic Desktop Environment. For information on installing a graphical Desktop Environment, refer to: Install Linux Desktop Environment. Rename newscenario.xmlfile generated by ACRN Configurator to your customized name before copying to the new board config directory to avoid compilation error. EditACRN_SCENARIOLISTin theconfigurations.mkfile accordingly to add your new ACRN scenario.Append the new board
my-ipc-boardto the ACRNconfigurations.mkfile:$ sed -i "/ACRN_BOARDLIST := /s/$/ my-ipc-board/" debian/configs/configurations.mk
Append a revision to the Debian
changelogso that the generated ACRN Deb packages will have a unique version. Make sure to use the same version as ACRN. In this example, the version of ACRN is3.3:$ sed -i "1 i\acrn-hypervisor (3.3-my-ipc-board) UNRELEASED; urgency=low\n\n * Adding my IPC board\n" debian/changelog
By default, ACRN is built in debug mode which provides access to the ACRN shell. To use the ACRN shell, your target system must have a serial port. If your target system does not have a serial port, then debug mode may be incompatible with your target system. To compile ACRN in release mode, export the
RELEASEenvironment variable:$ export RELEASE="y"
Tip
If you’re building the ACRN Deb packages using the ECI Build Engine
bitbake, theacrn-hypervisorrecipe provides a mechanism to change the ACRN release mode using theACRN_RELEASEvariable.Verify that all ACRN Deb package build dependencies are satisfied:
$ dpkg-checkbuilddepsIf all dependencies are satisfied, then the command will not output anything. If the command does output anything, then there are missing dependencies which must be installed prior to building the Deb packages. For example, if
acpica-toolsis missing:$ dpkg-checkbuilddeps: error: Unmet build dependencies: acpica-tools (>= 20200326)
Then, install the missing
acpica-toolsdependency:$ sudo apt install acpica-tools
Build the ACRN Deb packages (use the
-Eflag to preserve environment variables):$ sudo -E dpkg-buildpackage
The build should take anywhere from 2-10 minutes, depending on the capabilities of the hardware platform. When the build is completed, there should be a collection of Deb packages in the parent
acrn-sourcedirectory. Go to the parent directory and make sure that the Deb packages were created:$ cd .. $ ls *.deb
Note that all packages contain the new
changelogrevision in their name. In this example, the revision is3.3-my-ipc-board:acrn-dev_3.3-my-ipc-board_amd64.deb acrn-devicemodel-dbgsym_3.3-my-ipc-board_amd64.deb acrn-devicemodel_3.3-my-ipc-board_amd64.deb acrn-doc_3.3-my-ipc-board_all.deb acrn-hypervisor_3.3-my-ipc-board_amd64.deb acrn-lifemngr-dbgsym_3.3-my-ipc-board_amd64.deb acrn-lifemngr_3.3-my-ipc-board_amd64.deb acrn-system_3.3-my-ipc-board_amd64.deb acrn-tools-dbgsym_3.3-my-ipc-board_amd64.deb acrn-tools_3.3-my-ipc-board_amd64.deb acrnd-dbgsym_3.3-my-ipc-board_amd64.deb acrnd_3.3-my-ipc-board_amd64.deb grub-acrn_3.3-my-ipc-board_amd64.deb python3-acrn-board-inspector_3.3-my-ipc-board_all.deb
The Deb packages get created with root ownership. Change the ownership to the current user to prevent an error message during installation:
$ sudo chown $(id -u):$(id -g) ./*.deb
Purge any existing ACRN Deb package installations which may conflict with the new Deb packages:
$ sudo apt purge acrn-hypervisor acrn-system grub-acrn
Install the newly created Deb packages
acrn-hypervisor_*.deb,acrnd_*.deb, andgrub-acrn_*.debto enable the ACRN hypervisor. For this example, we performed:$ sudo apt install -f ./acrn-hypervisor_3.3-my-ipc-board_amd64.deb ./acrnd_3.3-my-ipc-board_amd64.deb ./grub-acrn_3.3-my-ipc-board_amd64.deb
Note: You need to install only three Deb packages. The remaining Deb packages will be installed automatically as dependencies.
During installation, you will be prompted to select the board on which ACRN will be run. Select the newly added board. In this example,
my-ipc-boardis selected: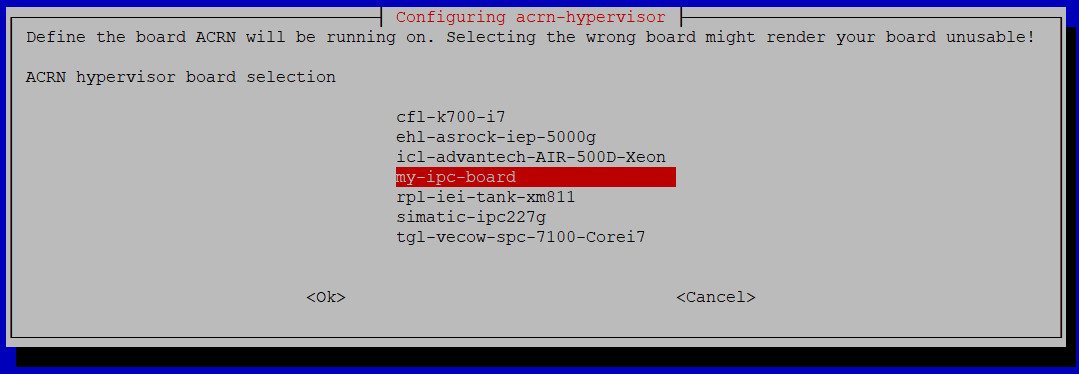
Install the
acrn-launch-scriptsDeb package which provides convenient scripts to launch ACRN VMs.$ sudo apt install acrn-launch-scripts
ACRN creates a network bridge named
acrn-br0which it shares with all the VMs by default. Without this bridge, VMs will not have network connectivity. To activateacrn-br0, ensure thesystemd-networkdservice is enabled:$ sudo systemctl enable systemd-networkd
Modify the default GRUB behavior so that the boot menu is not hidden and update the GRUB configuration:
$ sudo sed -i 's/^GRUB_TIMEOUT_STYLE=hidden/GRUB_TIMEOUT_STYLE=menu/' /etc/default/grub
$ sudo sed -i 's/^GRUB_TIMEOUT=0/GRUB_TIMEOUT=5/' /etc/default/grub
$ sudo update-grub
Reboot the system to allow the ACRN hypervisor to load.
$ sudo reboot
When the system reboots and reaches the GRUB menu, there should be new menu entries for ACRN. By default, a menu entry similar to
Debian GNU/Linux, with ACRN hypervisor, with Linux #.#.#-linux-intel-acrn-sos+ (ACRN #.#)should be selected. Select this menu entry to boot ACRN, or wait for GRUB to timeout.
Tip
If you face any issues while booting ACRN, fallback to a non-ACRN GRUB menu entry to boot the system without ACRN.
Login and verify that ACRN hypervisor is active:
$ dmesg | grep ACRN
The output should be similar to the following:
[ 0.000000] Hypervisor detected: ACRNAllow network traffic to be forwarded from VMs to the
acrn-br0network bridge:$ sudo nft add rule ip filter FORWARD iifname "acrn-br0" counter accept
Note:
nftconfiguration does not normally persist after reboot. You might need to re-run this command after rebooting.At this point, ACRN is installed and ready for use. To start using virtual machines, refer to Launch Virtual Machines
Use ACRN Hypervisor Shell
When compiled in debug mode, ACRN provides a shell that can be used to monitor and control the hypervisor activity. To access this shell, attach a serial cable from the target system to another system of choice. Use a preferred serial communication program such as PuTTy or minicom to open a session to the ACRN shell via the serial cable with standard settings: 115200 (speed), 8N1 (8 data bits, no parity, 1 stop bit).
Note: The serial cable may need a NULL modem termination depending on the target system hardware.
The tutorial on enabling serial port on NUC shows an example of accessing the ACRN hypervisor shell on a KBL Intel® NUC.
For a list and description of ACRN hypervisor shell commands, refer to ACRN Shell Commands.
List Actively Running VMs
Execute the following command to list the actively running VMs on ACRN:
ACRN:\>vm_list
The following is an example output:
 ---Entering ACRN SHELL---
ACRN:\>vm_list

VM_UUID                          VM_ID VM_NAME                          VM_STATE
================================ ===== ================================ ========
b2a92becca6b11eab1063716a8ba0bb9   0   ACRN PRE-LAUNCHED VM0            Running
dbbbd4347a574216a12c2201f1ab0240   1   ACRN SOS VM                      Running
Open Console Session to VM
Execute the following command to open a virtual UART console session (vUART) with a VM, replacing # with the VM_ID of an active VM (see above vm_list command):
ACRN:\>vm_console #Tip
The vUART enters escaping mode after a BREAK character is received from the physical UART. When in escaping mode, the next received character is interpreted as a command. After processing this command, the vUART exits the escaping mode. The following escaping commands are currently supported:
BREAK character. If user sends break character again in escaping mode, one break character will be sent to vUART.
Character
e. This will deactivate vUART. Inputs to the physical UART will be handled by the hypervisor shell starting from the next timer event.Other characters are not supported. If an unknown character is received, the physical UART will prompt out an “Unknown escaping key” message and the active vUART exits escaping mode.
Note that the BREAK character is a control character and different serial emulators have different methods of sending the BREAK character. The table below details how to send a BREAK character using the most popular serial emulators:
Serial Emulator
Key Binding
Minicom
Ctrl + a, followed by f
Picocom
Ctrl + a, followed by Ctrl + -
Screen
Ctrl + a, followed by Ctrl + b
ACRN Best Known Methods
Document/Section |
Description |
|---|---|
This section contains a collection of Best Known Methods (BKMs) for the ACRN Hypervisor. |
Convert KVM images for ACRN
Document/Section |
Description |
|---|---|
This section provides instructions on converting KVM images for use with ACRN. |
Thermal Monitor for ACRN
Document/Section |
Description |
|---|---|
This section provides instructions on building and running thermal monitor on ACRN. |