ACRN Hypervisor
ACRN™ is a, flexible, lightweight reference hypervisor, built with real-time and safety-criticality in mind, and optimized to streamline embedded development through an open source platform. ACRN defines a device hypervisor reference stack and an architecture for running multiple software subsystems, managed securely, on a consolidated system by means of a virtual machine manager (VMM). It also defines a reference framework implementation for virtual device emulation, called the “ACRN Device Model”.
The ACRN Hypervisor is a Type 1 reference hypervisor stack, running directly on the bare-metal hardware, and is suitable for a variety of IoT and embedded device solutions. The ACRN hypervisor addresses the gap that currently exists between datacenter hypervisors, and hard partitioning hypervisors. The ACRN hypervisor architecture partitions the system into different functional domains, with carefully selected user VM sharing optimizations for IoT and embedded devices.
For the most recent documentation on ACRN, please refer to the project documentation at: https://projectacrn.github.io/
Attention
The ACRN Hypervisor is actively being developed and has not yet reached maturity. Refer to section Validated Hardware Platforms for a list of platforms validated with ACRN. Additional platform support may be limited. For a list of active issues, please see the following: https://github.com/projectacrn/acrn-hypervisor/issues
ACRN Terminology
- VM
Hypervised operating systems (OS) are referred to as virtual machines, or “VM” for short.
- Service VM
Since ACRN is a Type 1 hypervisor, the OS in which the ACRN tools reside is also virtualized. This virtualized OS is commonly referred to using the terms “Service VM”, “Service OS”, and “SOS”.
- User VM
VMs other than the Service VM are commonly referred to using the terms “User VM”, “Guest VM”, “Guest OS”, “User OS”, and “UOS”.
ACRN Prerequisites
Important
ACRN is only supported on specific target platforms! Please see section Validated Hardware Platforms for a list of platforms which support ACRN. To build ACRN for non-supported platforms, see section Compiling ACRN for different platforms.
Follow section acrn-sos to build an ECI target with the ACRN Hypervisor.
Tip
The ACRN hypervisor can be used to run ECI-B and ECI-X as a virtual machine. Build one of the available ECI-B or ECI-X targets as well to enable embedding the target during creation of bootable USB flash drive.
Follow section Installing ECI-A to create a bootable USB flash drive with
acrn-sosimage and install to a target system.Follow section Configure Target System BIOS to configure the target system BIOS correctly for use with ACRN.
Using ACRN to launch virtual machines
The following section is applicable to:

ECI provides two methods which simplify the process of launching VMs with ACRN. The first and most automated method utilizes the VM profile tool. The VM profile tool ensures a valid VM configuration, but does not have the ability to expose all possible customization. Follow section Using the VM profile tool to use the first method. The second method utilizes automation scripts and is more open to customization, but does not prevent invalid configurations from occurring. Follow section Using a launch script to use the second method.
Using the VM profile tool
Follow the steps below to use the VM profile tool.
Verify that the VM profile tool is available in the ECI-A image. Navigate to
/var/lib/machinesand check the contents of this directory:# cd /var/lib/machines # ls
The expected output should look similar to the following:
images launch_vm_profile.sh profiles scripts vm_profileEach of these files and directories serve a particular purpose:
File / Directory
Description
launch_vm_profile.shVM profile launch script
/profilesVM profile directory
/profiles/xxxx.xmlSelected VM profile
vm_profileSymbolic link to selected VM profile
/images/xxxx.wicECI image(s) used in the VM profile
Attention
If some of these files are missing, then the VM profile tool was not invoked during the creation of the bootable USB as described in section ECI-A: Create Bootable USB and the alternative launch script method from the following section should be used instead: Using a launch script.
During the creation of the bootable USB, the VM profile tool attempts to automatically copy images used by the VM profile into the ECI-A image. However, if any images used in the VM profile cannot be located, the VM profile tool will not copy the image and instead output additional steps to perform after ECI-A is installed.
For example, if Linux is selected in the VM profile, the VM profile tool will display the following:
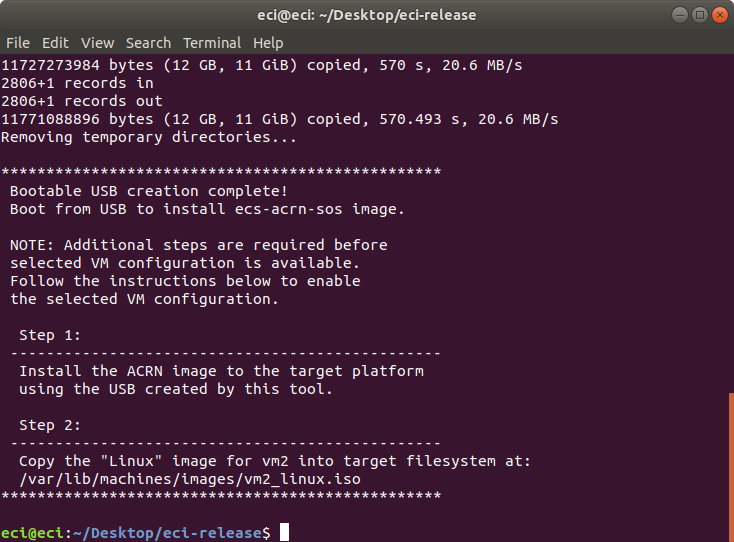
If a similar message was displayed during the bootable USB creation process, perform the steps displayed by the VM profile tool to prepare the VM images (Copy the respective images to the target system as directed).
Note
ECI images can be copied automatically by the VM profile tool. It is recommended to build any missing ECI image(s) by following section Building ECI Targets and performing the Installing ECI-A section again to allow the VM profile tool to automatically copy the required ECI image(s).
Alternatively, the ECI images can be copied manually. After building an ECI image, the resulting
.wic/.imgfile will be located at/eci-release/build/ecs-<target>/build/tmp/deploy/images/intel-*-corei7-64. Copy the respective ECI image.wic/.imgfile into the target system as directed by the VM profile tool steps.After preparing any missing VM images, the
launch_vm_profile.shscript can be used to automatically launch the VM profile. Perform the following steps to launch the VM profile:# ./launch_vm_profile.shAttention
Graphical VMs should automatically take control of any display output. If the mouse/keyboard passthrough option was enabled for a VM, all attached keyboards and mice should be assigned to that VM only.
Using a launch script
ECI provides convenience scripts at directory /var/lib/machines/scripts which simplify the process of launching a User VM. These scripts and their usage are described in the table below:
Note
These scripts make generic assumptions about the desired configuration. Modification to a script may be necessary to customize the User VM. See section ACRN Device Model example parameters for more information.
Warning
Do not use the same VM image file (ex: vm0.wic) for running multiple VMs simultaneously. This can produce undefined behavior!
Launch Script Name
Use Case
Default image location
launch-rtvm.shThis script launches a real-time VM without graphics. It is best suited for ECI targets ECI-B and ECI-X.
Note
Due to current limitations with the ACRN hypervisor, only a single RT-VM can be running at a given time.
/var/lib/machines/images/vm0.wic
launch-uos.shThis script launches a VM without graphics. It is best suited for ECS targets ECI-B and ECI-X with graphical features disabled.
/var/lib/machines/images/vm0.wic
launch-uos_passthrough-graphics.shThis script launches a VM with graphics passthrough. It is best suited for ECI targets ECI-B and ECI-X with graphical features enabled.
/var/lib/machines/images/linux.iso
launch-uos_secureVM-communication.shThis script launches a VM without graphics and with virtual UART communication to TEP (Trusted VM for IoT Platforms). It is best suited for targets ECI-B and ECI-X with graphical features disabled and a requirement to access the TPM.
Note
This script will only be present when the ECI-A image is built with the SecureVM feature option enabled.
/var/lib/machines/images/vm0.wic
launch-windows_passthrough-graphics.shThis script launches a Windows VM with graphics passthrough. It is best suited for Windows as a Guest.
/var/lib/machines/images/windows.img
Prepare to launch a VM by copying an OS image to virtualize to
/var/lib/machines/images. Rename the OS image according to the table above.Note
ECI optionally embeds an ECI image as a User VM during the process of creating a bootable USB flash drive. See section ECI-A: Create Bootable USB for more information. If this option was previously selected, there will already be an image prepared.
Launch a VM using the appropriate script. For example, to launch a non-graphical UOS VM:
# ./launch-uos.shAttention
When using graphics passthrough to a User VM, the following limitations apply:
Any attached display output will no longer correspond to the Service VM upon launching the User VM. If interaction with the Service VM is desired after launching the User VM, it is advised to establish an SSH connection to the Service VM before starting the User VM so that continued interaction is possible.
Graphics can only be assigned to a single User VM at any given time.
- Cannot find VM image
If the User VM image cannot be located, the launch script will print a message similar to the following:
root@ecs-intel-56f8:/var/lib/machines/scripts# ./launch-uos.sh
cpu1 online=0
cpu2 online=1
cpu3 online=1
Could not find VM image:
/var/lib/machines/images/vm0.wic
Fix this issue by copying or renaming the User VM image to the location output by the launch script. In this example, the User VM image should be copied to
/var/lib/machines/images/vm0.wic.Warning
Do not use the same VM image file (ex: vm0.wic) for running multiple VMs simultaneously. This can produce undefined behavior!
- Passthrough Mouse/Keyboard
The launch script may prompt to passthrough mouse/keyboard to the VM. If this is desired, enter y at this prompt. The output will appear similar to the following:
Do you want to automatically assign all mouse/keyboard to VM? y/[n]Note
If mouse/keyboard passthrough is enabled for a VM, all attached mouse and keyboard will be assigned to that VM only.
- Passthrough Ethernet interface
The launch script may prompt to passthrough an Ethernet interface to the VM. If this is desired, enter y at this prompt. The output will appear similar to the following:
Do you want to passthrough an Ethernet interface to the VM? y/[n]

###########################################################################################################################################
|                  PCI Ethernet Interfaces                                                                                                |
===========================================================================================================================================
| Index  | Interface      | PCI BDF       | PCI VPID   | Name                                                                             |
===========================================================================================================================================
| 0      | N/A            | 0000:01:00.0  | 8086 157b  | Intel Corporation I210 Gigabit Network Connection (rev 03)                       |
| 1      | N/A            | 0000:02:00.0  | 8086 157b  | Intel Corporation I210 Gigabit Network Connection (rev 03)                       |
===========================================================================================================================================

Enter the Index of the Interface to passthrough to the VM :
Enter a number corresponding to the Index of the desired Ethernet interface to passthrough.
Note
When an Ethernet interface passthrough is selected for a VM, the selected Ethernet interface will no longer be available to the Service OS or other VMs.
ACRN Device Model example parameters
The following section is applicable to:
The ACRN tool acrn-dm is used to manage VMs. It is invoked by the convenience scripts located at /var/lib/machines/scripts. Modify these scripts and change the parameters passed to acrn-dm to configure the User VM. A few examples are described below. For more information, please refer to the ACRN project documentation at: https://projectacrn.github.io/latest/user-guides/acrn-dm-parameters.html
|
This directs ACRN where to look for the OS image to virtualize. |
|
This configures the VM with 2048MB of memory.
Modify |
|
This configures network virtualization so that tap0 is available within the User VM. Change tap0 as necessary. |
|
This configures passthrough of a specific network
controller. Modify |
|
This opens a port 5900 on the Service VM which can be connected to via vncviewer. |
|
This configures passthrough of the mouse/keyboard to the User VM via virtio. Change event4 accordingly. Use the following command to check the event node on your Service VM: <To find the input event of mouse>
# cat /proc/bus/input/devices | grep mouse
|
|
This configures passthrough of bus 1 USB ports 2, 4, and 5 to the User VM. Change which ports are passed through by modifying this parameter. To determine bus number use command: # lsusb -t
Note Depending on the system, lsusb may display Device number and omit Port number. These are not interchangeable Note USB ports can only be assigned to a single User VM at any given time. |
ACRN Best Known Methods
Document / Section |
Description |
|---|---|
This section contains a collection of BKMs (Best Known Methods) for the ACRN Hypervisor. |
Enabling Secure Boot with ACRN
Document / Section |
Description |
|---|---|
This section details the procedure to enable Secure Boot with the ACRN hypervisor. |
Enabling non-Linux VMs
Document / Section |
Description |
|---|---|
This section details the procedure to enable Windows as a Guest on the ACRN hypervisor. |
Compiling ACRN for different platforms
The following section is applicable to:

Attention
This section is intended for advanced users! The topic explored in this section assumes the user is comfortable navigating and modifying bitbake configuration files.
ECI provides a select number of precomposed definitions for target platforms to use with ACRN. If additional target platforms are desired, new XML definitions must be created. Follow the steps below to enable and build ACRN for a specific target platform.
Follow section Configure Target System BIOS to configure the target system BIOS correctly for use with ACRN.
Create new XML definitions for the target platform by using the following the tutorial: https://projectacrn.github.io/latest/tutorials/acrn_configuration_tool.html
Important
The ACRN Configuration Tool must be executed on the target system, not the Linux build system. Use a unique
boardname for the target system.After creating the XML definitions, navigate to the XML directory at:
acrn-hypervisor/misc/config_tools/data/[board]/(see acrn-hypervisor for reference). Copy the generated board XML andscenario.xmlfile todata/[board]directory. Verify that the generated config XML files exist atdata/[board]directory.If the
acrn-sostarget has not yet been configured on the Linux build system, run the./setup.shscript for theacrn-sostarget (See section acrn-sos for instructions). Select any target platform when prompted. Do not perform an automated build.Copy entire
datadirectory created earlier to the Linux build system at:/eci-release/targets/resources/meta-acrn-tgr/recipes-core/acrn/files. This will overwrite the existing directory, appending new files and directories insidedata.On the Linux build system, edit the file at
/eci-release/build/ecs-acrn-sos/build/conf/local.confand change the line starting withACRN_BOARD_pn-acrn-hypervisorto use the name of the new XML configuration. For example:ACRN_BOARD_pn-acrn-hypervisor = "nuc7i7dnb".Perform the acrn-sos bitbake build process to build the
acrn-sostarget image.Note
It is recommended to clean the acrn-hypervisor bitbake recipe if an existing build has already completed. To clean the acrn-hypervisor bitbake recipe, perform the following commands:
# cd /eci-release/build/ecs-acrn-sos/poky
# source oe-init-build-env ../build
# bitbake -c cleanall acrn-hypervisor
Using the ACRN hypervisor shell
When compiled in debug mode, ACRN provides a shell which can be used to monitor and control the hypervisor activity. To access this shell, attach a serial cable from the target system to another system of choice. Use a preferred serial communication program such as PuTTy or minicom to open a session to the ACRN shell via the serial cable with standard settings: 115200 (speed), 8N1 (8 data bits, no parity, 1 stop bit).
Note
The serial cable may need a NULL modem termination depending on the target system hardware.
An example of accessing the ACRN hypervisor shell on a KBL Intel NUC can be found here: https://projectacrn.github.io/latest/tutorials/using_serial_port.html
For a list and description of ACRN hypervisor shell commands, refer to the following document: https://projectacrn.github.io/latest/user-guides/acrn-shell.html#acrnshell
List actively running VMs
Perform the following command to list the actively running VMs on ACRN:
ACRN:\>vm_listAn example output of this command is shown below:
 ---Entering ACRN SHELL---
ACRN:\>vm_list

VM_UUID                          VM_ID VM_NAME                          VM_STATE
================================ ===== ================================ ========
b2a92becca6b11eab1063716a8ba0bb9   0   ACRN PRE-LAUNCHED VM0            Running
dbbbd4347a574216a12c2201f1ab0240   1   ACRN SOS VM                      Running
Open a console session to a VM
Perform the following command to open a console session with a VM, where
#is replaced with theVM_IDof an active VM (see abovevm_listcommand):ACRN:\>vm_console #Tip
After starting a VM console session, press Ctrl + Space to return to the ACRN shell console.