Verifying Deployment
This section will help to verify whether ECI has been deployed correctly. You can also familiarize with ECI.
The following section is applicable to:

Verifying Correct Deployment
To verify the deployment, ECI (excluding ECI-A) provides a comprehensive benchmarking utility. This utility automates the process of executing benchmarks, and aggregate performance data on the various components that ECI delivers.
Follow these steps to verify the correctness of deployment:
Follow the steps in Installing ECI Images to install an ECI image on a target system.
After booting and logging into the target system, navigate to the
/opt/benchmarkingdirectory:$ cd /opt/benchmarking
Locate the Mega Benchmark script,
mega_benchmark.sh. This script automatically runs several ECI benchmarks and aggregates the benchmark results into a single log file. You can use the results to verify the correctness of deployment. Run themega_benchmark.shscript to start the process:$ ./mega_benchmark.shThe Mega Benchmark script might take 30 minutes or more to complete. Wait until the script outputs a complete message before continuing.
After the benchmarking is complete, you will find a log file, with the naming convention
results_mega_benchmark_<date>, in the/opt/benchmarkingfolder. This log contains the results of the Mega Benchmark test. View and compare these results with the data from section Benchmark Data by matching the test type and processor type. A successful test should exhibit results similar to the data provided. A deviation of up to 10% is acceptable.
Users and Permissions in ECI
ECI provides the following users:
User Account |
Password |
Permissions |
Description |
|---|---|---|---|
|
|
Full read/write permissions to all files. |
Administrative user account to be used for granting permissions to non-root users, monitoring activity, applying system-level configurations, general system maintenance, and so on. |
|
|
Limited read permissions to non-system files. |
Basic user account intended to be used strictly for executing control applications without access to system-level configurations. |
Note
If SELinux feature option is enabled, login with user root and password 123456*18.
The following table lists the availability of user accounts in the various ECI images:
Target |
User Account |
|
|---|---|---|
root |
eci-user |
|
base-poky |
Yes |
Yes |
base-buster |
Yes |
Yes |
xenomai-poky |
Yes |
Yes |
xenomai-buster |
Yes |
Yes |
rts-poky |
Yes |
No |
rts-buster |
Yes |
Yes |
acrn-sos |
Yes |
No |
acrn-zephyr-ehl |
Yes |
Yes |
If any of the assumptions made in ECI regarding users and privileges do not fit the desired use case, standard Linux user commands can be used to add, delete, and modify users.
Moderating Superuser Capability
In ECI images that contain non-root user accounts, superuser capabilities may be moderated for all non-root users as follows:
Using a root account, add the user to the
sudogroup. For example, the following was performed for usereci-user:# usermod -aG sudo eci-user
Using a root account, edit the
sudoersfile usingvisudo:# visudo /etc/sudoers
Add a line to grant superuser capability to all users in the
sudogroup:%sudo ALL=(ALL) ALL
Note
Press the i key to enter interactive mode in
visudo.Save and exit
visudoby pressing the following the following key sequence: Esc, :, x, Enter.Logout of all users to re-evaluate the user permissions.
How ECI Achieves Determinism
Determinism is defined as the ability to operate with a predictable outcome. In the context of the Linux kernel, this means that applications can run without experiencing spurious interrupts, which enables them to achieve consistent real-time performance.
At its core, ECI is an optimized Linux kernel with specific configurations to enable real-time workloads to operate deterministically. This is accomplished by configuring the following:
By default, all Linux kernel processes are scheduled to run on CPU 0 and CPUs 1 & 3 are configured to be isolated for real-time usage.
Important
This creates a side effect that any workloads which utilize CPU 0 will experience degraded performance. Therefore, it is recommended to move all critical processes to a CPU other than CPU 0.
For reference, the snippet below shows the default kernel boot parameters which affect CPUs:
nmi_watchdog=0
irqaffinity=0
isolcpus=1,3
rcu_nocbs=1,3
nohz_full=1,3
Attention
When the Intel® Elkhart Lake Functional Safety (FuSa) Software Package is enabled in the ECI image, no isolated real-time cores are defined. This is in contrast to the default behavior described above.
ECI builds the Linux kernel to be tickless. With a tickless kernel, timer interrupts do not occur at regular intervals, but are only delivered as required. This minimizes the number of kernel interrupts to the minimum required.
ECI builds the Linux kernel to maintain persistent CPU power/frequency state. With this configuration, the CPU never reduces clock speed, remaining at full potential to better process real-time workloads.
See also
Refer to section ECI Kernel Configuration Optimizations and ECI Kernel Boot Optimizations for a list of kernel configurations and boot parameters used to optimize the ECI.
Example Use Case
The Application #1: Single-Host Roundtrip TSN Transport example makes use of a number of ECI features. This example utilizes the Edge Control Protocol Bridge, open62541 OPC-UA Pubsub performance testing framework, and Intel® Ethernet Controllers TSN Enabling and Testing frameworks.
The single host roundtrip example uses multiple instances of the EC Protocol Bridge and the OPC UA plug-in to create a roundtrip OPC UA communication loop. The example also demonstrates how to configure the OPC UA plug-in to take advantage of Time Sensitive Networking. The configuration for each segment is described in the diagram below.
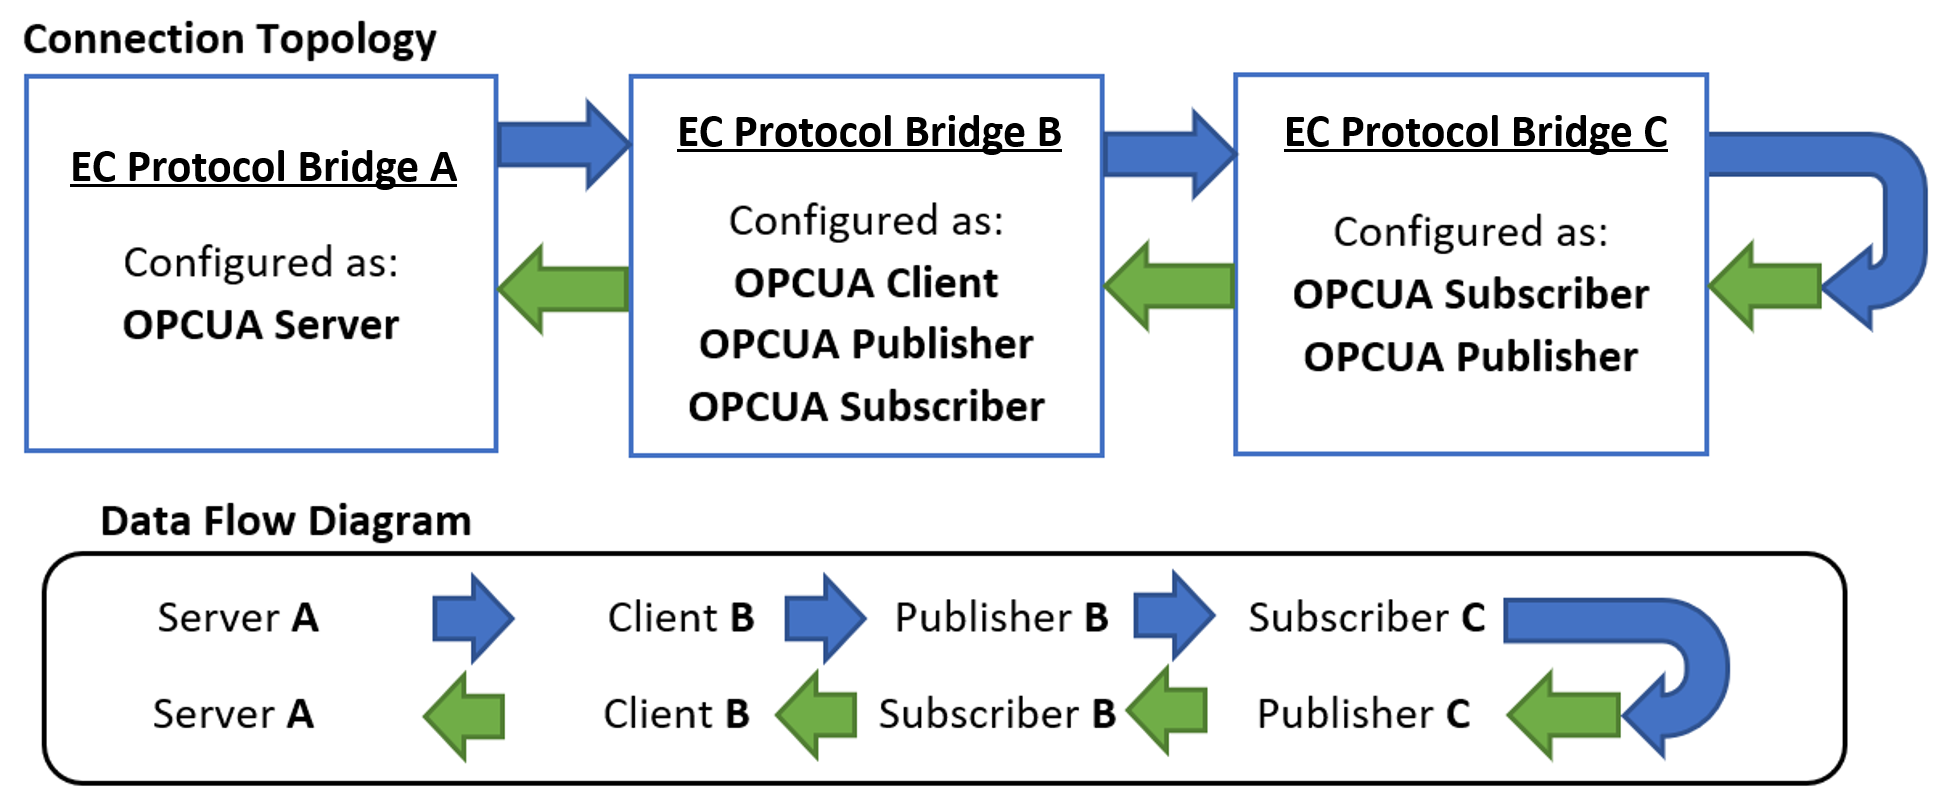
For the complete guide, refer to the following section: Application #1: Single-Host Roundtrip TSN Transport
Where to go next?
For more information on the various components ECI has to offer, refer to: Components and Features of ECI
For more information on developing real-time applications using ECI, refer to: Developer Resources
See also
Visit the Edge Controls for Industrial online support forum for questions and answers: https://community.intel.com/t5/Intel-Edge-Software-Hub/bd-p/edge-software-hub