ACRN Secure Boot
Important
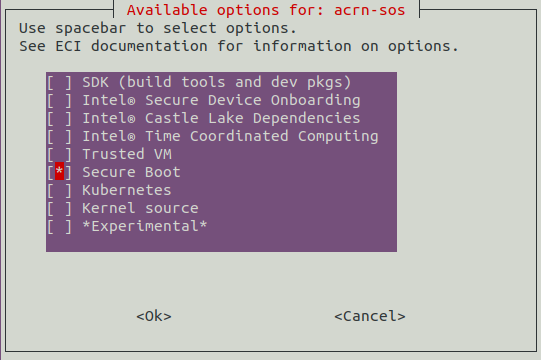
Secure Boot must be enabled in the acrn-sos image before it can be used. Creating an ECI-A image that contains the Secure Boot feature can be accomplished by selecting the Secure Boot feature option during image setup. See section acrn-sos for more information.
ACRN Secure Boot Sequence
Secure Boot is a verification mechanism for ensuring that code launched by a computer’s UEFI firmware is trusted. It is designed to protect a system against malicious code being loaded and executed early in the boot process, before the operating system has been loaded.
Secure Boot works using cryptographic checksums and signatures. Each program that is loaded by the firmware includes a signature and a checksum, and before allowing execution the firmware will verify that the program is trusted by validating the checksum and the signature. When SB is enabled on a system, any attempt to execute an untrusted program will not be allowed. This stops unexpected / unauthorized code from running in the UEFI environment.
ECI enables secure boot for ACRN as described in the ACRN documentation: https://projectacrn.github.io/latest/tutorials/acrn-secure-boot-with-grub.html
The secure boot chain is depicted and described below:

- Initial Setup
An ECI image is built with the
Secure Bootfeature option enabled. During the build, the GRUB bootloader and any boot assets (ex: Linux kernel, grub.cfg) are signed using adb.authauthentication variable. The ECI image is installed to a target platform and thedb.authvariable is registered in BIOS with secure boot enabled.- Stage 1
The UEFI firmware verifies the GRUB bootloader against the
db.authauthentication variable stored in BIOS. If the GRUB bootloader is authentic, then the verification will pass and GRUB will load.- Stage 2
GRUB then verifies all assets which are intended to be loaded by calculating a cryptographic checksum and comparing to a precomputed signature for each asset. If any asset verification fails, GRUB will halt the boot process. Typical assets include the Linux kernel, GRUB config file, ACRN hypervisor binary, and any ACRN pre-launch VM initramfs.
- Stage 3
The Service VM OS kernel verifies the Device Model (
acrn-dm) and User VM OVMF bootloader (with the help ofacrn-dm)- Stage 4
The User VM virtual bootloader (e.g. OVMF) starts the guest side verified boot process
Secure Boot Keys
There are typically four types of Secure Boot keys built into the BIOS UEFI firmware.
Database Key (db) — This is the key type that is most likely to be associated with Secure Boot, because it’s used to sign or verify the binaries (boot loaders, boot managers, shells, drivers, etc.). Most computers come with two Microsoft keys installed. Microsoft uses one of these itself and uses the other to sign third-party software, such as Shim. Some computers also come with keys created by the computer manufacturer or other parties. Canonical (the creator of the Ubuntu Linux distribution) has managed to get its key embedded in some computers’ firmware, for instance, although it’s not nearly ubiquitous enough to count on its being present. As this description implies, the db can hold multiple keys — an important fact for some purposes. Note that the db can contain both public keys (which are matched to private keys that can be used to sign multiple binaries) and hashes (which describe individual binaries).
Database Blacklist Key (dbx) — The dbx is sort of opposite of db; it contains keys and hashes that correspond to known malware or otherwise undesirable software. This enables blacklisting a single binary (via its hash) even if that binary is signed by a key which will not be revoked because it has been used to sign legitimate binaries.
Key Exchange Key (KEK) — The KEK is used to sign keys so that the firmware accepts them as valid when entering them into the database (either the db or the dbx). Without the KEK, the firmware would have no way of knowing whether a new key was valid or was being served by malware. Thus, in the absence of the KEK, Secure Boot would either be broken or require that the databases remain static. Since a critical point of Secure Boot is the dbx, a static database would be unworkable.
Platform Key (PK) — The PK is the top-level key in Secure Boot, and it serves a function relative to the KEK similar to that of the KEK to the db and dbx. UEFI Secure Boot supports a single PK, which is generally provided by the motherboard manufacturer. Thus, only the motherboard manufacturer has full control over the computer. An important part of controlling the Secure Boot process is to replace the PK with a user specific version.
Generating Secure Boot Keys and Certificates
The following section is applicable to:

To generate keys for use with Secure Boot, perform the commands below:
Generate platform keys
$ mkdir keys
$ cd keys
$ openssl req -new -x509 -newkey rsa:3072 -subj "/CN=Test PK/" -keyout PK.key -out PK.crt -days 3650 -nodes -sha256
$ openssl req -new -x509 -newkey rsa:3072 -subj "/CN=Test KEK/" -keyout KEK.key -out KEK.crt -days 3650 -nodes -sha256
$ openssl req -new -x509 -newkey rsa:3072 -subj "/CN=Test DB/"  -keyout DB.key -out DB.crt -days 3650 -nodes -sha256
Convert keys to DER format
$ openssl x509 -in PK.crt -out PK.der -outform DER
$ openssl x509 -in KEK.crt -out KEK.der -outform DER
$ openssl x509 -in DB.crt -out DB.der -outform DER
Get globally unique identifier and generate EFI signature list
$ GUID=`python -c 'import uuid; print(str(uuid.uuid1()))'`
$ touch guid.txt
$ sudo chmod 777 guid.txt
$ echo $GUID > guid.txt
$ sudo cert-to-efi-sig-list -g $GUID PK.crt PK.esl
$ sudo cert-to-efi-sig-list -g $GUID KEK.crt KEK.esl
$ sudo cert-to-efi-sig-list -g $GUID DB.crt DB.esl
Sign generated keys
$ sudo sign-efi-sig-list -t "$(date --date='1 second' +'%Y-%m-%d %H:%M:%S')" -k PK.key -c PK.crt PK PK.esl PK.auth
$ sudo sign-efi-sig-list -t "$(date --date='1 second' +'%Y-%m-%d %H:%M:%S')" -k PK.key -c PK.crt KEK KEK.esl KEK.auth
$ sudo sign-efi-sig-list -t "$(date --date='1 second' +'%Y-%m-%d %H:%M:%S')" -k KEK.key -c KEK.crt DB DB.esl DB.auth
$ sudo chmod 0600 *.key
After completing the previous steps, the following files should be present:
db.auth  db.der  db.key    KEK.auth  KEK.der  KEK.key  PK.crt  PK.esl
db.crt   db.esl  grub.pub  KEK.crt   KEK.esl  PK.auth  PK.der  PK.key
Note
To use these keys during the ECI-A build process, copy these keys to the following directory on the Linux build machine:
/eci-release/build/ecs-acrn-sos/build/keys.
Enabling Secure Boot
Follow the steps below to enable Secure Boot with an ACRN image.
Generate Keys and Prepare an ECI Image
The following section is applicable to:
During the ECI-A image build process, a set of keys will be used to sign various boot assets automatically. This set of keys can be optionally supplied by the user. To create keys for signing, see section: Generating Secure Boot Keys and Certificates.
Note
If no user-supplied keys are present when the ECI-A image build occurs, then a set of keys will be automatically generated at the following directory:
/eci-release/build/ecs-acrn-sos/build/keysBuild an acrn-sos image with the Secure Boot feature option enabled. Creating an ECI-A image that contains the Secure Boot feature can be accomplished by selecting the
Secure Bootfeature option during image setup. See section acrn-sos for more information.
After building an ECI-A image with the
Secure Bootfeature option enabled, install the ECI-A image to a target system by following section: Installing ECI-A.Note
If Secure Boot is already enabled in the BIOS, the ECI installer may not be permitted to boot until Secure Boot is disabled.
Copy the
db.authauthentication variable used to sign the GRUB bootloader onto a USB mass storage device. Thedb.authauthentication variable is typically located at:/eci-release/build/ecs-acrn-sos/build/keys
Enroll Signature in BIOS and Enable Secure Boot
The following section is applicable to:

Insert the USB mass storage device which contains the
db.authauthentication variable into the target system.Reboot the target system and access the BIOS (typically pressing keys delete or F2 at boot will open the BIOS menu).
Depending on which target system is being used, the method to enroll a signature in the BIOS can vary greatly. Two BIOS types are presented in the tabs below. Select the tab which more closely resembles the BIOS in use.
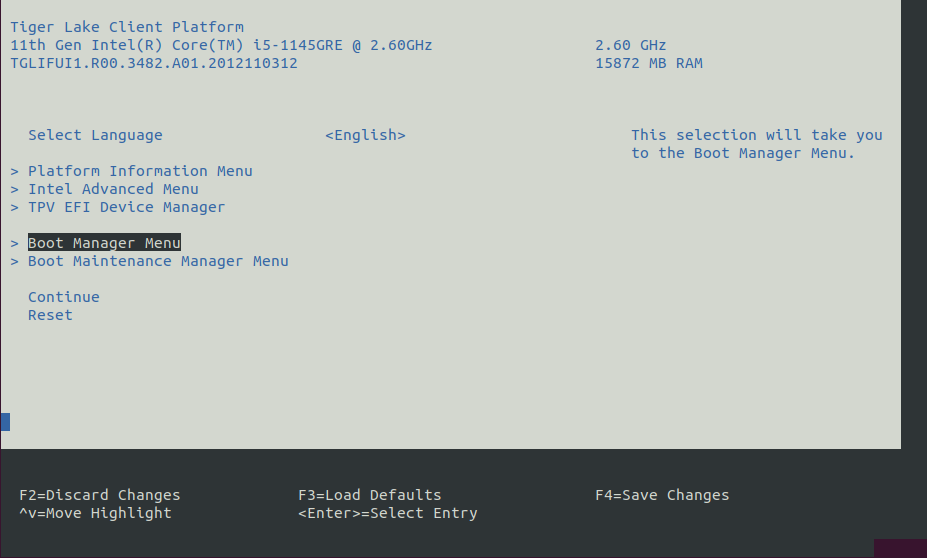
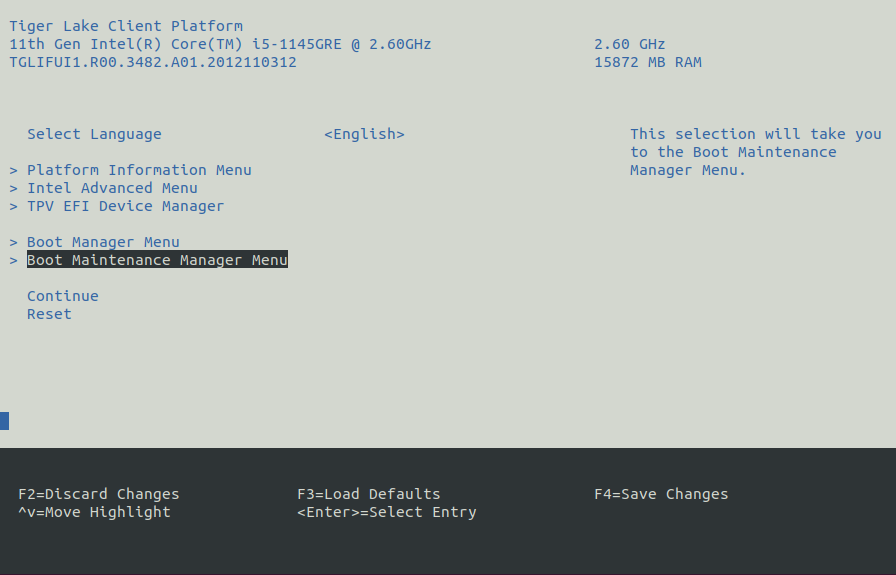
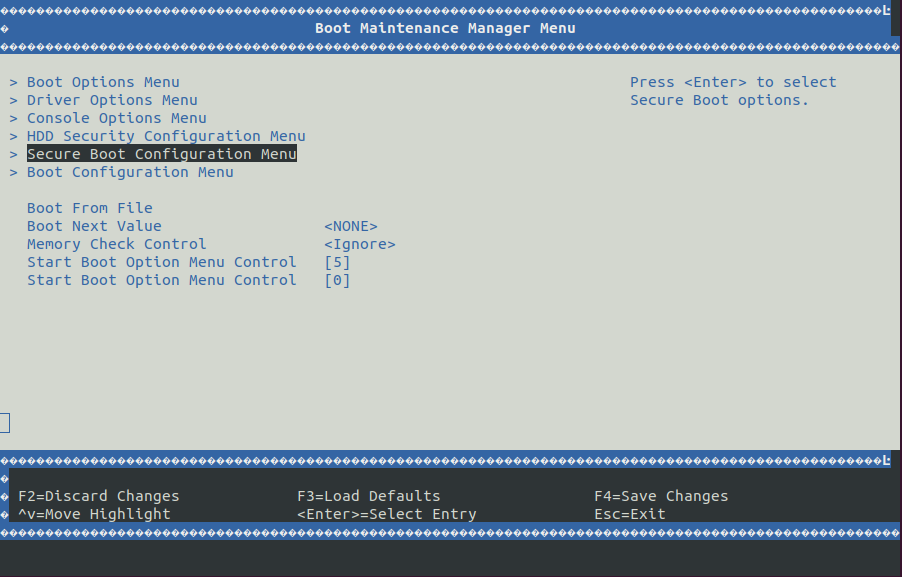
At the BIOS menu, open the “Boot Maintenance Manager Menu”.
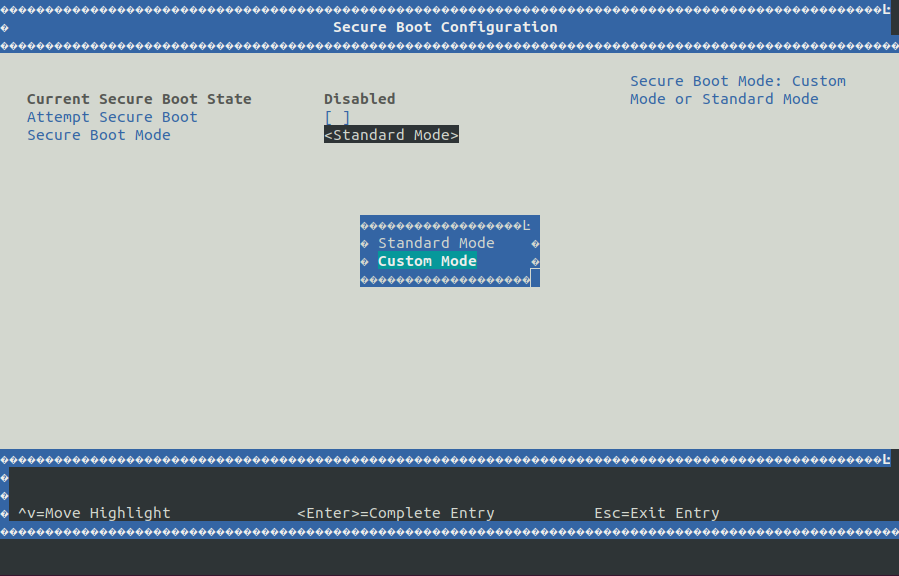
Open the “Secure Boot Configuration Menu”.
Change the “Secure Boot Mode” to be “Custom Mode”.
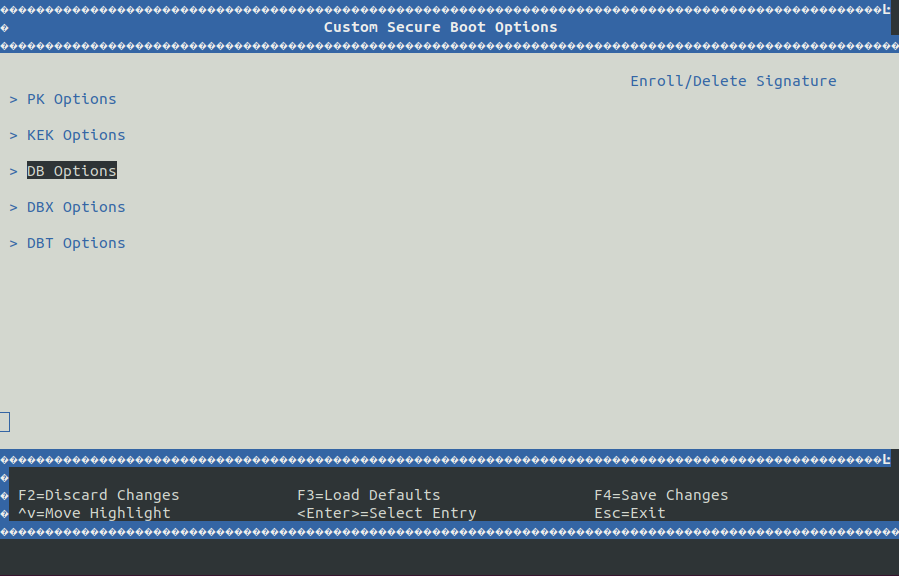
Open the “Custom Secure Boot Options” item.

Open the “DB Options” item.
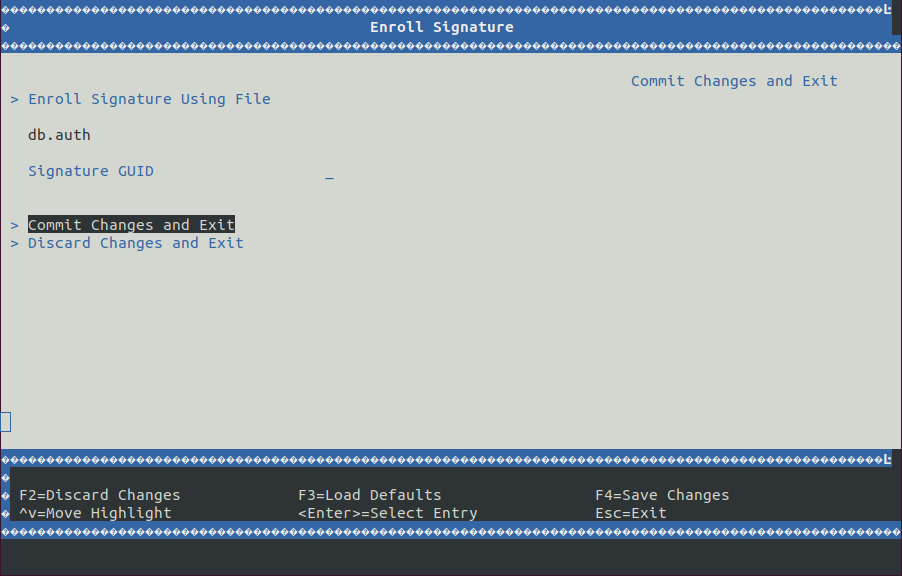
Select the “Enroll Signature Using File” option.

Select the entry corresponding to the USB mass storage device.
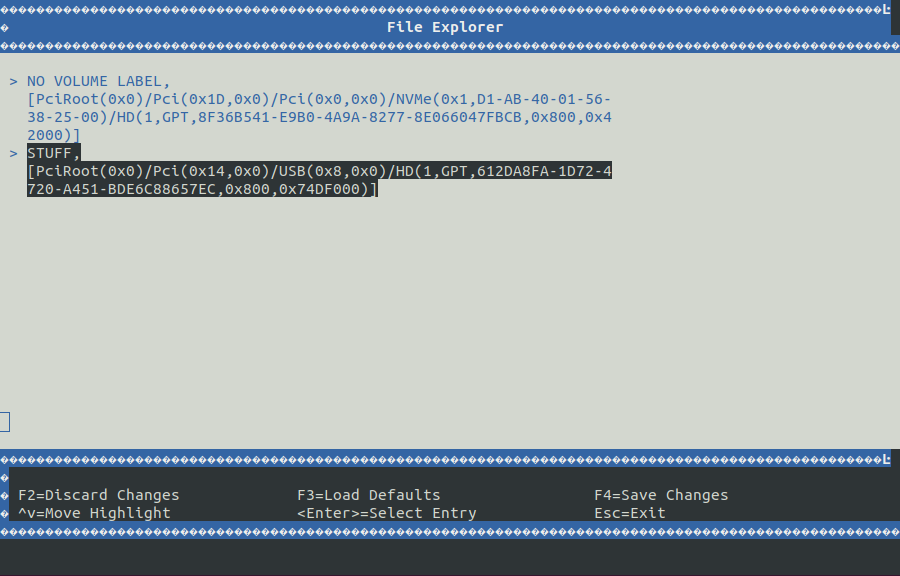
Navigate to the directory where the
db.authauthentication variable is located and select it.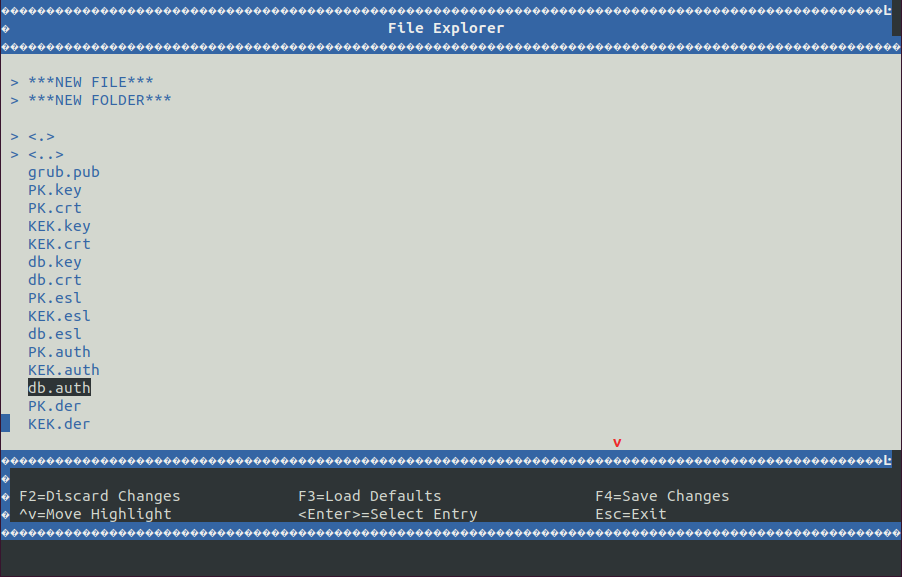
Select the “Commit Changes and Exit” option.
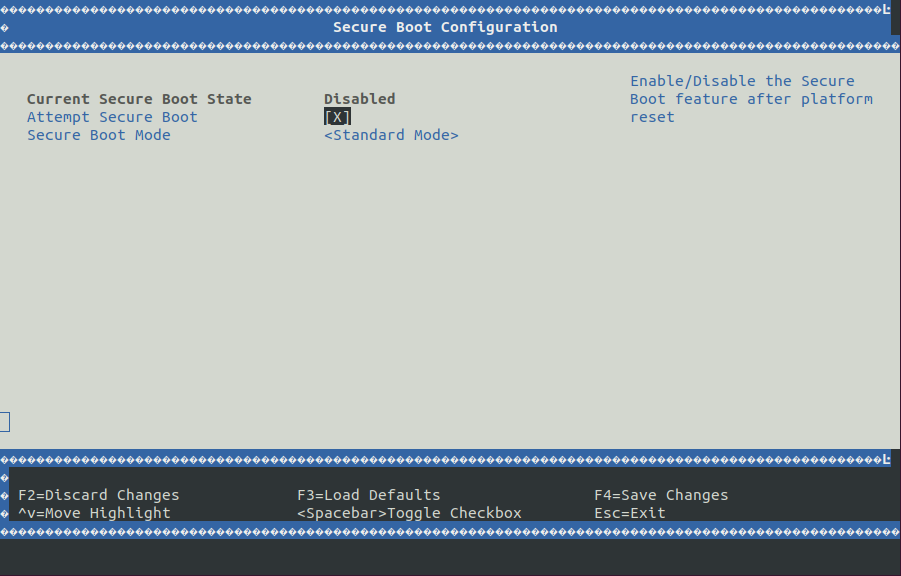
Check the box for “Attempt Secure Boot”.
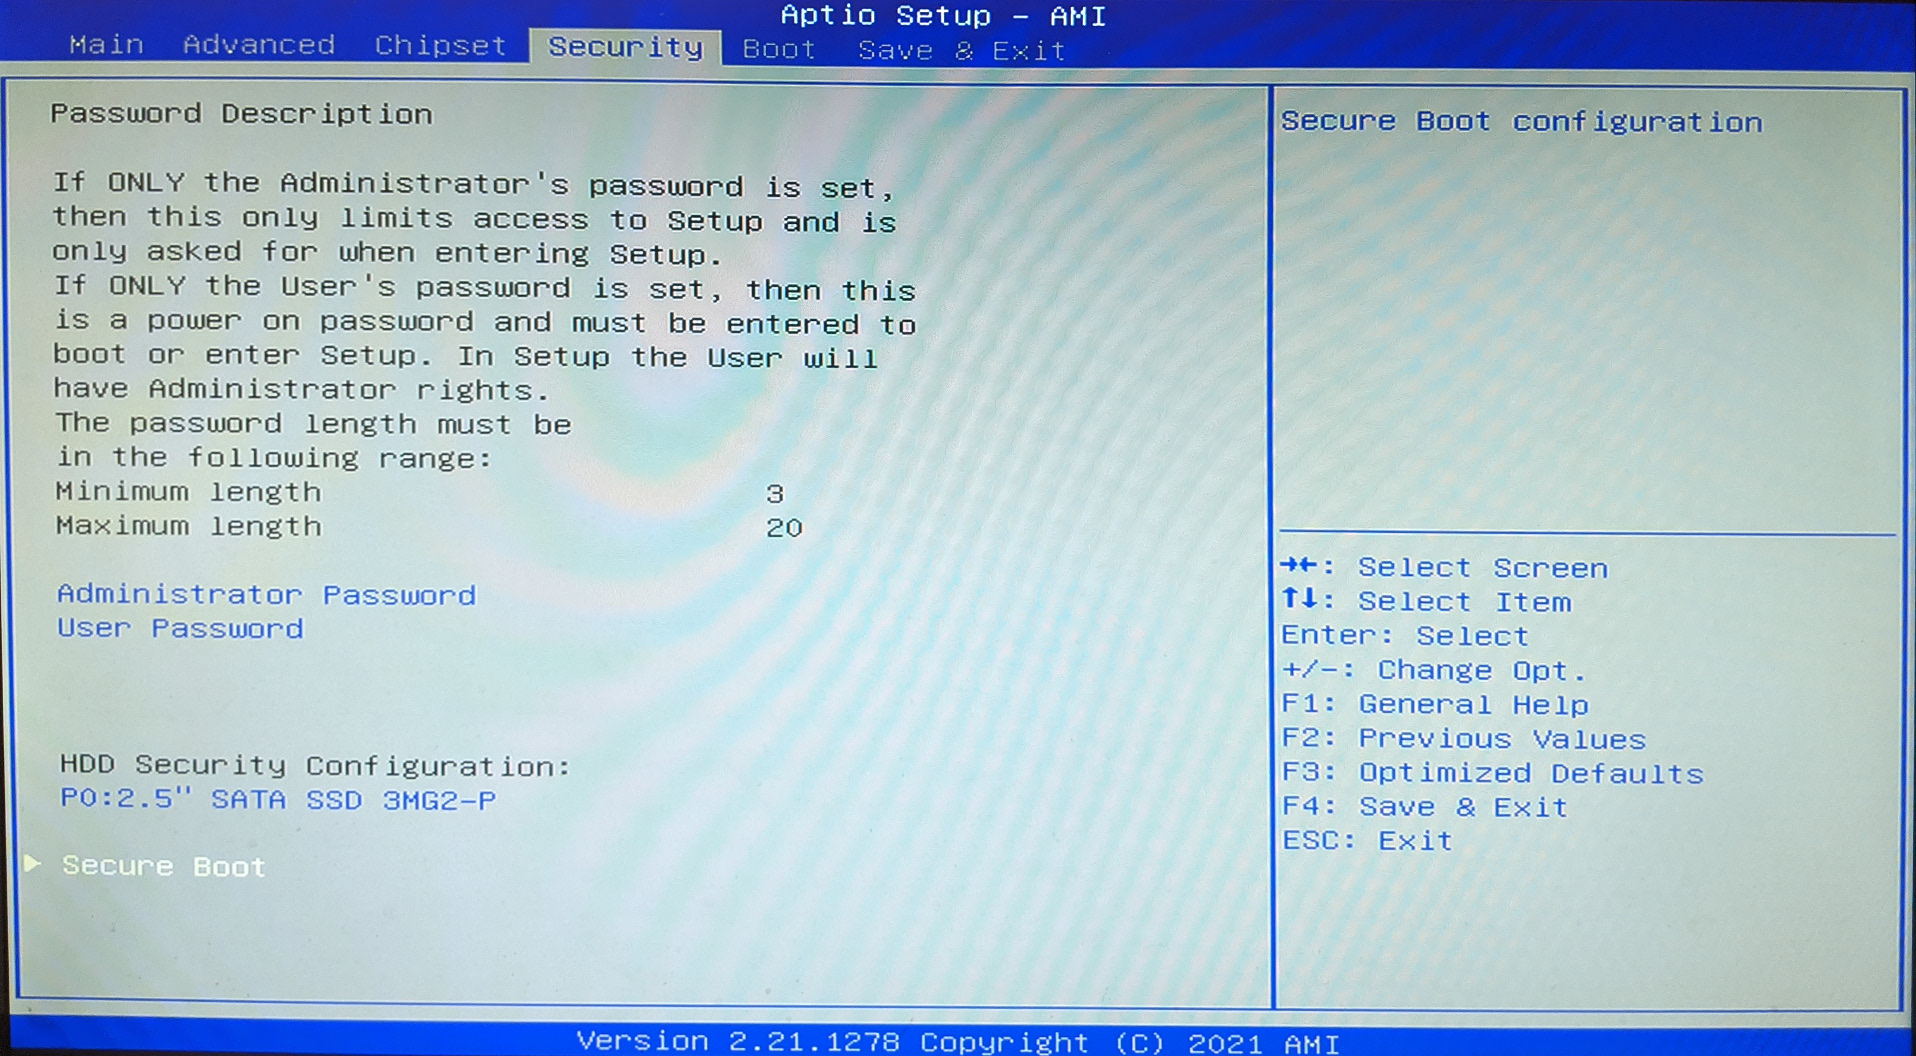
At the BIOS menu, navigate to the “Security” tab and open the “Secure Boot” menu.
Change “Secure Boot” to be “Enabled”.
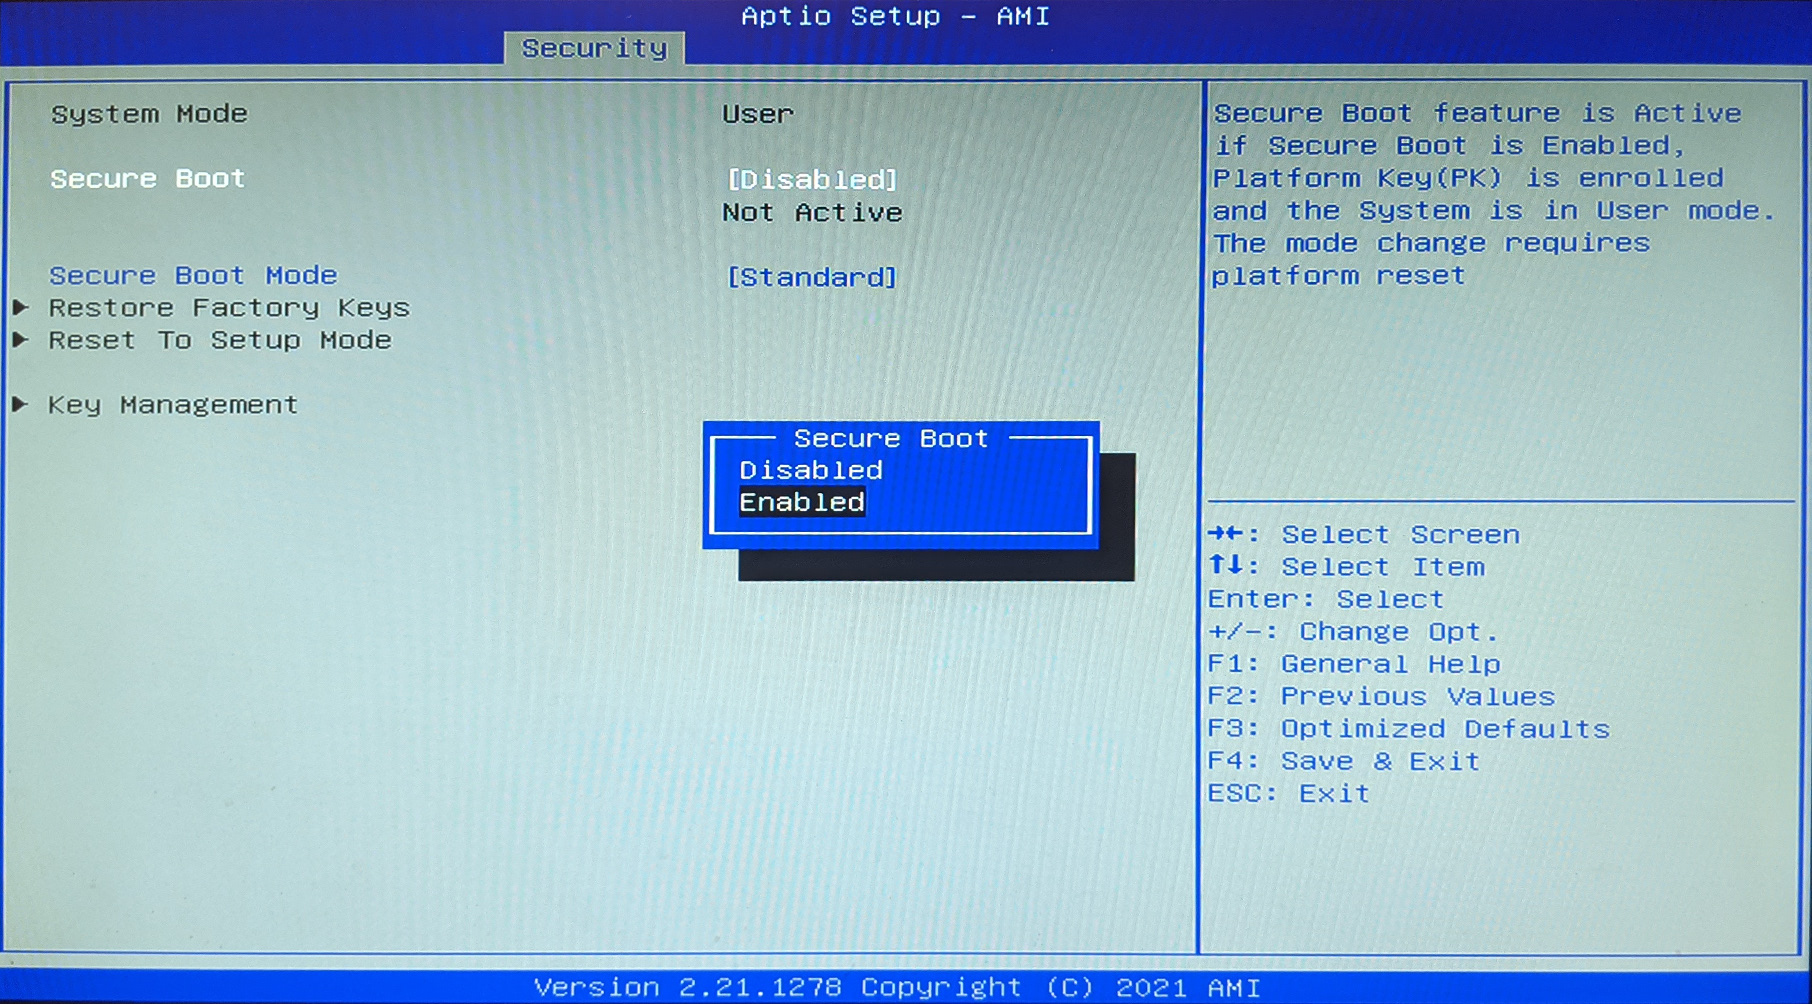
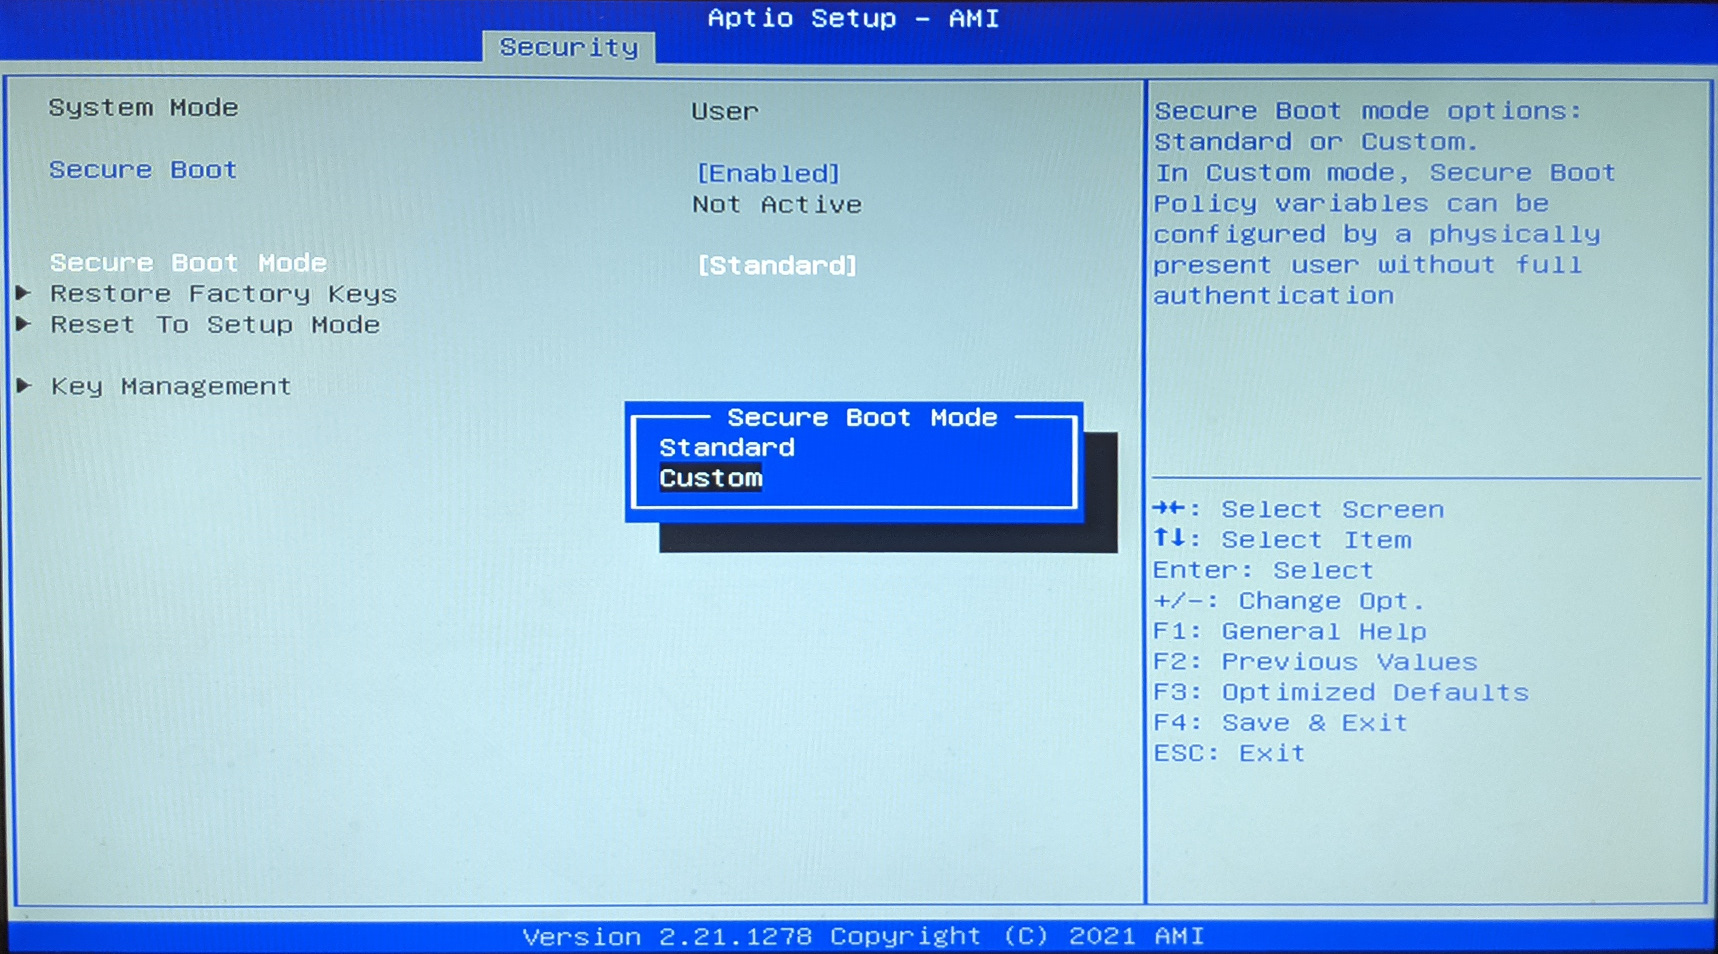
Change the “Secure Boot Mode” to be “Custom”.
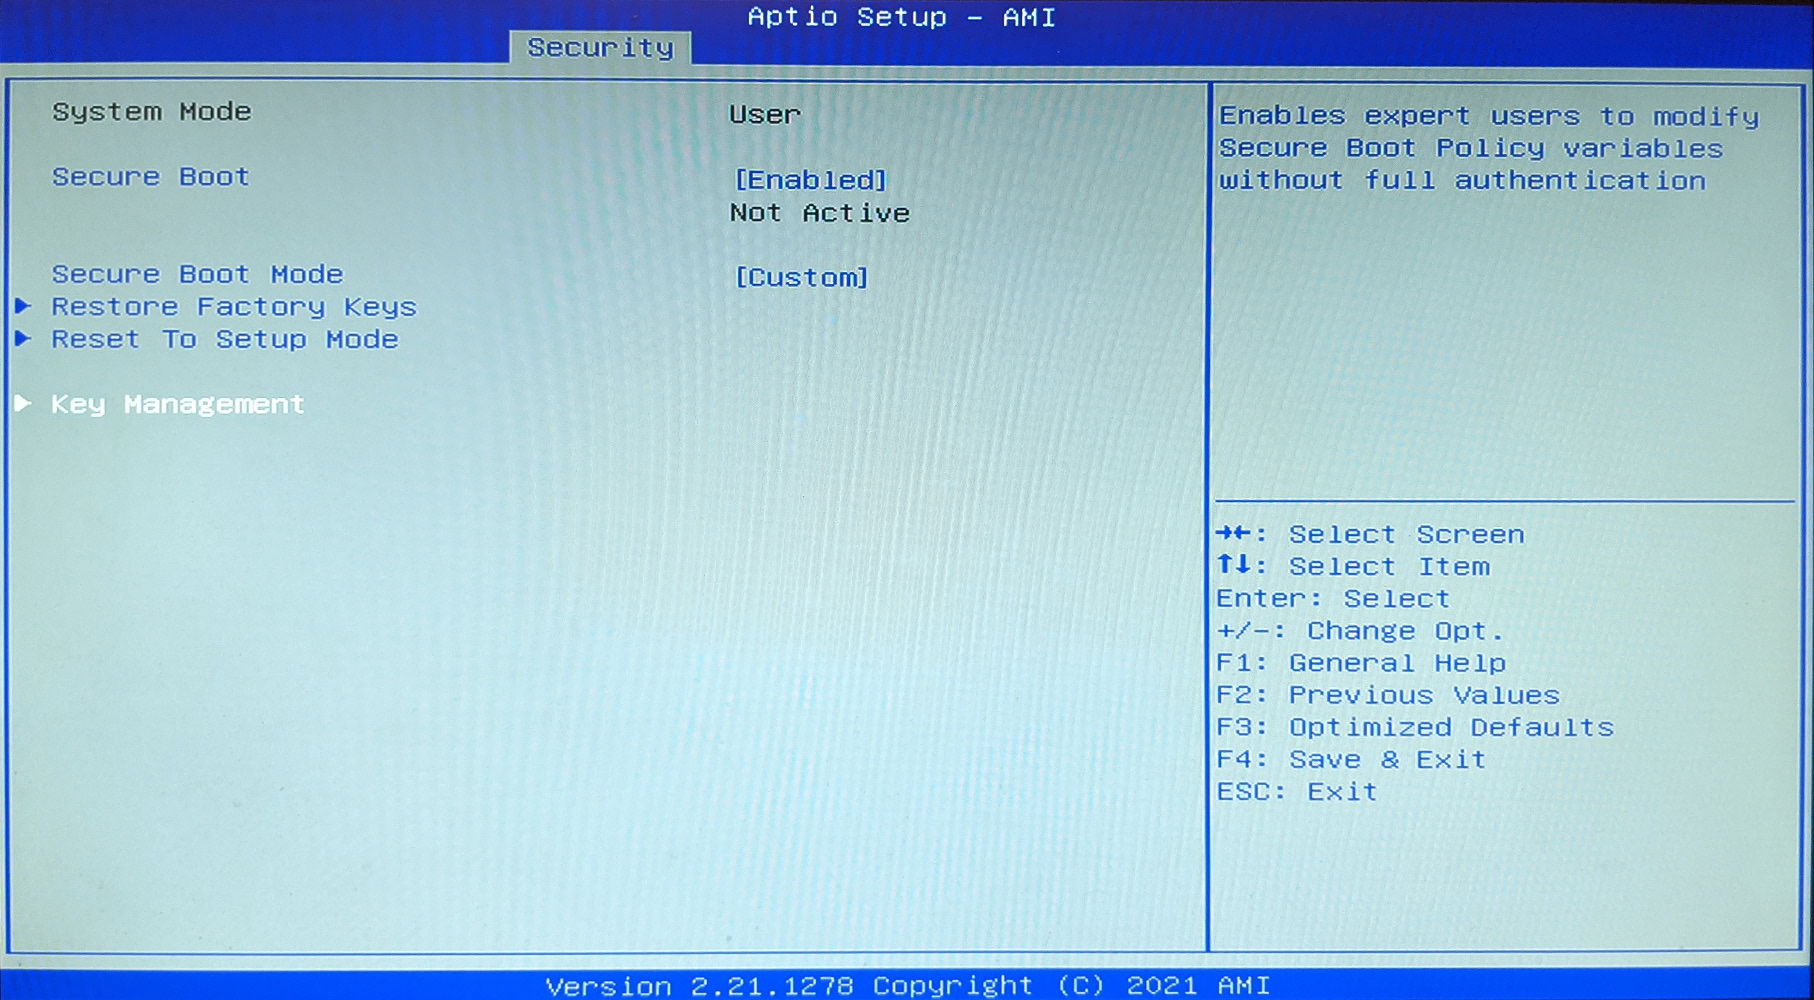
Open the “Key Management” menu.
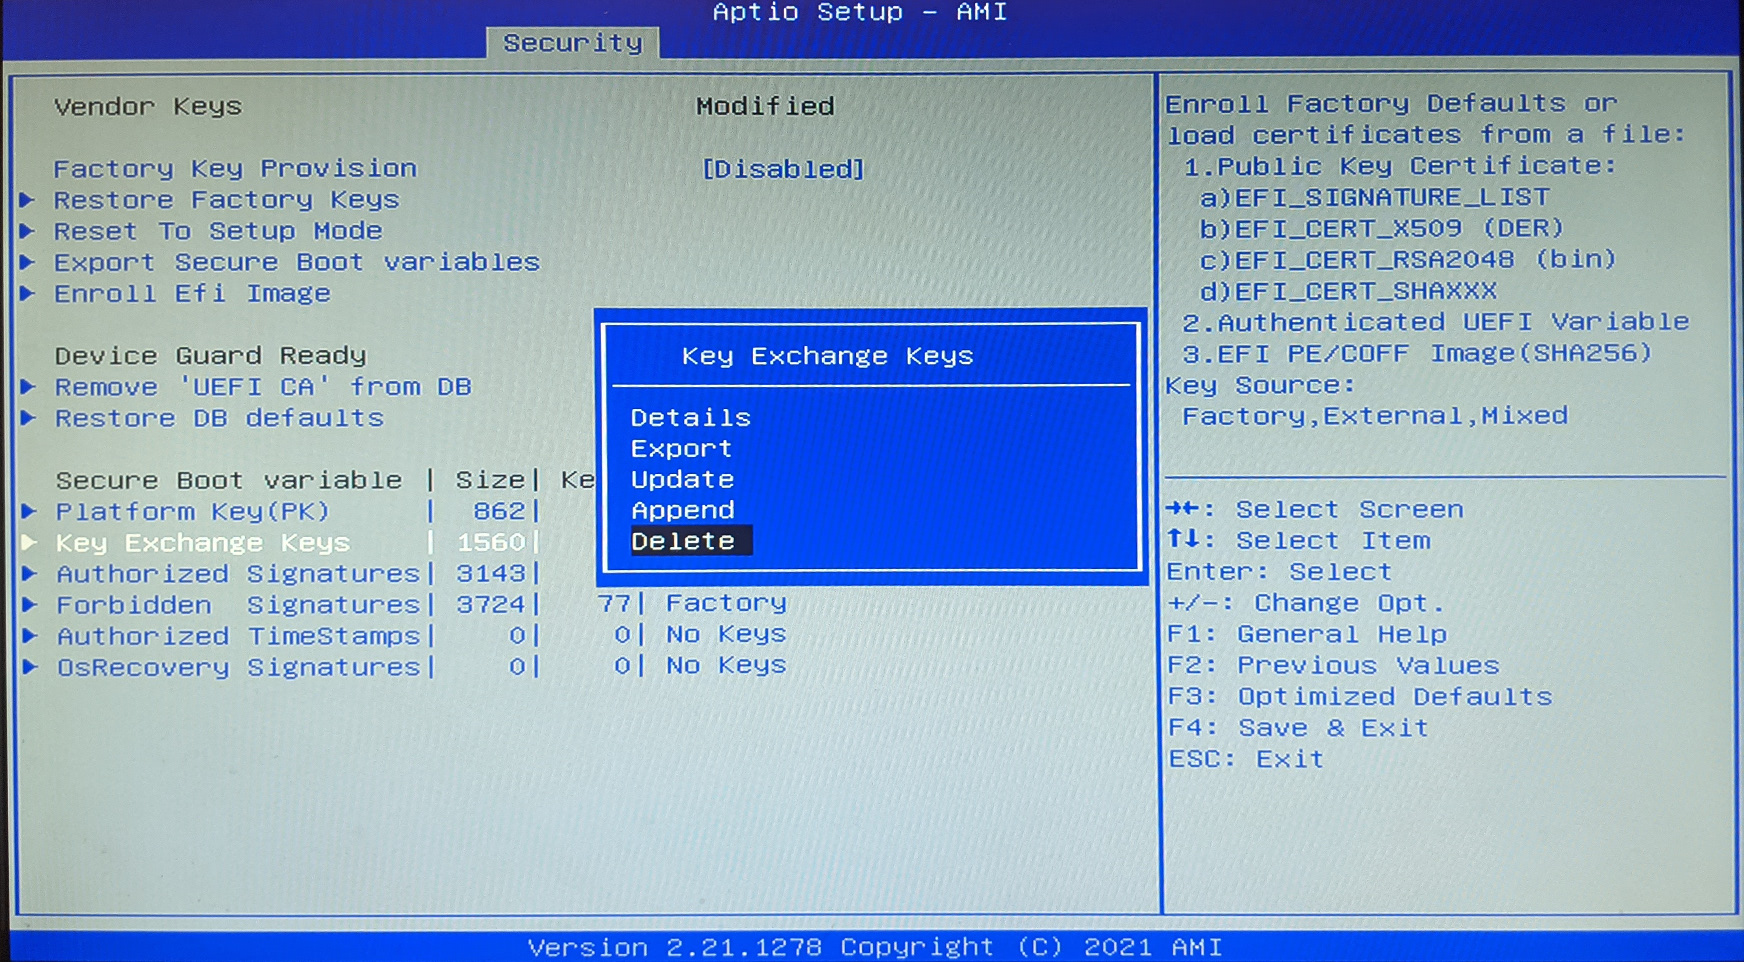
Keep the “Platform Key(PK)” as default, but delete the remainder of the keys and signatures.
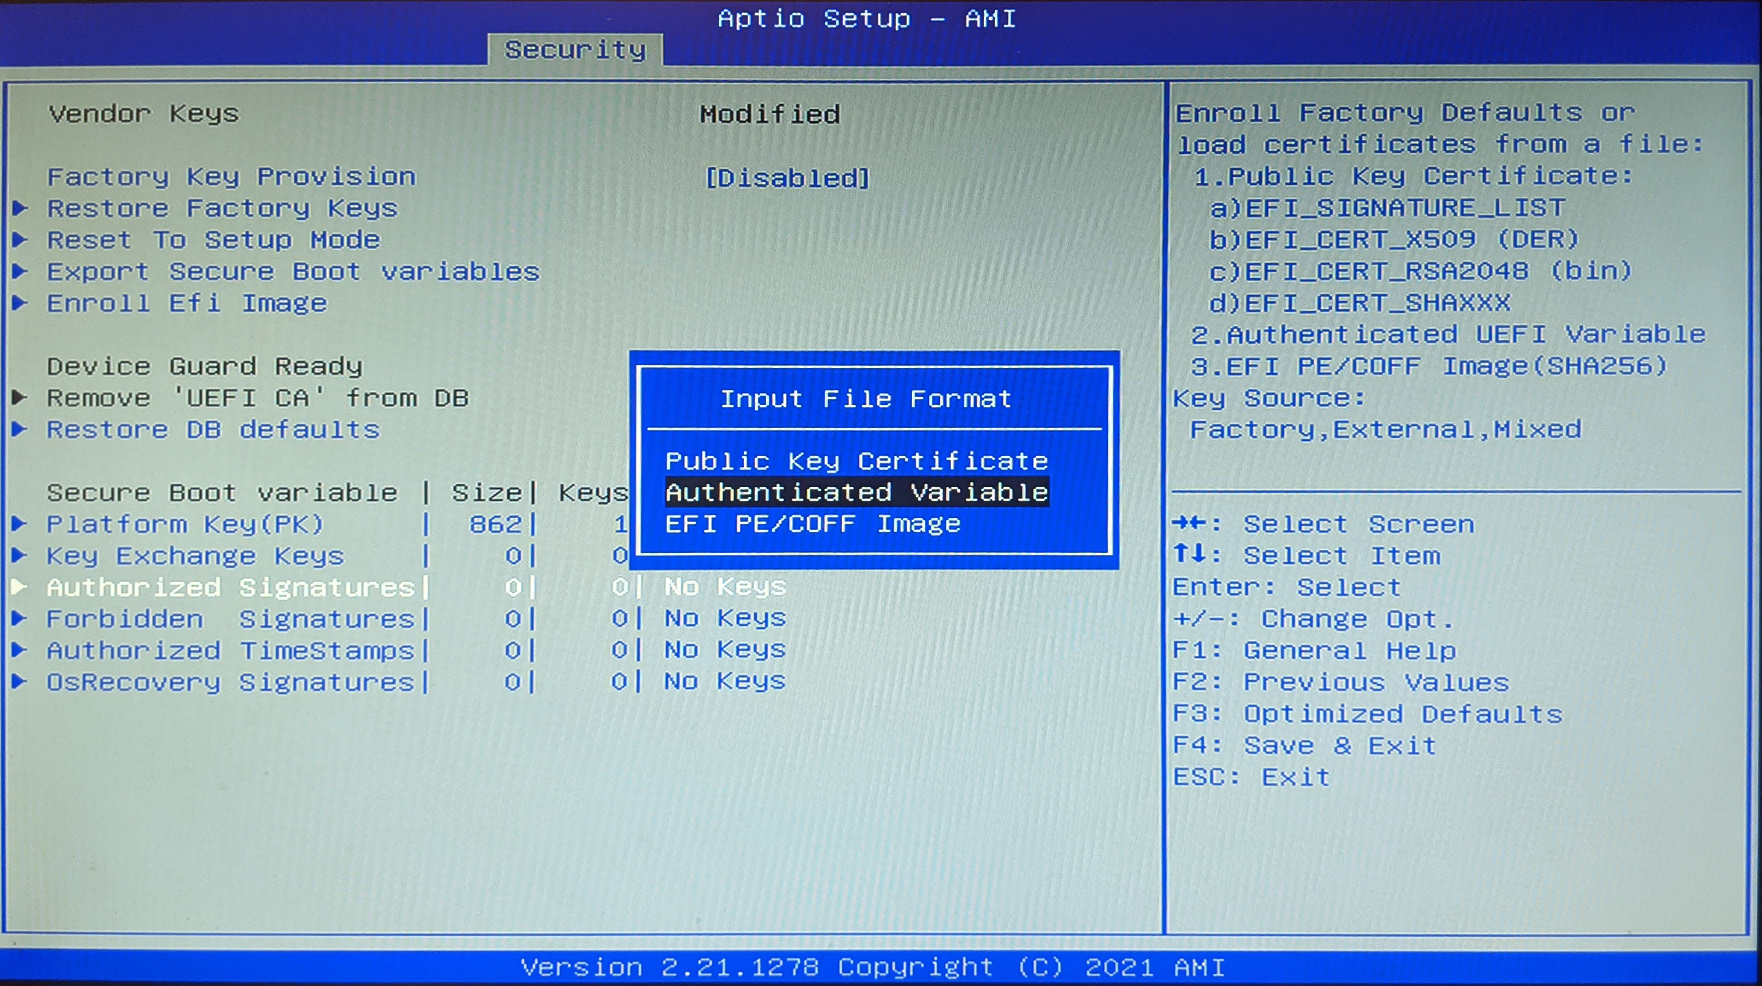
Select the “Authorized Signatures” item and select the “Update” option.
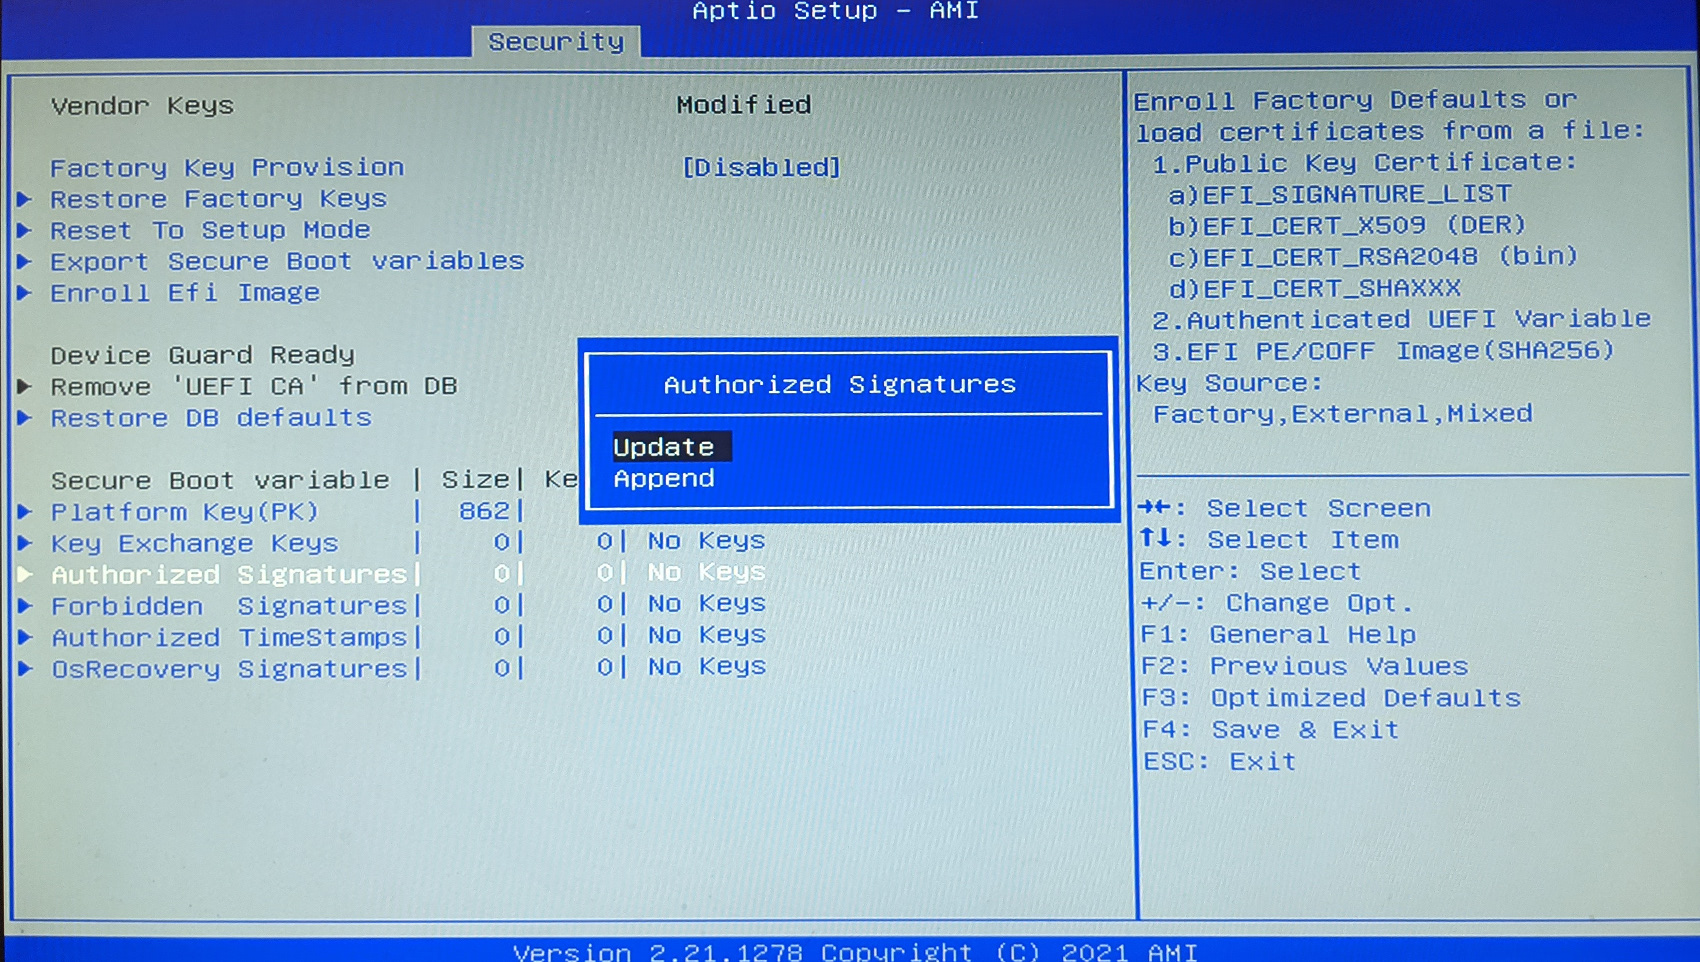
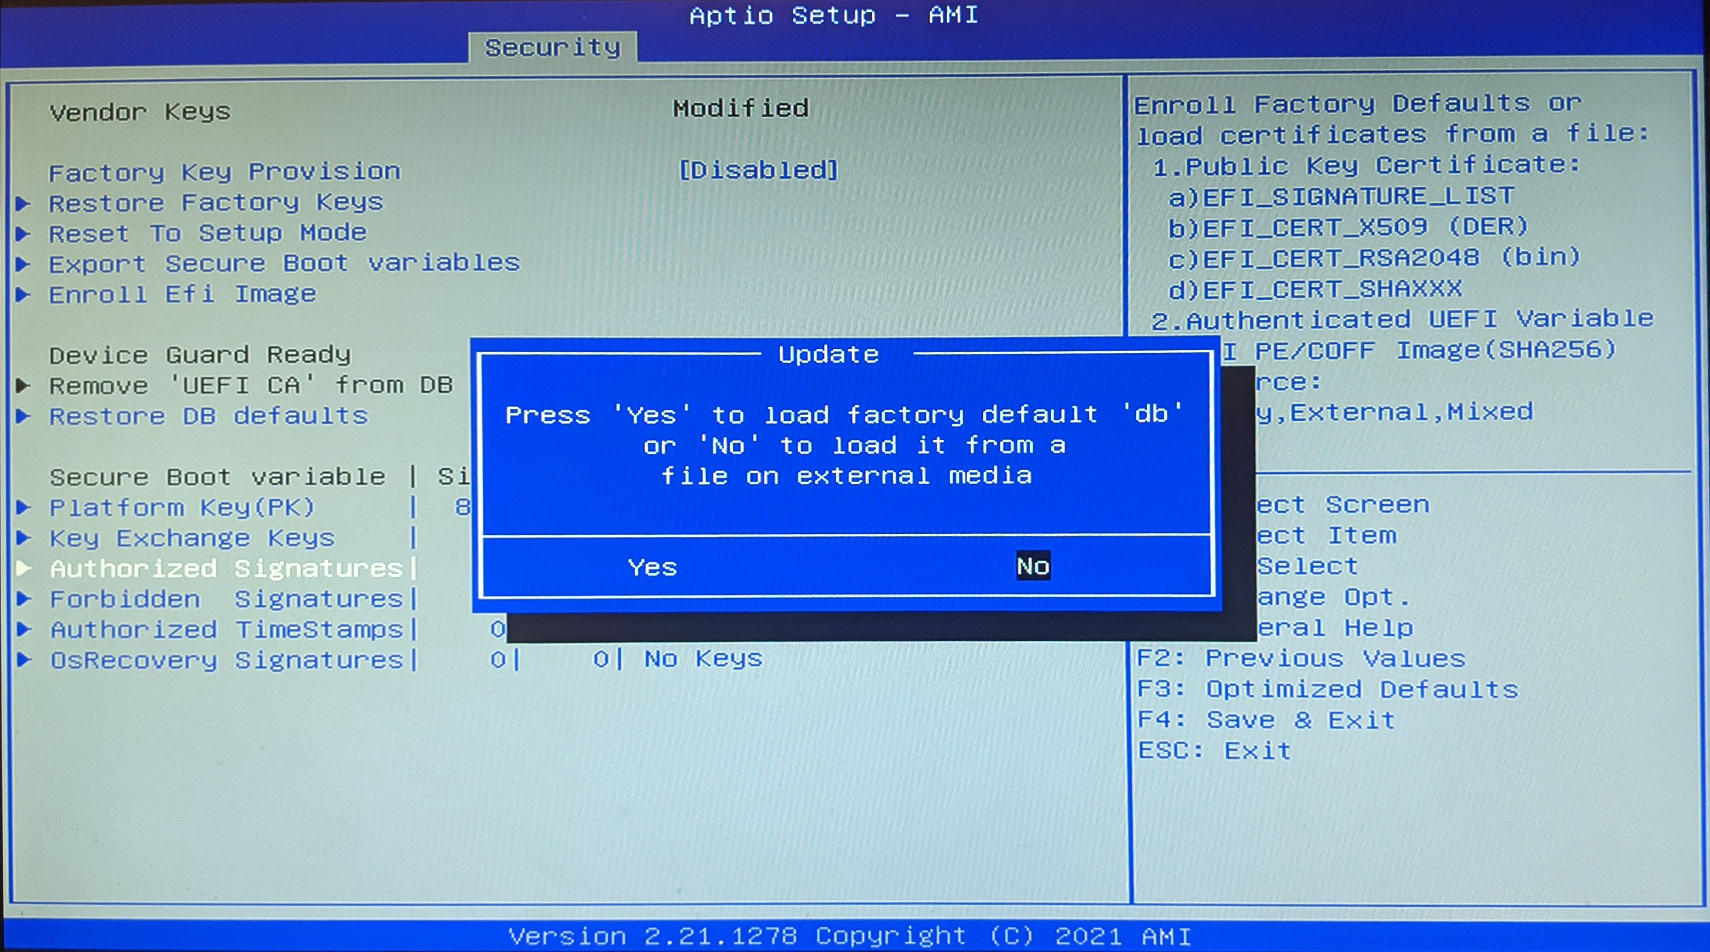
Select “No” if prompted to load factory default values.
Select the entry corresponding to the USB mass storage device.
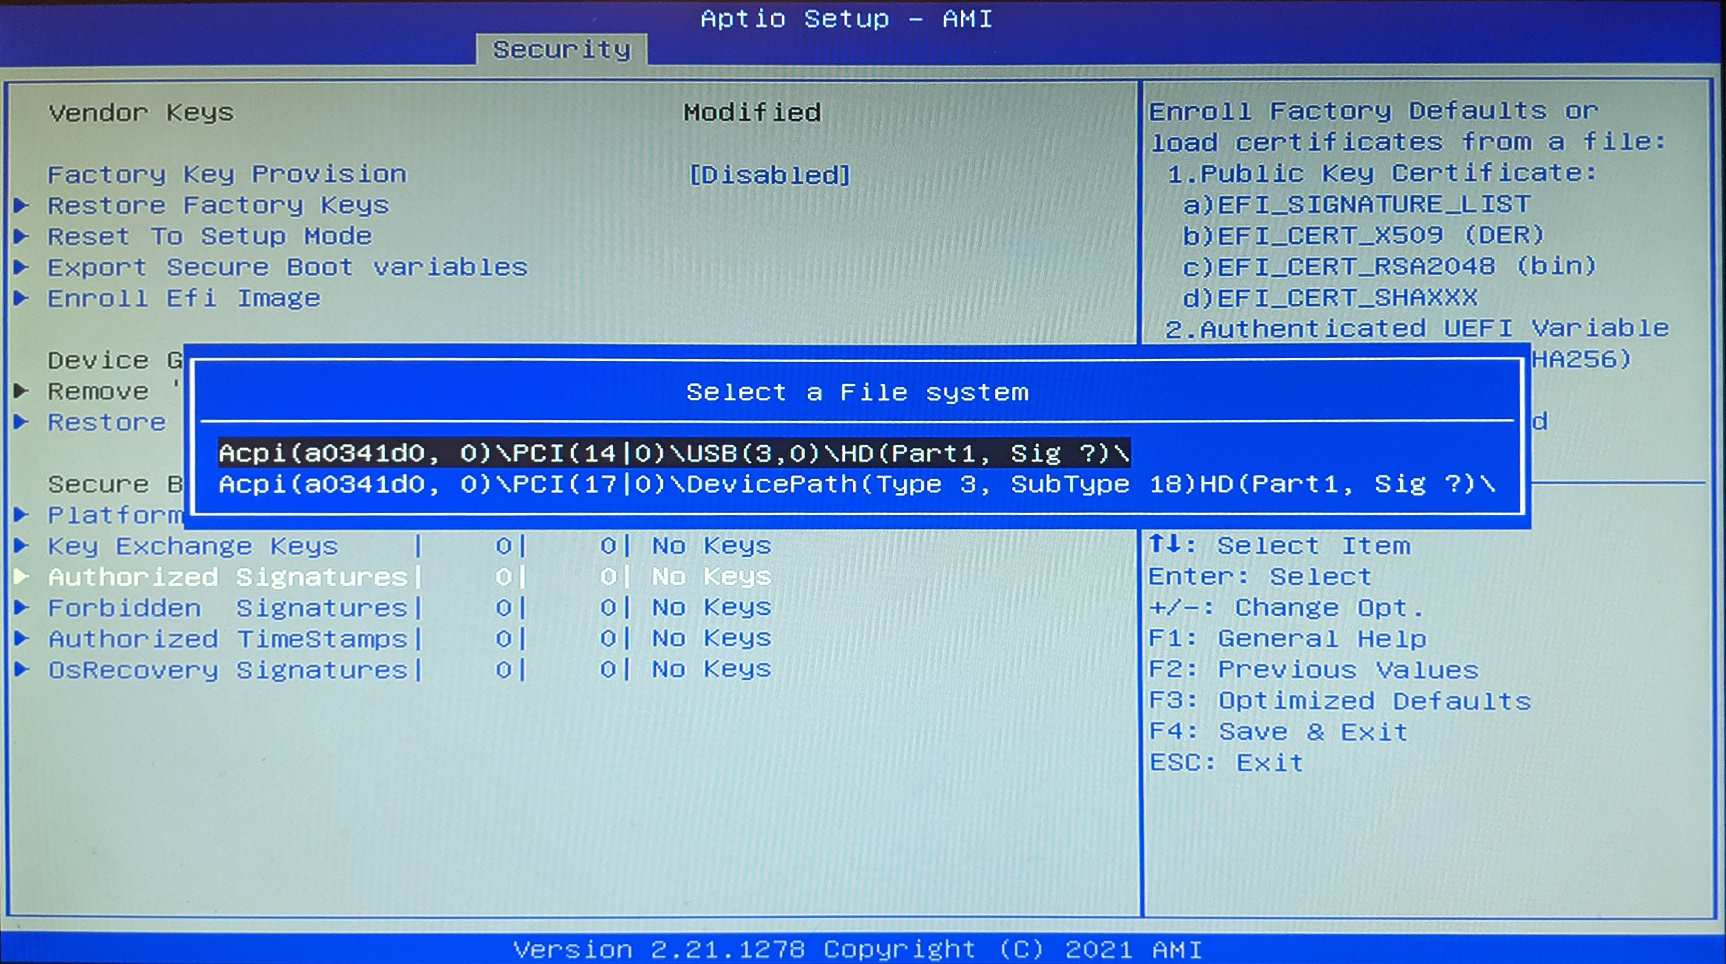
Navigate to the directory where the
db.authauthentication variable is located and select it.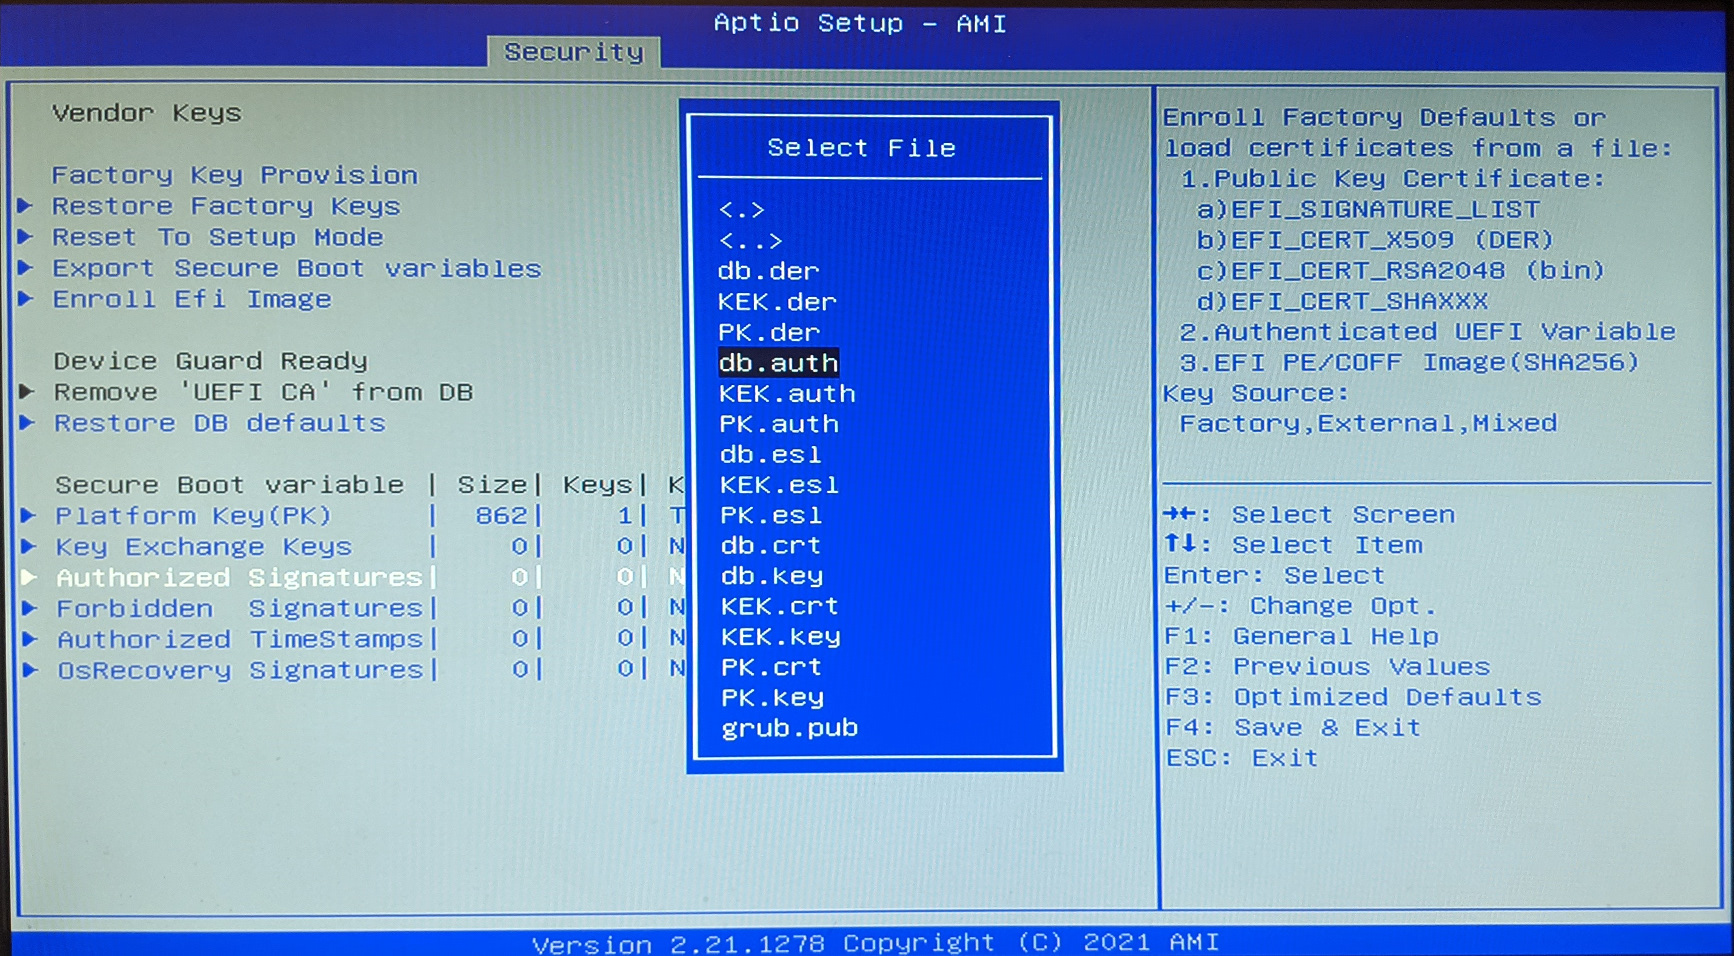
Select the “Authentication Variable” option.
Select “Yes” when prompted to update
db.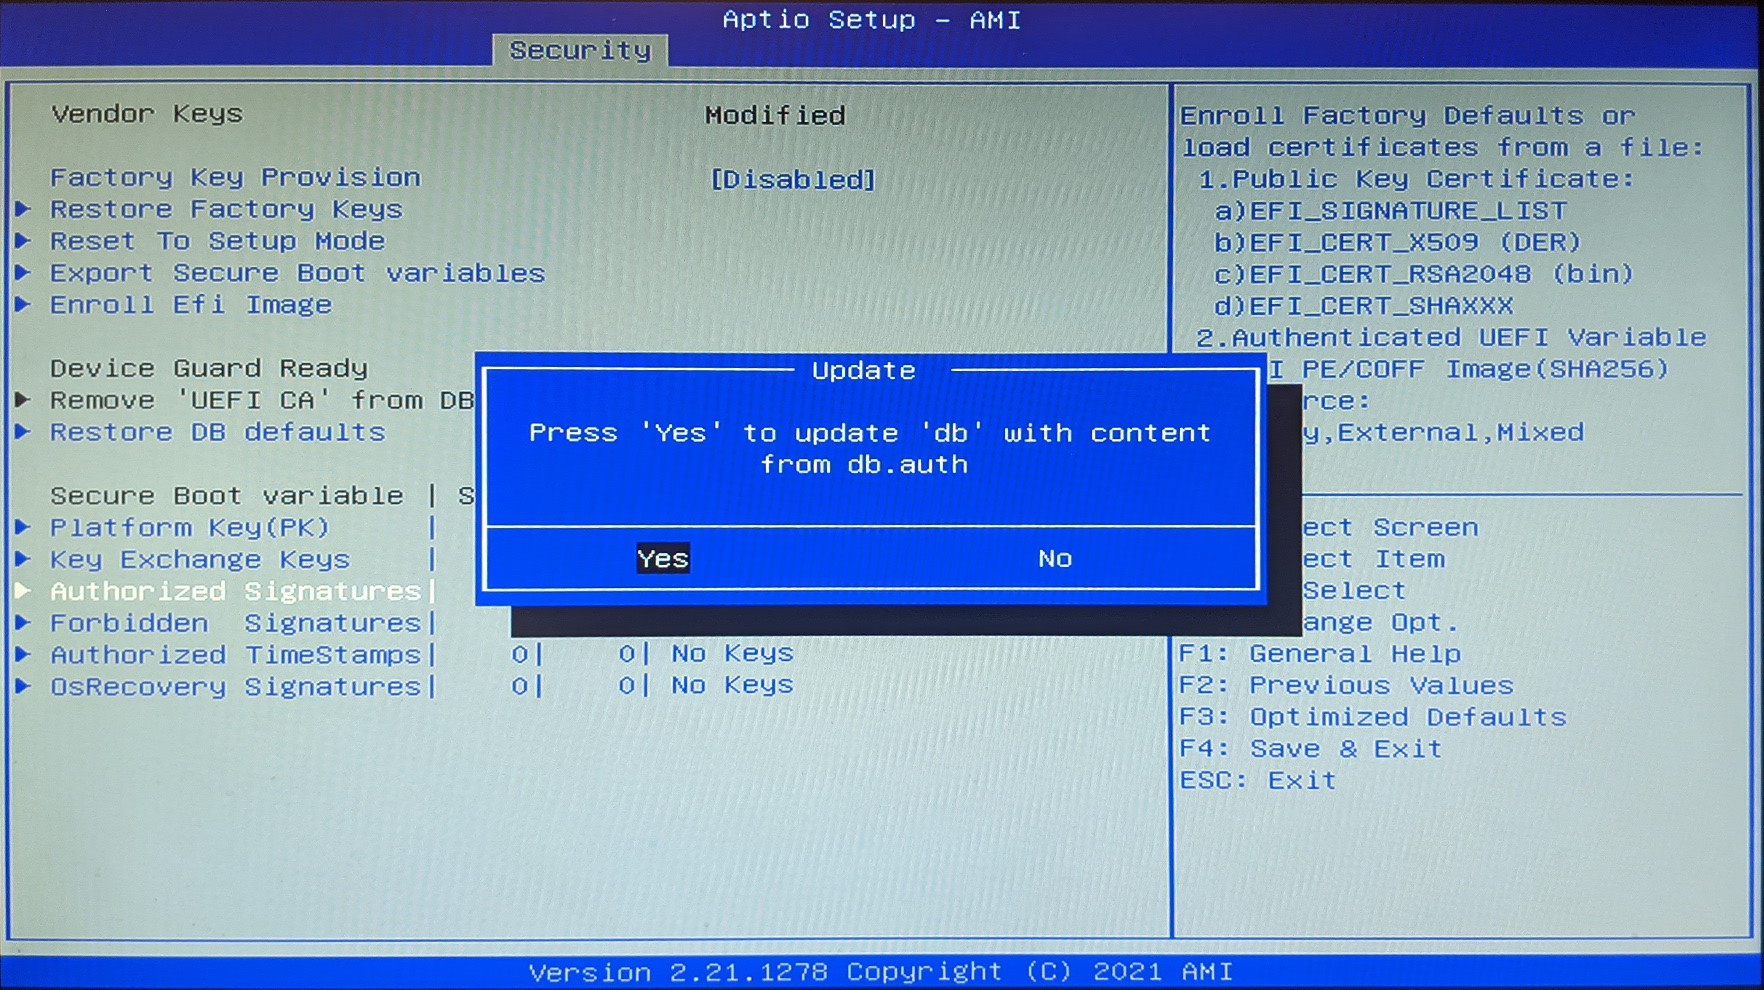
Save the BIOS changes and reboot the system to start using secure boot.
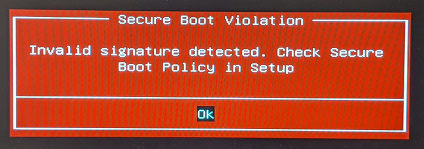
Note
If the signature used to sign GRUB does not match the enrolled
db.authauthentication variable, the boot process will halt.