Bare Metal Onboarding
Secure Device Onboarding of ECI images to the Supported DMS using Intel® In-band Manageability
With a properly configured infrastructure, Intel® Secure Device Onboard (Intel® SDO) can be leveraged to autonomously deploy ECI images on networked target systems. This section describes the setup necessary to enable and use Intel® SDO.
Intel® SDO Infrastructure Prerequisites
The following section is applicable to:

Required Infrastructure for Node 0:
Compute platform with Intel® 6th Generation CPU (minimum 4 cores), >16GB RAM, and >250GB SSD Storage (additional storage is recommended for mirroring OS repositories and building images locally)
Required Software
An ECI image with the Intel SDO features enabled. To create an ECI image with Intel SDO features, select the option
Intel® Secure Device Onboardingduring image setup. See the section Building ECI Targets for more information.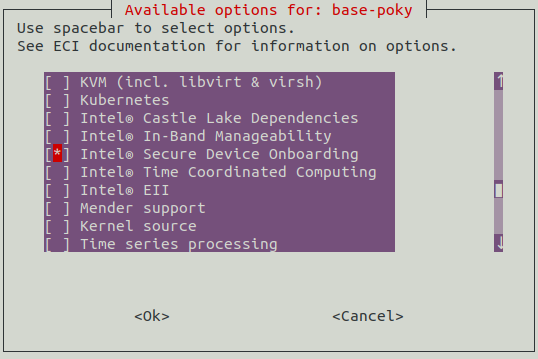
For a full zero-touch OS image installation and onboarding on to the DMS and orchestration, the following is required:
BMO setup Script
Binaries provided from Edge Software Hub (ESH)
Ubuntu-minimal-desktop (20.04 preferred)
Do the following to install the required software packages:
$ sudo apt install -y git build-essential openssh-server net-tools wget curl docker docker-compose
Node 0 Components and Services
The BMO setup script will automatically pull the open-source components from GitHub and use the provided binaries to build and set up the infrastructure. The BMO script will setup the following services:
SDO All-In-One container (AIO)
The integrated Supply Chain Toolkit (SCT)
Owner Companion Service (OCS)
Owner Protocol Service (OPS)
Owner File Service (OFS)
Automatic TO0 Client, which discovers the New Ownership vouchers in the SCT database, extends them with the owner public key, and then registers automatically to the RV service
Rendezvous-service Container (RV)
Redistributable-Database container
AIO-TB-plugin container
Edge Software Provisioner (ESP)
Web-service container
Gitea-service container
Registry-service container
Squid-service container
dnsmasq-service container
Thingsboard container
For OS image installation on bare-metal platforms, Edge Software Provisioner is required as it offers PXE boot services to perform SDO DI on COTS White Labeled Boxes.
For ease and visualization of voucher extension and profile selection, ThingsBoard open source DMS is used.
Setting up Node 0 using BMO Script
Step 1: Configure the BMO setup script
Copy the BMO script
setup_node0_#.#.#.shfrom the ECI release archive (release-eci_#.#.zip) to the Linux build system. The BMO release content is located in the ECI release archive within theSupport/Bare-Metal-Onboardingdirectory as follows:└── Support └── Bare-Metal-Onboarding ├── ESP_#.#.#.tar └── setup_node0_#.#.#.sh
Open the BMO setup script using a text editor:
$ vi setup_node0_#.#.#.sh
Edit the variable “$USER” to reflect the local username.
Step 2: Make BMO executable
Make the BMO setup script executable:
$ chmod +x setup_node0_#.#.#.sh
Step 3: Exceute the script
Execute the setup_node0_#.#.#.sh script as root.
$ sudo ./setup_node0_#.#.#.sh
This set up may take up to 30 minutes depending on the resources available on the host machine.
Infrastructure Setup Steps
Step 1: Access ThingsBoard DMS
Open the ThingsBoard DMS set up on Node 0. The URL is http://<IP_Address>:9090. For instance,
http://localhost:9090.Log in using the credentials defined in the application.property file of the ThingsBoard SDO plugin. The file is in: ~/ThingsBoardBMO/ocswfm/.
From the left pane, navigate to Dashboards.
Select ECS Node Build Type.
Step-2: Initialize Turtle-Creek Node
Create the DMS-TBTurtleCreek node and then the APS-CastleLake node using the infrastructure.
Using ESP and SDO, device initialization will be performed on the selected hardware via PXE boot. After completion of SDO device initialization (SDO DI), the device will shutdown and power OFF automatically.
To start, build DMS-TBTurtleCreek as the DMS node (this can be a VM or a physical node). Start with a minimum 4 core i5, 8GB RAM or more, and at least 100GB storage.
PXE Boot your designated node/VM for the DMS by connecting it to the same network segment as the BS-BMOThingsBoard Host Node.
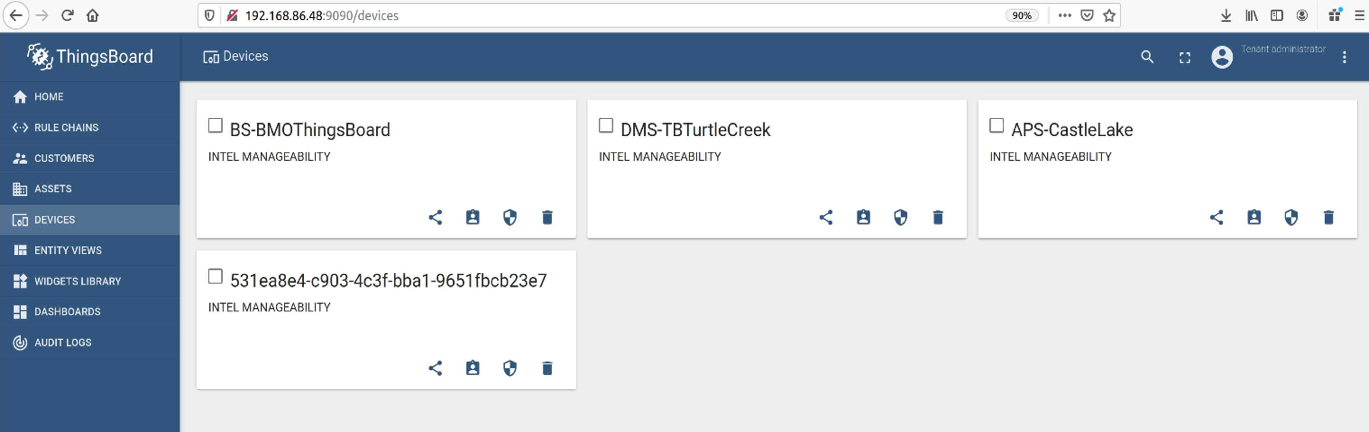
After the DMS-TBTurtleCreek node PXE Boots, performs device initialization and shuts down. A new entry will now be added to the DEVICES dashboard on the ThingsBoard portal as shown in the following figure.
From the left pane, navigate to DASHBOARDS. Then, click the ECS Node Build Type dashboard. From the ECS Node List, select the generated device and BS-BMOThingsBoard. After selection, click ECS Build Type. From the drop-down menu, select ubuntu-tb-tc and click Send. Now, the stack is ready to deploy the OS and the software stack required to create the “DMS-TBTurtleCreek” node. When the device turns ON, it will automatically, with zero touch, install Ubuntu-20.04-Desktop and add a new ThingsBoard, which is pre-configured to manage x86 devices running OS images enabled with Intel Manageability feature with SDO.

After you select the options and click Send, the SDO Owner Service is configured to provision this node/VM into an Ubuntu 20.04 node running the Service for ThingsBoard DMS enabled with TurtleCreek Dashboards and SDO Owner Services.
Step 3: Initialize CastleLake Manager
Repeat “Step 2 Initialize Turtle-Creek Node” to create APS-CastleLake. From the drop-down menu, select Ubuntu-casl-mgr. When the device powers ON, it will automatically, with zero touch, install Ubuntu-18.04-Server and enable Castle Manager.
Step 4: Initialize Worker Node
This section explains the process to prepare COTS hardware for deployment and orchestration.
Device initialization will be performed on the selected hardware via PXE boot. After completion of device initialization, the device will shutdown. A new entry will be added to the DEVICES dashboard. The device name will be the new UUID related to SDO.
From the ECS Node Build Type Dashboard, select the generated device/devices plus and the following:
BS-BMOThingsBoard: To choose the base OS image
DMS-TBTurtleCreek: For onboarding to TurtleCreek at stage 2 for SOFA/FOTA
APS-CastleLake: For onboarding to Castle Manager at stage 3 for orchestration
After selecting the options, click ECS BUILD TYPE. From the pop-up, select the desired image type.

Click Send and close the pop-up. Click the Result tab to check if the submission was successful. Selected devices will now be ready for multistage deployment.
Step 5: Deploy Woker Node
Make sure that the device is connected to the same network segment.
Power on the device.
The following processes will occur:
The device will boot from the EFI partition and will automatically provision with SDO.
After provisioning, the device will install the corresponding OS.
After the installation is complete, the node will reboot.
After reboot, SDO will run again and onboard on to node to the DMS-TBTurtleCreek.
After a few seconds, telemetry will start publishing to the DMS-TBTurtleCreek ThingsBoard (Telemetry update interval is ~5 minutes).
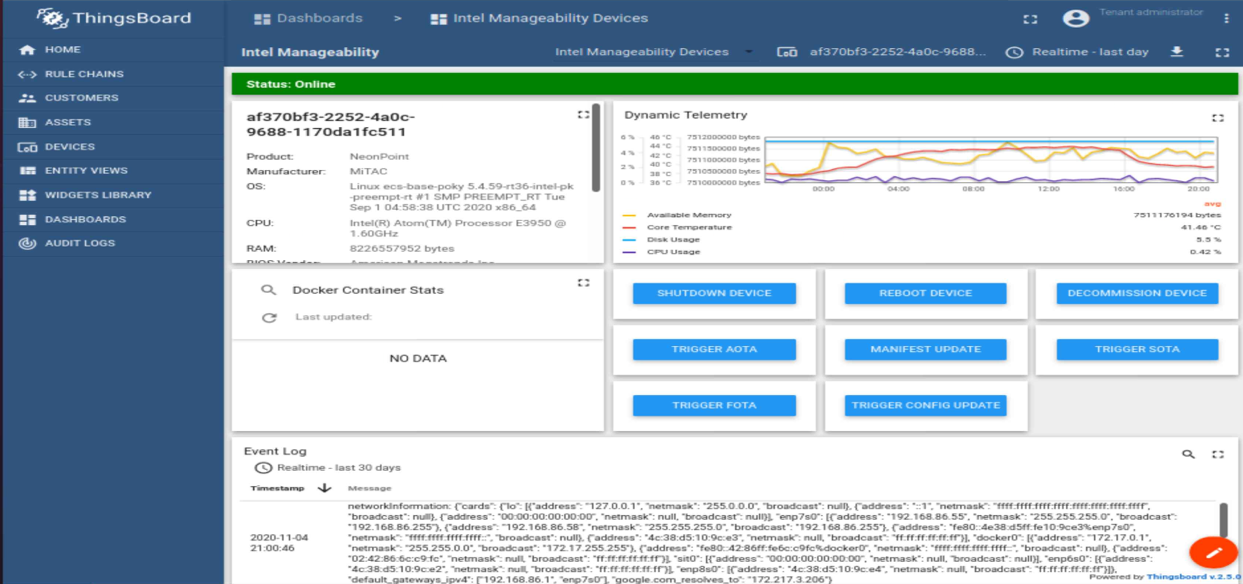
After onboarding on to the TurtleCreek ThingsBoard, onboarding on to CastleLake will be triggered by reusing SDO provisioning. The following figure shows multiple nodes onboarded on to CastleLake and some workloads running.
