acrn-sos
The following section is applicable to:

Important
Complete the pre-requisite section Setting up ECI Build before continuing further.
The ECI acrn-sos Yocto target image provides the ACRN Hypervisor, service OS (SOS), and software utilities to manage virtual machines.
Important
ACRN is only supported on specific target platforms! Please see section Validated Hardware Platforms for a list of platforms which support ACRN. To build ACRN for non-supported platforms, see section Compiling ACRN for different platforms.
Run the setup script:
$ ./setup.sh
The setup script will present a list of pre-configured use cases. Select
customto start configuring a custom build.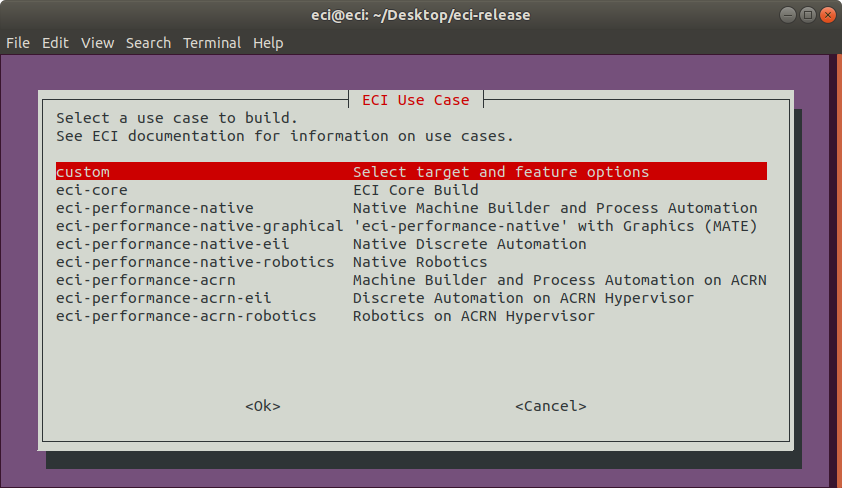
The setup script will present a list of available build targets. Select
acrn-sosfrom the list.
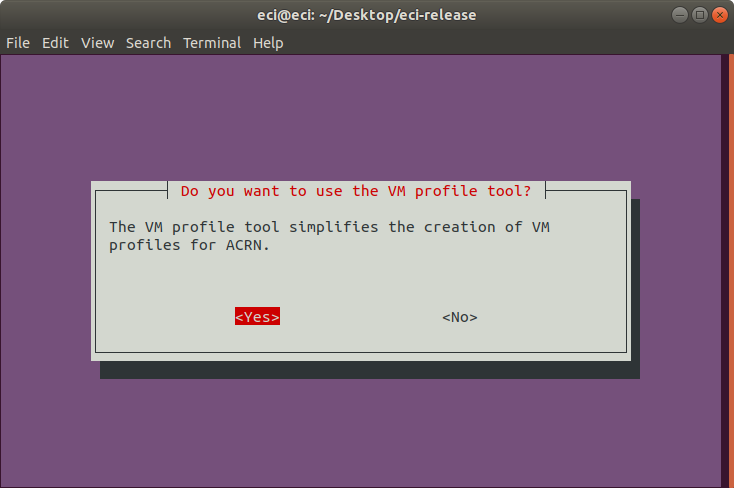
ECI includes a VM profile tool to simplify the setup and configuration of ACRN VMs. The VM profile tool is a menu-based interactive guide which generates a VM profile for use by automation scripts in
acrn-sosimage. It is recommended to use the VM profile tool to create a valid VM configuration for the desired target hardware platform.Note
The VM profile tool currently exposes the following configurations for ACRN VMs:
Image selection (ECI, Linux, Windows)
CPU affinity
Memory allocation
Real-time features
Graphics passthrough (GVT-D)
USB keyboard & mouse passthrough
On the following prompt, use the arrow keys to move the selection and press the enter key to finalize the selection.
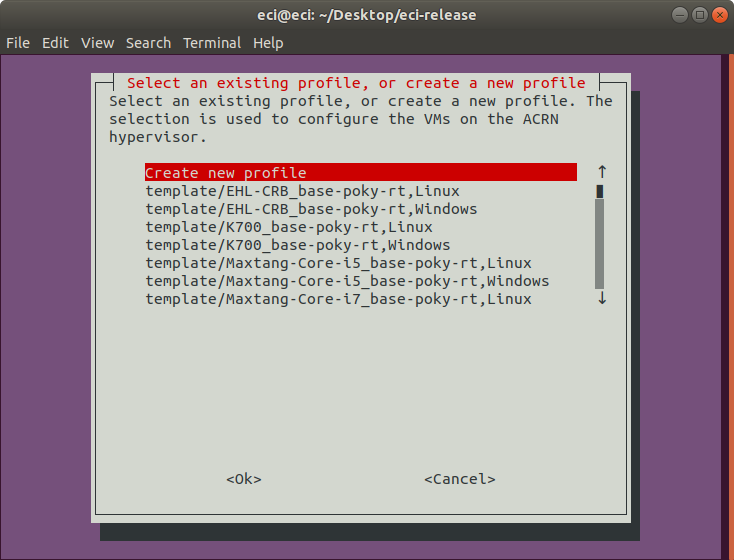
After choosing to use the VM profile tool, a new menu guide will appear. On the following prompt, select an existing profile or create a new one. Selecting an existing profile will load the respective configuration. Choosing to create a new profile will start the configuration guide. For the purpose of this tutorial, we selected to create a new profile. Use the arrow keys to move the selection and press the enter key to finalize the selection.
If an existing profile was selected, the following prompt will appear. Select the
Accept selectionoption to accept the selected profile, or selectChange selectionto return to the previous menu to make another profile selection.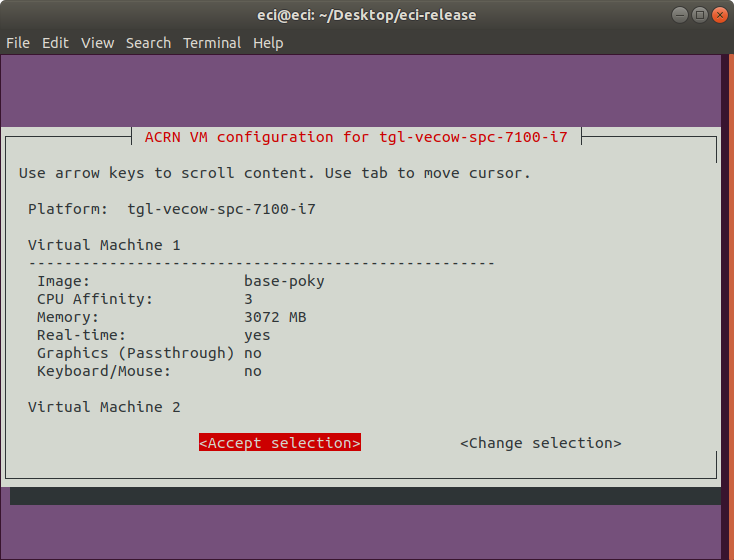
Note
If an existing profile was selected, the VM configuration steps can be skipped. Select this link to skip ahead to the remaining steps.
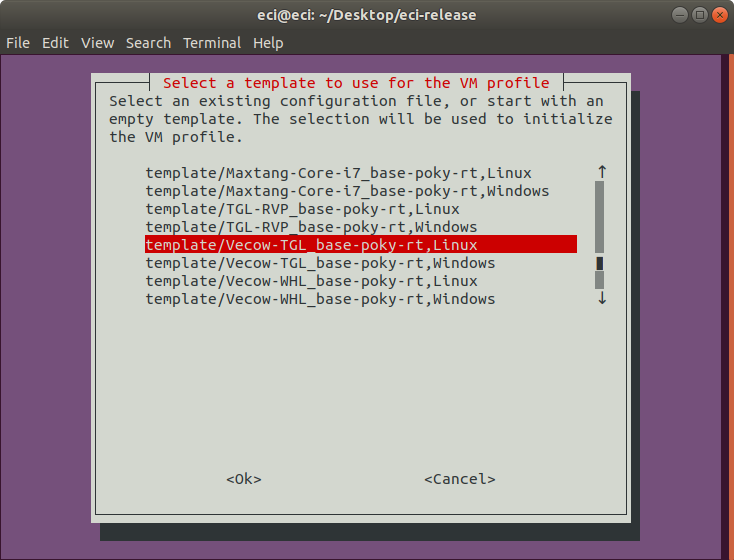
When creating a new VM profile, it is possible to start with an existing profile/template. Choosing an existing profile/template will load the respective configuration into the tool. Choosing
Default empty templatewill load a blank configuration into the tool. For the purpose of this tutorial, we selected an existing template.Important
The selected profile will determine which target hardware platform the
acrn-sostarget is compiled for. Only the target hardware platform for which theacrn-sostarget was compiled for will correctly work with the resulting target image.Note
When choosing an existing template, select a template designed for the specific target hardware platform desired. Due to differences in target hardware platform capabilities, it is not possible to modify the target hardware platform of an existing template. Only the VM configuration parameters of an existing template can be modified.
The following prompt will appear if the
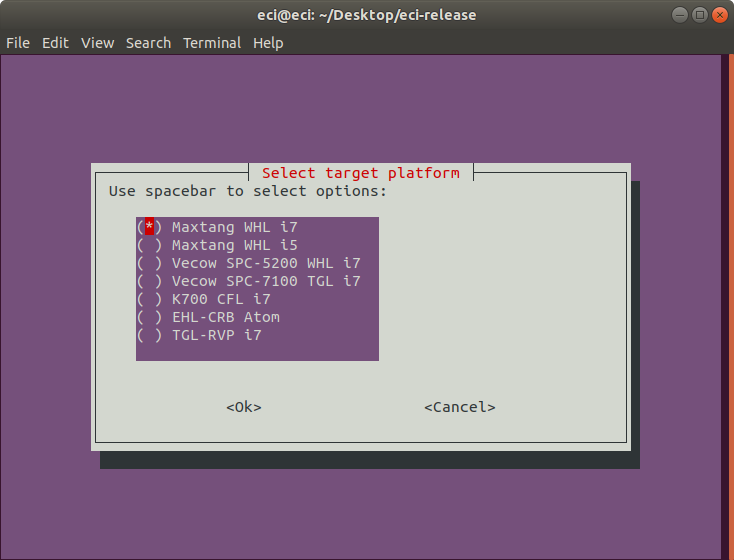
Default empty templateoption as selected. On this prompt, select a target hardware platform to host the ACRN hypervisor and the various VMs. Use the arrow keys to move the selection and spacebar to toggle the state. When complete, press the enter key to finalize the selection.
The following table describes the various options available:
Target Hardware Platform
Description
Maxtang WHL i7
Maxtang WHL i5
Vecow SPC-5200 WHL i7
Vecow SPC-7100 TGL i7
K700 CFL i7
EHL-CRB Atom
Elkhart Lake Customer Reference Board
TGL-RVP i7
Tiger Lake Reference Validation Platform
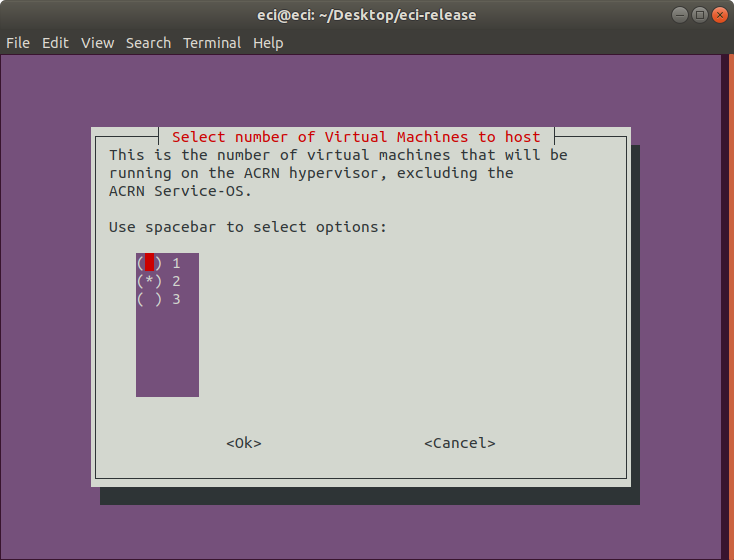
On the following prompt, select the number of virtual machines to host. This is the number of virtual machines that will be running on the ACRN hypervisor, excluding the ACRN Service-OS.
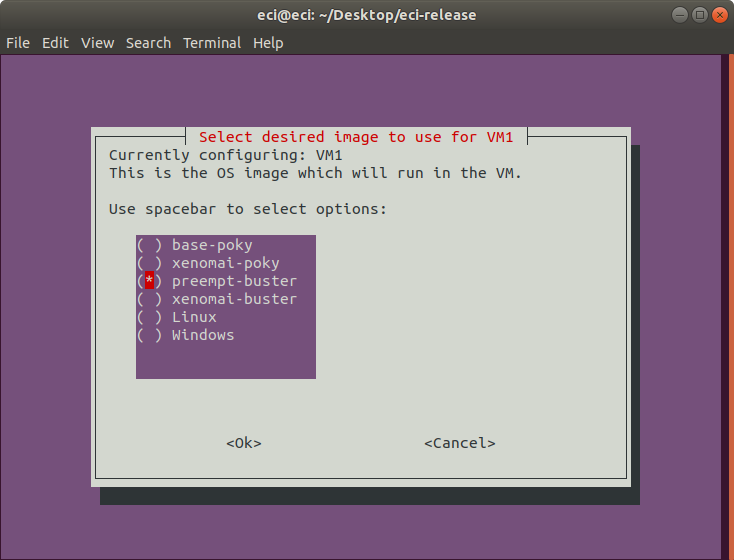
On the following prompt, select the desired image to use for the VM. The options include ECI images, Linux, and Windows.
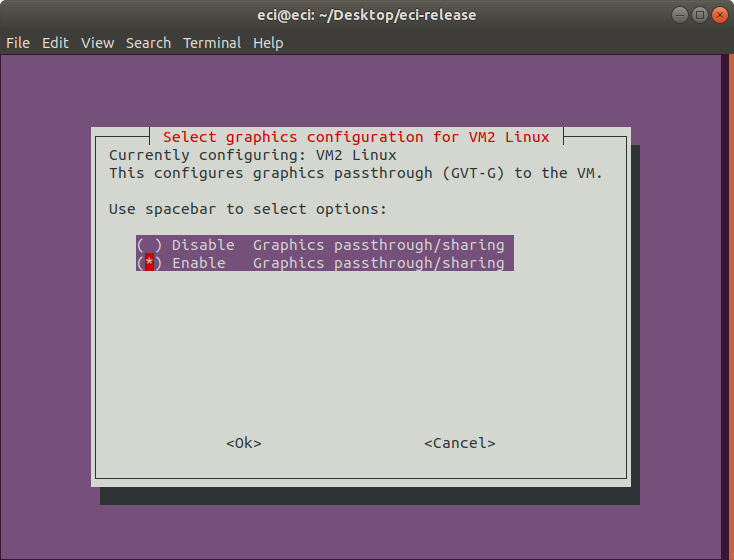
On the following prompt, select the graphics configuration for the VM. If enabled, this option configures graphics passthrough (GTV-D) to the VM.

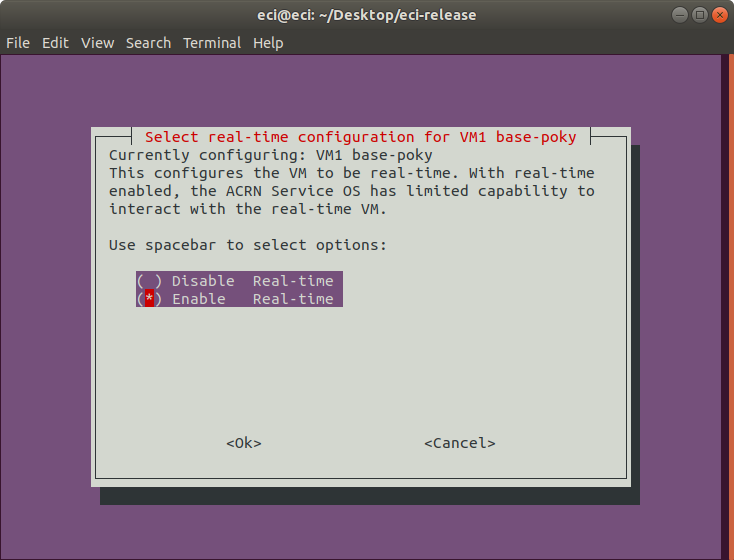
On the following prompt, select the real-time configuration for the VM. If enabled, this option configures the VM to be real-time. With real-time enabled, the ACRN Service-OS has limited capability to interact with the real-time VM.
Important
It is only possible to configure a single VM to be real-time. If another VM has already been configured as real-time, this prompt will not appear.
Note
Some images (ie: Windows, Linux) are not supported by this option, so this prompt will not appear when configuring VMs using such images.
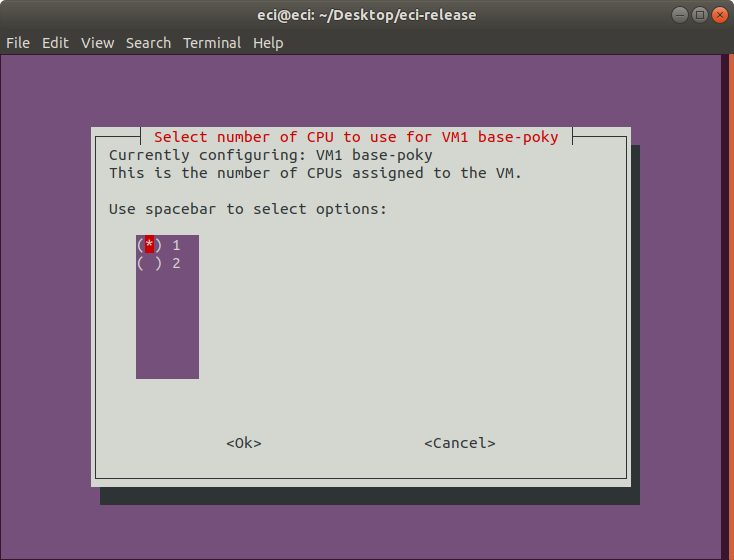
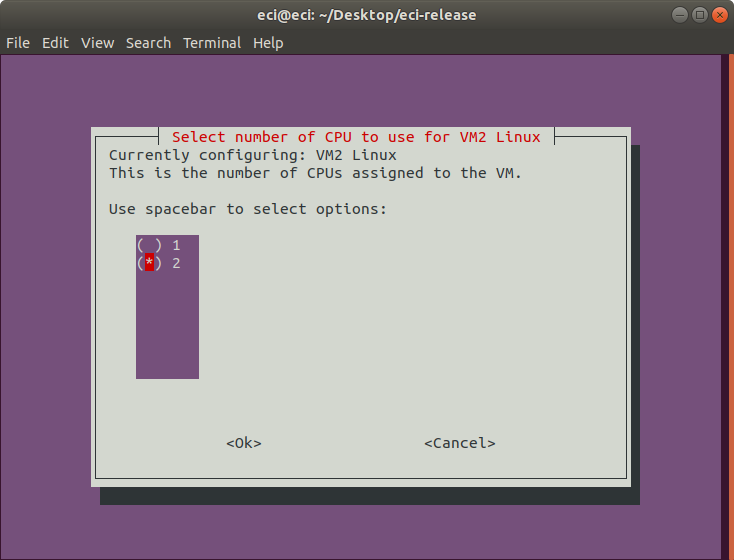
On the following prompt, select the number of CPUs to use for the VM. This selection controls the number of CPUs assigned to the VM.
Note
As CPUs are allocated to VMs, the number of available CPUs decreases. The VM profile tool accounts for this adjustment.
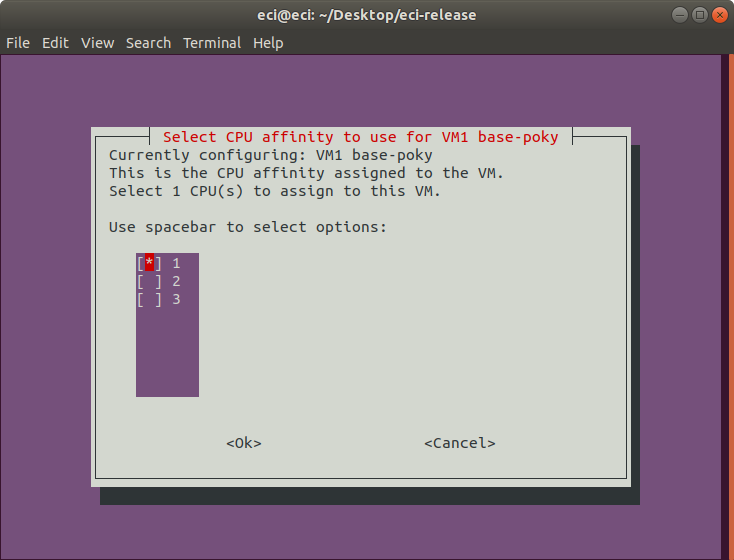
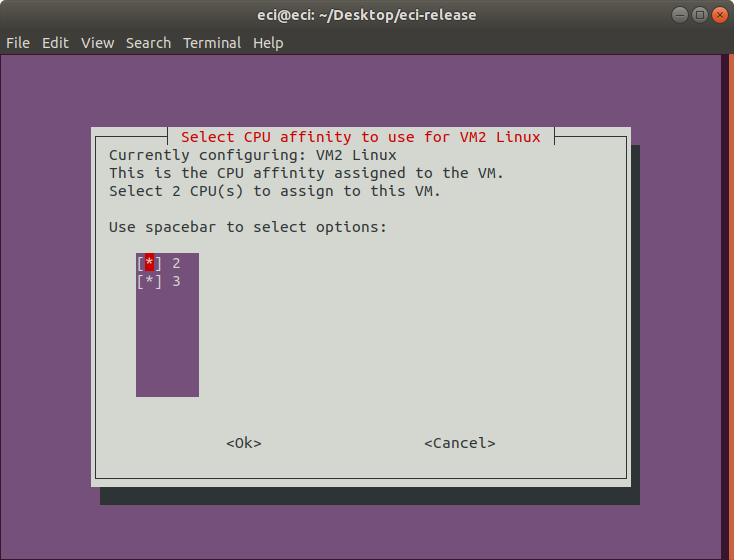
On the following prompt, select the CPU affinity to use for the VM. This selection controls the specific CPUs assigned to the VM.
Note
It is necessary to select the same quantity of CPUs configured in the previous step. Selecting fewer or more CPUs than the previous step will generate an error prompt and return to this menu.
Tip
For best real-time performance, it is generally advised to assign CPU affinity such that the assigned VM CPUs reside within the same physical core(s). This affords the VM exclusive access to lower level cache (L1, L2), and helps improve memory access latencies. Many processors use hyperthreading to increase the number of apparent CPUs and do so by presenting each core as two or more CPUs. As a result, CPUs are grouped in pairs based on the hyperthreading model in use. Typically, the CPU pairs which reside on the same physical core are: 0-1, 2-3, 4-5, etc. Following this logic, selecting CPUs 2 and 3 is better than selecting CPUs 1 and 2 for a real-time VM requiring two CPUs.
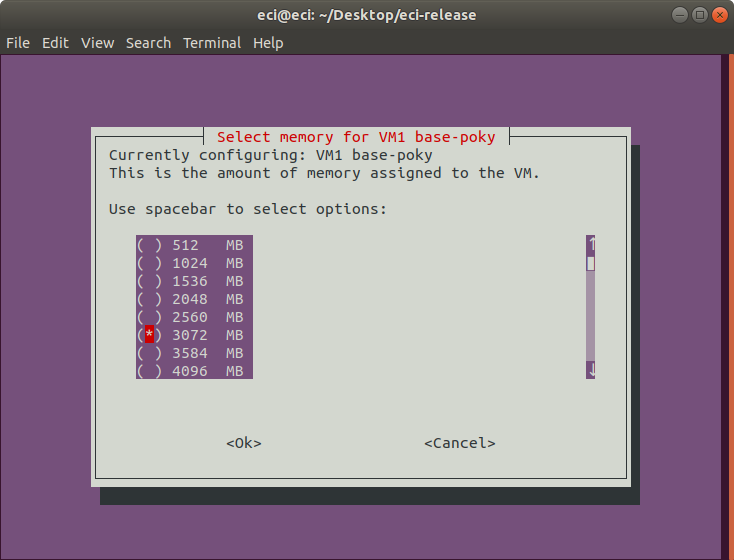
On the following prompt, select the memory to allocate for the VM. This selection controls the amount of memory the VM will have access to.
Note
As memory is allocated to VMs, the amount of available memory decreases. The VM profile tool accounts for this adjustment.
At this point in the VM profile tool, the first VM has been completely configured. If any VMs remain to be configured, the VM profile tool will present the same menu prompts as encountered in the previous steps. Rather than repeat the explanation of these menu prompts, this tutorial will simply show the images of the respective prompts:


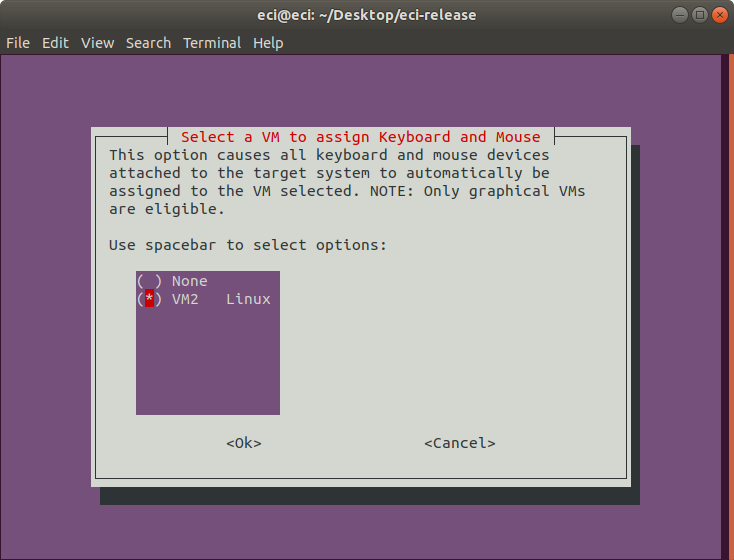
If a VM was configured with graphics enabled, the following prompt will occur. On this prompt it is possible to select which graphical VM to automatically assign keyboard and mouse to.
Important
This feature does not attempt to split available keyboards and mice to multiple VMs. Only a single graphical VM can be configured to automatically be assigned keyboard and mouse. As a result, all keyboards and mice attached to the target hardware platform at the time of launching the VM profile will be assigned to the selected VM.
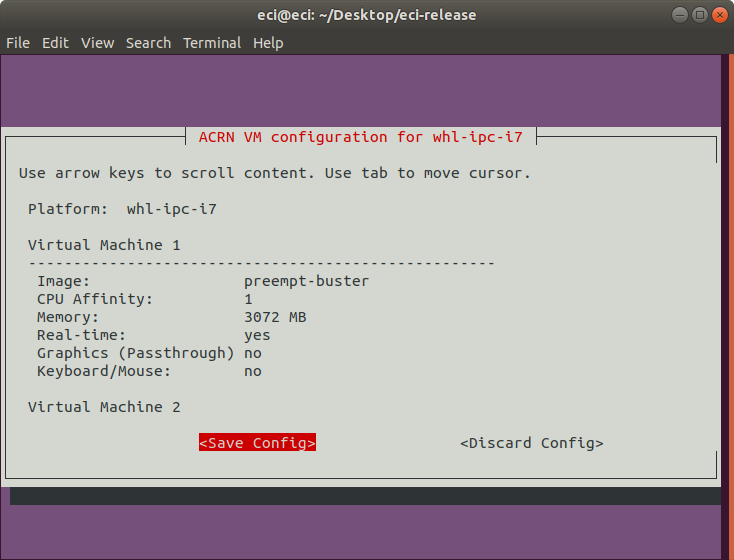
After completion of the VM configuration, a save prompt will appear. Examine the VM configuration presented for correctness. If the VM configuration is correct, select the
Save Configurationoption to continue.Important
This saved VM configuration must be selected during the Create Bootable USB steps to automatically embed VMs into the ACRN image.
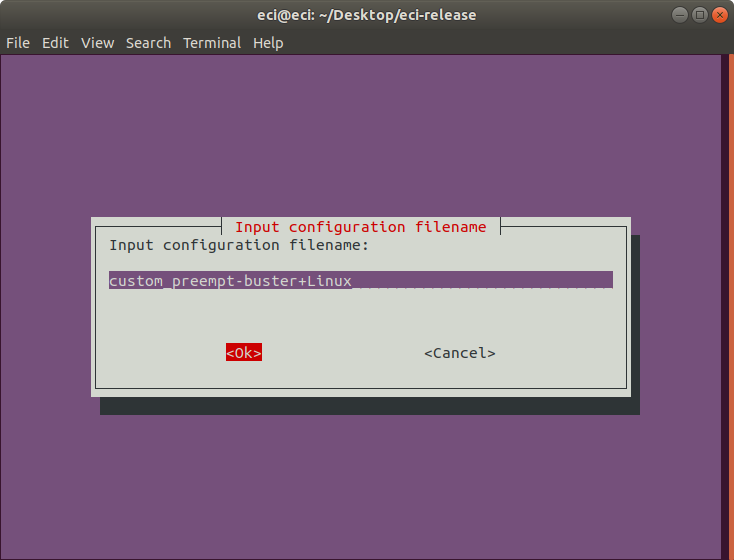
On the following prompt, enter a filename to save the VM configuration to.
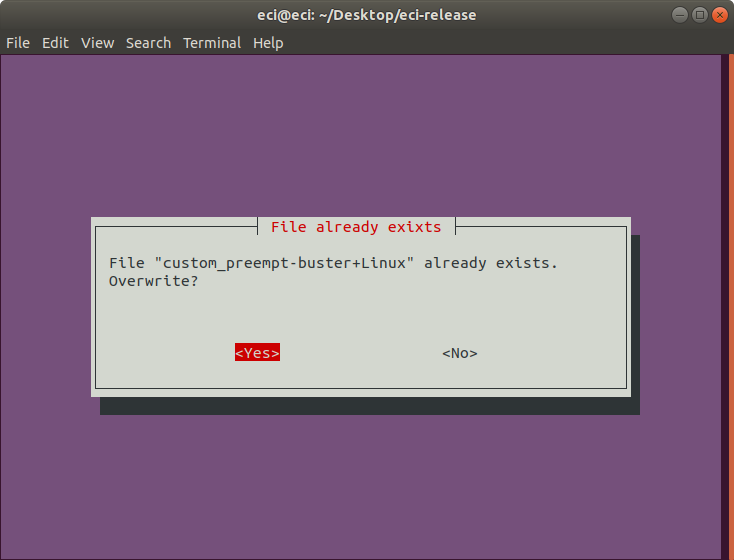
If the file already exists, a prompt will occur asking if the existing file should be overwritten:
If the VM profile tool is not used, a menu will appear with the available target hardware platforms. The ACRN hypervisor is compiled based on the selected target hardware platform. On the following prompt, select the target hardware platform to compile for using the arrow keys to move the selection and spacebar to toggle the state. When complete, press the enter key to finalize the selection.
The following table describes the various options available:
Target Hardware Platform
Description
Maxtang WHL i7
Maxtang WHL i5
Vecow SPC-5200 WHL i7
Vecow SPC-7100 TGL i7
K700 CFL i7
EHL-CRB Atom
Elkhart Lake Customer Reference Board
TGL-RVP i7
Tiger Lake Reference Validation Platform
On the following prompt, it is possible to modify the build configuration of the target image. Select/deselect features to be included in the image using the arrow keys to move the selection and spacebar to toggle the state. When complete, press the enter key to finalize the selection.
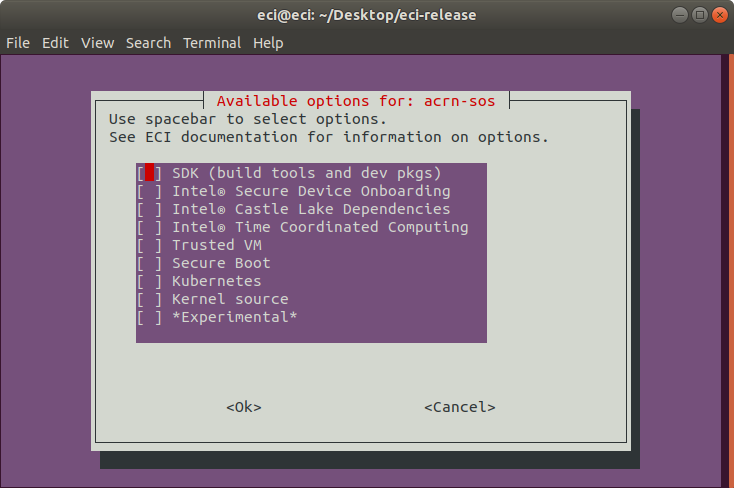
The following table describes the various options available:
Feature Option
Description
SDK (build tools and dev pkgs)
Adds GCC and Make to the target image.
Intel® Castle Lake Dependencies
Adds kernel modules and tools necessary to support an Intel® Castle Lake Client.
Intel® Time Coordinated Computing
Enables Intel® Time Coordinated Computing Tools (Intel® TCC Tools) features.
Attention
Intel TCC Tools features are only supported on 11th Gen Intel® Core™ and Intel Atom® x6000E Series processors.
Trusted VM
Embed a pre-launched VM to manage TPM access.
Secure Boot
Creates a signed bootloader and boot artifacts for use with Secure Boot.
Kubernetes
Adds binaries required to join a Kubernetes cluster.
Kernel source
Adds kernel source & header files to the target image.
*Experimental*
Enables experimental features.
The setup script will begin downloading and configuring the assets needed to build the target image. Depending on the feature options selected and state of the build environment, a few notifications may occur. Some of these notifications are described below.
If the setup script is not building the target for the first time, the script will prompt:
Build directory ecs-acrn-sos already exists. Do you want to clean the cached build? y/[n]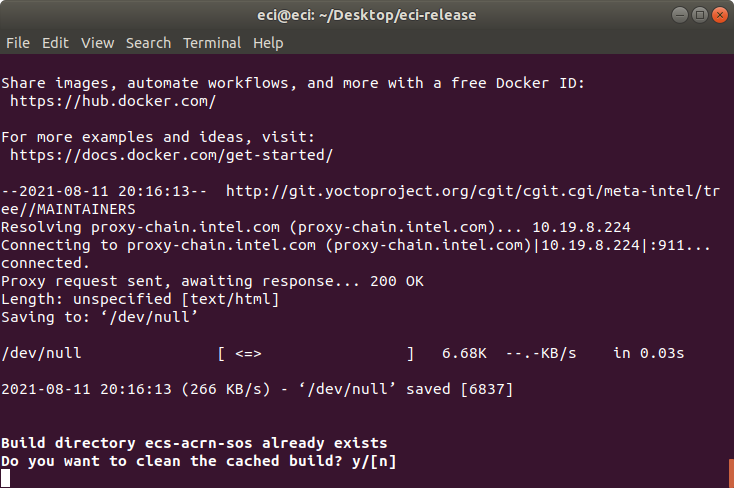
Press n to retain the target build cache, or press y to delete target build cache.
Note
It is advised to delete the target build cache if the target source was modified or the previous build was incomplete. Retaining the target build cache will reduce the build time, but may promote build errors if the target source was modified or the previous build was incomplete. If build errors occur, rerun the setup script and choose y at this prompt.
For all other notifications, refer to the section links below:
After setting up the build target, the script will prompt:
Do you want to run an automated build? y/[n].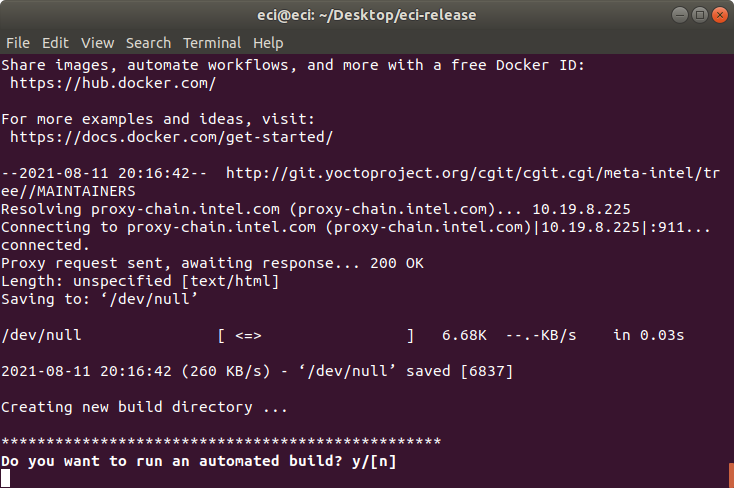
To perform an automated build, press y at the prompt.
To perform a manual build, press n at the prompt. The setup script will output a completion message with the steps necessary to perform a build manually.
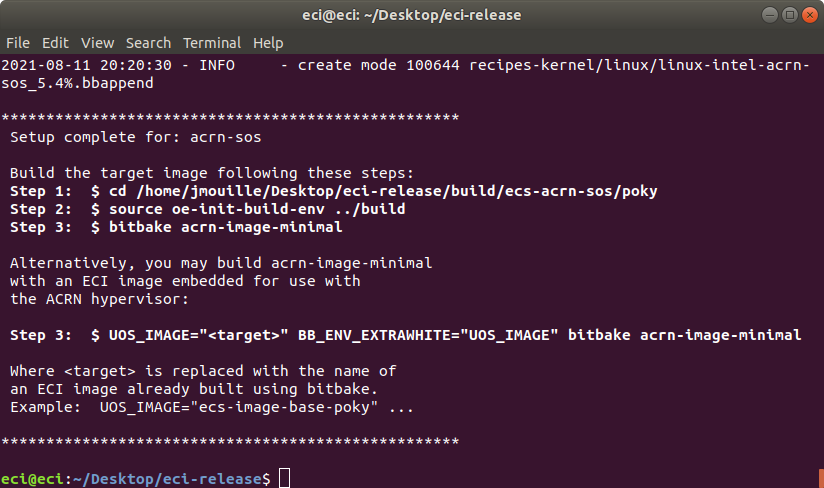
Notice that Step 3 output by the setup script has two forms:
Option A - Build an image with only the ACRN hypervisor:
$ bitbake acrn-image-minimal
Option B - Build an image with the ACRN hypervisor and embedded ECI image(s) for use as VMs:
$ UOS_TARGET="<target>" BB_ENV_EXTRAWHITE="UOS_TARGET" bitbake acrn-image-minimal
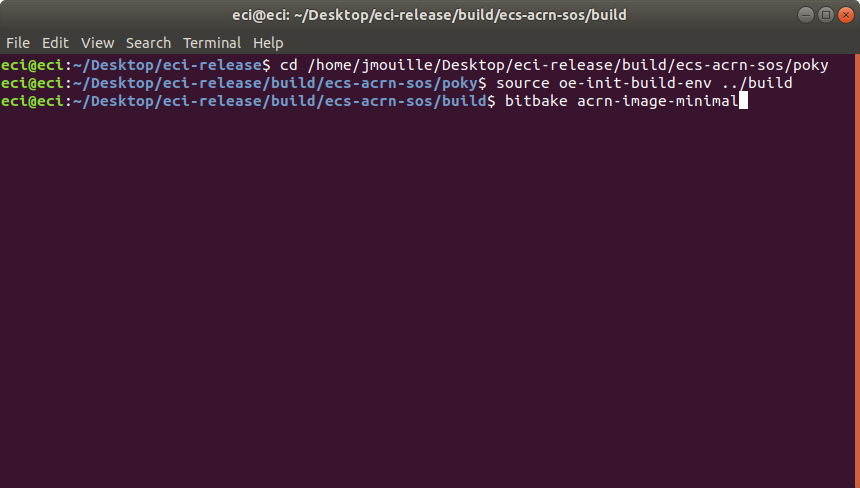
Building Option A - ACRN hypervisor only:
Perform the steps provided by the setup script. These steps will start the build process. For this example we performed:
$ cd /home/eci/Desktop/eci-release/build/ecs-acrn-sos/poky
$ source oe-init-build-env ../build
$ bitbake acrn-image-minimal
Building Option B - ACRN hypervisor with embedded ECI image VMs:
Perform the alternative steps provided by the setup script, replacing
targetwith one or more ECI target images of choice. These steps will start the build process.Important
When specifying an ECI target name for
UOS_TARGET, the ECI target image must already be built. Specifying an ECI target which is not yet built will cause the ACRN build to fail!Note
Embedded ECI targets are copied to the ACRN image at
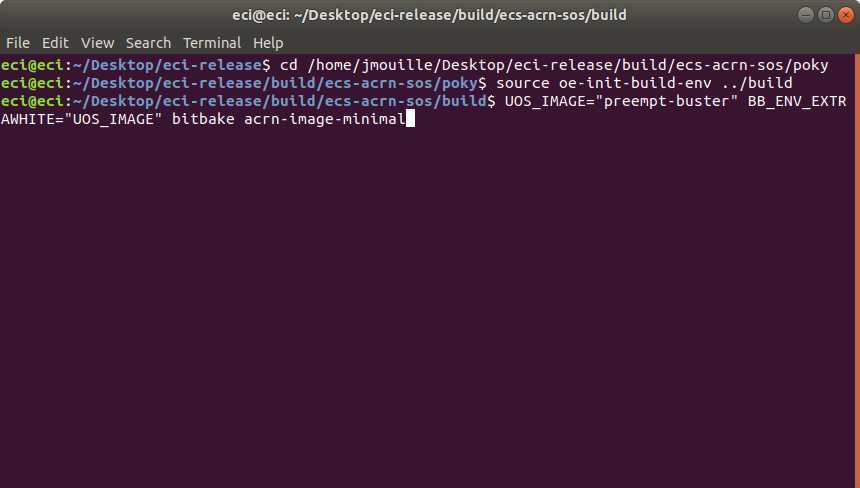
/var/lib/machines/images/vm#.wicin the order in which they are specified forUOS_TARGET. The embedded VM name will begin atvm0.wicand increment in count for each additional ECI target copied.Example 1: Embed ECI target
preempt-busterThis example will embed ECI target
preempt-busterasvm0.wicat/var/lib/machines/imagesin the ACRN image.$ cd /home/eci/Desktop/eci-release/build/ecs-acrn-sos/poky $ source oe-init-build-env ../build $ UOS_TARGET="preempt-buster" BB_ENV_EXTRAWHITE="UOS_TARGET" bitbake acrn-image-minimal
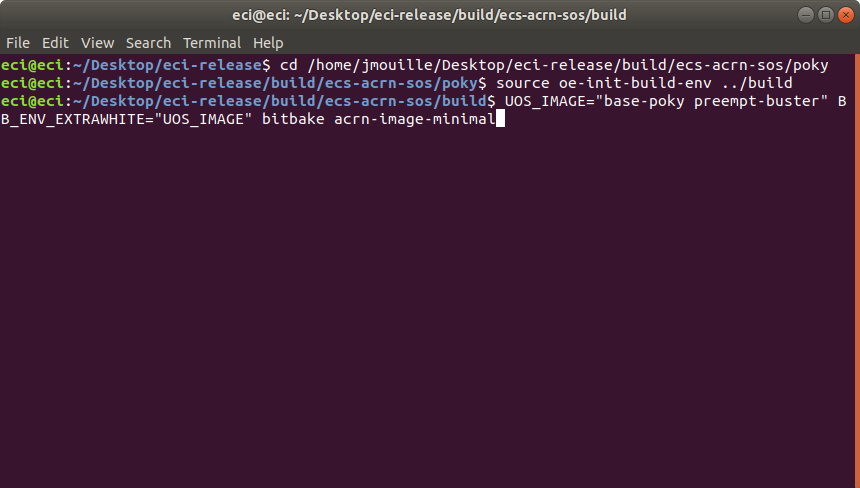
Example 2: Embed ECI targets
base-pokyandpreempt-busterThis example will embed ECI targets
base-pokyandpreempt-busterasvm0.wicandvm1.wicrespectively at/var/lib/machines/imagesin the the ACRN image.$ cd /home/eci/Desktop/eci-release/build/ecs-acrn-sos/poky $ source oe-init-build-env ../build $ UOS_TARGET="base-poky preempt-buster" BB_ENV_EXTRAWHITE="UOS_TARGET" bitbake acrn-image-minimal
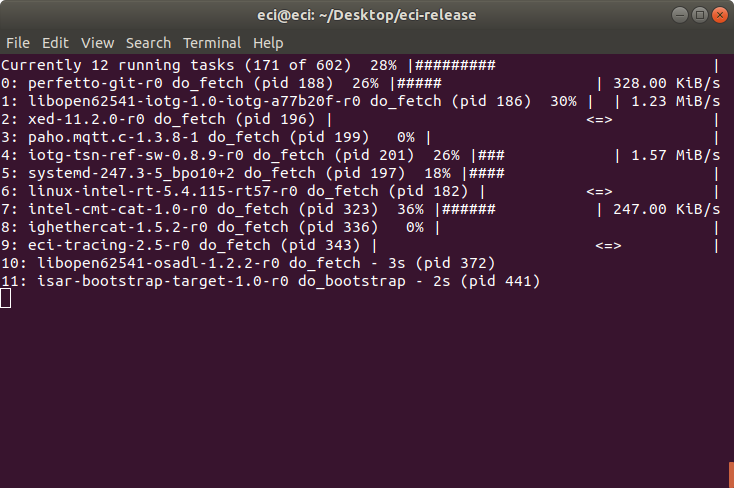
The build typically takes a very long time. A Linux build system with the recommended specs may take about 1-2 hours to complete. A Linux build system with the minimum specs may take 6+ hours to complete. See section Linux Build System for recommended specs.
Important
The VM profile tool will automatically attempt to embed ECI images used in the selected VM profile. If using the VM profile tool, ensure the ECI images used in the VM profile are built by following section Building ECI Targets before continuing.
After the build completes, see section Installing ECI-A to create a bootable USB flash drive to install the ECI-A image.