Real Time Data Agent
The Real Time Data Agent provides an unified and real-time way to write/read data to/from shared memory, and also a demo program to parse/pack/send data to container stack for storage and visualization. It includes below three major parts.
Block based lockless shared memory ring buffer library
Python3 example program
Example time series database container stack
It supports both Xenomai kernel, Preempt RT kernel.
Main structure and data flow
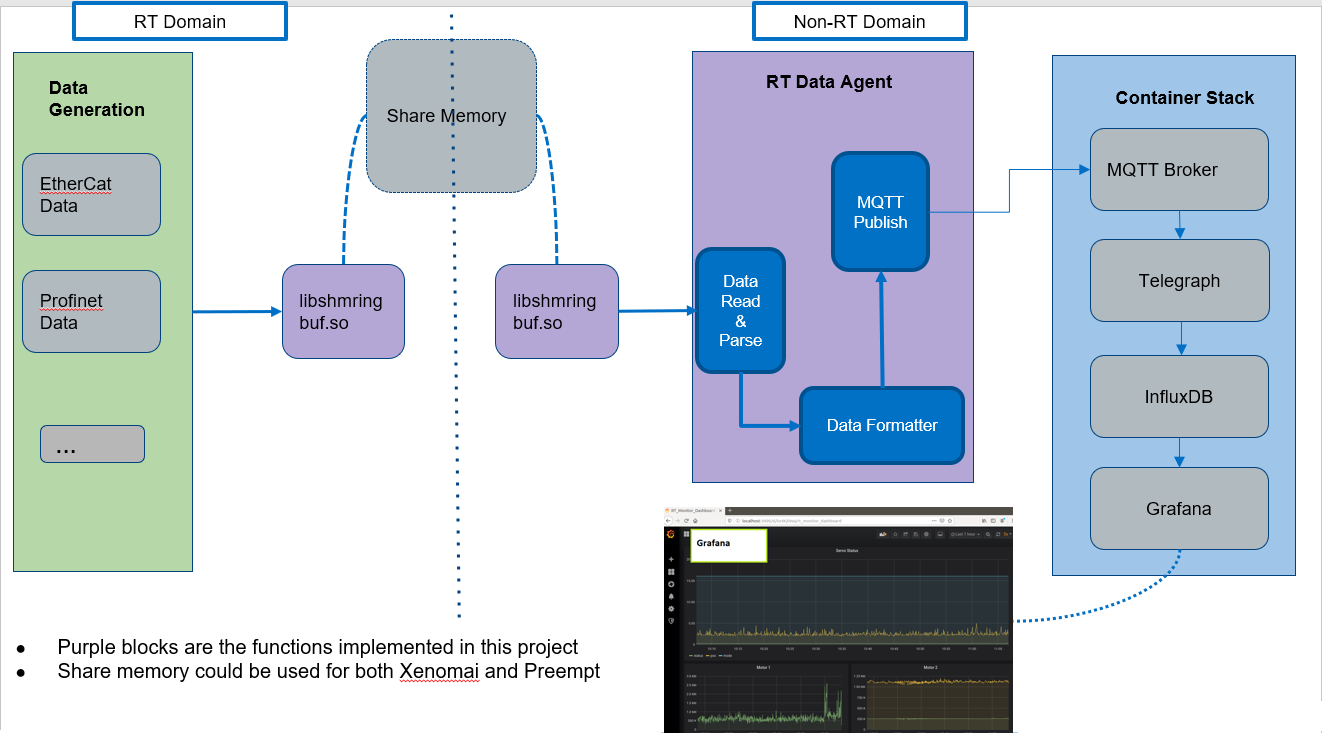
Shared memory ring buffer library
This library implements an unified and real-time APIs to write/read data to/from shared memory without lock required.
Design principle
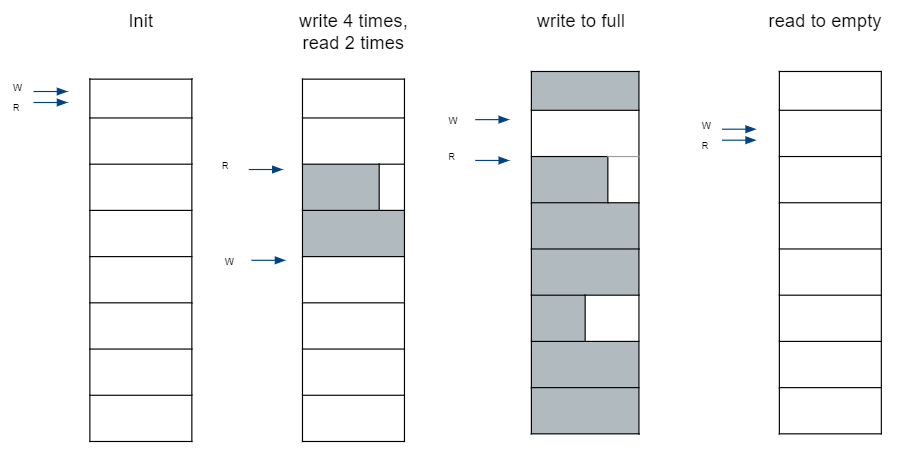
Block based ring buffer, fixed max block size on initialization
Block number could be set on initialization
No lock required, one producer (write), one consumer (read) for one named ring buffer
Buffer empty: write index == read index
Buffer full: write index + 1 == read index
Each read/write never across block boundary
Example 8 blocks ring buffer states:
How to use
The following section is applicable to:

For ECI installed image, the library is in the path /usr/lib/libshmringbuf.so, the header file is in the path /usr/include/shmringbuf.h.
Generic usage
Call
shm_blkbuf_initto initialize a named ring buffer with provided max block size and block number, return a handle.Use that handle or call
shm_blkbuf_openwith the name to get the handle.Use
shm_blkbuf_writeto write data to the ring buffer, only one writer accepted for one opened ring buffer handle.Use
shm_blkbuf_readto read data from the ring buffer, only one reader accepted for one opened ring buffer handle.shm_blkbuf_emptyandshm_blkbuf_fullcould be used to check the status of the ring buffer.
Example sample code
int main(int argc, char **argv)
{
    int i, len;
    uint8_t data[1200];
    shm_handle_t handle;

    handle = shm_blkbuf_init("shm_test", 10, 1024);

    for (i=0; i<5; i++)
    {
        len = shm_blkbuf_write(handle, data, 800);
        printf("len written %d\n", len);
    }

    shm_dump(handle);

    for (i=0; i<6; i++)
    {
        len = shm_blkbuf_read(handle, data, 1100);
        printf("len read %d\n", len);
    }

    shm_dump(handle);

    for (i=0; i<12; i++)
    {
        len = shm_blkbuf_write(handle, data, 600);
        printf("len written %d\n", len);
    }

    shm_dump(handle);

    for (i=0; i<7; i++)
    {
        len = shm_blkbuf_read(handle, data, 350);
        printf("len read %d\n", len);
    }

    shm_dump(handle);
    shm_blkbuf_close(handle);
}
Demo agent program to process the real-time data
The following section is applicable to:
In the installed ECI image, the example demo program is in the path /opt/rt-data-agent/agent/.
The program entry is the agent.py.
python3 agent.py --host <mqtt broker ip> --port <mqtt port> --qos <mqtt qos> --lib < shared memory library path>
<mqtt broker ip>, defaultlocalhost<mqtt port>, default 1883<mqtt qos>, default 1<shared memory library path>, default/usr/lib/libshmringbuf.so.0
In default, it starts three tasks as below:
ShmTask, wraps thelibshmringbuf.soin python3 by ctypes, continuously reads data from the shared memory (usually data written by another real time thread), then puts to a predefined data queue.DataFmtTask, reads data from the data queue, parse it (based on providedconfig.json) and re-pack it to mqtt format then puts to predefined mqtt queue.MqttPubTask, reads data from mqtt queue, then publish it to mqtt broker.
Example time series database container stack
The following section is applicable to:
In the installed ECI image, there is a example time series database container stack in the path /opt/rt-data-agent/stack.
It includes below four major container images:
mqtt broker, there is one default mqtt broker running in the ECI image,http://localhost:1883. If the stack is not running in ECI image, you can start the mqtt broker by the/opt/rt-data-agent/stack/mqtt-broker.yml.telegraf, configuration is in the/opt/rt-data-agent/stack/telegraf/. It sets input plugin as the mqtt broker and output plugin as the InfluxDB database.influxdb, the InfluxDB database, recording the time series data.grafana, visualize the time series data from the InfluxDB database, example configuration/dashboard is in the path/opt/rt-data-agent/stack/grafana.
Run the simulation example
The following section is applicable to:
In the ECI image, there is one simulation tool (/opt/rt-data-agent/sim/sim_rt_send) to send data (format as described in config.json) to shared memory block ring buffer (name shm_test).
In real case, replace the sim tool with the actual data generator, such as reading data by ethercat then sending data to shared memory with the Shared memory ring buffer library.
The agent then could be started to read the data from shm_test shared memory block ring buffer, and parse/pack/send the mqtt format data to mqtt broker.
The container stack starts to receive the data from mqtt broker, save to InfluxDB database, and could be visualized by grafana.
Here are the steps:
Step 1, in one terminal, starts the sim tool to send data in 10ms interval.
$ cd /opt/rt-data-agent/sim
$ sudo ./sim_rt_send -i 10
Step 2, in the third terminal, starts the container stack.
$ cd /opt/rt-data-agent/stack
$ docker-compose up
Step 3, in another terminal, starts the agent.
$ cd /opt/rt-data-agent/agent
$ sudo python3 agent.py
Step 4, if everything works fine, visualize the data in
http://localhost:3000.