Performance Sanity Check Testing
The following section is applicable to:

The sanity checks in this section include:
Sanity Check 0 - Cyclictest Workload
- Script
rt_bmark.py- Information
The benchmark will use the following input configuration:
One thread per core
Use clock_nanosleep instead of posix interval timers
Set number of threads to the number of CPUs and same priority of all threads
Priority = 99
Timer interval on core 0: 100[us]
Interval increment for each core: 20[us]
Number of loops (on core 0): 30000
- Step 0
- Step 1
Run the workload with the following command in target shell (locally or remotely over SSH or UART console):
$ /opt/benchmarking/rt-tests/rt_bmark.py- Script
start-cyclic.py- Information
The benchmark will use the following input configuration:
Core affinity = 3
Priority = 95 (
chrt -f 95)Total loops = 100000
Thread distance = 1
Interval = 1000.
SSH session (not using integrated GPU)
- Step 0
- Step 1
Run the workload with the following command in target shell (locally or remotely over SSH or UART console):
$ /opt/benchmarking/rt-tests/start-cyclic.py
Sanity Check 1 - LMbench Workload
- Information
The benchmark will use the following input configuration:
Core affinity ($CORE_AFFINITY) = 1
Memory total ($MEMRD_SIZE) = 192M
Stride size ($MEMRD_CHUNCKS) = 512
SSH session (not using integrated GPU)
- Step 1
Run the workload with the following command in target shell (locally or remotely over SSH or UART console):
$ cd ~/;taskset -c $CORE_AFFINITY /usr/bin/lat_mem_rd -P 1 $MEMRD_SIZE $MEMRD_CHUNCKS &> /tmp/result_lat_mem_rd.txt
Sanity Check 2 - Jitter Workload
- Information
The benchmark will use the following input configuration:
Core affinity = 3
Priority = 95
chrt -f 95Noisy Neighbor
stress-ngaffinity = 0CAT used to assign
0x0fto COS0CAT used to assign
0xf0to COS1Logging output to
jitter_with_cat.logRunning for 7200 samples
SSH session (not using integrated GPU)
- Step 0
- Step 1
Run the workload with Cache Allocation Technology using the following command in target shell (locally or remotely over SSH or UART console):
$ /opt/pqos/pqos-helper.py --cos0 0x0f --cos1 0xf0 --assign_cos "0=0 0=1 0=2 1=3" --pqos_rst --pqos_msr --command "/opt/benchmarking/jitter/start-benchmark.py --jitter_args '-c 3 -l jitter_with_cat.log -s 7200'"
The test results will be saved as
jitter_with_cat.log.- Step 2
Run the workload without Cache Allocation Technology using the following command in target shell (locally or remotely over SSH or UART console):
$ /opt/benchmarking/jitter/start-benchmark.py --jitter_args '-c 3 -l jitter_without_cat.log -s 7200'
The test results will be saved as
jitter_without_cat.log.- Step 3
Compare the results of the run with and without ref:Cache Allocation Technology <intel-pqos>. The run with Cache Allocation Technology should measure less jitter.
Sanity Check 3 - Caterpillar Workload
- Information
The benchmark will use the following input configuration:
Core affinity = 3
Priority = 95
chrt -f 95Noisy Neighbor
stress-ngaffinity = 0CAT used to assign
0x0fto COS0CAT used to assign
0xf0to COS1Logging output to
caterpillar_withcat.logRunning for 7200 samples (about 3 hours)
SSH session (not using integrated GPU)
- Step 0
- Step 1
Run the workload with Cache Allocation Technology using the following command in target shell (locally or remotely over SSH or UART console):
$ /opt/pqos/pqos-helper.py --cos0 0x0f --cos1 0xf0 --assign_cos "0=0 0=1 0=2 1=3" --pqos_rst --pqos_msr --command "/opt/benchmarking/caterpillar/start-benchmark.py --caterpillar_args '-c 3 -l caterpillar_with_cat.log -s 7200'"
The test results will be saved as
caterpillar_with_cat.log.- Step 2
Run the workload without Cache Allocation Technology using the following command in target shell (locally or remotely over SSH or UART console):
$ /opt/benchmarking/caterpillar/start-benchmark.py --caterpillar_args '-c 3 -l caterpillar_without_cat.log -s 7200'
The test results will be saved as
caterpillar_without_cat.log.- Step 3
Compare the results of the run with and without ref:Cache Allocation Technology <intel-pqos>. The run with Cache Allocation Technology should measure less jitter.
Sanity Check 4 - Latency Workload
- Information
The benchmark will use the following input configuration:
Core affinity = 1
Noisy Neighbor
stress-ngaffinity = 2Test time = 10800 seconds
SSH session (not using integrated GPU)
- Step 0
- Step 1
Run the workload with the following command in target shell (locally or remotely over SSH or UART console):
$ cd /opt/benchmarking/rhealstone && python run_xlatency.py -T 10800 --stress
//exclude the gfx stress for image without glxgears
$ python run_xlatency.py -T 10800 --stress --no-gfx
The test results will be saved as
latency_test_results.txt.
Sanity Check 5 - MSI Latency
- Information
The benchmark will use the following input configuration:
coreSpecIRQ= 1coreSpecWQ= 1irqSpec= 1irqPeriod= 10irqCount= 2000000verbosity= 1offsetStart= 0blockIRQ= 0
- Step 0
- Step 1
Run the workload with the following command in target shell (locally or remotely over SSH or UART console):
$ cd /opt/benchmarking/msi-latency
$ ./msiLatencyTest.sh 1 10 2000000
$ cat /sys/kernel/debug/msi_latency_test/current_value   # Get current result
Sanity Check 6 - MSI Jitter
- Information
The benchmark will use the following input configuration:
core affinity = 1
runtime = 21600(s)
interval = 100(ms)
unbind_igb_id (checked by
lspci)
- Step 0
- Step #1
Run the workload with the following command in target shell (locally or remotely over SSH or UART console):
$ cd /opt/benchmarking/msi-jitter
$ ./irq_rcu.sh
$ ./run_msijitter.sh <unbind_igb_id> 1 100 21600
//get current test result
$ cat /sys/kernel/debug/msi_jitter_test/current_value
Sanity Check 7 - Rhealstone Workload
- Information
The benchmark will use the following input configuration:
Core affinity = 1
Total loops = 100
Noisy Neighbor
stress-ngaffinity = 2SSH session (not using integrated GPU)
- Step 0
- Step 1
Run the workload with the following command in target shell (locally or remotely over SSH or UART console):
$ cd /opt/benchmarking/rhealstone && ./run_rhealstone_bmark_stress.py 100
The test result will be saved as a file named
rhealstone_test_result.txt.
Sanity Check 8 - MMIO Latency Workload
- Step 0
Setup the workload with the following input configuration:
Configure non-RT related tasks to core 0.
$ ./opt/benchmarking/mmio-latency/configRTcores.shFind the physical MMIO address using either of the following options:
Option 1:
//Find the physical mmio address to test by `lspci -vvv -s $BDF`.
eg: $ lspci -nn ==> 00:02.0 SATA controller; $ lspci -vvv -s 00:02.0 ==> Region 0: Memory at 80002000.
Option 2:
$ lspci -k
$ cat /proc/bus/pci/devices | grep <name> | awk '{print $4}'
- Step 1
Run the workload with the following command in target shell (locally or remotely over SSH or UART console):
$ ./opt/benchmarking/mmio-latency/mmioLatency.sh <mmio-address>
Sanity Check 9 - CODESYS PlcLogic Workload
- Information
The benchmark will use the following input configuration:
- Step 1
Run the workload with the following command in target shell (locally or remotely over SSH or UART console):
$ systemctl restart codesyscontrol.service
$ /opt/benchmarking/codesys/start_codesys_native.sh
You can consider that the sanity check has passed, if
stdoutresults are similar to the data provided in the following links:
Sanity Check 10 - OpenGL glxgears Workload
Step 0
Make sure that mesa has been installed in the target set up with the Graphical Windowing System option.
- Step 1
Run the workload with the following command in target shell (locally or remotely over SSH or UART console):
$ cd /opt/benchmarking/rhealstone && python3 run_opengl_glxglears.py -T 60 --cyclictest
Test result will be saved as a file named
OpenGL_glxgears_result.txt. You can consider that the sanity check has passed, if the test results are similar to the following:==========modify date:Mon Jul 6 10:18:22 2020==========#============================================================================== # Test case (1/1): Test.glxgears.OpenGL.cyclictest #.............................................................................. #Starting stress(cyclictest) # Command: 'taskset -c 1 /opt/benchmarking/rt-tests/cyclictest -p 99 -i 250 -m -N' #Starting test # Command: taskset -c 0 glxgears -geometry 600x800 #Hung task detection not supported # (File /proc/sys/kernel/hung_task_timeout_secs not found) #10:18:22: Start of execution #10:19:22: 1/ 1: min: 59.997 #10:19:22: Test completed. Actual execution time:0:01:00 #Terminated stress #Min FPS: 59.997 #PASS Test.OpenGL.cyclictest[FPS]: 59.997 PASS:Test.OpenGL.cyclictest
==========modify date:Mon Jul  6 10:19:33 2020==========#==============================================================================
#  Test case (1/1): Test.glxgears.OpenGL.latency
#..............................................................................
#Starting stress(latency)
#  Command: 'taskset -c 1 /usr/bin/latency -c 1 -p 250'
#Starting test
#  Command: taskset -c 0 glxgears -geometry 600x800
#Hung task detection not supported
#  (File /proc/sys/kernel/hung_task_timeout_secs not found)
#10:19:33: Start of execution
#10:20:33:  1/ 1: min: 59.998
#10:20:33: Test completed. Actual execution time:0:01:00
#Terminated stress
#Min FPS: 59.998
#PASS

Test.OpenGL.latency[FPS]:
59.998
PASS:Test.OpenGL.latency
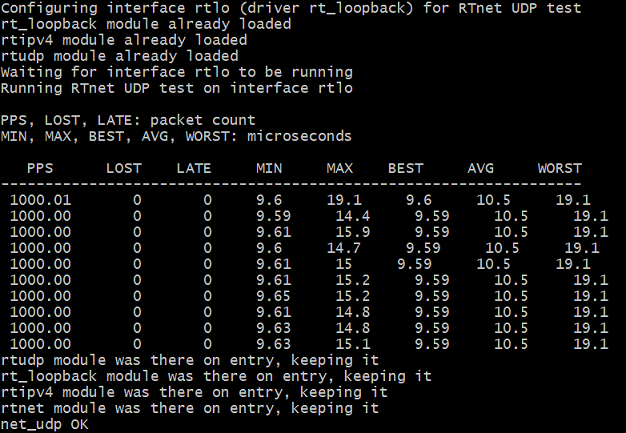
Sanity Check 11 - Smokey
- Step 0
Setup the workload with the following input configuration:
Setup
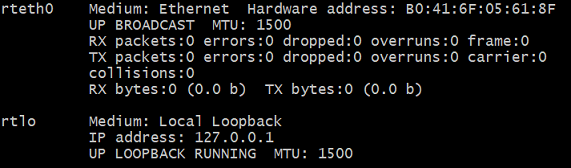
rtnet://find RT_DRIVER $ lspci -v | grep ' Ethernet controller: Intel Corporation I210 Gigabit Network Connection ' -A 15
e.g.

01:00.0 Ethernet controller: Intel Corporation I210 Gigabit Network Connection (rev 03)
        Subsystem: Intel Corporation I210 Gigabit Network Connection
        Flags: bus master, fast devsel, latency 0, IRQ 18
        Memory at a1100000 (32-bit, non-prefetchable) [size=128K]
        I/O ports at 3000 [size=32]
        Memory at a1120000 (32-bit, non-prefetchable) [size=16K]
        Capabilities: [40] Power Management version 3
        Capabilities: [50] MSI: Enable- Count=1/1 Maskable+ 64bit+
        Capabilities: [70] MSI-X: Enable+ Count=5 Masked-
        Capabilities: [a0] Express Endpoint, MSI 00
        Capabilities: [100] Advanced Error Reporting
        Capabilities: [140] Device Serial Number 00-07-32-ff-ff-6f-ee-90
        Capabilities: [1a0] Transaction Processing Hints
        Kernel driver in use: rt_igb
        Kernel modules: igb, rt_igb
$ sudo vim /etc/rtnet.conf
//
$ RT_DRIVER="rt_igb"
// Change to the device address you found,here is my example address
$ REBIND_RT_NICS="0000:01:00.0"
Start
rtnet:$ sudo /usr/sbin/rtnet master $ sudo /usr/sbin/rtifconfig rteth0 up $ sudo /usr/sbin/rtifconfig
Query cmd:
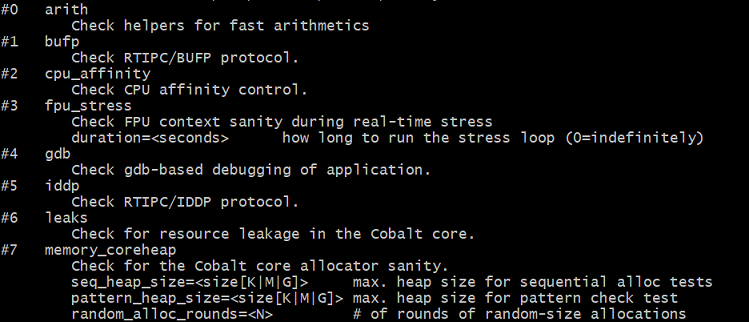
$ sudo /usr/lib/xenomai/testsuite/smokey --list
- Step 1
Run the workload with the following command in target shell (locally or remotely over SSH or UART console):
//Default
$ sudo /usr/lib/xenomai/testsuite/smokey --run=12 --verbose=2
//Optional
$ sudo /usr/lib/xenomai/testsuite/smokey --run=12 --verbose=2 rtnet_driver=rt_loopback rtnet

.. list-table::
  :widths: 500 500
  :header-rows: 1

  * - parameters
    - description
  * - --run
    - run [portion of] the test list, 12 = ``net_udp``
  * - --verbose
    - set verbosity to desired level, default = 1
  * - ``rtnet_driver``
    - choose network driver, default = ``rt_loopback``
  * - ``rtnet_interface``
    - choose network interface, default = ``rteth0``
  * - ``rtnet_rate``
    - choose packet rate . default=1000, it means send/receive UDP datagram per 1000000000/1000 ns = 1ms
  * - ``rtnet_duration``
    - choose test duration. default=10, it means test lasts 10 seconds
You can consider that the sanity check has passed, if stdout results are as shown in the following figure, that is, no-zero and no-n/a values.
Sanity Check 12 - Smokey Net Server
- Step 0
Setup the workload with the following input configuration:
Setup rtnet for server and client
//Find the values of RT_DRIVER and REBIND_RT_NICS for setting "/etc/rtnet.conf" and the mac address for setting "/tmp/rtnet_smokey.log"
$ lspci -v | grep ' Ethernet controller: Intel Corporation I210 Gigabit Network Connection ' -A 15
 e.g.

01:00.0 Ethernet controller: Intel Corporation I210 Gigabit Network Connection (rev 03)
      Subsystem: Intel Corporation I210 Gigabit Network Connection
      Flags: bus master, fast devsel, latency 0, IRQ 18
      Memory at a1100000 (32-bit, non-prefetchable) [size=128K]
      I/O ports at 3000 [size=32]
      Memory at a1120000 (32-bit, non-prefetchable) [size=16K]
      Capabilities: [40] Power Management version 3
      Capabilities: [50] MSI: Enable- Count=1/1 Maskable+ 64bit+
      Capabilities: [70] MSI-X: Enable+ Count=5 Masked-
      Capabilities: [a0] Express Endpoint, MSI 00
      Capabilities: [100] Advanced Error Reporting
      Capabilities: [140] Device Serial Number 00-07-32-ff-ff-6f-ee-90
      Capabilities: [1a0] Transaction Processing Hints
      Kernel driver in use: rt_igb
      Kernel modules: igb, rt_igb
//modify those values in the configure file according your board(both server and client)
$ sudo vim /etc/rtnet.conf

//for I210, the rt driver is "rt_igb"
$ RT_DRIVER="rt_igb"
//change to the device address of your board, here is an example address
$ REBIND_RT_NICS="0000:01:00.0"

//clear the IPADDR and NETMASK, those values will be configured by following steps
IPADDR=""
NETMASK=""

//set TDMA_MODE as master for both boards(server and client), this value will be overwrite by following steps
TDMA_MODE="master"

//clear the TDMA_SLAVES, the client address will be configure by the file "/tmp/rtnet_smokey.log"
TDMA_SLAVES=""
Create
rtnet_smokey.logfor the server://create file "/tmp/rtnet_smokey.log" in server then record the client address according your client board in this file, here is an example $ sudo vim /tmp/rtnet_smokey.log 00:07:32:6B:A7:FE 192.208.1.101
Query cmd:
$ sudo /usr/lib/xenomai/testsuite/smokey --list
- Step 1
Run the workload with the following command in target shell (locally or remotely over SSH or UART console):
Start rtnet and configure the IP address on server:
//load all nessary modules
$ sudo /usr/sbin/rtnet start

//Server will be reconfigure by command smokey_net_server, here detach firtly, and TDMA is not enabled in this case.
$ sudo /usr/sbin/rtcfg rteth0 detach

//configure the server ip address
$ sudo /usr/sbin/rtifconfig rteth0 up 192.208.1.100 netmask 255.255.255.0
Start rtnet and configure the IP address on client:
//load all nessary modules
$ sudo /usr/sbin/rtnet start

//Client will be reconfigure by following step, here detach firtly, and TDMA is not enabled in this case.
$ sudo /usr/sbin/rtcfg rteth0 detach

//configure the client ip address
$ sudo /usr/sbin/rtifconfig rteth0 up 192.208.1.101 netmask 255.255.255.0
Start
smokey_net_serveron the server:$ sudo /usr/lib/xenomai/testsuite/smokey_net_server rteth0 --file /tmp/rtnet_smokey.log

Start smokey on the client:
//configure as client mode
$ sudo /usr/sbin/rtcfg rteth0 client -c

//client announe to server
$ sudo /usr/sbin/rtcfg rteth0 announce

//run net_udp test case
$ sudo /usr/lib/xenomai/testsuite/smokey --run=12 --verbose=2 rtnet_driver=rt_igb rtnet_interface=rteth0 rtnet_rate=1000 rtnet_duration=10
Parameters
Description
–run
run [portion of] the test list, 12 =
net_udp–verbose
set verbosity to desired level, default = 1
rtnet_driverchoose network driver, default =
rt_loopbackrtnet_interfacechoose network interface, default =
rteth0rtnet_ratechoose packet rate . default=1000, it means send/receive UDP datagram per 1000000000/1000 ns = 1ms
rtnet_durationchoose test duration. default=10, it means test lasts 10 seconds
You can consider that the sanity check has passed, if
stdoutresults are similar to the following, that is, no-zero and no-n/a values: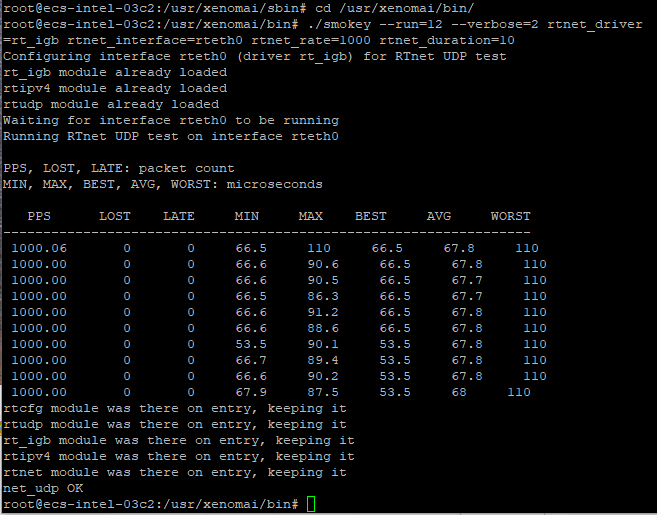
Note: It is recommended to use onboard Ethernet ports on the target to reach best real time performance.