Edge Control Protocol Bridge & OPC UA
PLCopen OPC UA Transport Layer
OPC UA is a machine-to-machine communication protocol for industrial automation developed by the OPC Foundation. Historically, OPC UA only supported a client/server model, but in recent years an additional publish/subscribe model has become available. Currently, most industrial applications only utilize the older OPC UA client/server model, primarily as a result of the industry trend to cautiously adopt new technologies.
OPC UA Client/Server Model
First released in 2006, OPC UA was developed to replace its predecessor (OPC) and provide a path forward that would better meet the emerging needs of industrial automation. Since its release, OPC UA has seen enormous success in the automation industry and continues to be employed, with its primary application to provide a standard fieldbus communication between PLCs and networked devices.
OPC UA Publish/Subscribe Model
The newest addition to OPC UA is the publish/subscribe model. The Publish/Subscribe (PubSub) extension for OPC UA enables fast and efficient 1:m communication. The PubSub extension is protocol agnostic and can be used with broker-based protocols like MQTT and AMQP or brokerless implementations like UDP-Multicasting.
Unfortunately, OPC UA publish/subscribe is not backwards compatible with OPC UA client/server. A software bridge is required to permit cross communication between the two models. To solve this issue, ECI includes an Edge Control Protocol Bridge. The EC Protocol Bridge can bridge OPC UA client/server to publish/subscribe.
Edge Control Protocol Bridge
Important
Edge Control Protocol Bridge features must be enabled in the ECI image before using Edge Control Protocol Bridge. To create an ECI image containing the Edge Control Protocol Bridge features, select the EC Protocol Bridge feature option during image setup. See section Building ECI for more information.

ECI provides an Edge Control Protocol Bridge, which can be used to bridge various industrial protocols together, effectively providing translation from one protocol to another. Some of the most notable use cases include bridging the OPC UA Client/Server Model to OPC UA Publish/Subscribe Model. Other uses include bridging the PLCopen OPC UA Transport Layer to MQTT. The following table lists the information on the EC Protocol Bridge and its various plugins.
Document / Section |
Description |
|---|---|
This Developer Guide covers the fundamentals for using and developing custom plugins within the EC Protocol Bridge framework. |
|
This section details the Edge Control Protocol Bridge application. |
|
This section details the configuration parameters that are common to all plug-ins. |
|
This section details the configuration parameters that are defined for the OPC UA plug-in. Note: This plugin only supports platforms with at least 4 cores. |
|
This section details the methods of creating and using certificates to sign and encrypt OPC UA data. |
|
This section details the configuration parameters that are defined for the MQTT plug-in. |
|
This section details the configuration parameters that are defined for the Simulator plug-in. |
|
This section details the configuration parameters that are defined for the Shared Memory plug-in. |
|
This section details the Edge Control Server application. |
|
This section details the configuration parameters that are defined for the EII Message Bus (EMB) plug-in. |
|
This section details the configuration parameters that are common across all C++ plug-ins. |
|
This section details the configuration parameters that are common across all plug-ins. |
EC Protocol Bridge Example Configurations
This section provides a set of examples, which exercise the functionality of the EC Protocol Bridge (Plug-in Framework). Each example supplies a different configuration file to the EC Protocol Bridge. The configuration file determines the plug-ins that are loaded and the configuration, thus the overall functionality.
The following section is applicable to:

EC Protocol Bridge Prerequisites and Instructions
To use the EC Protocol Bridge, the ECI image must be built with
EC Protocol Bridgefeature option enabled. See section Building ECI for more information.Elevated permissions may be required depending on the example being executed. Make sure elevated permissions are available for best results.
Terminal access is required to execute the EC Protocol Bridge and view the results.
The command line for each test case may need to be adjusted depending upon the file path of the EC Protocol Bridge and the configuration test files. All examples assume the current directory is the location of the EC Protocol Bridge and the ‘config’ directory is a sub-directory.
Allow the application to execute for 10 seconds or so for each test case and then terminate with CTRL-C. This should allow sufficient time for the plug-ins to initialize, connect to resources, and to start outputting valid results to the terminal.
Example #1: Data exchange using all datatypes
This example demonstrates the exchange of all supported datatypes between two plug-ins.
Navigate to the EC Protocol Bridge directory on the target system:
$ cd /opt/ec-protocol-bridge
Execute the EC Protocol Bridge and supply the smoke-test.yaml configuration:
$ ./ec-bridge ./config/smoke-test.yaml
Expected Results
Three output data fields: an integer, a float, and a string. Look for lines similar to these (ignoring all others) and make a note of any errors (a char E after the timestamp):
15:12:16.214374 D eci_display_variant   fld-int32: 1
15:12:16.215392 D eci_display_variant   fld-float: 0.100000
15:12:16.227001 D eci_display_variant   fld-string: A random number: "77"
Example #2: OPC UA Publish & Subscribe over ETF
This example demonstrates OPC UA Publish & Subscribe over ETF using separate OPC UA instances.
Navigate to the EC Protocol Bridge directory on the target system:
$ cd /opt/ec-protocol-bridge
Execute the EC Protocol Bridge and supply the opc-pubsub-etf-loopback.yaml configuration:
$ ./ec-bridge ./config/opc-pubsub-etf-loopback.yaml
Expected Results
Three output data fields: an integer, a float, and a string. Look for lines similar to these (ignoring all others) and make note of any errors (a char E after the timestamp):
20:38:00.303452 D eci_display_variant   fld-int32: 1
20:38:00.303478 D eci_display_variant   fld-float: 0.100000
20:38:00.303493 D eci_display_variant   fld-string: A random number: "77"
Example #3: OPC UA Client Read & Write
This example demonstrates OPC UA Client Write and Read.
On terminal 1, run the EC Server Configuration:
$ /opt/ec-protocol-bridge/ec-server /opt/ec-protocol-bridge/config/ec-server-config-secure.xml
On terminal 2, navigate to the EC Protocol Bridge directory on the target system:
$ cd /opt/ec-protocol-bridge
On terminal 2, execute the EC Protocol Bridge and supply the opc-cli-rw.yaml configuration:
$ sudo ./ec-bridge ./config/opc-cli-rw.yaml
Expected Results
Three output data fields: an integer, a float, and a string. Look for lines similar to these (ignoring all others) and make note of any errors (a char E after the timestamp):
15:12:16.214374 D eci_display_variant   fld-int32: 1
15:12:16.215392 D eci_display_variant   fld-float: 0.100000
15:12:16.227001 D eci_display_variant   fld-string: A random number: "77"
Example #4: Secure OPC UA Client Read & Write
This example demonstrates a secure OPC UA client (sign and encrypt).
As a pre-requisite, the server needs is that the server needs a signed certificate that includes its public key, and the client needs a signed certificate that includes its public key. For more details on generating the keys, refer to the section: OPC UA Key Generation.
See also
For an automated scripted approach to the following example, refer to the section: Application #3: OPC UA Secure Communication.
The example consists of the following:
An OPC UA server application with nodes from which the client plug-in will read. This application is
ec-server. It is written such that the server requires sign and encrypt security. The configuration for the application isec-server-config-secure.xml. This OPC UA server runs on port 53550.The EC Protocol Bridge and OPC UA client plug-in. This is the example being demonstrated. The configuration for the plug-in is
opc-cli-rw-secure.yaml.The certificate and private key files for the server that runs on port 53550 and the client running as a plug-in. These are
server-certificate.der,server-private-key.der,client-certificate.der, andclient-private-key.enc.
On terminal 1, run the EC Server Configuration:
$ /opt/ec-protocol-bridge/ec-server /opt/ec-protocol-bridge/config/ec-server-config-secure.xml
On terminal 2, navigate to the EC Protocol Bridge directory on the target system:
$ cd /opt/ec-protocol-bridge
On terminal 2, execute the EC Protocol Bridge and supply the opc-cli-rw-secure.yaml configuration. Note that
-Eis used, so that thesudouser can inherit environment variables needed for the key store:$ sudo -E ./ec-bridge ./config/opc-cli-rw-secure.yaml
Expected Results
Output of three data fields, an integer, a float, and a string. Look for lines similar to these (ignoring all others) and make note of any errors (a char E after the timestamp):
15:12:16.214374 D eci_display_variant   fld-int32: 1
15:12:16.215392 D eci_display_variant   fld-float: 0.100000
15:12:16.227001 D eci_display_variant   fld-string: A random number: "77"
Example #5: EII Message Bus Publisher and Subscriber
This example demonstrates the EII Message Bus (EMB) configuration with an instance of publisher and subscriber.
Navigate to the EC Protocol Bridge directory on the target system:
$ cd /opt/ec-protocol-bridge
Execute the EC Protocol Bridge and supply the emb-tcp-loopback.yaml configuration:
$ ./ec-bridge ./config/emb-tcp-loopback.yaml
Expected Results
Three output data fields: an integer, a float, and a string. Look for lines similar to these (ignoring all others) and make note of any errors (a char E after the timestamp):
15:26:06.903033 D eci_display_variant   fld1: 1
15:26:06.903654 D eci_display_variant   fld2: 0.100000
15:26:06.904075 D eci_display_variant   fld3: A random number: "90"
Example #6: MQTT Publish and Subscribe
This example demonstrates MQTT publishing.
On terminal 1, launch the MQTT subscriber that listens for all topics:
$ mosquitto_sub -v -t '#'
On terminal 2, navigate to the EC Protocol Bridge directory on the target system:
$ cd /opt/ec-protocol-bridge
On terminal 2, execute the EC Protocol Bridge and supply the mqtt-loopback.yaml configuration:
$ ./ec-bridge ./config/mqtt-loopback.yaml
Expected Results
The terminal running the MQTT subscriber should output the content published by the MQTT plug-in. This will consist of a JSON string containing three data fields, one an incrementing counter, one a float, and one string with random number. For example, look for lines similar to these (ignoring all others) and make note of any errors (a char E after the timestamp):
message {"fld-int32":17,"fld-float":1.7000000476837158,"fld-string":"A random number: \"39\""}
Example #7: Secure OPC UA Client/Server with Secure Key Store
This example demonstrates a secure OPC UA client/server (sign and encrypt) with the private key secured in the TPM.
OPC UA client private key must be encrypted using the AES key from the secure key store. A utility application is provided for encryption. The key must be encrypted using the utility application so that the decryption portion of the OPC UA plug-in can properly decrypt.
The example consists of the following:
An OPC UA server application with nodes from which the client plug-in will read. This application is
ec-server. It is written such that the server requires sign and encrypt security. The configuration for the application isec-server-config-secure.xml. This OPC UA server runs on port 53550.The EC Protocol Bridge and OPC UA client plug-in. This is the example being demonstrated. The configuration for the plug-in is
opc-cli-rw-secure-key-store.yaml.The certificate and private key files for the server that runs on port 53550 and the client running as a plug-in. These are
server-certificate.der,server-private-key.der,client-certificate.der, andclient-private-key.enc.
On terminal 1, run the EC Server Configuration:
$ /opt/ec-protocol-bridge/ec-server /opt/ec-protocol-bridge/config/ec-server-config-secure.xml
On terminal 2, navigate to the EC Protocol Bridge directory on the target system:
$ cd /opt/ec-protocol-bridge
On terminal 2, execute the EC Protocol Bridge and supply the opc-cli-rw-secure-key-store.yaml configuration. Note that
-Eis used, so that thesudouser can inherit environment variables needed for the key store:$ sudo -E ./ec-bridge ./config/opc-cli-rw-secure-key-store.yaml
Expected Results
Output of three data fields, an integer, a float, and a string. Look for lines similar to these (ignoring all others) and make note of any errors (a char E after the timestamp):
15:12:16.214374 D eci_display_variant   fld-int32: 1
15:12:16.215392 D eci_display_variant   fld-float: 0.100000
15:12:16.227001 D eci_display_variant   fld-string: A random number: "77"
EC Protocol Bridge Example Applications
The following section provides example applications of the EC Protocol Bridge. These examples attempt to showcase realistic uses which highlight the value of the EC Protocol Bridge.
Document / Section |
Description |
|---|---|
The single-host roundtrip TSN transport example uses multiple instances of the EC Protocol Bridge and the OPC UA plug-in to create a roundtrip OPC UA communication loop. The example also demonstrates how to configure the OPC UA plug-in to take advantage of Time Sensitive Networking. |
|
The OPC UA Publish/Subscribe Example makes use of CODESYS and the ECI Edge Control Protocol Bridge to showcase bridging OPC UA Client/Server Model to OPC UA Publish/Subscribe Model. |
|
The OPC UA Secure Communication examples demonstrate encrypted communication between the OPC UA plugin and OPC UA applications. An example which utilizes TEP (Trusted VM for IoT Platforms) to decrypt a certificate is also demonstrated. |
EC Protocol Bridge Sanity-Check Testing
The following section is applicable to:
Sanity-Check #1: OPC UA PUB/SUB Pairs with 2 Transport Layers
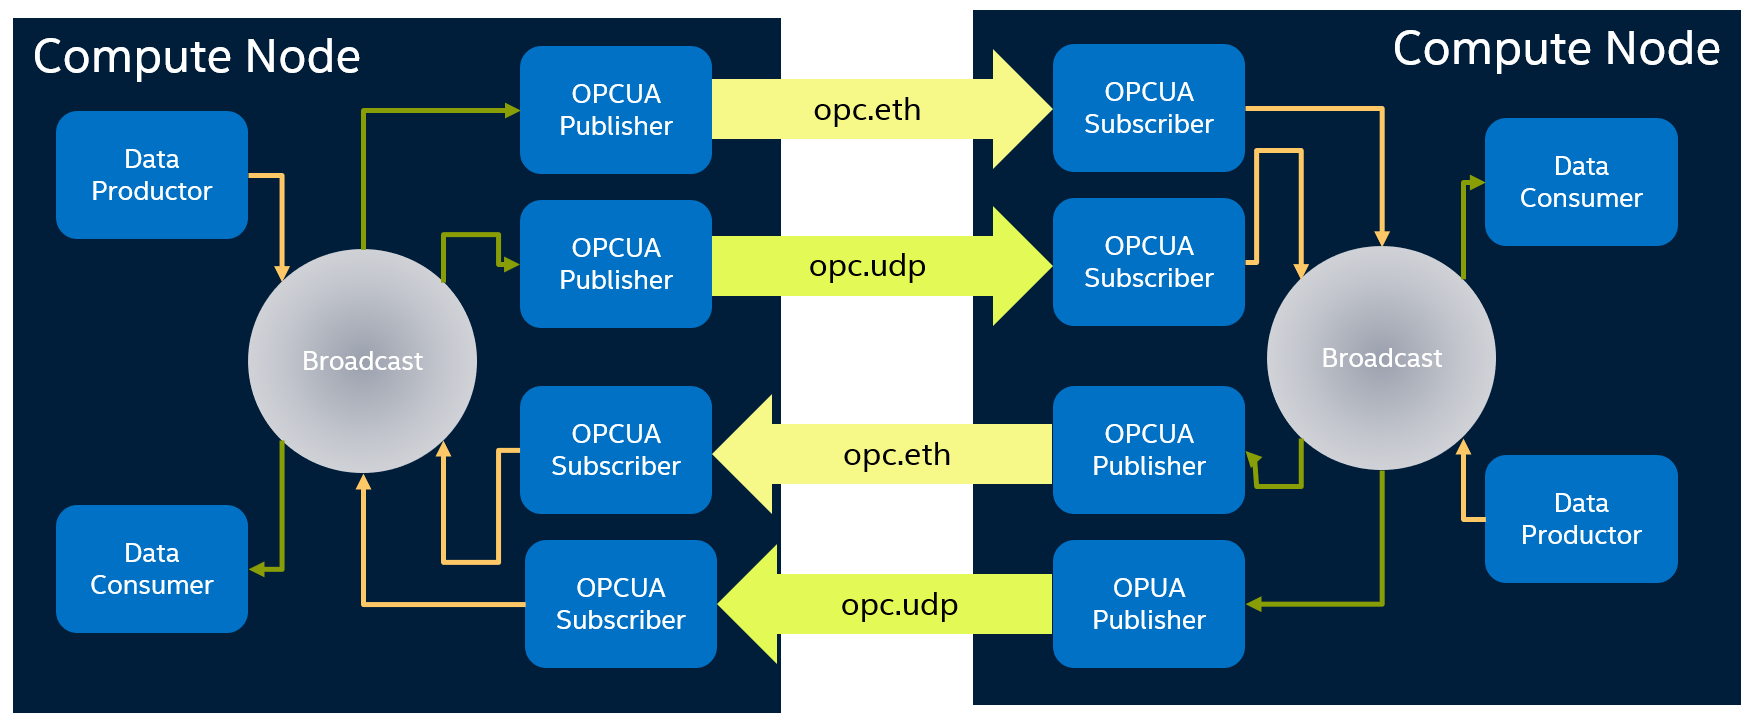
Assuming TSN NIC interface name is enp1s0.
Below steps must be operated on both testing nodes.
Step 1: Configure QDISC.
i=$((`date +%s%N` + (120 * 1000000000)));\
base_time=$(($i - ($i % 1000000000)));\
tc -d qdisc replace dev enp1s0 parent root handle 100 taprio \
num_tc 4 map 3 3 3 1 3 0 3 2 3 3 3 3 3 3 3 3 \
queues 1@0 1@0 1@0 3@1 \
base-time $base_time \
sched-entry S 02 35000  \
sched-entry S 01 75000  \
sched-entry S 08 50000  \
sched-entry S 04 60000  \
sched-entry S 02 30000  \
sched-entry S 02 35000  \
sched-entry S 01 75000  \
sched-entry S 08 50000  \
sched-entry S 04 60000  \
sched-entry S 02 30000  \
clockid CLOCK_TAI \
flags 0x1 \
txtime-delay 150000

tc qdisc replace dev enp1s0 parent 100:1 \
etf clockid CLOCK_TAI delta 150000 \
offload  skip_sock_check
Step 2: Configure VLAN.
$ ip link add link enp1s0 name enp1s0.8 type vlan id 8 egress-qos-map 0:3
$ ip route add 224.0.0.0/4 dev enp1s0.8
$ cat /proc/net/vlan/enp1s0.8
The expected results should be similar to the following:
enp1s0.8  VID: 8         REORDER_HDR: 1  dev->priv_flags: 1021
          total frames received     63123714
           total bytes received   3053444527
      Broadcast/Multicast Rcvd      1373968
      total frames transmitted      8163138
       total bytes transmitted    658441147

Device: enp1s0
INGRESS priority mappings: 0:0  1:0  2:0  3:0  4:0  5:0  6:0 7:0
 EGRESS priority mappings: 0:3
Step 2: Start the ec-bridge.
$ iperf3 -s -A 0
$ iperf3 -c ${OTHER_NODE_IP}  -t 86400 -b 50M -u -l 1448 -A 0

$ cd /opt/ec-protocol-bridge
$ ./ec-bridge plg-opcua-rt/config/sim-bcast-3x-pub-sub-eth-etf-udp-bcast-sim.yaml
The expected results should be similar to the following:
[2020-06-03 15:57:37.227 (UTC+0000)] warn/userland      AcceptAll Certificate Verification. Any remote certificate will be accepted.
[2020-06-03 15:57:37.227 (UTC+0000)] info/session       Connection 0 | SecureChannel 0 | Session g=00000001-0000-0000-0000-000000000000 | AddNodes: No TypeDefinition for i=50363; Use the default TypeDefinition for the Variable/Object
[2020-06-03 15:57:37.227 (UTC+0000)] info/session       Connection 0 | SecureChannel 0 | Session g=00000001-0000-0000-0000-000000000000 | AddNodes: No TypeDefinition for ns=1;s=fldint; Use the default TypeDefinition for the Variable/Object
[2020-06-03 15:57:37.227 (UTC+0000)] info/userland      PubSub channel requested
[2020-06-03 15:57:37.227 (UTC+0000)] warn/server        PubSub Connection creation failed. No multicast address.
[2020-06-03 15:57:37.228 (UTC+0000)] warn/server        PubSub Connection not on multicast
[2020-06-03 15:57:37.228 (UTC+0000)] info/network       TCP network layer listening on opc.tcp://intel-rt-corei7-64:62543/
[2020-06-03 15:57:37.228 (UTC+0000)] info/network       TCP network layer listening on opc.tcp://intel-rt-corei7-64:62544/

****************************
*** Press CTRL+C to quit ***
****************************
Step 3: Capture UADP interval of ETH.
$ cd /opt/ec-protocol-bridge/plg-opcua-rt/utilities
$ ./uadp_eth_cap.sh -i enp1s0
After 1 minute, press Ctrl+C to stop, continue below operations:
$ cd /opt/ec-protocol-bridge/plg-opcua-rt/utilities
$ sort -n Live_Cycle_of_Priority_5.his
The expected results should be similar to the following:
250 27548The result shows a histogram of UADP interval. The first column is the interval in us, the second column is the number of packets which occurred in that interval. For this configuration, the distribution of intervals is expected converging to 250.
Step 4: Capture UADP interval of UDP.
$ cd /opt/intel/iotg_tsn_ref_sw/sample-app-taprio
$ ./tsn_perf.sh -i enp1s0 -f "port 4840"
After 1 minute, press Ctrl+C to stop, continue below operations:
$ cd /opt/intel/iotg_tsn_ref_sw/sample-app-taprio
$ sort -n Live_Cycle_of_Priority_3.his
The expected results should be similar to the following:
1992    41
1993    46
1994    50
1995    35
1996    37
1997    44
1998    56
1999    61
2000    47
2001    48
2002    41
2003    56
2004    36
2005    39
2006    41
2007    49
2008    45
2009    60
2010    47
2011    62
2012    61
2013    67
2014    63
2015    72
The result shows a histogram of UADP interval. The first column is the interval in us, the second column is the number of packets which occurred in that interval. For this configuration, the distribution of intervals is expected converging to 2000.