Intel® Elkhart Lake Functional Safety (FuSa) Software Package
Intel® Elkhart Lake Functional Safety (FuSa) Software Package consists of two variants:
Linux* Native
Virtualized using Zephyr and Linux over ACRN Hypervisor
Attention
ECI is not safety-critical certified and the libraries available in bitbake layers are released for Elkhart Lake FuSa hardware only for development purposes.
System Overview
This section provides a brief overview of components in the Intel® Functional Safety Software Package (Intel® FuSa) Software Package.
Safety Monitoring Integrated Suite (SMIS)
Safety Monitoring Integrated Suite (SMIS) is a generic framework to demonstrate the usage of On-demand Cross Comparison (ODCC) while implementing the safety workloads, executing periodic STLs and interacting with Intel® Safety Island (Intel® SI) through Safety Monitor Communication Library (SMCL) framework. ECI builds CLI variant of SMIS. SMIS is a reference application with certain Systematic Capability 3 (SC3) capable components. ECI build uses GCC 9.3 to build SMIS. You need to select an appropriate compiler and version for certification.
See also
For more information on SMIS and its interaction with other components within the FuSa Software Package, refer to Intel® Elkhart Lake Safety Monitoring Integrated Suite-User Guide (Intel RDC#616713).
Software Test Library (STL)
The Software Test Library (STL) is a collection of diagnostic tests that detect and report silicon/hardware failures to the application. The STL contains core STLs, uncore STLs, error configuration checks, and error status checks. STL is SC3 capable and can be reused on another OS. The FuSa software suite provides Host STL Driver (for Yocto Linux) to access Elkhart Lake IPs necessary for STL functions:
The Startup STLs help in configuring the settings on the Elkhart Lake SoC and is executed only when the STL Manager starts.
The Periodic STLs are invoked periodically every PST interval to check the health of Elkhart Lake SoC.
The On-demand STLs must to be called if there are errors, and Intel® SI sends a notification.
STL Manager
STL Manager is custom application that helps in scheduling runs of available STLs and ensuring that the STL results are delivered to Intel® SI within Diagnostic Time Interval (DTI).
On-demand Cross Comparison (ODCC)
On-demand Cross Comparison (ODCC) is a diagnostic measure that can detect random hardware failures affecting the core and other associated IPs by comparing snapshots of two redundant safety applications being executed from two cores.
Safety Monitor Communication Library (SMCL)
Safety Monitor Communication Library (SMCL) is responsible for providing an interface to the upper layers (STL, ODCC) to communicate with Intel® SI on Elkhart Lake. SMCL is SC3 capable and ensures the safety of the packets sent from the workloads to Intel® SI. Packets sent to Intel® SI are entirely wrapped and unwrapped by the SMCL. Intel® SI Linux kernel module drivers/platform/x86/intel_isi_mb.ko acts as an intermediary that writes the packet to the Intel® SI Hardware Mailbox interface and routes the response packets back to the desired workload.
Operation System Adaptation Layer (OSAL)
Operation System Adaptation Layer (OSAL) provides a set of APIs for abstracting the OS interfaces and features. Current implementation is a reference code for Yocto Linux and can be ported to different operating systems.
SlimBootLoader (SBL)
Intel® SlimBootLoader (Intel® SBL) is the chosen boot firmware for Elkhart Lake FuSa application. SBL is responsible for the correct Elkhart Lake hardware initialization for FuSa operation and booting the operating system. Intel® SBL is a Quality Managed (QM) component. To achieve the SC3 capability Pre-OS Checker (POSC) is used to verify the safety critical platform configuration done by SBL during boot. POSC is SC3 capable and acts as a STL for Intel® SBL.
FuSa Prerequisites
To function correctly, the Intel® Functional Safety Software Package requires certain hardware, bootloader, and software configurations to be present on the target system. The following are the specific requirements:
Intel Atom® x6425RE processor, Intel Atom® x6427FE processor (Elkhart Lake FuSa SKU 11 [QWW2/RKLH])
Compatible Intel® SBL Integrated FirmWare Image (IFWI) to boot the target system. For details, refer to Building Intel® Firmware Image (IFWI)
Building Intel® Firmware Image (IFWI)
The Integrated Firmware Image (IFWI) or ‘BIOS’ is a 32MB binary file written on SPI-NOR of the target system. This image contains various components that are necessary to reliably initialize the Elkhart Lake SoC and successfully boot to an operating system. To enable FuSa,build and flash IFWI on to the target system.
To build and stitch a compatible IFWI binary, follow the section Slim Bootloader Stitching in Sbl_Ehl_ReleaseNotes.pdf (part of Intel® Elkhart Lake Slim Bootloader (SBL) (Intel RDC#646837)). Note that this document also lists various firmware components that are used as part of the IFWI binary stitching and their availability in Intel® Resource Design Center.
After building the IFWI, refer to Flashing an Integrated FirmWare Image (IFWI) to flash the IFWI to the target system.
Note
SBL boots Linux in Container Boot Image format:
ECI installation (Boot & Install Image) also installs Container Boot Image appropriately, so that SBL can boot to OS successfully.
For signing Container Boot Image, ECI uses the example file
cert/OS1_TestKey_Pub_RSA2048_priv.pemavailable inmeta-fusalayer.Signing key is used to sign the Container Boot Image. SBL authenticates the Container Boot Image during boot.
You can point to a different key file using the
PREGENERATED_SIGNING_KEY_SLIMBOOT_KEY_SHA256variable intargets/kas/opt-fusa.yml. Use the same key file instead of./SblPlatform/SblKeys/OS1_TestKey_Pub_RSA2048_priv.pemin Intel® Elkhart Lake Slim Bootloader (SBL) (Intel RDC#616714) to build SBL and IFWI binary file.For information on the SBL bootable Container Boot Image format, refer to the section Create Container Boot Image in Intel® Elkhart Lake Slim Bootloader (SBL) (Intel RDC#616714).
Steps to generate signing keys is not within the scope of this documentation.
FuSa - Resources
For architecture and implementation details of the FuSa Software Package, refer to the following documents:
Intel® Elkhart Lake Safety Monitoring Integrated Suite-User Guide (Intel RDC#616713)
Intel® Elkhart Lake Intel® SlimBootLoader (Intel RDC#616714)
Intel® Elkhart Lake Intel® SlimBootLoader Release Notes (Intel RDC#646837)
Intel® Elkhart Lake Intel® for IoT Applications CRB User Guide (Intel RDC#615859)
Intel® Elkhart Lake Functional Safety Demonstrator Software Stack (Intel RDC#643840)
These documents are available at Intel® Resource Documentation Center (RDC) and you might need to request access.
Building ECI Image with FuSa Feature
The FuSa Software Package provides two variants. Click the tab corresponding to the variant that you want to include in the ECI image.
Follow these steps to build an ECI image with FuSa feature (Linux):
Build an ECI image with the
Intel® Functional Safety (EHL/SBL)feature. For more information, refer to Building ECI Targets.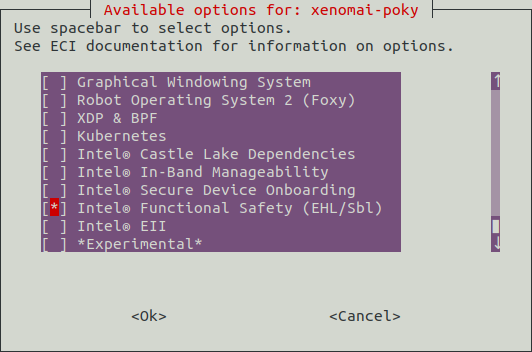
Install the ECI image to a target system. For more information, refer to Installing ECI Images.
Intel® ECI integrates the ‘Beta2 release’ of Intel® Elkhart Lake Functional Safety (FuSa) Software Package (Revision 1.0.1).
Follow these steps to build an ECI image with FuSa feature (Virtualized – Zephyr + ACRN):
Build an ECI image with
acrn-zephyr-ehlas build target. For more information, refer to Building ECI Targets.Install the ECI image to a target system. For more information, refer to Installing ECI Images.
FuSa Sanity-Check Testing
Click the tab corresponding to the variant for which you want to run the sanity checks.
Tip
journalctl -f contains SMIS messages related to the progress and status of various STL and ODCC execution. It is recommended to watch the output of journalctl -f.
Run following command in a new console to capture the SMIS logs:
$ journalctl -f
Sanity-Check #1: Install Intel® Safety Island Mailbox (ISI-MB) Driver and Host STL Driver (HSTD)
It is necessary that platform has a cold-reset/power-cycle to ensure that Intel SI is in the OK state. Power cycle the Elkhart Lake platform before executing the following steps.
Enable the Intel® SI driver and verify whether the
/dev/ISI_DRIVERinterface is available:$ insmod /opt/intel/ehl_fusa_sw_v1.0/isi_kernel_driver.ko $ ls /dev/ISI_DRIVER
Enable the HSTD driver and verify whether the string
hstd: Module version 1.1 successfully initilizedappears in thedmesglog:$ insmod /opt/intel/ehl_fusa_sw_v1.0/hstd.ko $ dmesg | tail
Sanity-Check #2: Establish Communication with Intel® Safety Island (ISI)
Complete Sanity-Check #1 before executing the following steps:
Run the following command to check the health of Intel® SI:
$ cd /opt/intel/ehl_fusa_sw_v1.0/
$ ./Smis -a workload_api -t ok_nok_status_read
Look for string
[SMIS] ISI Status is 0after running the command.
Note: For more information on the ./smis command options for stl and odcc, refer to Intel® Elkhart Lake Safety Monitoring Integrated Suite-User Guide (Intel RDC#616713).
Sanity-Check #3: Execute STL Manager to Startup STL
Complete Sanity-Check #2 before executing the following steps:
Perform the following commands to run
startup stlon all cores:$ cd /opt/intel/ehl_fusa_sw_v1.0/ $ ./Smis --startup $ ./Smis -a workload_api -t ok_nok_status_read
Look for the string
[SMIS] ISI Status is 2after running the command.
Sanity-Check #4: Execute STL Manager for Core and Uncore STL
Complete Sanity-Check #3 before executing the following steps”
Run the following commands to enable
core-stlon all cores, enableuncore-stlon core 0, and start the STL Manager:$ cd /opt/intel/ehl_fusa_sw_v1.0/ $ ./Smis --core_stl 0,1,2,3 --uncore_stl 0 --oem 0,1,2,3 --sl_time 100000 --tmax 220000 --tmin 99940 --to_ideal 90000 --to_max 80000
The command will not return/exit to prompt. It exits if there is a failure or if a NOK is generated from Intel SI. Make sure that there is no error or failure at the prompt and that no unknown error or failure appears in the SMIS logs at
journalctl -f. Use a new terminal for executing other commands.
Note: As PLL may not lock to the desired 1900 MHz with 38.4 MHz crystal, stlclockmonitoring tolerance is updated to 0.1% of the expected 1900 MHz.
Sanity-Check #5: Execute ODCC Workload
Complete Sanity-Check #4 before executing the following steps:
Perform the following commands to run the ODCC workload on two cores for on-demand cross comparison:
$ cd /opt/intel/ehl_fusa_sw_v1.0/
$ ./Smis -a odcc -t odcc_start --sl_time 100000 --tmax 220000 --tmin 99940 --to_ideal 90000 --to_max 80000 --cr_ch_drift 99480 -e 2,3
Wait for 30 minutes and make sure that no error or failure occurs and that no error or failure appears in the ODCC and SMIS logs at
journalctl -f.
Note: It is a known observation that due to the nature of non-realtime scheduler, the ODCC threads on the cores 0 and 1 might drift apart in timing. As a workaround:
use
echo 4 > /proc/irq/##/smp_affinityorecho 8 > /proc/irq/##/smp_affinityto assign interrupts to cores 3 and 4. Here,##is the IRQ number where larger number of interrupts are serviced by only cores 0 and 1 (determined bycat /proc/interrupts)‘DOWN’ unused network adapter, for example,
ip link set eth0 down.
Invoke FuSa Sanity Checks using the SMIS GUI running on an Ubuntu Host PC connected to same network as the Elkhart Lake platform. SMIS GUI is a QT-based application. Refer to DP4_EHL_FuSA_DSS_Getting_Started_Guide.pdf in the 723072 - Intel® Elkhart Lake Functional Safety (FuSa) Software Package (Revision 1.0.1) package for details on how to build and invoke the SMIS GUI.
Sanity-Check #1: Setup Target to Establish Communication between Target and SMIS GUI
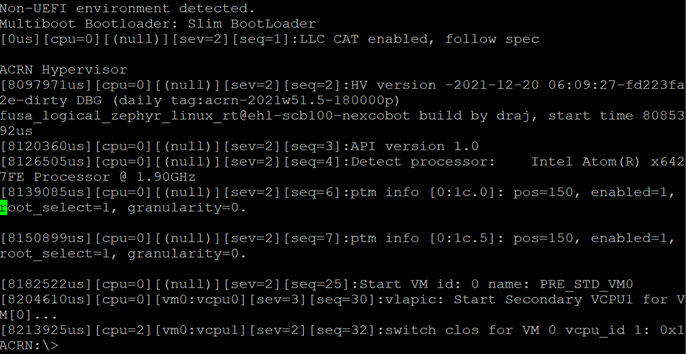
After installing the ECI image to the target, it is necessary that platform has a cold-reset power cycle. After the power cycle, the platform boots into ACRN. The serial console will show ACRN prompt on successful boot.
From the ACRN serial console, run the following command to view the list of VMs that are running:
vm_list
From the ACRN serial console, run the following command to enter into the Linux VM shell (VM1):
vm_console 1
The following message is displayed on VM1 shell.

Run the following command from Linux kernel (VM1) console to load the UIO driver for inter-VM communication between VM0 and VM1:
# Commands to probe uio device

modprobe uio
modprobe uio_pci_generic
echo "1af4 1110" > /sys/bus/pci/drivers/uio_pci_generic/new_id

# Verify that the uio device is now visible

root@ecs-intel-56f8:~# ls /dev/uio0
/dev/uio0
Run the following command to obtain the IP address of VM1:
root@ecs-intel-56f8:~# ifconfigOn the Display console of VM1 or by using a SSH connection to VM1 with its IP address, Go to
/opt/intel/fusa_app/and run the ‘router’ application with the IP address of the VM1 as parameter:cd /opt/intel/fusa_app/ ./router <IP address>
The following message is displayed on VM1 shell.

Sanity-Check #2: Run SMIS GUI QT Application from Host PC and Establish Communication with Target
Complete Sanity-Check#1 before executing the following steps.
Start the SMIS GUI QT application from the host Ubuntu host machine. The Safety Monitoring Integrated Suite opens up.
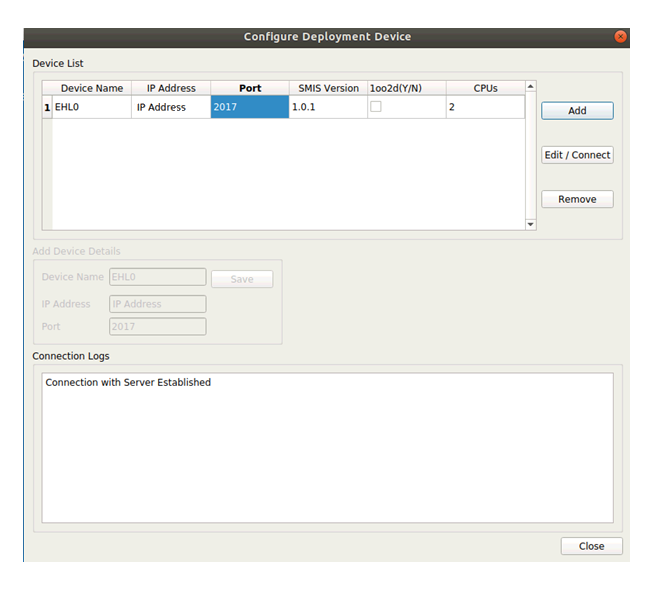
Do the following to configure the deployment device:
Go to Tools > Configure.
In the Configure Deployment Device dialog, click Add and enter the following:
IP Address: The IP address of the Elkhart Lake setup to which the connection needs to be established. This is the IP address obtained in Sanity-Check #1.
Port: 2017
Click Save. The message Connection with Server Established is displayed in the Connection Logs.
Press ctrl+space to enter the ACRN serial console. From the ACRN serial console, run the following command to enter into the VM0 console:
vm_console 0
The following message is displayed on the serial console confirming connection with the SMIS GUI.

Sanity-Check #3: Establish SMCL Communication
Complete Sanity-Check#2 before executing the following steps.
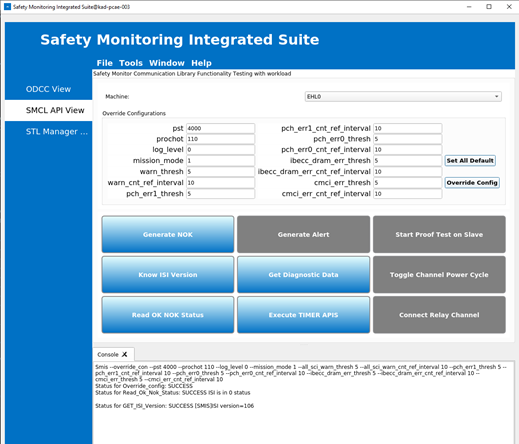
Once the connection is established between the SMIS GUI application and the target, do the following to configure Intel SI, get the Intel SI version from the target, and check the OK/NOK status:
From the left pane, click SMCL API View.
In the Override Configurations section, change pst to 4000. Click Override Config.
Click Read OK NOK Status and note the success message displayed in the Console.
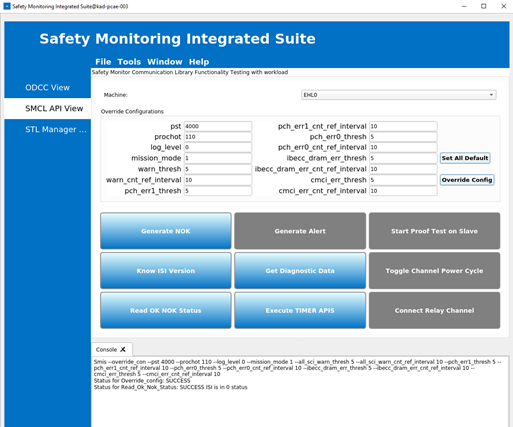
Click Know ISI Version and note the Intel SI version number and success message displayed in the Console.
Check the VM0 console for the following message:

Sanity-Check #4: Execute STL Manager Startup STL
Complete Sanity-Check#3 before executing the following steps.
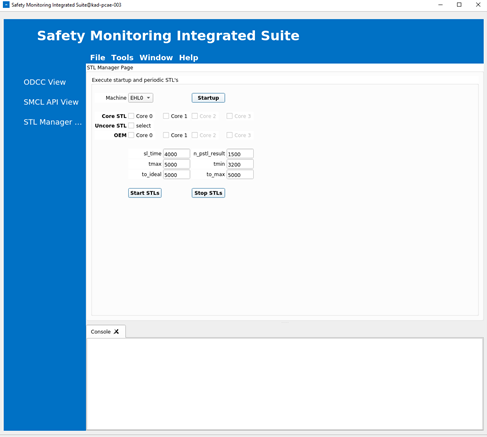
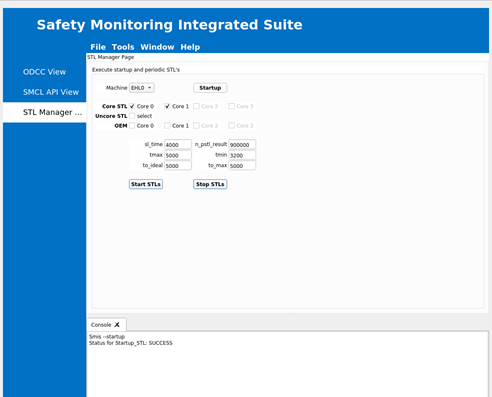
From the left pane, click STL Manager View.
From the Machine drop-down list, select the machine on which the startup STLs will be executed. In this example, startup STLs will be executed on EHL0.
Select Core 0 and Core 1 as the Core STL.
For n_pstl_results, set a value that matches the duration of the run. For example, for a 60-minute duration, enter a value 900000.
Click Startup to configure the Intel SI parameters. On successful completion, the following message is displayed in the Console.
Check the VM0 console for the following message:
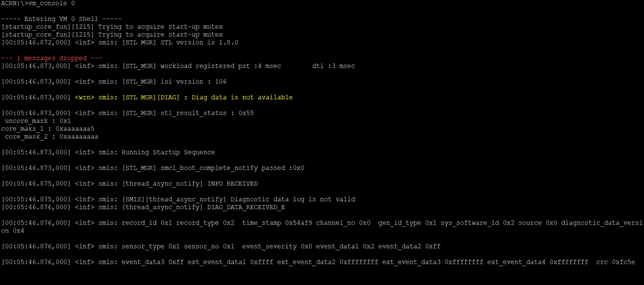
Click Start STL to start the STL execution. On successful completion, the following message is displayed in the Console.

Check the VM0 console for the ‘STL started’ message:

Sanity-Check #5: Execute ODCC Workload
Complete Sanity-Check#4 before executing the following steps.
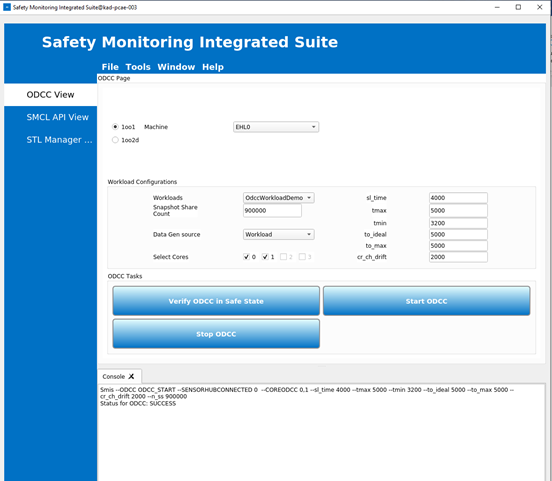
From the left pane, click ODCC View.
Select the 1oo1 radio button.
From the Machine drop-down list, select the machine on which ODCC workload must be executed. In this example, ODCC workload will be executed on EHL0.
For Snapshot Share Count, set a value that matches the duration of the run. For example, for a 60-minute duration, enter a value 900000.
Note: For information on the parameters
sl_time,tmax,tmin,to_ideal,to_max, andcr_ch_drift, refer to the Sample Timing Calculations section of the Elkhart Lake FuSa Demonstrator Software Stack Developer Guide.Select the cores 0 and 1.
Click Start ODCC. On successful completion, the following message is displayed in the Console.
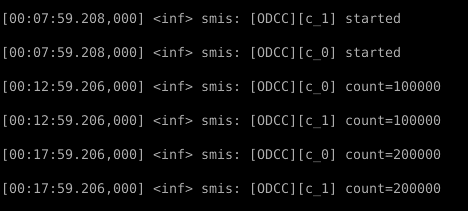
Check the VM0 console for the following message: