Trusted VM for IoT Platforms
Important
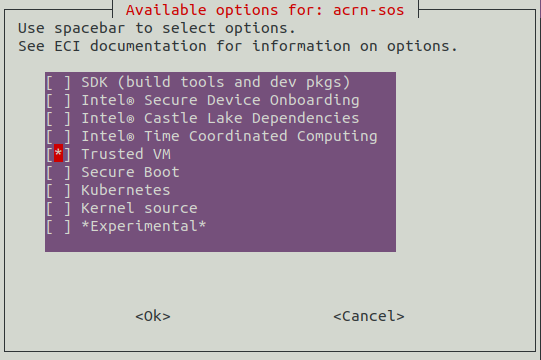
Trusted VM for IoT Platforms must be enabled in the acrn-sos image before it can be used. Creating an ECI-A image that contains the Trusted VM for IoT Platforms feature can be accomplished by selecting the Trusted VM feature option during image setup. See section acrn-sos for more information.
The Trusted VM for IoT Platforms, also referred to as Trusted Edge Platform (TEP), is specifically for use in conjunction with the ACRN Hypervisor. This document covers the concept of the Trusted VM, its components and how it interacts with other VMs. For detailed instructions on how to use the Trusted VM, please refer to the TrustedVM_UserGuide.pdf.
Definitions and Acronyms
Term |
Description |
|---|---|
TPM |
Trusted Platform Module |
RPC |
Remote Procedure Call |
eRPC |
Embedded RPC |
PKCS#11 |
Public-Key Cryptography Standards |
Trusted VM Architecture
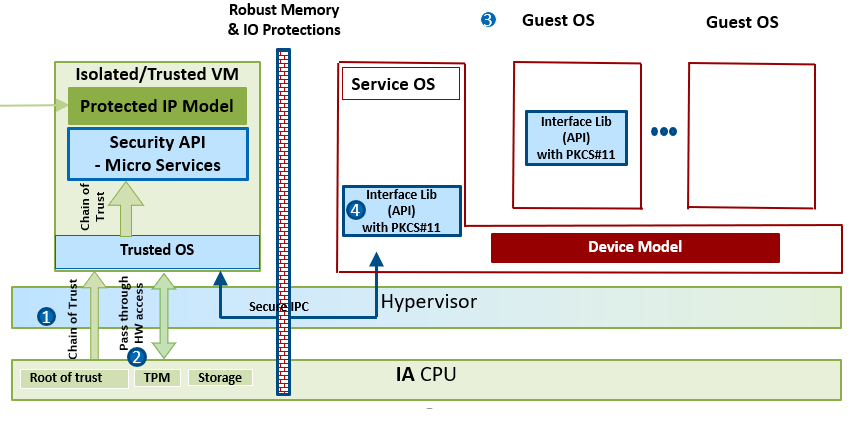
Trusted VM is designed to isolate a virtual machine at HW level using Intel silicon technologies and hypervisor protections to create a higher privileged VM. The Trusted VM is launched automatically (also referred to as pre-launched) by the ACRN hypervisor when the system boots. A lightweight trusted OS boots the trusted VM to keep the surface attack to minimum. Administrators could host their services within Trusted VM to keep their data confidential and minimize their exposure to threats from other workloads running on the same system.
Trusted VM offers:
Integrity protection for Trusted OS & its services during boot-up time
Run-time protection for Trusted OS & its services
Data at rest protection
Some of the components Trusted VM utilizes:
Secure boot: The hypervisor, trusted OS and its file system are verified using secure boot chain of trust, which is rooted to the HW root of trust for boot time integrity protection.
Pass-through access to HW: Trusted VM also has a pass-through access to the PCI devices on the platform providing it exclusive access as per user configuration.
Storage: Trusted VM is configured to have a direct pass through access to NVMe based storage device that could be used for exclusive storage. System admin can modify and configure to have other type of storage device (USB, SATA, NVMe, etc..) in the Trusted VM. All other VMs, including Service VM, do not have access to this storage.
TPM: Trusted VM also has exclusive MMIO pass-through access to the Intel® PTT (Platform trust technology) or discrete TPM on the platform. During the boot up, Trusted VM has the single ownership of the TPM and has a single Storage Root Key and password, one Endorsement Key, and a single set of Platform Configuration Registers (PCRs).
Inter VM IPC Communication: Guest VMs and Service VM can communicate with the Trusted VM and its services using an interface library with
PKCS#11API interface. StandardPKCS#11API (2.4 version of spec) interfaces are supported. Any OEM application that needs key store services can compile with this interface library and start makingPKCS#11API calls. Sample applications are provided to serve as an example how to use these APIs.
Trusted VM design consists of Trusted OS, Security Micro Services & Interface Library. While Trusted OS and Micro services form the Trusted VM, Interface Library itself executes from the Service VM/Guest VM.
Trusted OS & Services
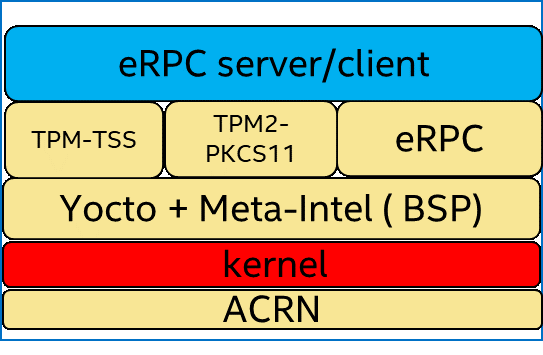
This section describes Trusted VM and a high-level design of its components. Trusted VM is built using Yocto infrastructure but designed to be a lightweight Trusted OS to keep the surface attack minimal. Security micro services that run on Trusted OS includes the TPM TSS stack, TPM2-PKCS#11 stack, eRPC stack, and Initialization scripts. Figure 2 describes different layers of the yocto recipe which combines to form the Trusted VM image.
Component level view of the stack
The following section is applicable to:

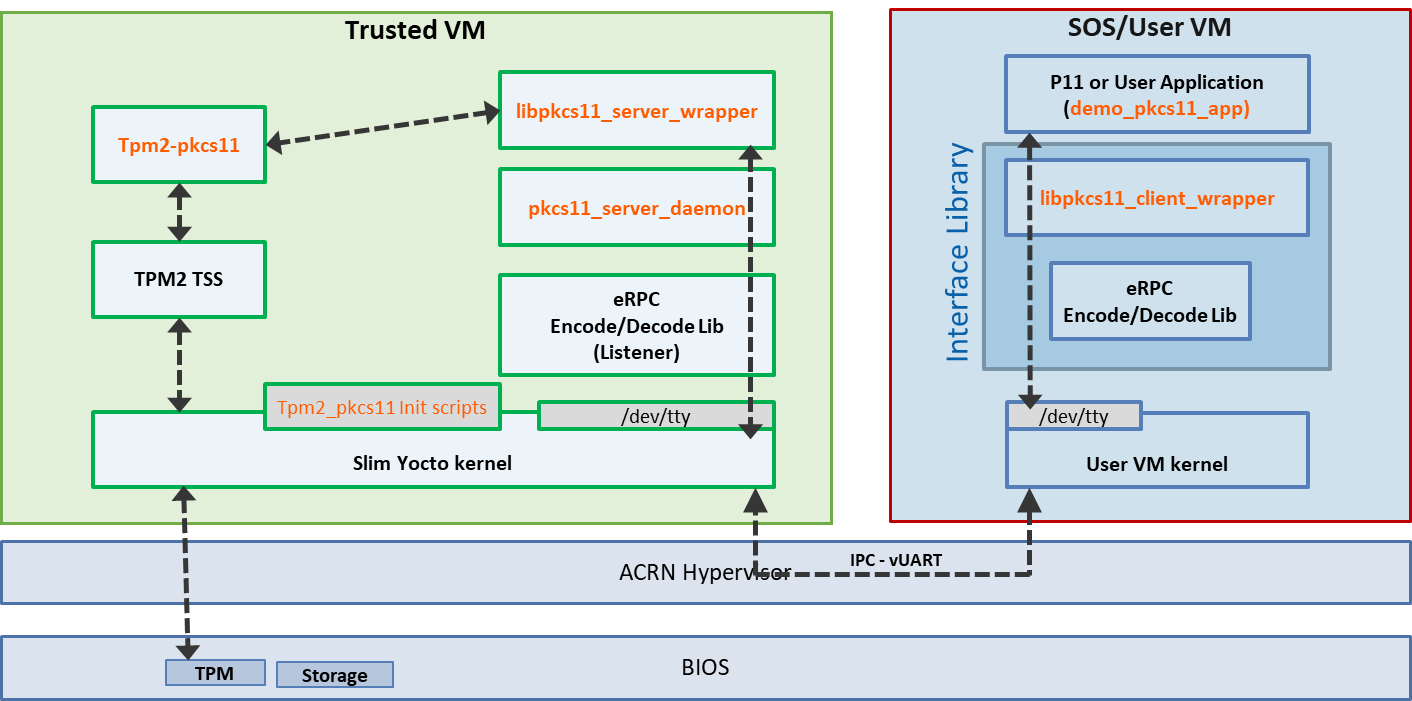
The component level view of the stack describes the Trusted VM components vs the User VM components. A customer application built using the Interface library /usr/lib/libpkcs11_client_wrapper.so can make direct calls in to PKCS#11 interface APIs. Each application is bound to a virtual UART channel (tty device) over which it communicates with Trusted VM. The application will have an exclusive lock on the tty channel and its session until it chooses to release it and at which time a different application can bind itself to that virtual UART channel.
Functionality for this release is limited to the following virtual UART channels: ttyS4, ttyS5, ttyS6, ttyS7, ttyS8, ttyS9.
Please refer to the TrustedVM_UserGuide.pdf for detailed integration steps.
Trusted VM prerequisites
The following section is applicable to:
The Trusted VM requires certain hardware, BIOS, and software configurations present on the target system to function correctly. The list below details these specific requirements.
Access to the ACRN hypervisor shell to initialize the TPM via the Trusted VM. See section Using the ACRN hypervisor shell for more information.
Note
The ACRN hypervisor shell is only required to initialize the TPM, after which this access may be revoked.
PTT(Intel Silicon TPM) must be enabled in the target system BIOS.A dedicated SATA storage device must be installed on the target system. This storage device must be formatted with at least one partition, of which the first partition filesystem must be either: ext2, ext3, ext4, FAT, or FAT32. For reference, the Trusted VM will attempt to mount the SATA device partition from
/dev/sda1.Note
ACRN only allows PCI devices to be passed through to a pre-launch VM.
Tip
To reformat and create an ext4 partition on the SATA device, perform these steps:
$ umount /dev/sda1
$ dd if=/dev/zero of=/dev/sda bs=512 count=100
$ fdisk /dev/sda

    Command (m for help): n
    p
    Partition number (1-4): 1
    Press `Enter` to accept default value
    Press `Enter` to accept default value
    Command (m for help): w

$ mkfs.ext4 /dev/sda1
Preparing the Trusted VM
The following section is applicable to:
Ensure the Trusted VM prerequisites are met.
Build an acrn-sos image with the Trusted VM for IoT Platforms feature option enabled. Creating an ECI-A image that contains the Trusted VM for IoT Platforms feature can be accomplished by selecting the
Trusted VMfeature option during image setup. See section acrn-sos for more information.
After building an
ECI-Aimage with theTrusted VMfeature option enabled, install the ECI-A image to a target system by following section: Installing ECI-A.Important
Do not install the ECI-A image to any SATA device since the SATA controller is passed through to the Trusted VM!
Boot the image and select
ACRNat the GRUB boot menu. ACRN will launch the Trusted VM and the service OS simultaneously.Note
The Trusted VM can only be accessed via the ACRN hypervisor shell.
Access the ACRN hypervisor shell and open the console to the Trusted VM (ID 0):
See also
For more information on using the ACRN hypervisor shell, see the following section: Using the ACRN hypervisor shell.
ACRN:\>vm_console 0Tip
Press Ctrl + Space to return to the ACRN shell console.
Login to the Secure VM using username
rootand password123456*18.Verify that the passthrough SATA device partition
/dev/sda1is correctly mounted at/home/root/tmp:root@sec-os-intel-corei7-64:~# mount | grep sda1 /dev/sda1 on /home/root/tmp type ext4 (rw,relatime,sync)
Delete any existing database
tpm2_pkcs11.sqlite3file stored in the SATA device:rm -rf /home/root/tmp/tpm2_pkcs11.sqlite3Initialize the TPM with an entry for use with the
tep_test_app:/usr/bin/run_pkcs11.sh
Verifying the Trusted VM
The following section is applicable to:
Ensure section Preparing the Trusted VM is completed.
Login to the ACRN Service OS.
Copy a User OS ECI image to
/var/lib/machines/images/vm0.wicif one does not already exists.Use the Trusted VM launch script to launch the User VM and establish a virtual UART connection to the Trusted VM:
$ /var/lib/machines/scripts/launch-uos_secureVM-communication.shLogin to the User OS.
Export the COMM port to be used for communication to the Trusted VM:
$ export TEC_COMM_PORT=/dev/ttyS4
Note
COMM port options include
ttyS4,ttyS5,ttyS6,ttyS7,ttyS8,ttyS9.Run the example application built into ECI images:
$ tep_test_appExpected Result
Click to toggle visibility
root@intel-rt-corei7-64:~# export TEC_COMM_PORT=/dev/ttyS4
root@intel-rt-corei7-64:~# tep_test_app
eRPC client initialize start
Selected port is /dev/ttyS4
Selected port is /dev/ttyS4
eRPC client initialize done
Calling C_Initialize_ERPC()
Return value of C_Initialize:0
Calling C_GetSlotList_ERPC()
SlotCount = 2
Return value of C_GetSlotList:0
Calling C_GetSlotList_ERPC()
Return value of C_GetSlotList:0
Calling C_GetMechanismInfo_ERPC()
Return value of C_GetMechanismInfo:0
Calling C_GetMechanismInfo_ERPC()
Return value of C_GetMechanismInfo:0
selected slot: 1
Calling C_GetTokenInfo_ERPC()
Return value of C_GetTokenInfo:0
Token already initialized
Calling C_OpenSession_ERPC()
Return value of C_OpenSession:0
Calling C_Login_ERPC()
Return value of C_Login:0
Generating keypair....
Calling C_GenerateKeyPair_ERPC()
Return value of C_GenerateKeyPair:0
Calling C_GetAttributeValue_ERPC()
Return value of C_GetAttributeValue:0
Calling C_GetAttributeValue_ERPC()
Public Key data:
        Modulus bits: 2048
        Modulus: ffffffbe53ffffffbeffffff9dffffffd3ffffffd7ffffffc449fffffff1ffffffb9024b79ffffff806e25ffffff865bffffffe71effffffdd7cffffffa94affffffd2ffffffa35614ffffffb10dfffffffc552b35ffffffed65043b2c6effffffccffffff86ffffffecffffffc367ffffffcf55ffffffa8ffffffe25bffffffd6fffffff636ffffffb7fffffff8ffffffbe5bffffffe5ffffffd72a4fffffffbb7e52fffffffbffffff8affffff8bffffffba38fffffff72cffffff8f640d306cffffffe50170fffffff12effffffd3221bffffffea2e12ffffffcdffffff8740ffffffd6ffffff86ffffff8fffffff87ffffffb859ffffffeefffffff9ffffff84ffffffd7fffffff636ffffffcaffffffa3ffffffe64effffff93ffffffe7ffffff81ffffffb2ffffffbcfffffffd483743ffffffc6462c1476ffffffa51a1cffffffd9ffffffc7443bffffffebffffffe624ffffffda31ffffff8affffffef0558ffffffc61cffffffc3fffffffdffffffd4ffffffe6ffffffe9ffffff8affffffc311ffffffa20dffffffc4ffffffaffffffff5ffffff8433fffffff1ffffffa8ffffffb2787d2447fffffffb005bffffffdd6a61fffffff76677216c14ffffffcaffffffb4fffffff0120effffffe3ffffffadffffffb8ffffffd3ffffffc1ffffff97ffffffd616fffffffafffffffdfffffff9ffffffd0fffffffaffffffb4ffffffe9fffffff6ffffffa7ffffffd4ffffffae301620ffffffb5ffffffb318ffffffbc0bffffffaf4072ffffffbcfffffff5ffffff9d4affffffa3ffffffc725ffffff8e651cfffffff758ffffff8a127312ffffff840270140052fffffff00bffffff894d6c23fffffffe58fffffffefffffff2ffffffb227ffffff9cffffffb513ffffff893d42ffffffe7ffffffae4e23447fffffffc212ffffffa9
        Public Exponent: 010001
Return value of C_GetAttributeValue:0
Calling C_SignInit_ERPC()
Return value of C_SignInit:0
Calling C_Sign_ERPC()
Return value of C_Sign:0
Message was successfully signed with private key!
Calling C_VerifyInit_ERPC()
Return value of C_VerifyInit:0
Calling C_Verify_ERPC()
Return value of C_Verify:0
Message was successfully verified with public key!
Calling C_GenerateRandom()
Calling C_SeedRandom_ERPC()
C_seedRandom 0
Calling C_GenerateRandom_ERPC()
Return value for C_GenerateRandom:0
Random number generated successfully: BC 7F CE 73 7E 9 7 A1 A4 BC DF 5A E9 8C 48 23 3B 29 AA 86 14 4 E7 DD 65 AA BA 9A 5 C0 5C 9D
Calling C_CloseSession_ERPC()
Return value of C_CloseSession
Starting AES encrypt and decrypt

Calling C_Initialize_ERPC()
Calling C_GetSlotList_ERPC()
slotCount = 2
Calling C_GetSlotList_ERPC()
Calling C_GetMechanismInfo_ERPC()
Calling C_GetMechanismInfo_ERPC()
selected slot: 1
Calling C_GetTokenInfo_ERPC()
Token already initialized
Calling C_OpenSession_ERPC()
Calling C_Login_ERPC()
Calling C_FindObjectsInit_ERPC()
Calling C_FindObjectsInit_ERPC()
Calling C_FindObjects_ERPC()
data objects count 1 found
Calling C_FindObjectsFinal_ERPC()
Calling C_GetAttributeValue_ERPC()
This is my data object
Calling C_DestroyObject_ERPC()
Calling C_DigestInit_ERPC()
Calling C_Digest_ERPC()
digest
5d fb ab ee df 31 8b f3 3c 9 27 c4 3d 76 30 f5 1b 82 f3 51 74 3 1 35 4f a3 d7 fc 51 f0 13 2e
Get AES Key object....
Calling C_FindObjectsInit_ERPC()
Calling C_FindObjects_ERPC()
AES object count 1 found
Calling C_FindObjectsFinal_ERPC()
AES Encrypt ....
Calling C_EncryptInit_ERPC()
Calling C_Encrypt_ERPC()
AES Decrypt ....
Calling C_DecryptInit_ERPC()
Calling C_Decrypt_ERPC()
Message was successfully decrypted!
AES Encrypt using Update & Final....
Calling C_EncryptInit_ERPC()
Calling C_EncryptUpdate_ERPC()
Calling C_EncryptUpdate_ERPC()
Calling C_EncryptFinal_ERPC()
Calling C_DecryptInit_ERPC()
Calling C_DecryptUpdate_ERPC()
Calling C_DecryptUpdate_ERPC()
Calling C_DecryptFinal_ERPC()
Message was successfully decrypted using Update & Final calls!
Calling C_CloseSession_ERPC()
Calling C_Finalize_ERPC()
eRPC client deinitialize start
eRPC client deinitialize done
Using the Trusted VM
The following section is applicable to:
To create an application that uses the Trusted VM, follow the steps below.
Ensure section Preparing the Trusted VM is completed.
Login to the ACRN Service OS.
Copy a User OS image to
/var/lib/machines/images/vm0.wicif one does not already exists.Use the Trusted VM launch script to launch the User VM and establish a virtual UART connection to the Trusted VM:
$ /var/lib/machines/scripts/launch-uos_secureVM-communication.shLogin to the User OS.
Export the COMM port to be used for communication to the Trusted VM:
$ export TEC_COMM_PORT=/dev/ttyS4
Note
COMM port options include
ttyS4,ttyS5,ttyS6,ttyS7,ttyS8,ttyS9.Compile the application, but for all instances where standard TPM2 library
tpm2_pkcs11would be used, link againstlibtep_interface.soinstead. The interface library will transport the TPM2 API calls to the Trusted VM via the virtual UART channel specified in the previous step.
Trusted VM Example Application
Sign and Encrypt - Encrypted Private Key
The Sign and Encrypt - Encrypted Private Key example demonstrates encrypted OPC UA communication between the Edge Control Protocol Bridge OPC UA plugin and OPC UA applications utilizing the Trusted VM to decrypt a private key.
Using Trusted Edge Platform as a container
It is possible to build the Trusted Edge Platform as a container as opposed to a VM image. Follow the steps below to build and deploy the Trusted Edge Platform as a container.
Preparing the Trusted Edge Platform container image
The following section is applicable to:

Build an acrn-sos image with the Trusted VM for IoT Platforms feature option enabled. Creating an ECI-A image that contains the Trusted VM for IoT Platforms feature can be accomplished by selecting the
Trusted VMfeature option during image setup. See section acrn-sos for more information.
After the build completes, prepare the system for manual build by performing the following commands:
$ cd eci-release/build/ecs-acrn-sos/poky
$ source oe-init-build-env ../build
Build the container image by performing the following command:
$ bitbake mc:x86-tep-trusted-os-tgl-initramfs:core-image-trusted-os
After the build completes, navigate to the TEP image directory.
$ cd eci-release/build/ecs-arrn-sos/build/tmp-x86-tep-trusted-os-tgl-initramfs/deploy/images/intel-corei7-64
In this directory will be a container image named
core-image-trusted-os-intel-corei7-64.tar.bz2. Copy this file or make note of its location for use later.
Deploying the Trusted Edge Platform container image
The following section is applicable to:
Attention
To achieve full security potential, the ECI image used with the TEP container should have the SELinux feature option enabled.
Transfer the container image
core-image-trusted-os-intel-corei7-64.tar.bz2to the target system. See section Preparing the Trusted Edge Platform container image for information on creating this container image.Import the container image into Docker by performing the following command:
docker import core-image-trusted-os-intel-corei7-64-*.tar.bz2 trusted_container:latestFollow the instructions in the
TrustedVM_UserGuide.pdfstarting at section 4.2.2 Installation and setup of TEP container.Use this
docker_setup.shscript when prompted in the User Guide.