Application #3: OPC UA Secure Communication
The following section is applicable to:

Important
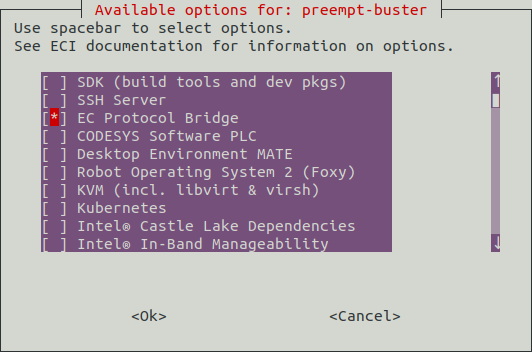
Edge Control Protocol Bridge features must be enabled in the ECI image before Edge Control Protocol Bridge can be used. Creating an ECI image that contains the Edge Control Protocol Bridge features can be accomplished by selecting the EC Protocol Bridge feature option during image setup. See section Building ECI for more information.
The OPC UA Secure Communication examples demonstrate encrypted communication between the OPC UA plugin and OPC UA applications. An example which utilizes TEP (Trusted VM for IoT Platforms) to decrypt a private key is also demonstrated.
Sign and Encrypt - Plaintext Private Key
In this example, the OPC UA plugin will establish an encrypted communication channel between two OPC UA server applications using a plaintext private key.
Prerequisites
An ECI image built with the
EC Protocol Bridgefeature option enabled. See section Building ECI for more information.The ECI image is installed and booted on a target system. See section Installing ECI Images for more information.
Elevated user permissions.
Description
In this example, the following steps occur:
A plaintext private key is created.
Attention
Be sure to keep the plaintext private key secure at all times. If an adversary were to obtain the plaintext private key, they would have the ability to connect a rogue client to the OPC UA server and monitor/modify data! To mitigate this attack vector, an encrypted private key should be used. See section Sign and Encrypt - Encrypted Private Key for more information.
A secured OPA UA server application (Origin) is started. Another secured OPC UA server application (Logger) is started which simply prints the current values of its dataset to the console.
The OPC UA plugin establishes a secure connection to both OPC UA server applications (Origin & Logger) using the private key.
The OPC UA plugin will read the dataset from the Origin application, and write the dataset to the Logger application.
If the dataset values in the Origin application are modified, this change will propagate to the Logger application via the OPC UA plugin, resulting in the modified dataset values being printed to the console.
Procedure
Follow the steps below to complete the example:
Run the
key-auth-local.shscript to execute this example:$ /opt/ec-protocol-bridge/plg-opcua-rt/examples/sign_and_encrypt/key-auth-local.shSee also
For a manual step-by-step breakdown of this script, refer to section: Example #4: Secure OPC UA Client Read & Write.
Expected Results
The Origin and Logger servers will exchange data securely, facilitated by the OPC UA plugin client which connects to both servers. Data on the Origin server will be mirrored on the Logger server, and the (3:Counter) node will increment periodically.
OPCUA Client Read Nodeset for Dataset: opcua-client-ds
Read Node: (6:Int32)  Value: 0
Read Node: (6:Float)  Value: 0.000000
Read Node: (6:String)  Value: unknown
Read Node: (3:Counter)  Value: 12
Called queue_databuf() to queue Client data
Called queue_databuf() to queue Listener data
Data stored to Client Write Queue for Dataset: opcua-sim-ds2
OPCUA Client Write Nodeset for Dataset: opcua-sim-ds2
Write Node: (6:Int32) Value: 0
Write Node: (6:Float) Value: 0.000000
Write Node: (6:String) Value: unknown
Write Node: (3:Counter) Value: 12
OPCUA Client Read Nodeset for Dataset: opcua-client-ds2
Read Node: (6:Int32)  Value: 0
Read Node: (6:Float)  Value: 0.000000
Read Node: (6:String)  Value: unknown
Read Node: (3:Counter)  Value: 12
Alternatively, follow the steps below to verify that the data is read from one server, passing through the plugin, and written to the other server:
Open an OPC UA client, such as UaExpert.
Connect one client to
opc.tcp://#.#.#.#:53530where#.#.#.#is the ip address of the system running the EC Protocol Bridge. This is the Origin server.Connect one client to
opc.tcp://#.#.#.#:53550where#.#.#.#is the ip address of the system running the EC Protocol Bridge. This is the Logger server.Update the uint32 node on the Origin server. The uint32 node on the Logger server should change to be the same value.
Sign and Encrypt - Encrypted Private Key
In this example, the OPC UA plugin will establish an encrypted communication channel between two OPC UA server applications using an encrypted private key which is decrypted using a symmetrical AES stored on a discrete TPM via TEP (Trusted VM for IoT Platforms).
Prerequisites
A User OS ECI image built with the
EC Protocol Bridgefeature option enabled. See section Building ECI for more information.Completed section: Trusted VM prerequisites.
Completed section: Preparing the Trusted VM.
The User OS ECI image is launched using the
launch-uos_secureVM-communication.shscript. See section VM launch scripts for more information.Elevated user permissions.
Description
In this example, the following steps occur:
A plaintext private key is created.
The plaintext private key is encrypted using a symmetrical AES key. The AES key is then stored into a discrete TPM via TEP (Trusted VM for IoT Platforms), which provides an additional level of isolation to improve security.
Attention
It is strongly recommended to destroy the plaintext key after encryption, such that it may only be decrypted using the AES key stored in the discrete TPM via TEP. If an adversary were to obtain the plaintext private key, they would have the ability to connect a rogue client to the OPC UA server and monitor/modify data!
A secured OPA UA server application (Origin) is started. Another secured OPC UA server application (Logger) is started which simply prints the current values of its dataset to the console.
The OPC UA plugin will decrypt the private key using TEP.
The OPC UA plugin establishes a secure connection to both OPC UA server applications (Origin & Logger) using the decrypted private key.
The OPC UA plugin will read the dataset from the Origin application, and write the dataset to the Logger application.
If the dataset values in the Origin application are modified, this change will propagate to the Logger application via the OPC UA plugin, resulting in the modified dataset values being printed to the console.
Procedure
Follow the steps below to complete the example:
Ensure the prerequisites have been completed.
Access the ACRN hypervisor shell and open the console to the Trusted VM (ID 0):
See also
For more information on using the ACRN hypervisor shell, see the following section: Using the ACRN hypervisor shell.
ACRN:\>vm_console 0Tip
Press Ctrl + Space to return to the ACRN shell console.
Login to the Secure VM using username
rootand password123456*18.Initialize the TPM with an AES key entry for the OPC UA example:
$ /opt/sign-and-encrypt-example/run_pkcs11.shVerify the contents of the TPM:
$ /opt/sign-and-encrypt-example/check_pkcs11.shLogin to the User OS and run the
key-auth-tep.shscript to execute this example:$ /opt/ec-protocol-bridge/plg-opcua-rt/examples/sign_and_encrypt/key-auth-tep.shTip
Make sure the User OS was launched using the
launch-uos_secureVM-communication.shscript otherwise the encryption/decryption step will fail. See section VM launch scripts for more information.See also
For a manual step-by-step breakdown of this script, refer to section: Example #4: Secure OPC UA Client Read & Write.
Expected Results
The Origin and Logger servers will exchange data securely, facilitated by the OPC UA plugin client which connects to both servers. Data on the Origin server will be mirrored on the Logger server, and the (3:Counter) node will increment periodically.
OPCUA Client Read Nodeset for Dataset: opcua-client-ds
Read Node: (6:Int32)  Value: 0
Read Node: (6:Float)  Value: 0.000000
Read Node: (6:String)  Value: unknown
Read Node: (3:Counter)  Value: 12
Called queue_databuf() to queue Client data
Called queue_databuf() to queue Listener data
Data stored to Client Write Queue for Dataset: opcua-sim-ds2
OPCUA Client Write Nodeset for Dataset: opcua-sim-ds2
Write Node: (6:Int32) Value: 0
Write Node: (6:Float) Value: 0.000000
Write Node: (6:String) Value: unknown
Write Node: (3:Counter) Value: 12
OPCUA Client Read Nodeset for Dataset: opcua-client-ds2
Read Node: (6:Int32)  Value: 0
Read Node: (6:Float)  Value: 0.000000
Read Node: (6:String)  Value: unknown
Read Node: (3:Counter)  Value: 12
Alternatively, follow the steps below to verify that the data is read from one server, passing through the plugin, and written to the other server:
Open an OPC UA client, such as UaExpert.
Connect one client to
opc.tcp://#.#.#.#:53530where#.#.#.#is the ip address of the system running the EC Protocol Bridge. This is the Origin server.Connect one client to
opc.tcp://#.#.#.#:53550where#.#.#.#is the ip address of the system running the EC Protocol Bridge. This is the Logger server.Update the uint32 node on the Origin server. The uint32 node on the Logger server should change to be the same value.